Configure and test Microsoft Entra SSO for UserVoice
Configure and test Microsoft Entra SSO with UserVoice using a test user called B.Simon. For SSO to work, you need to establish a link relationship between a Microsoft Entra user and the related user in UserVoice.
To configure and test Microsoft Entra SSO with UserVoice, perform the following steps:
Browse to Identity > Applications > Enterprise applications > UserVoice > Single sign-on.
On the Select a single sign-on method page, select SAML.
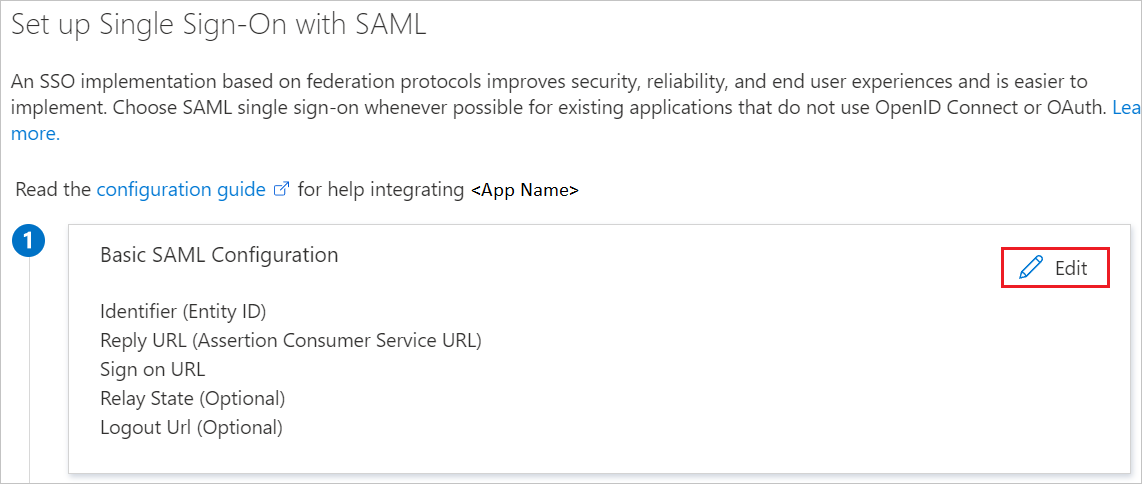
On the Set up single sign-on with SAML page, click the pencil icon for Basic SAML Configuration to edit the settings.
On the Basic SAML Configuration section, perform the following steps:
a. In the Identifier (Entity ID) text box, type a URL using the following pattern:
https://<TENANT_NAME>.UserVoice.com
b. In the Sign on URL text box, type a URL using the following pattern:
https://<TENANT_NAME>.UserVoice.com
Note
These values are not real. Update these values with the actual Identifier and Sign on URL. Contact UserVoice Client support team to get these values. You can also refer to the patterns shown in the Basic SAML Configuration section.
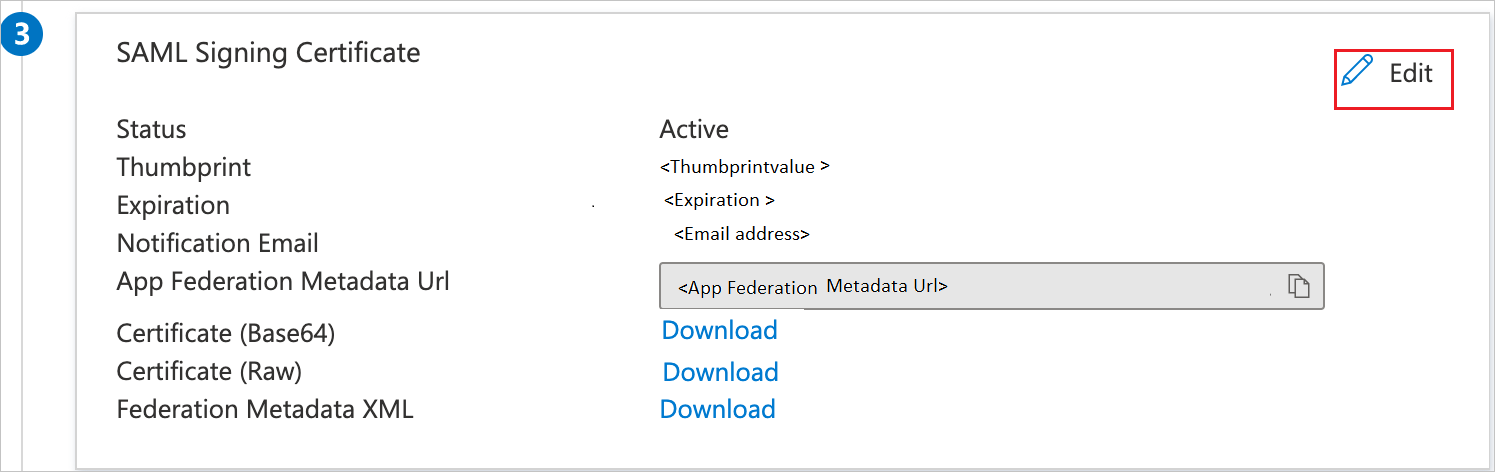
In the SAML Signing Certificate section, click Edit button to open SAML Signing Certificate dialog.
In the SAML Signing Certificate section, copy the Thumbprint and save it on your computer.
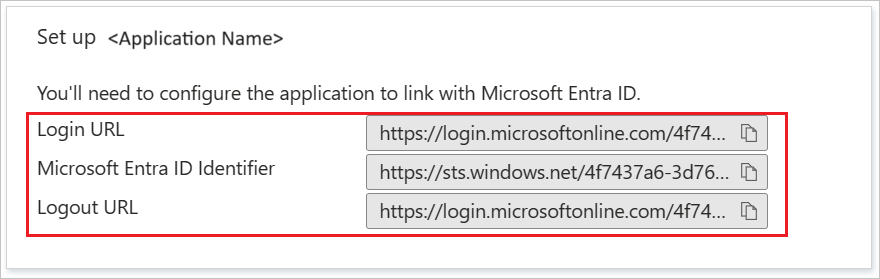
On the Set up UserVoice section, copy the appropriate URL(s) as per your requirement.
Create a Microsoft Entra test user
In this section, you'll create a test user called B.Simon.
Browse to Identity > Applications > Enterprise applications > UserVoice.
In the app's overview page, select Users and groups.
Select Add user/group, then select Users and groups in the Add Assignment dialog.
In the Users and groups dialog, select B.Simon from the Users list, then click the Select button at the bottom of the screen.
If you are expecting a role to be assigned to the users, you can select it from the Select a role dropdown. If no role has been set up for this app, you see "Default Access" role selected.
In the Add Assignment dialog, click the Assign button.
Configure UserVoice SSO
In a different web browser window, sign in to your UserVoice company site as an administrator.
In the toolbar on the top, click Settings, and then select Web portal from the menu.
On the Web portal tab, in the User authentication section, click Edit to open the Edit User Authentication dialog page.
On the Edit User Authentication dialog page, perform the following steps:
a. Click Single Sign-On (SSO).
b. Paste the Login URL value into the SSO Remote Sign-In textbox.
c. Paste the Logout URL value into the SSO Remote Sign-Out textbox.
d. Paste the Thumbprint value,. into the Current certificate SHA1 fingerprint textbox.
e. Click Save authentication settings.
Create UserVoice test user
To enable Microsoft Entra users to sign in to UserVoice, they must be provisioned into UserVoice. In the case of UserVoice, provisioning is a manual task.
To provision a user account, perform the following steps:
Sign in to your UserVoice tenant.
Go to Settings.
Click General.
Click Agents and permissions.
Click Add admins.
On the Invite admins dialog, perform the following steps:
a. In the Emails textbox, type the email address of the account you want to provision, and then click Add.
b. Click Invite.
Note
You can use any other UserVoice user account creation tools or APIs provided by UserVoice to provision Microsoft Entra user accounts.
Test SSO
In this section, you test your Microsoft Entra single sign-on configuration with following options.
Click on Test this application, this will redirect to UserVoice Sign-on URL where you can initiate the login flow.
Go to UserVoice Sign-on URL directly and initiate the login flow from there.
You can use Microsoft My Apps. When you click the UserVoice tile in the My Apps, this will redirect to UserVoice Sign-on URL. For more information about the My Apps, see Introduction to the My Apps.
Discover how Microsoft Entra External ID can provide secure, seamless sign-in experiences for your consumers and business customers. Explore tenant creation, app registration, flow customization, and account security.