Photon quickstart
This quickstart shows how to set up Photon Multiplayer to work with PlayFab. Currently, PlayFab offers the following Photon integrations:
- Authenticate Photon players with PlayFab.
- Listen for room events using PlayFab CloudScript callbacks.
In this quickstart, we illustrate how both features work using the latest Photon Unity example project.
Note
For a fully supported PlayFab Multiplayer and Chat Experience on Unity, see the PlayFab Party Unity Plugin for more information.
Prerequisites
- A Unity project with the PlayFab SDK imported, and a configured title.
- The PlayFab title registered.
Note
This guide omits the Chat Application settings. For your Chat Application to be integrated, create a new Photon Chat Application, and enter the App ID in the corresponding boxes in Unity and in the PlayFab Game Manager - Photon Add-on page.
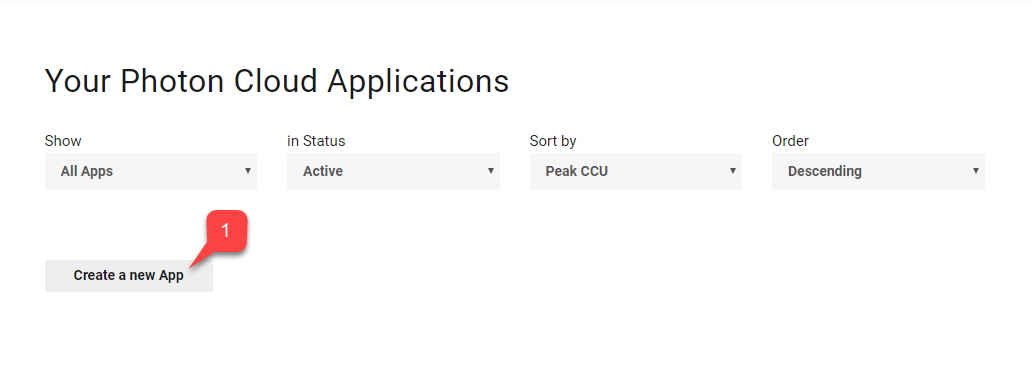
Setting up a Photon application
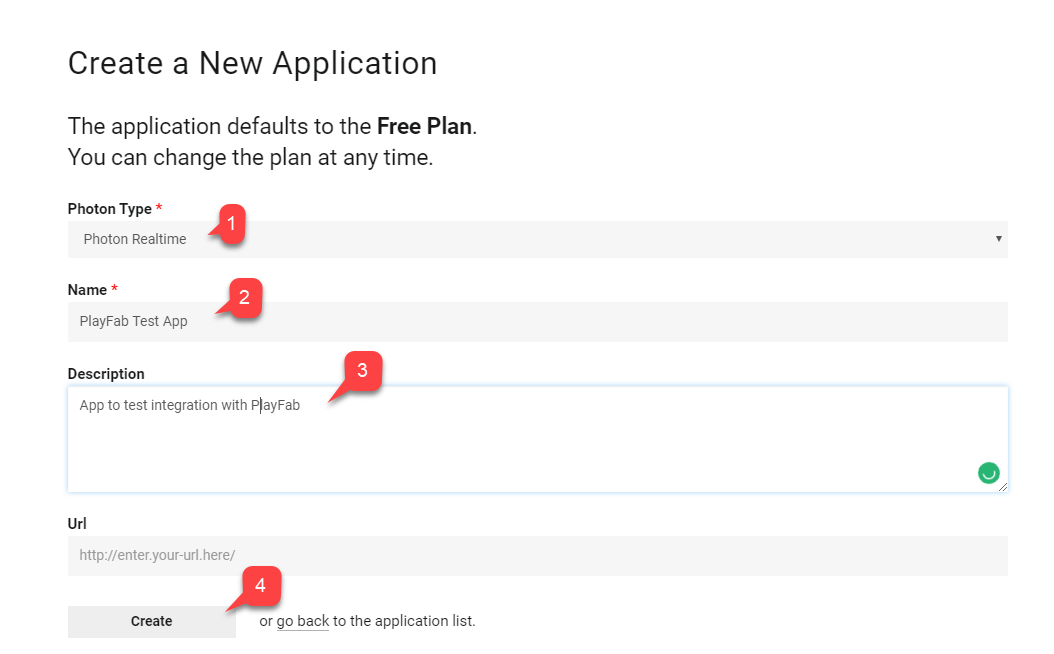
- Once you have registered and logged into the Photon dashboard, select Create a new App.
- Select Photon Type.
- Choose a Name.
- Create a Description.
- Submit by selecting Create.
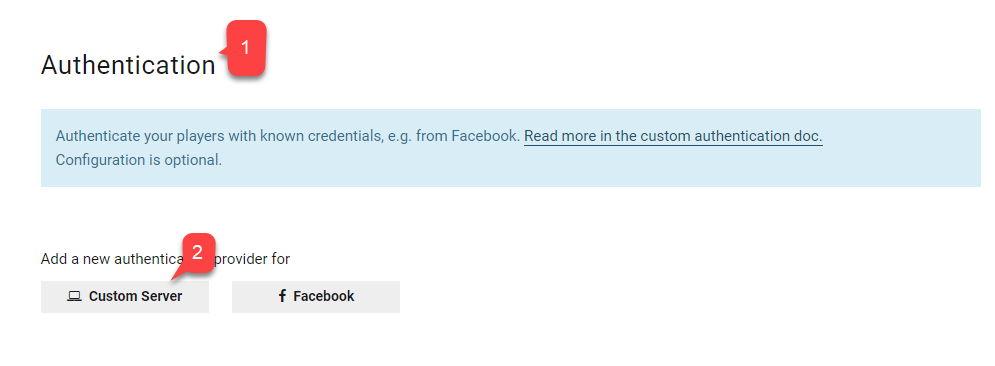
Setting up authentication
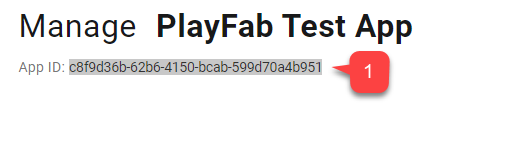
- Find the newly created Application in the list, and select Manage.
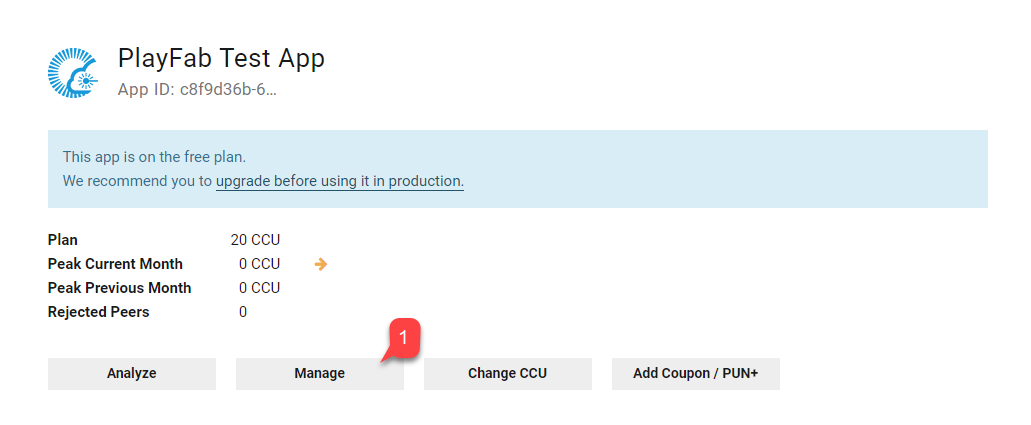
- In the Application dashboard, find and save the App ID located under the page Title.
- Locate the Authentication section.
- Select the Custom Server.
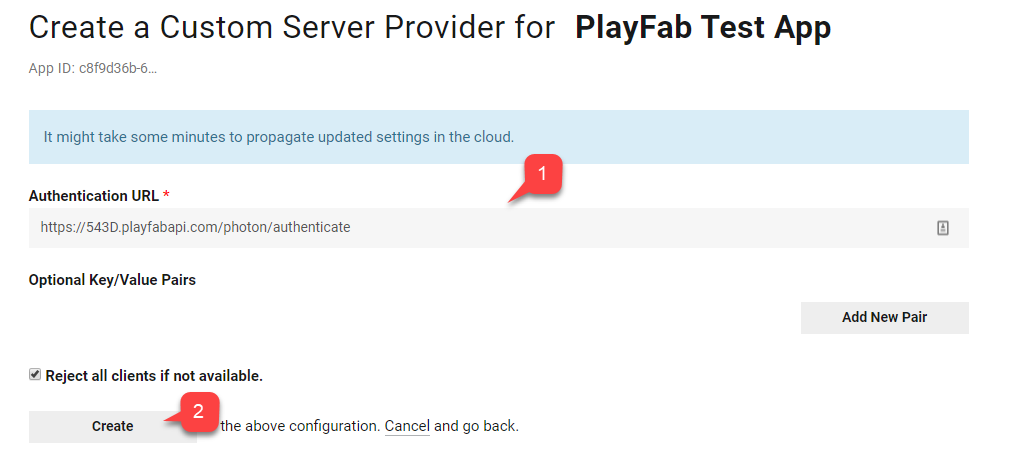
The next page lets you configure the Authentication URL for Photon.
https://{PlayFabTitleId}.playfabapi.com/photon/authenticate
Replace the PlayFabTitleId place holder with your own Title Id.
{PlayFabTitleId}
- Enter the URL.
- Submit by selecting the Create button.
Setting up a PlayFab title for Photon
Navigate to your title's Game Manager page, then:
- Navigate to Add-ons tab.
- In the list of Add-ons, find and select Photon.
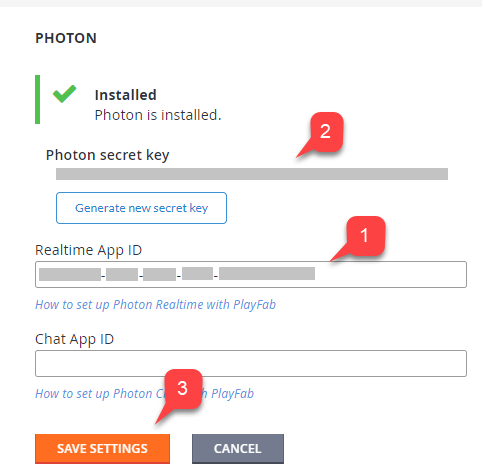
- The Photon Add-on page allows you to install Photon by specifying your Photon Realtime Application ID.
- Optionally, you may specify Chat App ID.
- Once you install the Add-on (3), a Photon secret Key is generated (2).
- Save it for future use when configuring web-hooks.
Note
Remember to save your Photon secret key in a safe and easily accessible place. It comes in handy when configuring Webhooks.
Setting Photon webhooks
As an optional integration, Photon may transmit certain events to your PlayFab CloudScript. This is done with webhooks:
- You specify a Base URL.
- Then you specify path for each of the available Events.
- A path is, effectively, a handler name implemented in your CloudScript.
The base URL has the following format:
https://{PlayFabTitleId}.playfablogic.com/webhook/1/prod/{PhotonSecretKey}
Make sure to replace Title Id placeholder with your own Title Id.
{PlayFabTitleId}
Make sure to replace the PhotonSecretKey token with the Secret Key you generated on the Photon Add-on page.
{PhotonSecretKey}
- Fill in the Base URL.
- Assign a CloudScript handler Name for each of the available Events.
- Remove any CustomHttpHeaders.
- Submit this by selecting the Save button.

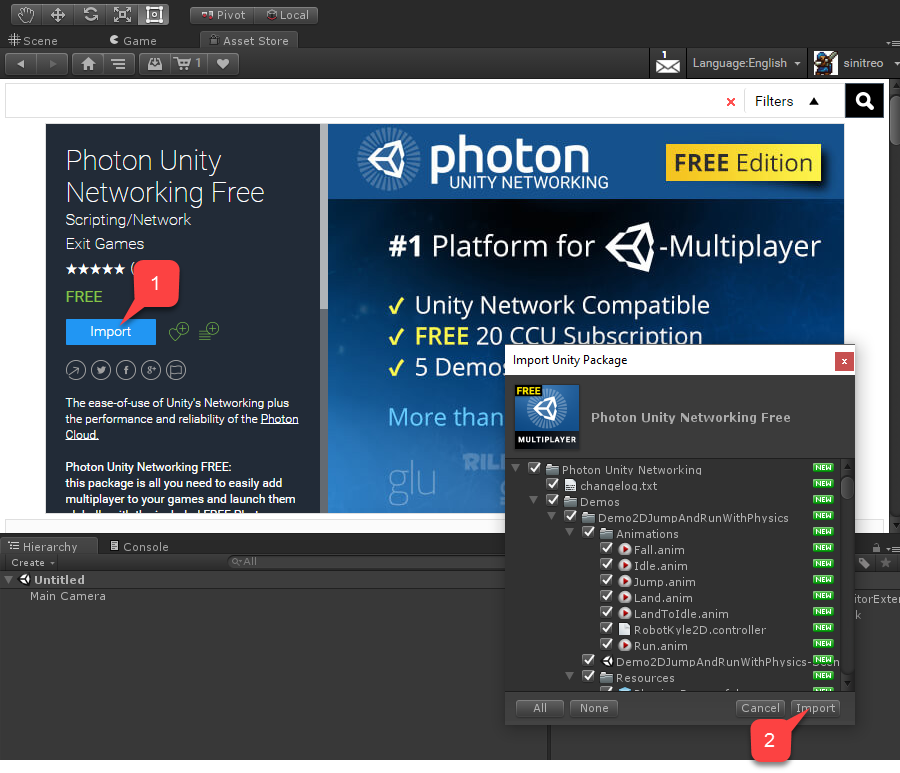
Setting up a Unity project
The guide assumes you already have PlayFab SDK imported, set up, and the title setting configured.
- Start by navigating to the Asset Store.
- Locate Photon Unity Networking Free package.
- Select Import (1).
- You may inspect the imported files.
- Then select Import (2).
Right after import process finishes, the PUN Setup window opens.
- Enter your Realtime Application ID (1) found in the Photon Application Dashboard for the Photon App you created.
- Select Setup Project (2).
- Once the setup finishes, select Close (3).

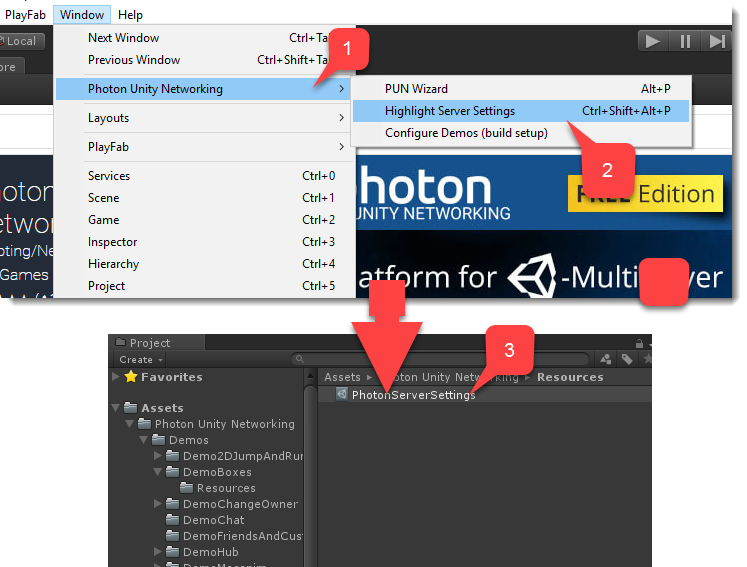
If AppId was accepted, the Photon Server Settings object is selected and viewable in the Unity Inspector window. To manually access the Server Settings object:
- Navigate to the top window panel.
- Select Window.
- Then select Photon Unity Networking (1).
- Finally select Highlight Server Settings (2).
- The Standard Unity project window reveals the PhotonServerSettings (3) object.
- Select the object to reveal its settings in the Unity Inspector window.
Note
As part of PhotonServerSettings, you have the option to assign the Chat Application ID.
At this point, the project is configured.
Implementing PlayFab to Photon authentication
When you enable the Photon Add-on for your title in the PlayFab Game Manager, and configure the authentication on the Photon Application dashboard, PlayFab allows you to authenticate existing PlayFab players inside the Photon environment.
This means you may completely avoid implementing any user management for Photon.
- Navigate to DemoHub-Scene-V2 scene from the Photon Unity Networking Free package, the Classic version.
- This scene is a hub for all the examples from the package.
- As it is the first scene to load, let's add a small script to enable authenticating PlayFab with Photon.
- Create an empty GameObject called PlayFabAuthenticator.
- Then in the Unity Inspector window, add a component with the same name to this GameObject.

Select the gear icon, then choose to edit the script from the drop-down menu. Copy and paste the code for the PlayFabAuthenticator component, and save and close the file.
using PlayFab;
using PlayFab.ClientModels;
using UnityEngine;

public class PlayFabAuthenticator : MonoBehaviour {

    private string _playFabPlayerIdCache;

    //Run the entire thing on awake
    public void Awake() {
        AuthenticateWithPlayFab();
    }

    /*
     * Step 1
     * We authenticate a current PlayFab user normally.
     * In this case we use the LoginWithCustomID API call for simplicity.
     * You can absolutely use any Login method you want.
     * We use PlayFabSettings.DeviceUniqueIdentifier as our custom ID.
     * We pass RequestPhotonToken as a callback to be our next step, if
     * authentication was successful.
     */
    private void AuthenticateWithPlayFab(){
        LogMessage("PlayFab authenticating using Custom ID...");

        PlayFabClientAPI.LoginWithCustomID(new LoginWithCustomIDRequest()
        {
            CreateAccount = true,
            CustomId = PlayFabSettings.DeviceUniqueIdentifier
        }, RequestPhotonToken, OnPlayFabError);
    }

    /*
    * Step 2
    * We request a Photon authentication token from PlayFab.
    * This is a crucial step, because Photon uses different authentication tokens
    * than PlayFab. Thus, you cannot directly use PlayFab SessionTicket and
    * you need to explicitly request a token. This API call requires you to
    * pass a Photon App ID. The App ID may be hard coded, but in this example,
    * we are accessing it using convenient static field on PhotonNetwork class.
    * We pass in AuthenticateWithPhoton as a callback to be our next step, if
    * we have acquired the token successfully.
    */
    private void RequestPhotonToken(LoginResult obj) {
        LogMessage("PlayFab authenticated. Requesting photon token...");

        //We can player PlayFabId. This will come in handy during next step
        _playFabPlayerIdCache = obj.PlayFabId;

        PlayFabClientAPI.GetPhotonAuthenticationToken(new GetPhotonAuthenticationTokenRequest()
        {
            PhotonApplicationId = PhotonNetwork.PhotonServerSettings.AppSettings.AppIdRealtime
        }, AuthenticateWithPhoton, OnPlayFabError);
    }

    /*
     * Step 3
     * This is the final and the simplest step. We create a new AuthenticationValues instance.
     * This class describes how to authenticate a player inside the Photon environment.
     */
    private void AuthenticateWithPhoton(GetPhotonAuthenticationTokenResult obj) {
        LogMessage("Photon token acquired: " + obj.PhotonCustomAuthenticationToken + "  Authentication complete.");

        //We set AuthType to custom, meaning we bring our own, PlayFab authentication procedure.
        var customAuth = new Photon.Realtime.AuthenticationValues { AuthType = CustomAuthenticationType.Custom };

        //We add "username" parameter. Do not let it confuse you: PlayFab is expecting this parameter to contain player PlayFab ID (!) and not username.
        customAuth.AddAuthParameter("username", _playFabPlayerIdCache);    // expected by PlayFab custom auth service

        //We add "token" parameter. PlayFab expects it to contain Photon Authentication Token issues to your during previous step.
        customAuth.AddAuthParameter("token", obj.PhotonCustomAuthenticationToken);

        //We finally tell Photon to use this authentication parameters throughout the entire application.
        PhotonNetwork.AuthValues = customAuth;
    }

    private void OnPlayFabError(PlayFabError obj) {
        LogMessage(obj.GenerateErrorReport());
    }

    public void LogMessage(string message) {
        Debug.Log("PlayFab + Photon Example: " + message);
    }
}
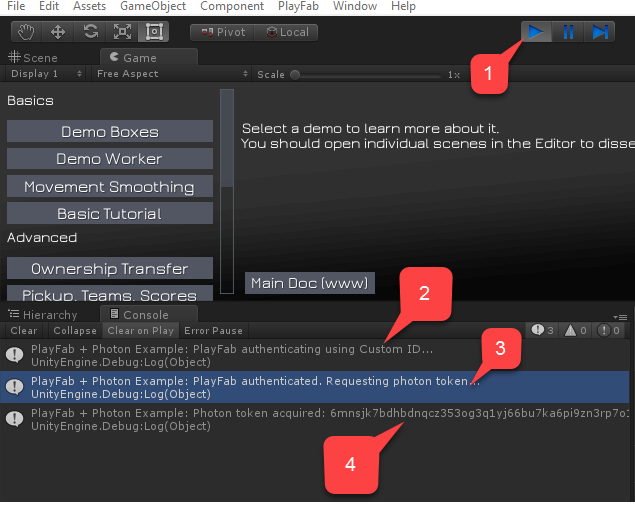
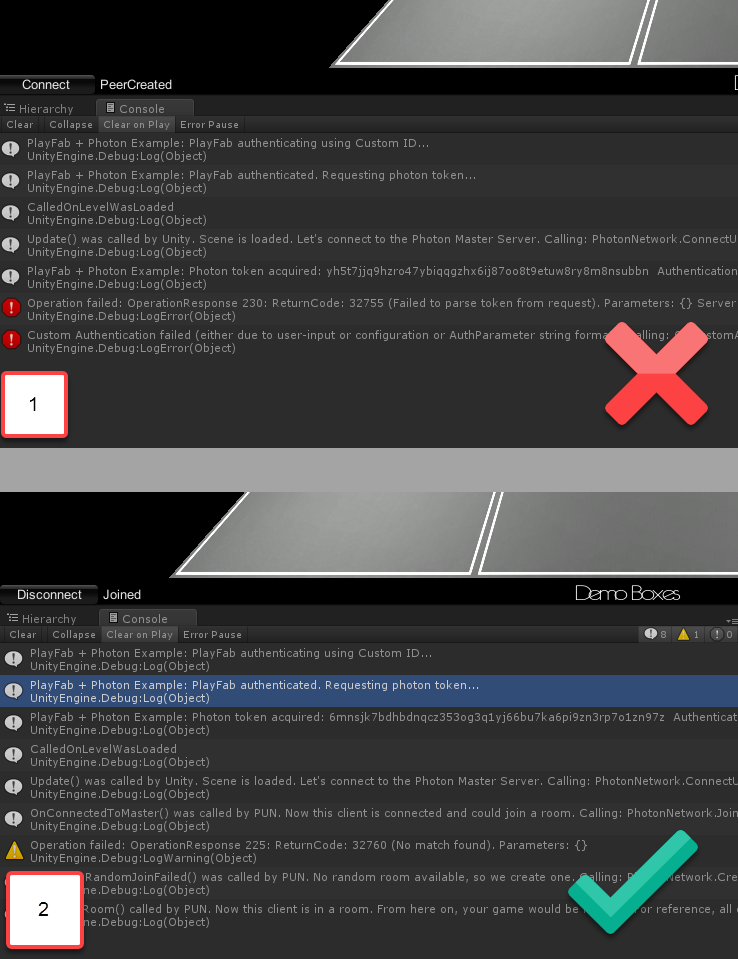
Testing PlayFab to Photon authentication
- Start the scene.
- Inspect the flow of console messages. Control that:
- Authentication to PlayFab itself was successful.
- The Photon token was acquired.
The following picture illustrates the correct flow.
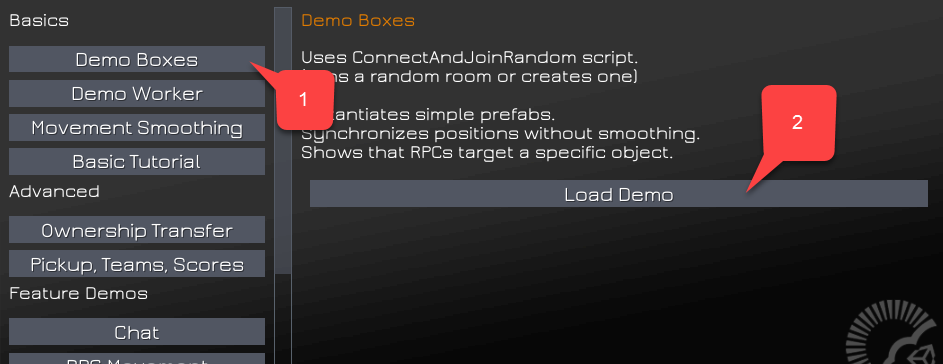
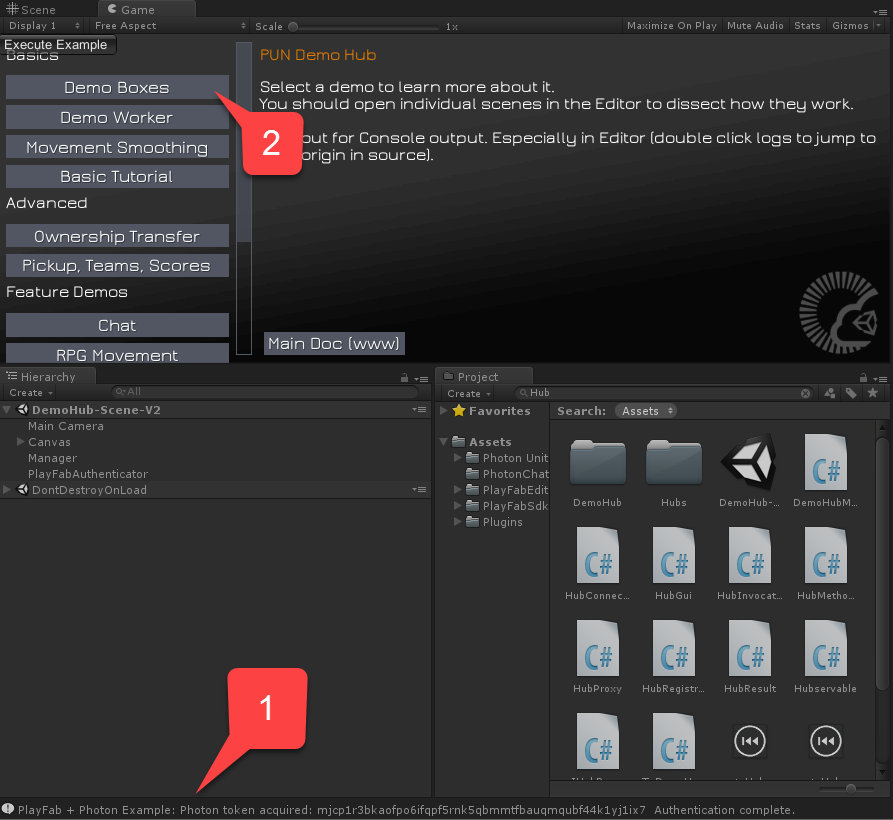
Once the Photon token has been acquired, and authentication is complete, we are okay to check out the Photon demos.
For example, start a demo called Demo Boxes.
- To ensure that the PlayFab authentication is complete, select Demo Boxes.
- Then select Load Demo, as shown on the following picture.
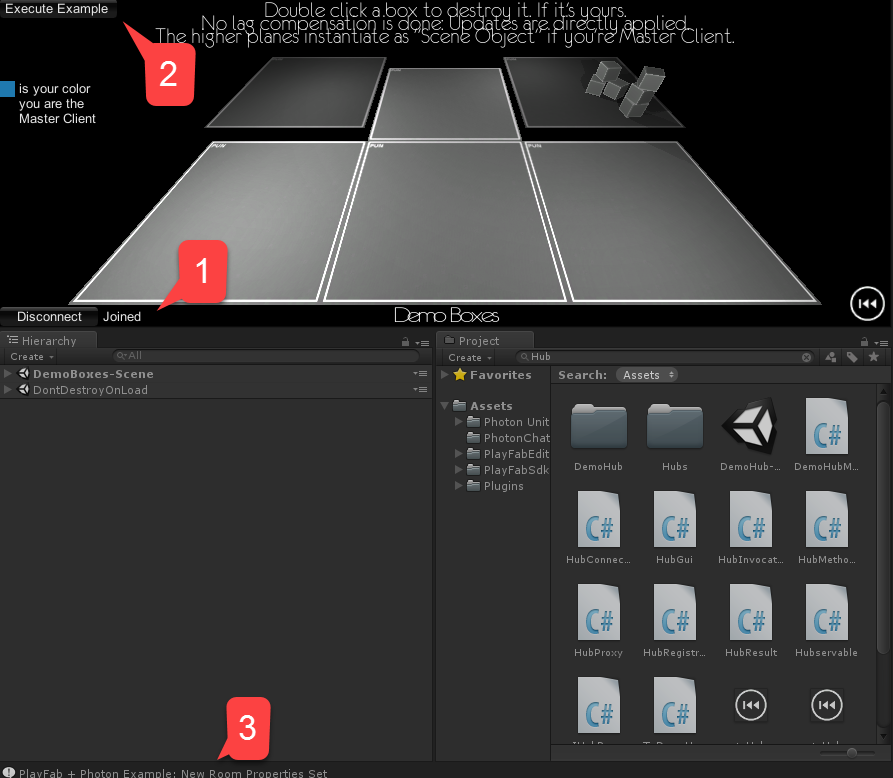
Photon starts outputting debug messages. By monitoring your console, you can easily spot if you have any authentication issues.
Ensure that no Authentication Denied errors are present in the console. At this point, you have set up minimal PlayFab and Photon integration.
Photon room event + CloudScript
The Photon matchmaking system has the concept of a Room. If you aren't familiar with this concept, consult with the Photon Matchmaking Guide.
PlayFab allows you to intercept various room events. The following room events require only CloudScript to be intercepted:
RoomCreatedRoomJoinedRoomLeftRoomClosed
The following events require extra control over Unity code to be intercepted (details are given later in this document):
RoomPropertyUpdatedRoomEventRaised
Note
Once you introduce a handler for a room event, it becomes an essential part of the event handling flow. So errors produced while running your CloudScript may cause problems for the entire system. For example, if the RoomCreated handler throws an error, your clients will throw an error as well, and won't be able to connect properly.
Let's construct a PlayFab CloudScript by defining a handler for each event type individually.
Room Created handler
The RoomCreated handler is invoked every time a Photon room is created. The following CloudScript handler intercepts such events.
// Triggered automatically when a Photon room is first created
handlers.RoomCreated = function (args) {
    return { ResultCode : 0, Message: 'Success' };
};
Note
You may acquire more data about the event using the "args" argument.
{
  "ActorNr": 1,
  "AppVersion": "1.2_1.85",
  "AppId": "bfd5f98b-c6a4-4763-80d9-824d20db842b",
  // Options with which the room was created.
  "CreateOptions": {
    "MaxPlayers": 4,
    "LobbyId": null,
    "LobbyType": 0,
    "CustomProperties": {

    },
    "EmptyRoomTTL": 0,
    "PlayerTTL": 0,
    "CheckUserOnJoin": false,
    "DeleteCacheOnLeave": true,
    "SuppressRoomEvents": false,
    "PublishUserId": false,
    "ExpectedUsers": null
  },
  // Unique game identifier
  "GameId": "8b8322de-096d-4481-a2b2-8db8bb45cfef",
  "Region": "EU",
  "Type": "Create",
  // User that caused the room to be created
  "UserId": "834D5AA5BAB1DFB6",
  "Username": ""
}
Room Joined handler
The RoomJoined handler is invoked every time a player joins the room. The following CloudScript handler intercepts such an event.
// Triggered automatically when a player joins a Photon room
handlers.RoomJoined = function (args) {
    return { ResultCode : 0, Message: 'Success' };
};
This callback isn't invoked for the first user entering the room. Use RoomCreated to intercept the first player that joins. You may acquire more data about the event using the "args" argument.
{
  "ActorNr": 2,
  "AppVersion": "1.2_1.85",
  "AppId": "bfd5f98b-c6a4-4763-80d9-824d20db842b",
  // Unique Game Identifier
  "GameId": "b0f55a2e-431d-402a-9809-b0240443267e",
  "Region": "EU",
  "Type": "Join",
  // Id of the player that has joined
  "UserId": "AAC7634BF46289DF",
  "Username": ""
}
Room left
The RoomLeft handler is invoked every time a player leaves the room. The following CloudScript handler intercepts such event.
// Triggered automatically when a player leaves a Photon room
handlers.RoomLeft = function (args) {
    return { ResultCode : 0, Message: 'Success' };
};
You may acquire more data about the event using "args" argument.
{
  "ActorNr": 2,
  "AppVersion": "1.2_1.85",
  "AppId": "bfd5f98b-c6a4-4763-80d9-824d20db842b",
  // Unique Game Identifier
  "GameId": "b0f55a2e-431d-402a-9809-b0240443267e",
  "IsInactive": false,
  "Reason": "0",
  "Region": "EU",
  "Type": "ClientDisconnect",
  // Id of the user that has left the room
  "UserId": "AAC7634BF46289DF",
  "Username": ""
}
Room Closed handler
The RoomClosed handler is invoked every time the last player leaves the room and room has no players left. The following CloudScript handler intercepts such event.
// Triggered automatically when a Photon room closes
// Note: currentPlayerId is undefined in this function
handlers.RoomClosed = function (args) {
    return { ResultCode : 0, Message: 'Success' };
};
You may acquire more data about the event using "args" argument.
  "ActorCount": 0,
  "ActorNr": 1,
  "AppVersion": "1.2_1.85",
  "AppId": "bfd5f98b-c6a4-4763-80d9-824d20db842b",
  // Unique game identifier
  "GameId": "b0f55a2e-431d-402a-9809-b0240443267e",
  "Region": "EU",
  "State2": {
    "ActorList": [

    ]
  },
  "Type": "Close"
}
Room Property Updated
The RoomPropertyUpdated handler is invoked every time the room property is changed. The following CloudScript handler intercepts such an event.
// Triggered automatically when a Photon room game property is updated.
// Note: currentPlayerId is undefined in this function
handlers.RoomPropertyUpdated = function (args) {
    return { ResultCode : 0, Message: 'Success' };
};
Note
The currentPlayerId is undefined in this handler. If the room property was changed from the client, you may use the "args" argument, and refer to the UserId to acquire the player in charge.
You may acquire more data about the event using "args" argument.
{
  "ActorNr": 1,
  "AppVersion": "1.2_1.85",
  "AppId": "bfd5f98b-c6a4-4763-80d9-824d20db842b",
  // Custom Room Properties
  "Properties": {
    "CustomProperty": "It's Value"
  },
  "GameId": "8b8322de-096d-4481-a2b2-8db8bb45cfef",
  "Region": "EU",
  "State": {
    "ActorCounter": 1,
    "ActorList": [
      {
        "ActorNr": 1,
        "UserId": "834D5AA5BAB1DFB6",
        "Username": "",
        "IsActive": true,
        "Binary": "RGIAAAEBRAAAAAFi\/3MAAA==",
        "DEBUG_BINARY": {
          "1": {
            "255": ""
          }
        }
      }
    ],
    "Binary": {
      "18": "RAAAAANi+nkAAHNzAA1QbGF5ZXJJbmRleGVzRGlpAAEAAAABAAAAAHMADkN1c3RvbVByb3BlcnR5cwAKSXQncyBWYWx1ZQ=="
    },
    "CheckUserOnJoin": false,
    "CustomProperties": {

    },
    "DeleteCacheOnLeave": true,
    "EmptyRoomTTL": 0,
    "IsOpen": true,
    "IsVisible": true,
    "LobbyType": 0,
    "LobbyProperties": [

    ],
    "MaxPlayers": 4,
    "PlayerTTL": 0,
    "SuppressRoomEvents": false,
    "Slice": 0,
    "DebugInfo": {
      "DEBUG_PROPERTIES_18": {
        "250": [

        ],
        "PlayerIndexes": {
          "1": 0
        },
        "CustomProperty": "It's Value"
      }
    },
    "ExcludedActors": [

    ],
    "PublishUserId": false,
    "ExpectedUsers": [

    ]
  },
  "Type": "Game",
  "UserId": "834D5AA5BAB1DFB6",
  "Username": ""
}
When changing custom Room properties using the Unity Photon client, it is important to mark the call, so that it passes the event to Webhook (PlayFab in this case).
// Properties updates ( this hashtable contains the properties to be changed. Properties not mentioned here will stay as is
var properties = new ExitGames.Client.Photon.Hashtable() { { "CustomProperty" , "It's Value" } };

// Control set. Empty in this case, because our property has not existed before.
// Otherwise you would include previous value of the property.
var expectedProperties = new ExitGames.Client.Photon.Hashtable();

// Set Custom Properties call. Notice the last argument set to "true"
// This tells Photon to forward event to the webhook.
PhotonNetwork.room.SetCustomProperties(properties, expectedProperties, true);
Room Event Raised
The Room Event Raised is called every time a custom room event is raised. The following CloudScript handler intercepts such an event.
// Triggered by calling "OpRaiseEvent" on the Photon client. The "args.Data" property is
// set to the value of the "customEventContent" HashTable parameter, so you can use
// it to pass in arbitrary data.
handlers.RoomEventRaised= function (args) {
    return { ResultCode : 0, Message: 'Success' };
};
You may acquire more data about the event using "args" argument.
{
  "ActorNr": 1,
  "AppVersion": "1.2_1.85",
  "AppId": "bfd5f98b-c6a4-4763-80d9-824d20db842b",
  // Custom event data
  "Data": {
    "Hello": "World"
  },
  "GameId": "8b8322de-096d-4481-a2b2-8db8bb45cfef",
  "Region": "EU",
  "State": {
    "ActorCounter": 1,
    "ActorList": [
      {
        "ActorNr": 1,
        "UserId": "834D5AA5BAB1DFB6",
        "Username": "",
        "IsActive": true,
        "Binary": "RGIAAAEBRAAAAAFi\/3MAAA==",
        "DEBUG_BINARY": {
          "1": {
            "255": ""
          }
        }
      }
    ],
    "Binary": {
      "18": "RAAAAAJi+nkAAHNzAA1QbGF5ZXJJbmRleGVzRGlpAAEAAAABAAAAAA=="
    },
    "CheckUserOnJoin": false,
    "CustomProperties": {

    },
    "DeleteCacheOnLeave": true,
    "EmptyRoomTTL": 0,
    "IsOpen": true,
    "IsVisible": true,
    "LobbyType": 0,
    "LobbyProperties": [

    ],
    "MaxPlayers": 4,
    "PlayerTTL": 0,
    "SuppressRoomEvents": false,
    "Slice": 0,
    "DebugInfo": {
      "DEBUG_PROPERTIES_18": {
        "250": [

        ],
        "PlayerIndexes": {
          "1": 0
        }
      }
    },
    "ExcludedActors": [

    ],
    "PublishUserId": false,
    "ExpectedUsers": [

    ]
  },
  "Type": "Event",
  // PlayFab User Id if he/she was the source of the event
  "UserId": "834D5AA5BAB1DFB6",
  "Username": "",
  // Event code
  "EvCode": 15
}
When raising custom room events using Unity Photon client, it is important to mark the call so that it passes the event to Webhooks (PlayFab in this case).
var data = new Dictionary<string,object>() {
    { "Hello" , "World" }
};

// Raise custom room event
// Replace 15 with any custom event code of your choice [0..299]
PhotonNetwork.RaiseEvent(15, data, true, new RaiseEventOptions() {
    ForwardToWebhook = true, // Mark call to pass event to Webhook (PlayFab in this case)
});
Testing Room Event handlers
This example extends the previous example (PlayFab + Photon authentication).
Upload the following CloudScript for your title.
handlers.RoomCreated = function (args) {
    server.WriteTitleEvent({
        EventName : "room_created"
    });
    return { ResultCode : 0, Message: 'Success' };
};

handlers.RoomJoined = function (args) {
    server.WriteTitleEvent({
        EventName : "room_joined"
    });
    return { ResultCode : 0, Message: 'Success' };
};

handlers.RoomLeft = function (args) {
    server.WriteTitleEvent({
        EventName : "room_left"
    });
    return { ResultCode : 0, Message: 'Success' };
};

handlers.RoomClosed = function (args) {
    server.WriteTitleEvent({
        EventName : "room_closed"
    });
    return { ResultCode : 0, Message: 'Success' };
};

handlers.RoomPropertyUpdated = function (args) {
    server.WriteTitleEvent({
        EventName : "room_property_changed"
    });
    return { ResultCode : 0, Message: 'Success' };
};

handlers.RoomEventRaised = function (args) {
    server.WriteTitleEvent({
        EventName : "room_event_raised"
    });
    return { ResultCode : 0, Message: 'Success' };
};
The code does nothing more than posting a new title event whenever a Photon callback is invoked. Being of no use in production, this example lets us clearly see how the callbacks are invoked.
Extend the PlayFabAuthenticator script by including new example code that raises a custom event, and set custom room property. The extended version also utilizes an Awake method to not destroy object between scene loads.
using System.Collections.Generic;
using PlayFab;
using PlayFab.ClientModels;
using UnityEngine;

public class PlayFabAuthenticator : MonoBehaviour {

    private string _playFabPlayerIdCache;


    //Run the entire thing on awake
    public void Awake() {
        AuthenticateWithPlayFab();
        DontDestroyOnLoad(gameObject);
    }


    /*
     * Step 1
     * We authenticate a current PlayFab user normally.
     * In this case we use the LoginWithCustomID API call for simplicity.
     * You can absolutely use any Login method you want.
     * We use PlayFabSettings.DeviceUniqueIdentifier as our custom ID.
     * We pass RequestPhotonToken as a callback to be our next step, if
     * authentication was successful.
     */
    private void AuthenticateWithPlayFab()  {
        LogMessage("PlayFab authenticating using Custom ID...");

        PlayFabClientAPI.LoginWithCustomID(new LoginWithCustomIDRequest()
        {
            CreateAccount = true,
            CustomId = PlayFabSettings.DeviceUniqueIdentifier+"EDITOR"
        }, RequestPhotonToken, OnPlayFabError);
    }

    /*
    * Step 2
    * We request a Photon authentication token from PlayFab.
    * This is a crucial step, because Photon uses different authentication tokens
    * than PlayFab. Thus, you cannot directly use PlayFab SessionTicket and
    * you need to explicitly request a token. This API call requires you to
    * pass a Photon App ID. The App ID may be hard coded, but in this example,
    * we are accessing it using convenient static field on PhotonNetwork class.
    * We pass in AuthenticateWithPhoton as a callback to be our next step, if
    * we have acquired the token successfully.
    */
    private void RequestPhotonToken(LoginResult obj) {
        LogMessage("PlayFab authenticated. Requesting photon token...");

        //We can player PlayFabId. This will come in handy during next step
        _playFabPlayerIdCache = obj.PlayFabId;

        PlayFabClientAPI.GetPhotonAuthenticationToken(new GetPhotonAuthenticationTokenRequest()
        {
            PhotonApplicationId = PhotonNetwork.PhotonServerSettings.AppSettings.AppIdRealtime
        }, AuthenticateWithPhoton, OnPlayFabError);
    }

    /*
     * Step 3
     * This is the final and the simplest step. We create a new AuthenticationValues instance.
     * This class describes how to authenticate a player inside the Photon environment.
     */
    private void AuthenticateWithPhoton(GetPhotonAuthenticationTokenResult obj) {
        LogMessage("Photon token acquired: " + obj.PhotonCustomAuthenticationToken + "  Authentication complete.");

        //We set AuthType to custom, meaning we bring our own, PlayFab authentication procedure.
        var customAuth = new Photon.Realtime.AuthenticationValues { AuthType = CustomAuthenticationType.Custom };

        //We add "username" parameter. Do not let it confuse you: PlayFab is expecting this parameter to contain player PlayFab ID (!) and not username.
        customAuth.AddAuthParameter("username", _playFabPlayerIdCache);    // expected by PlayFab custom auth service

        //We add "token" parameter. PlayFab expects it to contain Photon Authentication Token issues to your during previous step.
        customAuth.AddAuthParameter("token", obj.PhotonCustomAuthenticationToken);

        //We finally tell Photon to use this authentication parameters throughout the entire application.
        PhotonNetwork.AuthValues = customAuth;
    }

    private void OnPlayFabError(PlayFabError obj) {
        LogMessage(obj.ErrorMessage);
    }

    public void LogMessage(string message) {
        Debug.Log("PlayFab + Photon Example: " + message);
    }


    // Add small button to launch our example code
    public void OnGUI() {
        if (GUILayout.Button("Execute Example ")) ExecuteExample();
    }


    // Example code which raises custom room event, then sets custom room property
    private void ExecuteExample() {

        // Raise custom room event
        var data = new Dictionary<string, object>() { {"Hello","World"} };
        var result = PhotonNetwork.RaiseEvent(15, data, true, new RaiseEventOptions()
        {
            ForwardToWebhook = true,
        });
        LogMessage("New Room Event Post: "+result);

        // Set custom room property
        var properties = new ExitGames.Client.Photon.Hashtable() { { "CustomProperty", "It's Value" } };
        var expectedProperties = new ExitGames.Client.Photon.Hashtable();
        PhotonNetwork.room.SetCustomProperties(properties, expectedProperties, true);
        LogMessage("New Room Properties Set");
    }

}
- Run the hub scene and wait for PlayFab authentication to complete (1).
- Then load the Boxes Demo scene (2).
- Once the scene loads, wait for the peer to connect newly created room (1).
- Then select Execute Example in the top left corner (2).
- Observe the console output (3).
- Make sure no errors have occurred.
Don't forget to stop Unity from playing. This is done to ensure that we also receive RoomLeft and RoomClosed events.
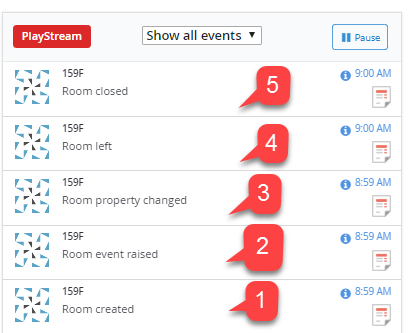
Navigate to the title Game Manager page, and observe the PlayStream panel. You should be able to see events generated as a result of our CloudScript code handling Photon events.
- Initially, our Photon instance had no opened room. When we launched the example, Photon has created the room for the Boxes Demo.
- The first player to join is the player who requested the room. So no RoomJoined Event was recorded. We then executed our example code:
- First, we raised a custom Room Event.
- Then, we set a custom Room Property.
- Then we stopped the Unity play mode. This resulted in our client leaving the room.
- Since our disconnected client was the last one, there are no more clients and Photon closes the room.
All the events should be logged into the PlayStream event flow, as shown on the following picture.
At this point, you have fully integrated Photon event support into your PlayFab title.
Feedback
Coming soon: Throughout 2024 we will be phasing out GitHub Issues as the feedback mechanism for content and replacing it with a new feedback system. For more information see: https://aka.ms/ContentUserFeedback.
Submit and view feedback for