Configure Collaboration Manager for Loans
After deploying the Collaboration Manager for Loans into your environment, you'll need to configure additional capabilities for it to be fully functional. You'll be prompted to configure these capabilities after the successful deployment in Microsoft Cloud Solution Center. You'll also need to set up the integrations with other Microsoft products.
After downloading the Collaboration Manager for Loans app from the organization’s Teams app catalogue, you can access the application and begin the configuration process. Once you complete the configuration, the app will become available to all authorized users.
Note
The Collaboration Manager for loans no longer includes the conversations feature. Your loan teams can use Microsoft Teams chat to communicate instead.
Note
You need to have the Collaboration Toolkit Administrator or System Administrator role to configure Collaboration Manager for Loans. The Collaboration Toolkit User role is also required to access the dashboard and update the configuration after the initial setup.
Configure the app
Note
To access the settings page, you need to have created at least one business record.
Open the Collaboration Manager for Loans app and select a business record.
Navigate to the Tasks tab, then select the Settings button.
Select Get started to begin configuration.
Select Next to navigate through the introductory instructional cards.

Get your Group ID
Choose the Microsoft Teams channel where you want to add the Collaboration Manager for Loans app. Select the ellipsis next to the channel from the list in Teams and choose Get link to channel from the menu.
The URL has this format: "https://teams.microsoft.com/1/channel/< CHANNEL ID >/< Channel name >?groupId=< GROUP ID >&tenantId=< Tenant ID>."
Extract the GROUP ID value
Add your Group ID that you extracted in step 3 into the Group ID field.
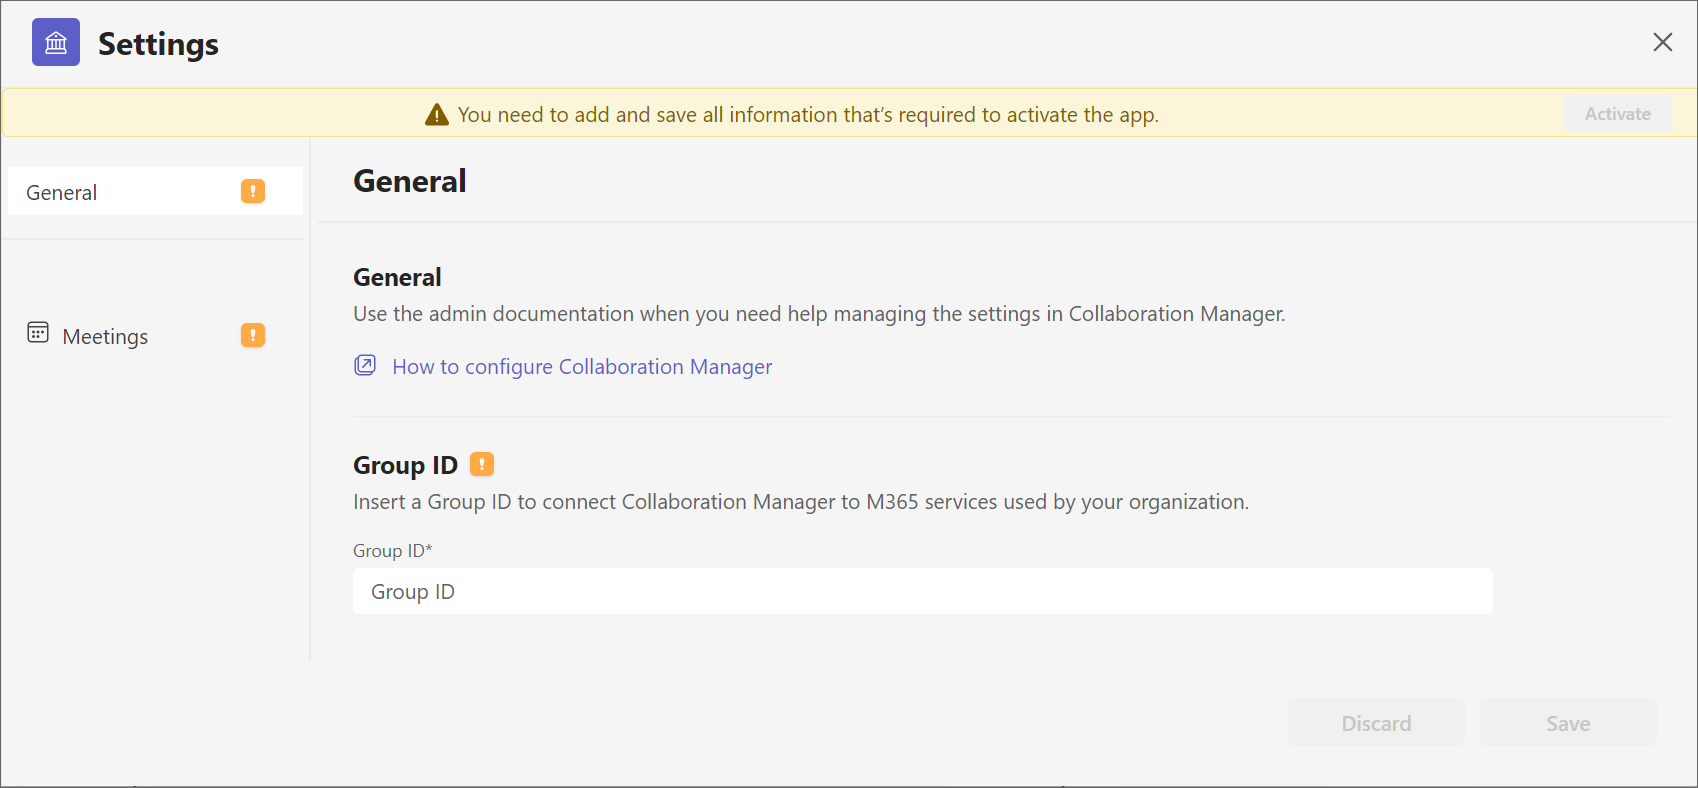
Select Save.
Configure your settings
You'll need to configure all mandatory settings before you can activate the app.
Finalize and activate
Once you’ve configured these settings, you can select Activate to make the app available to your organization. All authorized users will have access once you activate it. Users in your organization will now see the Collaboration Manager for Loans instead of an error message when they open the app.
Note
Activating the app doesn't change Dataverse permissions.
Once you've configured all your settings, the top banner will turn green. Select Activate in the banner.
Select Activate in the pop up window.
Select Go to dashboard to see the landing page for Collaboration Manager for Loans.
Test the app by opening a loan record and loading each tab to ensure that all settings have been configured correctly. See Use Collaboration Manager for Loans for more details on how to use the different tabs.
You can edit the settings at any time by choosing Edit settings from the ellipses at the top right of the dashboard. Changes that you make to the settings apply to all Collaboration Manager for Loans users.
Share Collaboration Manager for Loans with users
- Sign into Power Apps as an admin user and select the environment.
- Navigate to Apps in the left navigation
- On the list of apps, select the Loans app.
- Select the Share command.
- Type in the name of the person or group you want to share to in the People field.
- Select the Collaboration Toolkit User, Collaboration Manager for Loans User, Loan Officer and Collaboration Toolkit Administrator security roles for each user or team, and then select Share.
The security roles provide the following permissions:
- Collaboration Toolkit User: Permissions required to create and access bookings, notes, and tasks.
- Collaboration Manager for Loans User: Permissions required to access Collaboration Manager model-driven application.
- Loan Officer: Permissions required to view loan application records.
- Collaboration Toolkit Administrator: Permissions required to manage settings.
Assigning users loans
To allow members of a Microsoft Teams team to collaborate on a record, access control on the record needs to be configured to ensure that they have the required permissions. This is done by creating a Microsoft Dataverse team and mapping the Office group of the team to it. You can then assign Records to the team at data hydration time or afterwards by using the Assign command.
Create a Dataverse team for a Microsoft Teams team
- Make sure that you have the System Administrator security role or equivalent permissions.
- Go to Power Platform admin center.
- Go to Environments and select the environment with Collaboration Manager for Loans in it.
- Navigate to Access > Teams > See all.
- From the command bar, select + Create team.
- Enter a team name, description, root business unit, and administrator.
- Select AAD Office Group as Team Type.
- Search for the name of the Teams team who will map to this Dataverse team.
- Select Next.
- Select the following Security roles: Collaboration Toolkit User, Collaboration Manager for Loans User, and Loan Officer.
- Also select the following Security role for teams that should be able to manage settings: Collaboration Toolkit Administrator.
- Select Save.
To learn more about Dataverse teams, refer to the Dataverse teams management documentation.
Assigning records during data hydration
To enable records to be assigned to the team, the owner id value of a record needs to be set to the ID of the Dataverse team. The record is then owned by the team, enabling all team members to access the record.
Overriding privileges
The configuration of the Collaboration Toolkit User role includes permissions set to the “Local” level (see Security Roles for details). This enables users to perform operations like viewing and editing tasks, meetings, and notes created by other users within the same business unit.
To enable a higher access level, edit the existing roles or create a security role and assign it to users of the application.
Enable Teams theme
- Sign into Power Apps as an admin user and select the environment.
- Go to Advanced Settings > Customizations.
- Select Themes to view the list of themes available in the environment. Select the Collaboration Manager Theme, then select Publish Theme at the top.
Customizing the app further
If you'd like to make the app your own, you can fully customize it using Microsoft Power Platform. If you're unfamiliar with building and customizing a model-driven app in Power Apps, you can follow the Microsoft Learn content for model-driven apps.
The following articles show you how to make common changes to the Collaboration Manager for Loans:
- Customize forms - Add or remove capabilities from the core loan experience.
- Customize views - Edit the list view that appears on the first dashboard screen.
- Create charts - Create additional charts that you can display on the dashboard page.
Uninstall
- Sign into Power Apps as an admin user and select the environment.
- Select Solutions from the left navigation to view installed solutions in the environment.
- Select Collaboration Manager for Loans in the solution list, and then choose Delete on the command bar.
- Repeat step 3 for the Collaboration Toolkit and Banking Data Model solutions.
Troubleshooting
You might experience issues when upgrading from a previous version of Collaboration Manager to the latest version. This will likely occur if you had configured the channel ID in the previous version of the application.
To resolve this, you'll need to follow these steps to delete the channel ID settings.
- Sign in to PowerApps with your admin account.
- Go to Dataverse and choose Tables.
- Select All under the Tables, then search for Settings using the search bar on the top right corner of the page.
- Select the downward arrow by the Edit button and choose Edit data in Excel.
- Open the Excel file and choose Enable editing in the banner.
- Select Accept and Continue.
- Select Sign in, and sign in with your admin account. If you're already signed in, make sure that you're signed in to the same account that you used in PowerApps. If not, sign out and then sign in again with the same account as you used for PowerApps.
- Select the entire Channel ID row and delete it.
- Select Publish, then select Yes.
- You'll now be able to deploy the new version of Collaboration Manager for Loans.