Manually register devices with Windows Autopilot
You can perform Windows Autopilot device registration within your organization by manually collecting the hardware identity of devices (hardware hashes) and uploading this information in a comma-separated-values (CSV) file. Capturing the hardware hash for manual registration requires booting the device into Windows. For this reason, this process is primarily for testing and evaluation scenarios.
You can manually register up to 500 devices per CSV file through the portal. Before proceeding with additional devices, check that the previous CSV file batch has been successfully registered. If you're transferring devices hashes from one tenant to another tenant, see Support tip: How to transfer Windows Autopilot devices between tenants for additional guidance.
Device owners can only register their devices with a hardware hash. Other methods (PKID, tuple) are available through OEMs or CSP partners.
This article provides step-by-step guidance for manual registration. For more information about registration, see:
- Windows Autopilot registration overview
- Manual registration overview
- Windows Autopilot for HoloLens 2
Prerequisites
Required permissions
Device enrollment requires Intune Administrator or Policy and Profile Manager permissions. You can also create a custom Autopilot device manager role by using role-based access control. Autopilot device management requires only that you enable all permissions under Enrollment programs, except for the four token management options.
Note
In both Intune Administrator and role-based access control methods, the administrative user also requires consent to use the Microsoft Intune PowerShell and Microsoft Graph PowerShell enterprise applications.
Collect the hardware hash
The following methods are available to harvest a hardware hash from existing devices:
Using Windows PowerShell
During OOBE by using the Diagnostics Page (Windows 11 only)
From the Desktop using Settings > Accounts
For a description of each method, select the link for the method.
Note
If OOBE is restarted too many times, it can enter a recovery mode and fail to run the Autopilot configuration. You can identify this scenario if OOBE displays multiple configuration options on the same page, including language, region, and keyboard layout. The normal OOBE process displays each of these configuration options on a separate page. The following registry key value tracks the count of OOBE retries:
HKCU\SOFTWARE\Microsoft\Windows\CurrentVersion\UserOOBE
To ensure that OOBE hasn't been restarted too many times, you can change this value to 1.
Configuration Manager
Microsoft Configuration Manager automatically collects the hardware hashes for existing Windows devices. For more information, see Gather information from Configuration Manager for Windows Autopilot. You can extract the hash information from Configuration Manager into a CSV file.
PowerShell
The hardware hash for an existing device is available through Windows Management Instrumentation (WMI), as long as that device is running a supported version of Windows. You can use a PowerShell script (Get-WindowsAutopilotInfo.ps1) to get a device's hardware hash and serial number. The serial number is useful for quickly seeing which device the hardware hash belongs to.
To use this script, you can use either of the following methods:
- Download the script file from the PowerShell Gallery and run it on each computer.
- Install the script directly from the PowerShell Gallery.
To install the script directly and capture the hardware hash from the local computer:
Use the following commands from an elevated Windows PowerShell prompt:
[Net.ServicePointManager]::SecurityProtocol = [Net.SecurityProtocolType]::Tls12
New-Item -Type Directory -Path "C:\HWID"
Set-Location -Path "C:\HWID"
$env:Path += ";C:\Program Files\WindowsPowerShell\Scripts"
Set-ExecutionPolicy -Scope Process -ExecutionPolicy RemoteSigned
Install-Script -Name Get-WindowsAutopilotInfo
Get-WindowsAutopilotInfo -OutputFile AutopilotHWID.csv
You can run the commands remotely if both of the following are true:
- WMI permissions are in place.
- WMI is accessible through Windows Firewall on the remote computer.
While OOBE is running, you can start uploading the hardware hash by opening a command prompt (Shift+F10 at the sign-in prompt), running the
PowerShellcommand in the command prompt that opens, and then using the following PowerShell commands:[Net.ServicePointManager]::SecurityProtocol = [Net.SecurityProtocolType]::Tls12 PowerShell.exe -ExecutionPolicy Bypass Install-Script -name Get-WindowsAutopilotInfo -Force Set-ExecutionPolicy -Scope Process -ExecutionPolicy RemoteSigned Get-WindowsAutopilotInfo -OnlineNote
The
Get-WindowsAutopilotInfoscript was updated in July of 2023 to use the Microsoft Graph PowerShell modules instead of the deprecated AzureAD Graph PowerShell modules. Make sure you're using the latest version of the script. The Microsoft Graph PowerShell modules may require approval of additional permissions in Microsoft Entra ID when they're first used. For more information, see AzureAD and Important: Azure AD Graph Retirement and PowerShell Module Deprecation.You're prompted to sign in. An account with the Intune Administrator role is sufficient, and the device hash is uploaded automatically.
After you confirm the details of the uploaded device hash, run a sync in the Microsoft Intune admin center. Select Devices > Windows > Windows enrollment > Devices (under Windows Autopilot Deployment Program) > Sync.
After the device appears in your device list, and an Autopilot profile is assigned, restarting the device causes OOBE to run through the Windows Autopilot provisioning process.
On first run, you're prompted to approve the required app registration permissions.
Note
Because Intune offers free (or inexpensive) accounts that lack robust vetting, and because 4K hardware hashes contain sensitive information that only device owners should maintain, we recommend registering devices through Microsoft Intune via a 4K hardware hash only for testing or other limited scenarios. In most cases, you should instead use the Microsoft Partner Center for Autopilot device registration.
For more information about running the Get-WindowsAutopilotInfo.ps1 script, see the script's help by using Get-Help Get-WindowsAutopilotInfo.
Diagnostics page hash export
To export a hardware hash using the Windows Autopilot Diagnostics Page, the device must be running Windows 11.
Windows Autopilot Diagnostics are available in OOBE.
During OOBE, press Ctrl-Shift-D to bring up the Diagnostics Page. From this page, you can export logs to a thumb drive. The logs include a CSV file with the hardware hash.
Desktop hash export
From the Windows 10 or Windows 11 Start menu, right click and select Settings > Accounts > Access work or school.
Export log files. The logs include a CSV file with the hardware hash.
- Windows 11: In the Export your management log files tile, select Export.
- Windows 10: Select the Export your management log files link.
Log files are exported to the Users\Public\Documents\MDMDiagnostics directory.
For more information, see Diagnose MDM failures in Windows 10
Ensure that the CSV file meets requirements
Device information in the CSV file where you capture hardware hashes should include:
- Serial number
- Windows product ID
- Hardware hash
- Optional group tag
- Optional assigned user
You can have up to 500 rows in the file's list of devices. The header and line format must look like this:
Device Serial Number,Windows Product ID,Hardware Hash,Group Tag,Assigned User
<serialNumber>,<ProductID>,<hardwareHash>,<optionalGroupTag>,<optionalAssignedUser>
Keep these other requirements for the CSV file in mind:
- You can't use extra columns.
- You can't use quotation marks.
- You can use only ANSI-format text files (not Unicode).
- Headers are case-sensitive.
Important
Use a plain-text editor such as Notepad with this CSV file. Don't use Microsoft Excel. Editing and saving the CSV file with Microsoft Excel doesn't generate a usable file for importing to Intune.
When you upload a CSV file to assign a user, make sure that you assign valid User Principal Names (UPNs). If you assign an invalid UPN (that is, an incorrect username), your device might be inaccessible until you remove the invalid assignment.
During upload of a CSV file, the only validation that Microsoft performs on the Assigned User column is to check that the domain name is valid. Microsoft doesn't perform individual UPN validation to ensure that you're assigning an existing or correct user.
Add devices
Now that you've captured hardware hashes in a CSV file, you can add Windows Autopilot devices by importing the file. To import the file by using Intune:
In the Microsoft Intune admin center, select Devices > Windows > Windows enrollment > Devices (under Windows Autopilot Deployment Program) > Import.

Under Add Windows Autopilot devices, browse to the CSV file that lists the devices that you want to add.
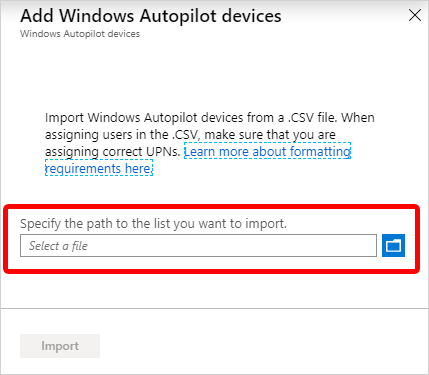
Select Import to start importing the device information. Importing can take several minutes.
After import is complete, select Devices > Windows > Windows enrollment > Devices (under Windows Autopilot Deployment Program) > Sync.
A message says that the synchronization is in progress. The process might take a few minutes to complete, depending on how many devices are being synchronized.
Refresh the view to see the new devices.
Edit Autopilot device attributes
After you've uploaded an Autopilot device, you can edit certain attributes of the device:
In the Microsoft Intune admin center, select Devices > Windows > Windows enrollment > Devices (under Windows Autopilot Deployment Program).
Select the device that you want to edit.
On the pane on the right of the screen, you can edit:
- Device name
- Group tag
- Username (if you've assigned a user)
Select Save.
Note
Device names can be configured for all devices but are ignored in Hybrid Microsoft Entra deployments. The device name still comes from the domain join profile for Hybrid Microsoft Entra devices.
Delete Autopilot devices
You can delete Windows Autopilot devices that aren't enrolled in Intune:
Select Devices > Windows > Windows enrollment > Devices (under Windows Autopilot Deployment Program).
Choose the devices that you want to delete, and then select Delete. The deletion process can take a few minutes to complete.
Completely removing a device from your tenant requires you to delete the Intune, Microsoft Entra ID, and Windows Autopilot device records. You can do all these deletions from Intune, in this order:
If the devices are enrolled in Intune, delete them from the Intune All devices pane.
Delete the devices from Windows Autopilot at Devices > Windows > Windows enrollment > Devices (under Windows Autopilot Deployment Program). Choose the devices that you want to delete, and then select Delete. The deletion process can take a few minutes to complete.
Delete the devices from Microsoft Entra ID at Devices > Microsoft Entra devices.
Troubleshooting registration failures
StorageError: This error is a generic error that can occur for various reasons. Most of the time it's not possible to determine the exact cause of the error until further investigation is done. If you encounter this error, the best course of action is to try again later. If the issue persists, contact support.
ZtdDeviceAssignedToAnotherTenant: This error occurs when the hardware hash you're uploading matches a device that is already registered to a different tenant. If you see this error, you should search for the serial number corresponding to the duplicate in the CSV file. Then, search for the serial number in the Windows Autopilot devices pane in Intune. If the device is already registered, don't import it again.
ZtdDeviceAlreadyAssigned: This error occurs when the hardware hash you're uploading matches a device that is already registered to your tenant. If you see this error, you should search for the serial number corresponding to the duplicate in the CSV file. Then, search for the serial number in the Windows Autopilot devices pane in Intune. If the device is already registered, don't import it again. If the device isn't registered, you can import it again.
ZtdDeviceDuplicated: This error occurs when there are duplicate hardware hashes in the CSV file. Only one of the duplicates is processed, and the others result in this error. If you see this error, you should look for the other duplicates of the same device to see what the actual result was. If you find a duplicate that was successfully processed, you can remove the duplicate row from the CSV file.
Next steps
- Create device groups to apply Autopilot deployment profiles.
Feedback
Coming soon: Throughout 2024 we will be phasing out GitHub Issues as the feedback mechanism for content and replacing it with a new feedback system. For more information see: https://aka.ms/ContentUserFeedback.
Submit and view feedback for