Tutorial: Enable co-management for existing Configuration Manager clients
With co-management, you can keep your well-established processes for using Configuration Manager to manage PCs in your organization. At the same time, you're investing in the cloud through use of Intune for security and modern provisioning.
In this tutorial, you set up co-management of your Windows 10 or later devices that are already enrolled in Configuration Manager. This tutorial begins with the premise that you already use Configuration Manager to manage your Windows 10 or later devices.
Use this tutorial when:
You have an on-premises Active Directory that you can connect to Microsoft Entra ID in a hybrid Microsoft Entra configuration.
If you can't deploy a hybrid Microsoft Entra ID that joins your on-premises AD with Microsoft Entra ID, we recommend following our companion tutorial, Enable co-management for new internet-based Windows 10 or later devices.
You have existing Configuration Manager clients that you want to cloud-attach.
In this tutorial you will:
- Review prerequisites for Azure and your on-premises environment
- Set up hybrid Microsoft Entra ID
- Configure Configuration Manager client agents to register with Microsoft Entra ID
- Configure Intune to auto-enroll devices
- Enable co-management in Configuration Manager
Prerequisites
Azure services and environment
Azure subscription (free trial)
Microsoft Entra ID P1 or P2
Microsoft Intune subscription
Tip
An Enterprise Mobility + Security (EMS) subscription includes both Microsoft Entra ID P1 or P2 and Microsoft Intune. EMS subscription (free trial).
If not already present in your environment, during this tutorial you'll configure Microsoft Entra Connect between your on-premises Active Directory and your Microsoft Entra tenant.
Note
Devices that are only registered with Microsoft Entra ID aren't supported with co-management. This configuration is sometimes referred to as workplace joined. They need to be either joined to Microsoft Entra ID or Microsoft Entra hybrid joined. For more information, see Handling devices with Microsoft Entra registered state.
On-premises infrastructure
- A supported version of Configuration Manager current branch
- The mobile device management (MDM) authority must be set to Intune.
Permissions
Throughout this tutorial, use the following permissions to complete tasks:
- An account that's a domain admin on your on-premises infrastructure
- An account that's a full administrator for all scopes in Configuration Manager
- An account that's a global administrator in Microsoft Entra ID
- Make sure you've assigned an Intune license to the account that you use to sign in to your tenant. Otherwise, sign in fails with the error message An unanticipated error occurred.
Set up hybrid Microsoft Entra ID
When you set up a hybrid Microsoft Entra ID, you're really setting up integration of an on-premises AD with Microsoft Entra ID using Microsoft Entra Connect and Active Directory Federated Services (ADFS). With successful configuration, your workers can seamlessly sign in to external systems using their on-premises AD credentials.
Important
This tutorial details a bare-bones process to set up hybrid Microsoft Entra ID for a managed domain. We recommend you be familiar with the process and not rely on this tutorial as your guide to understanding and deploying hybrid Microsoft Entra ID.
For more information about hybrid Microsoft Entra ID, start with the following articles in the Microsoft Entra documentation:
Set up Microsoft Entra Connect
Hybrid Microsoft Entra ID requires configuration of Microsoft Entra Connect to keep computer accounts in your on-premises Active Directory (AD) and the device object in Microsoft Entra ID in sync.
Beginning with version 1.1.819.0, Microsoft Entra Connect provides you with a wizard to configure Microsoft Entra hybrid join. Use of that wizard simplifies the configuration process.
To configure Microsoft Entra Connect, you need credentials of a global administrator for Microsoft Entra ID. The following procedure should not be considered authoritative for set up of Microsoft Entra Connect but is provided here to help streamline configuration of co-management between Intune and Configuration Manager. For the authoritative content on this and related procedures for set up of Microsoft Entra ID, see Configure Microsoft Entra hybrid join for managed domains in the Microsoft Entra documentation.
Configure a Microsoft Entra hybrid join using Microsoft Entra Connect
Get and install the latest version of Microsoft Entra Connect (1.1.819.0 or higher).
Launch Microsoft Entra Connect, and then select Configure.
On the Additional tasks page, select Configure device options, and then select Next.
On the Overview page, select Next.
On the Connect to Microsoft Entra ID page, enter the credentials of a global administrator for Microsoft Entra ID.
On the Device options page, select Configure Microsoft Entra hybrid join, and then select Next.
On the Device operating systems page, select the operating systems used by devices in your Active Directory environment, and then select Next.
You can select the option to support Windows downlevel domain-joined devices, but keep in mind that co-management of devices is only supported for Windows 10 or later.
On the SCP page, for each on-premises forest you want Microsoft Entra Connect to configure the service connection point (SCP), do the following steps, and then select Next:
- Select the forest.
- Select the authentication service. If you have a federated domain, select AD FS server unless your organization has exclusively Windows 10 or later clients and you have configured computer/device sync or your organization is using SeamlessSSO.
- Click Add to enter the enterprise administrator credentials.
If you have a managed domain, skip this step.
On the Federation configuration page, enter the credentials of your AD FS administrator, and then select Next.
On the Ready to configure page, select Configure.
On the Configuration complete page, select Exit.
If you experience issues with completing Microsoft Entra hybrid join for domain joined Windows devices, see Troubleshooting Microsoft Entra hybrid join for Windows current devices.
Configure Client Settings to direct clients to register with Microsoft Entra ID
Use Client Settings to configure Configuration Manager clients to automatically register with Microsoft Entra ID.
Open the Configuration Manager console > Administration > Overview > Client Settings, and then edit the Default Client Settings.
Select Cloud Services.
On the Default Settings page, set Automatically register new Windows 10 domain joined devices with Microsoft Entra ID to = Yes.
Select OK to save this configuration.
Configure auto-enrollment of devices to Intune
Next, we'll set up auto-enrollment of devices with Intune. With automatic enrollment, devices you manage with Configuration Manager automatically enroll with Intune.
Automatic enrollment also lets users enroll their Windows 10 or later devices to Intune. Devices enroll when a user adds their work account to their personally owned device, or when a corporate-owned device is joined to Microsoft Entra ID.
Sign in to the Azure portal and select Microsoft Entra ID > Mobility (MDM and MAM) > Microsoft Intune.
Configure MDM user scope. Specify one of the following to configure which users' devices are managed by Microsoft Intune and accept the defaults for the URL values.
Some: Select the Groups that can automatically enroll their Windows 10 or later devices
All: All users can automatically enroll their Windows 10 or later devices
None: Disable MDM automatic enrollment
Important
If both MAM user scope and automatic MDM enrollment (MDM user scope) are enabled for a group, only MAM is enabled. Only Mobile Application Management (MAM) is added for users in that group when they workplace join personal device. Devices aren't automatically MDM-enrolled.
When Configuration Manager is set to enroll devices to Intune, you still need to change the MDM user scope for device token enrollment. Configuration Manager uses the MDM URLs that it stores in the site database to verify the client belongs to expected Intune tenant.
Select Save to complete configuration of automatic enrollment.
Return to Mobility (MDM and MAM) and then select Microsoft Intune Enrollment.
Note
Some tenants may not have these options to configure.
Microsoft Intune is how you configure the MDM app for Microsoft Entra ID. Microsoft Intune Enrollment is a specific Microsoft Entra app that's created when you apply multi-factor authentication policies for iOS and Android enrollment. For more information, see Require multi-factor authentication for Intune device enrollments.
For MDM user scope, select All, and then Save.
Enable co-management in Configuration Manager
With hybrid Microsoft Entra set-up and Configuration Manager client configurations in place, you're ready to flip the switch and enable co-management of your Windows 10 or later devices. The phrase Pilot group is used throughout the co-management feature and configuration dialogs. A pilot group is a collection containing a subset of your Configuration Manager devices. Use a pilot group for your initial testing, adding devices as needed, until you're ready to move the workloads for all Configuration Manager devices. There isn't a time limit on how long a pilot group can be used for workloads. A pilot group can be used indefinitely if you don't wish to move the workload to all Configuration Manager devices.
When you enable co-management, you'll assign a collection as a Pilot group. This is a group that contains a small number of clients to test your co-management configurations. We recommend you create a suitable collection before you start the procedure. Then you can select that collection without exiting the procedure to do so. You may need multiple collections since you can assign a different Pilot group for each workload.
Note
Since devices are enrolled in the Microsoft Intune service based on its Microsoft Entra device token, and not a user token, only the default Intune enrollment restriction will apply to the enrollment.
Enable co-management for versions 2111 and later
Starting in Configuration Manager version 2111, the co-management onboarding experience changed. The Cloud Attach Configuration Wizard makes it easier to enable co-management and other cloud features. You can choose a streamlined set of recommended defaults, or customize your cloud attach features. There's also a new built-in device collection for Co-management Eligible Devices to help you identify clients. For more information on enabling co-management, see Enable cloud attach.
Note
With the new wizard, you don't move workloads at the same time that you enable co-management. To move workloads, you'll edit the co-management properties after enabling cloud attach.
Enable co-management for versions 2107 and earlier
When you're enabling co-management, you can use the Azure public cloud, Azure Government cloud, or Azure China 21Vianet cloud (added in version 2006). To enable co-management, follow these instructions:
In the Configuration Manager console, go to the Administration workspace, expand Cloud Services, and select the Cloud Attach node. Select Configure Cloud Attach on the ribbon to open the Cloud Attach Configuration Wizard.
For version 2103 and earlier, expand Cloud Services and select the Co-management node. Select Configure co-management on the ribbon to open the Co-management Configuration Wizard.
On the onboarding page of the wizard, for Azure environment, choose one of the following environments:
Azure public cloud
Azure Government cloud
Azure China cloud (added in version 2006)
Note
Update the Configuration Manager client to the latest version on your devices before you onboard to the Azure China cloud.
When you select the Azure China cloud or Azure Government cloud, the Upload to Microsoft Endpoint Manager admin center option for tenant attach is disabled.
Select Sign In. Sign in as a Microsoft Entra Global Administrator, and then select Next. You sign in this one time for the purposes of this wizard. The credentials aren't stored or reused elsewhere.
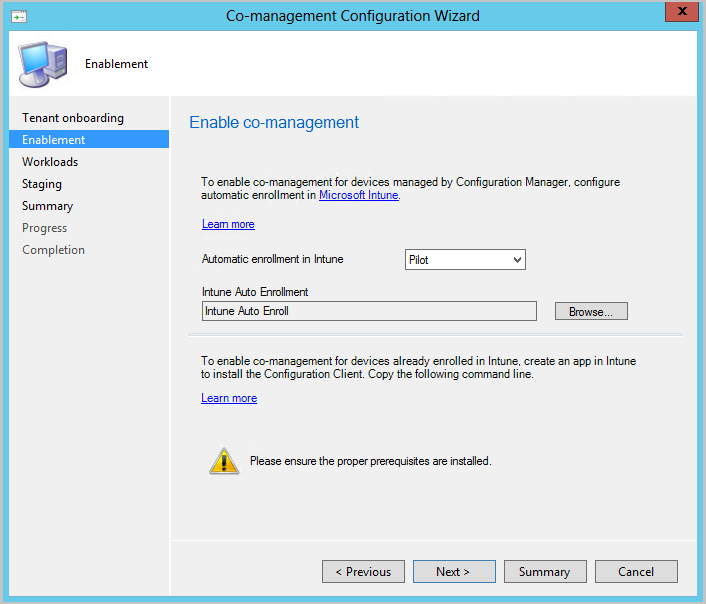
On the Enablement page, choose the following settings:
Automatic enrollment in Intune: Enables automatic client enrollment in Intune for existing Configuration Manager clients. This option allows you to enable co-management on a subset of clients to initially test co-management and then roll out co-management by using a phased approach. If the user unenrolls a device, the device will be re-enrolled on the next evaluation of the policy.
- Pilot: Only the Configuration Manager clients that are members of the Intune Auto Enrollment collection are automatically enrolled in Intune.
- All: Enable automatic enrollment for all clients running Windows 10 version 1709 or later.
- None: Disable automatic enrollment for all clients.
Intune Auto Enrollment: This collection should contain all of the clients that you want to onboard into co-management. It's essentially a superset of all the other staging collections.
Automatic enrollment isn't immediate for all clients. This behavior helps enrollment scale better for large environments. Configuration Manager randomizes enrollment based on the number of clients. For example, if your environment has 100,000 clients, when you enable this setting, enrollment occurs over several days.
A new co-managed device is now automatically enrolled in the Microsoft Intune service based on its Microsoft Entra device token. It doesn't need to wait for a user to sign in to the device for automatic enrollment to start. This change helps to reduce the number of devices with the enrollment status Pending user sign in. To support this behavior, the device needs to be running Windows 10 version 1803 or later. For more information, see Co-management enrollment status.
If you already have devices enrolled in co-management, new devices are now enrolled immediately after they meet the prerequisites.
For internet-based devices that are already enrolled in Intune, copy and save the command on the Enablement page. You'll use this command to install the Configuration Manager client as an app in Intune for internet-based devices. If you don't save this command now, you can review the co-management configuration at any time to get this command.
Tip
The command appears only if you've met all of the prerequisites, such as setting up a cloud management gateway.
On the Workloads page, for each workload, choose which device group to move over for management with Intune. For more information, see Workloads.
If you only want to enable co-management, you don't need to switch workloads now. You can switch workloads later. For more information, see How to switch workloads.
- Pilot Intune: Switches the associated workload only for the devices in the pilot collections that you'll specify on the Staging page. Each workload can have a different pilot collection.
- Intune: Switches the associated workload for all co-managed Windows 10 or later devices.
Important
Before you switch any workloads, make sure that you properly configure and deploy the corresponding workload in Intune. Make sure that workloads are always managed by one of the management tools for your devices.
On the Staging page, specify the pilot collection for each of the workloads that are set to Pilot Intune.

To enable co-management, complete the wizard.
Next steps
- Review the status of co-managed devices with the Co-management dashboard
- Start getting immediate value from co-management
- Use conditional access and Intune compliance rules to manage user access to corporate resources
Feedback
Coming soon: Throughout 2024 we will be phasing out GitHub Issues as the feedback mechanism for content and replacing it with a new feedback system. For more information see: https://aka.ms/ContentUserFeedback.
Submit and view feedback for