Create and manage device tags
Note
Want to experience Microsoft Defender XDR? Learn more about how you can evaluate and pilot Microsoft Defender XDR.
Applies to:
- Microsoft Defender for Endpoint Plan 1
- Microsoft Defender for Endpoint Plan 2
- Microsoft Defender XDR
Want to experience Microsoft Defender for Endpoint? Sign up for a free trial.
Add tags on devices to create a logical group affiliation. Device tags support proper mapping of the network, enabling you to attach different tags to capture context and to enable dynamic list creation as part of an incident. Tags can be used as a filter in the Device inventory view, or to group devices. For more information on device grouping, see Create and manage device groups.
Note
Device group creation is supported in Defender for Endpoint Plan 1 and Plan 2.
You can add tags on devices using the following ways:
- Using the portal
- Using dynamic rules for device tagging
- Setting a registry key value (Windows)
- Using Defender for Endpoint security settings management (macOS / Linux)
- Creating a configuration profile (macOS / Linux)
- Creating a custom profile in Microsoft Intune (Windows 10 or later)
- Using App configuration policy in Intune (iOS / Android)
Note
There might be some latency between the time a tag is added to a device and its availability in the devices list and device page.
To add device tags using API, see Add or remove device tags API.
Add device tags using the portal
Select the device that you want to manage tags on. You can select or search for a device from any of the following views:
Alerts queue - Select the device name beside the device icon from the alerts queue.
Devices inventory - Select the device name from the list of devices.
Search box - Select Device from the drop-down menu and enter the device name.
You can also get to the alert page through the file and IP views.
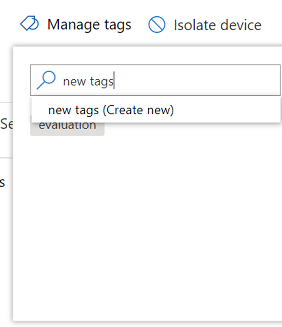
Select Manage tags from the row of Response actions.

Type to find or create tags


Tags are added to the device view and will also be reflected on the Devices inventory view. You can then use the Tags filter to see the relevant list of devices.
Note
Filtering might not work on tag names that contain parenthesis or commas.
When you create a new tag, a list of existing tags are displayed. The list only shows tags created through the portal. Existing tags created from client devices will not be displayed.
You can also delete tags from this view.

Add device tags using dynamic rules for device tagging
You can create and manage rules that automatically assign and remove tags from devices based on user-defined criteria directly in the Microsoft Defender portal. Please refer to following documents for details
- Manage your devices with ease using dynamic rules for device tagging in Microsoft Defender
- Asset rule management - Dynamic rules for devices
Add device tags by setting a registry key value
Note
Applicable only on the following devices:
- Windows 11
- Windows 10, version 1709 or later
- Windows Server, version 1803 or later
- Windows Server 2016
- Windows Server 2012 R2
- Windows Server 2008 R2 SP1
- Windows 8.1
- Windows 7 SP1
Note
The maximum number of characters that can be set in a tag is 200.
Devices with similar tags can be handy when you need to apply contextual action on a specific list of devices.
Use the following registry key entry to add a tag on a device:
- Registry key:
HKEY_LOCAL_MACHINE\SOFTWARE\Policies\Microsoft\Windows Advanced Threat Protection\DeviceTagging\ - Registry key value (REG_SZ):
Group - Registry key data:
Name of the tag you want to set
Note
The device tag is part of the device information report that's generated once a day. As an alternative, you may choose to restart the endpoint that would transfer a new device information report.
If you need to remove a tag that was added using the above Registry key, clear the contents of the Registry key data instead of removing the 'Group' key.
Add device tags using the Defender for Endpoint security settings management
Note
Applicable only on the following devices:
- macOS
- Linux
You can use Defender for Endpoint security settings management to define and apply device tags for macOS and Linux. You can perform this task by creating Endpoint detection and response security policy. Please refer to following documentation for details.
- Manage endpoint security policies on devices onboarded to Microsoft Defender for Endpoint
- Manage endpoint security policies in Microsoft Defender for Endpoint
Add device tags by creating a configuration profile
Note
Applicable only on the following devices:
- macOS
- Linux
You can use configuration profile to set device tag for macOS and Linux. Please refer to following documentation for details.
For macOS, create configuration profile (.plist file) and deploy it manually or through management tool including Intune. See the guidance in Set preferences for Microsoft Defender for Endpoint on macOS. To deploy configuration profile with Intune, follow the guidance in Use custom settings for macOS devices in Microsoft Intune.
For Linux, create configuration profile (.json file) and deploy it manually or through management tool. See the guidance in Set preferences for Microsoft Defender for Endpoint on Linux
Add device tags by creating a custom profile in Microsoft Intune
Note
Applicable only on the following devices:
- Windows 10
- Windows 11
You can use Microsoft Intune to define and apply device tags. You can perform this task by creating a device configuration profile using custom settings in Intune. For more information, see Create a profile with custom settings in Intune.
In the Create the profile procedure, for step 3, choose Windows 10 and later.
In the OMA-IRU settings section, for Data type, choose String. For OMA-URI, type (or paste)
./Device/Vendor/MSFT/WindowsAdvancedThreatProtection/DeviceTagging/Group.
Add device tags by creating app configuration policy in Microsoft Intune
Note
Applicable only on the following devices:
- iOS
- Android
You can use Microsoft Intune to define and apply tag for mobile devices. You can perform this task by creating an app configuration profile in Intune. For more information, please refer to following information.
For iOS, follow the guidance in Configure Microsoft Defender for Endpoint on iOS features.
For Android, follow the guidance on Configure Defender for Endpoint on Android features.
Tip
Do you want to learn more? Engage with the Microsoft Security community in our Tech Community: Microsoft Defender for Endpoint Tech Community.
Feedback
Coming soon: Throughout 2024 we will be phasing out GitHub Issues as the feedback mechanism for content and replacing it with a new feedback system. For more information see: https://aka.ms/ContentUserFeedback.
Submit and view feedback for