Set up Microsoft Defender for Endpoint deployment
Applies to:
- Microsoft Defender for Endpoint Plan 1
- Microsoft Defender for Endpoint Plan 2
- Microsoft Defender XDR
Want to experience Microsoft Defender for Endpoint? Sign up for a free trial.
The first step when deploying Microsoft Defender for Endpoint is to set up your Defender for Endpoint environment.
In this deployment scenario, you'll be guided through the steps on:
- Licensing validation
- Tenant configuration
- Network configuration
Note
For the purpose of guiding you through a typical deployment, this scenario will only cover the use of Microsoft Configuration Manager. Defender for Endpoint supports the use of other onboarding tools but we won't cover those scenarios in the deployment guide. For more information, see Identify Defender for Endpoint architecture and deployment method.
Check license state
Checking for the license state and whether it was properly provisioned can be done through the admin center or through the Microsoft Azure portal.
To view your licenses, go to the Microsoft Azure portal and navigate to the Microsoft Azure portal license section.
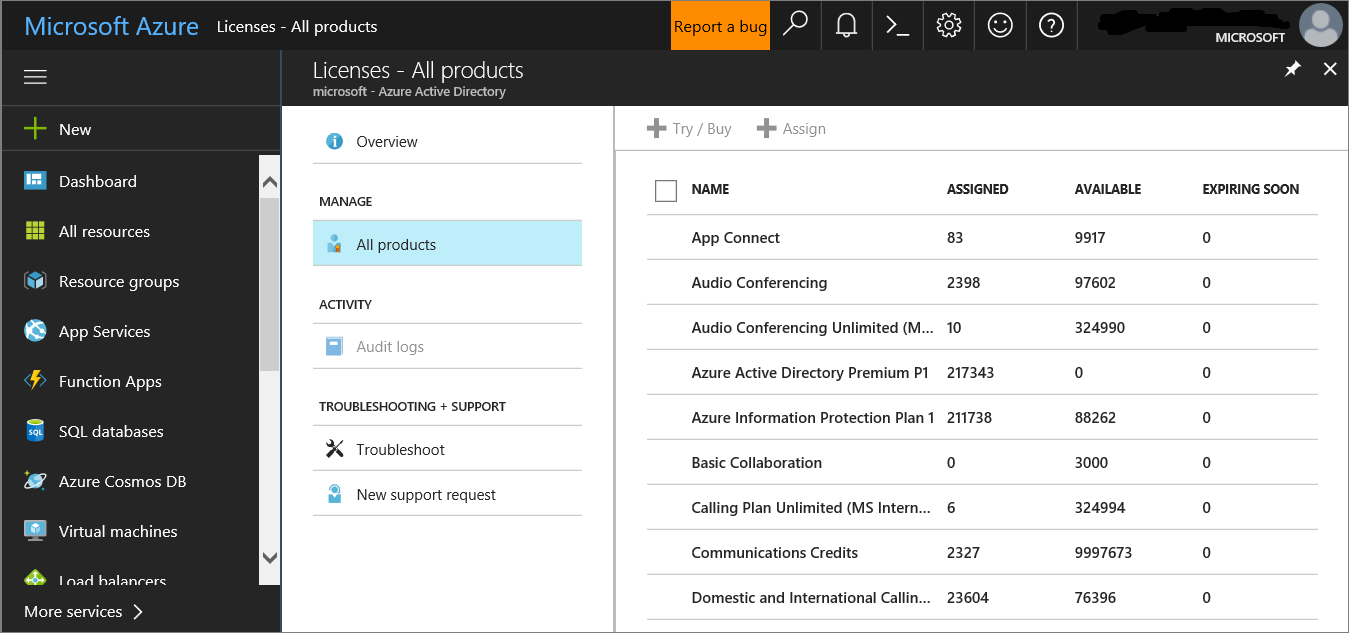
Alternately, in the admin center, navigate to Billing > Subscriptions.
On the screen, you'll see all the provisioned licenses and their current Status.

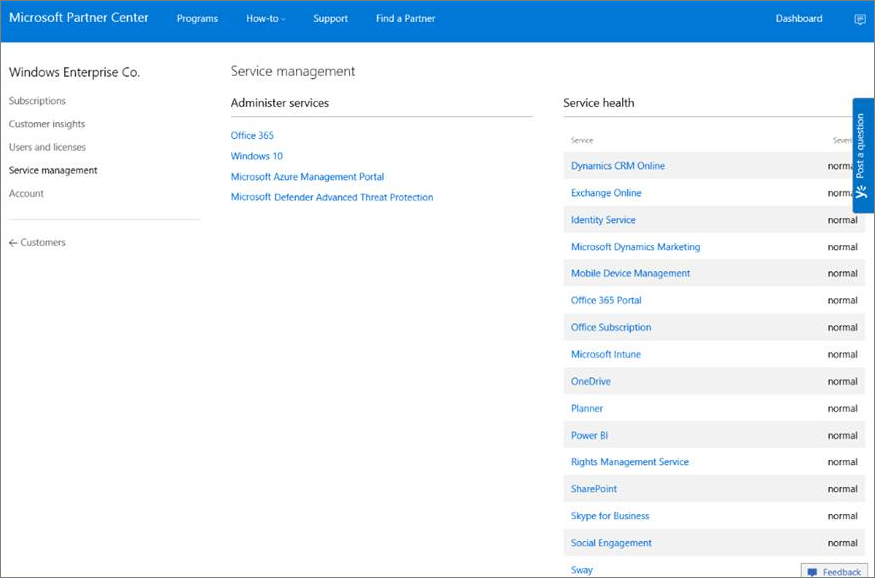
Cloud Service Provider validation
To gain access into which licenses are provisioned to your company, and to check the state of the licenses, go to the admin center.
From the Partner portal, select Administer services > Office 365.
Clicking on the Partner portal link will open the Admin on behalf option and will give you access to the customer admin center.

Tenant Configuration
Onboarding to Microsoft Defender for Endpoint is easy. From the navigation menu, select any item under the Endpoints section, or any Microsoft Defender XDR feature such as Incidents, Hunting, Action center, or Threat analytics to initiate the onboarding process.
From a web browser, navigate to the Microsoft Defender portal.
Data center location
Microsoft Defender for Endpoint will store and process data in the same location as used by Microsoft Defender XDR. If Microsoft Defender XDR has not been turned on yet, onboarding to Microsoft Defender for Endpoint will also turn on Microsoft Defender XDR and a new data center location is automatically selected based on the location of active Microsoft 365 security services. The selected data center location is shown on the screen.
Network configuration
If the organization doesn't require the endpoints to use a Proxy to access the Internet, skip this section.
The Microsoft Defender for Endpoint sensor requires Microsoft Windows HTTP (WinHTTP) to report sensor data and communicate with the Microsoft Defender for Endpoint service. The embedded Microsoft Defender for Endpoint sensor runs in the system context using the LocalSystem account. The sensor uses Microsoft Windows HTTP Services (WinHTTP) to enable communication with the Microsoft Defender for Endpoint cloud service. The WinHTTP configuration setting is independent of the Windows Internet (WinINet) internet browsing proxy settings and can only discover a proxy server by using the following discovery methods:
Autodiscovery methods:
- Transparent proxy
- Web Proxy Autodiscovery Protocol (WPAD)
If a Transparent proxy or WPAD has been implemented in the network topology, there is no need for special configuration settings. For more information on Microsoft Defender for Endpoint URL exclusions in the proxy, see the Proxy Service URLs section in this document for the URLs allow list or on Configure device proxy and Internet connectivity settings.
Manual static proxy configuration:
Registry-based configuration
WinHTTP configured using netsh command
Suitable only for desktops in a stable topology (for example: a desktop in a corporate network behind the same proxy).
Configure the proxy server manually using a registry-based static proxy
Configure a registry-based static proxy to allow only Microsoft Defender for Endpoint sensor to report diagnostic data and communicate with Microsoft Defender for Endpoint services if a computer isn't permitted to connect to the Internet. The static proxy is configurable through Group Policy (GP). The group policy can be found under:
- Administrative Templates > Windows Components > Data Collection and Preview Builds > Configure Authenticated Proxy usage for the Connected User Experience and Telemetry Service
- Set it to Enabled and select Disable Authenticated Proxy usage
Open the Group Policy Management Console.
Create a policy or edit an existing policy based off the organizational practices.
Edit the Group Policy and navigate to Administrative Templates > Windows Components > Data Collection and Preview Builds > Configure Authenticated Proxy usage for the Connected User Experience and Telemetry Service.

Select Enabled.
Select Disable Authenticated Proxy usage.
Navigate to Administrative Templates > Windows Components > Data Collection and Preview Builds > Configure connected user experiences and telemetry.
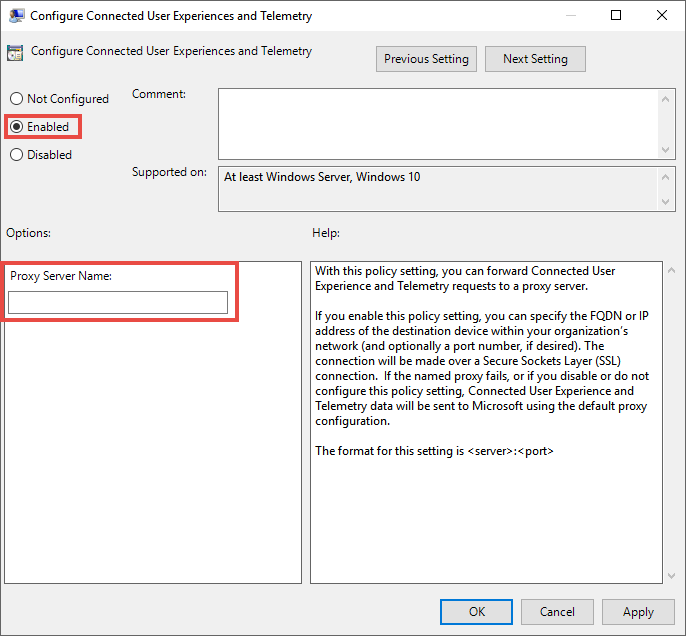
Select Enabled.
Enter the Proxy Server Name.


The policy sets two registry values TelemetryProxyServer as REG_SZ and DisableEnterpriseAuthProxy as REG_DWORD under the registry key HKLM\Software\Policies\Microsoft\Windows\DataCollection.
The registry value TelemetryProxyServer takes the following string format:
<server name or ip>:<port>
For example: 10.0.0.6:8080
The registry value DisableEnterpriseAuthProxy should be set to 1.
Configure the proxy server manually using netsh command
Use netsh to configure a system-wide static proxy.
Note
- This will affect all applications including Windows services which use WinHTTP with default proxy.
- Laptops that are changing topology (for example: from office to home) will malfunction with netsh. Use the registry-based static proxy configuration.
Open an elevated command line:
- Go to Start and type cmd.
- Right-click Command prompt and select Run as administrator.
Enter the following command and press Enter:
netsh winhttp set proxy <proxy>:<port>For example: netsh winhttp set proxy 10.0.0.6:8080
Proxy Configuration for down-level devices
Down-Level devices include Windows 7 SP1 and Windows 8.1 workstations as well as Windows Server 2008 R2, and other server operating systems that have been onboarded previously using the Microsoft Monitoring Agent. These operating systems will have the proxy configured as part of the Microsoft Management Agent to handle communication from the endpoint to Azure. Refer to the Microsoft Management Agent Fast Deployment Guide for information on how a proxy is configured on these devices.
Proxy Service URLs
URLs that include v20 in them are only needed if you have Windows 10, version 1803 or Windows 11 devices. For example, us-v20.events.data.microsoft.com is only needed if the device is on Windows 10, version 1803 or Windows 11.
If a proxy or firewall is blocking anonymous traffic, as Microsoft Defender for Endpoint sensor is connecting from system context, make sure anonymous traffic is permitted in the listed URLs.
The following downloadable spreadsheet lists the services and their associated URLs that your network must be able to connect to. Ensure there are no firewall or network filtering rules that would deny access to these URLs, or you may need to create an allow rule specifically for them.
| Spreadsheet of domains list | Description |
|---|---|
| Microsoft Defender for Endpoint URL list for commercial customers | Spreadsheet of specific DNS records for service locations, geographic locations, and OS for commercial customers. Download the spreadsheet here. |
| Microsoft Defender for Endpoint URL list for Gov/GCC/DoD | Spreadsheet of specific DNS records for service locations, geographic locations, and OS for Gov/GCC/DoD customers. Download the spreadsheet here. |
Next step
- Continue to Step 2 - Assign roles and permissions
Tip
Do you want to learn more? Engage with the Microsoft Security community in our Tech Community: Microsoft Defender for Endpoint Tech Community.
Feedback
Coming soon: Throughout 2024 we will be phasing out GitHub Issues as the feedback mechanism for content and replacing it with a new feedback system. For more information see: https://aka.ms/ContentUserFeedback.
Submit and view feedback for