Manage incidents in Microsoft Defender
Note
Want to experience Microsoft Defender XDR? Learn more about how you can evaluate and pilot Microsoft Defender XDR.
Applies to:
- Microsoft Defender XDR
- Microsoft Defender unified security operations center (SOC) platform
Incident management is critical to ensuring that incidents are named, assigned, and tagged to optimize time in your incident workflow and more quickly contain and address threats.
Tip
For a limited time during January 2024, when you visit the Incidents page, Defender Boxed appears. Defender Boxed highlights your organization's security successes, improvements, and response actions during 2023. To reopen Defender Boxed, in the Microsoft Defender portal, go to Incidents, and then select Your Defender Boxed.
You can manage incidents from Incidents & alerts > Incidents on the quick launch of the Microsoft Defender portal (security.microsoft.com). Here's an example.

Here are the ways you can manage your incidents:
- Edit the incident name
- Assign or change severity
- Add incident tags
- Assign the incident to a user account
- Resolve them
- Specify its classification
- Add comments
- Assess the activity audit and add comments in the Activity log
- Export incident data to PDF
You can manage incidents from the Manage incident pane for an incident. Here's an example.

You can display this pane from the Manage incident link on the:
- Alert story page.
- Properties pane of an incident in the incident queue.
- Summary page of an incident.
- Manage incident option located on the upper right side of the Incident page.
In cases where you want to move alerts from one incident to another, you can also do so from the Alerts tab, thus creating a larger or smaller incident that includes all relevant alerts.
Edit the incident name
Microsoft Defender automatically assigns a name based on alert attributes such as the number of endpoints affected, users affected, detection sources or categories. The incident name allows you to quickly understand the scope of the incident. For example: Multi-stage incident on multiple endpoints reported by multiple sources.
You can edit the incident name from the Incident name field on the Manage incident pane.
Note
Incidents that existed before the rollout of the automatic incident naming feature will retain their name.
Assign or change incident severity
You can assign or change the severity of an incident from the Severity field on the Manage incident pane. The severity of an incident is determined by the highest severity of the alerts associated with it. The severity of an incident can be set to high, medium, low, or informational.
Add incident tags
You can add custom tags to an incident, for example to flag a group of incidents with a common characteristic. You can later filter the incident queue for all incidents that contain a specific tag.
The option to select from a list of previously-used and selected tags appear after you start typing.
Assign an incident
You can select the Assign to box and specify the user account to assign an incident. To reassign an incident, remove the current assignment account by selecting the "x" next to the account name and then select the Assign to box. Assigning ownership of an incident assigns the same ownership to all the alerts associated with it.
You can get a list of incidents assigned to you by filtering the incident queue.
- From the incident queue, select Filters.
- In the Incident assignment section, clear Select all. Select Assigned to me, Assigned to another user, or Assigned to a user group.
- Select Apply, and then close the Filters pane.
You can then save the resulting URL in your browser as a bookmark to quickly see the list of incidents assigned to you.
Resolve an incident
Select Resolve incident to move the toggle to the right when an incident is remediated. Resolving an incident also resolves all the linked and active alerts related to the incident.
An incident that isn't resolved displays as Active.
Specify the classification
From the Classification field, you specify whether the incident is:
- Not set (the default).
- True positive with a type of threat. Use this classification for incidents that accurately indicate a real threat. Specifying the threat type helps your security team see threat patterns and act to defend your organization from them.
- Informational, expected activity with a type of activity. Use the options in this category to classify incidents for security tests, red team activity, and expected unusual behavior from trusted apps and users.
- False positive for types of incidents that you determine can be ignored because they're technically inaccurate or misleading.
Classifying incidents and specifying their status and type helps tune Microsoft Defender XDR to provide better detection determination over time.
Add comments
You can add multiple comments to an incident with the Comment field. The comment field supports text and formatting, links, and images. Each comment is limited to 30,000 characters.
All comments are added to the historical events of the incident. You can see the comments and history of an incident from the Comments and history link on the Summary page.
Activity log
The Activity log displays a list of all the comments and actions performed on the incident, known as Audits and comments. All changes made to the incident, whether by a user or by the system, are recorded in the activity log. The activity log is available from the Activity log option on the incident page or on the incident side pane.

You can filter the activities within the log by comments and actions. Click the Content: Audits, Comments then select the content type to filter activities. Here's an example.

You can also add your own comments using the comment box available within the activity log. The comment box accepts text and formatting, links, and images.

Export incident data to PDF
Important
Some information in this article relates to prereleased product which may be substantially modified before it's commercially released. Microsoft makes no warranties, express or implied, with respect to the information provided here.
The export incident data feature is currently available to Microsoft Defender XDR and Microsoft Defender unified security operations center (SOC) platform customers with the Microsoft Copilot for security license.
You can export an incident’s data to PDF through the Export incident as PDF function and save it into PDF format. This function allows security teams to review an incident’s details offline at any given time.
The incident data exported includes the following information:
- An overview containing the incident details
- The attack story graph and threat categories
- The impacted assets, covering up to 10 assets for each asset type
- The evidence list covering up to 100 items
- Supporting data, including all related alerts and activities recorded in the activity log
Here's an example of the exported PDF:

If you have the Copilot for Security license, the exported PDF contains the following additional incident data:
The export to PDF function is also available in the Copilot side panel of a generated incident report.
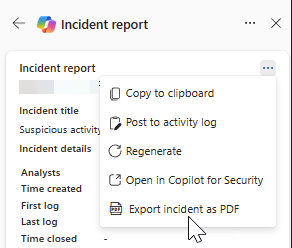
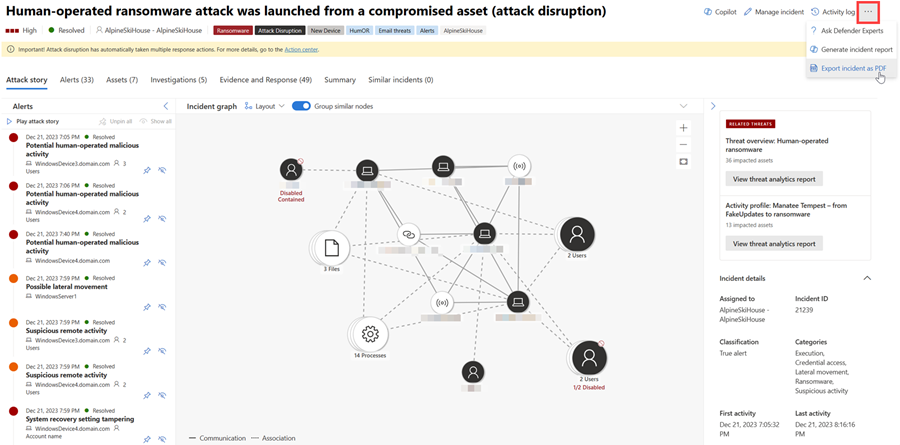
To generate the PDF, perform the following steps:
Open an incident page. Select the More actions ellipsis (...) on the upper right corner and choose Export incident as PDF. The function becomes grayed out while the PDF is being generated.
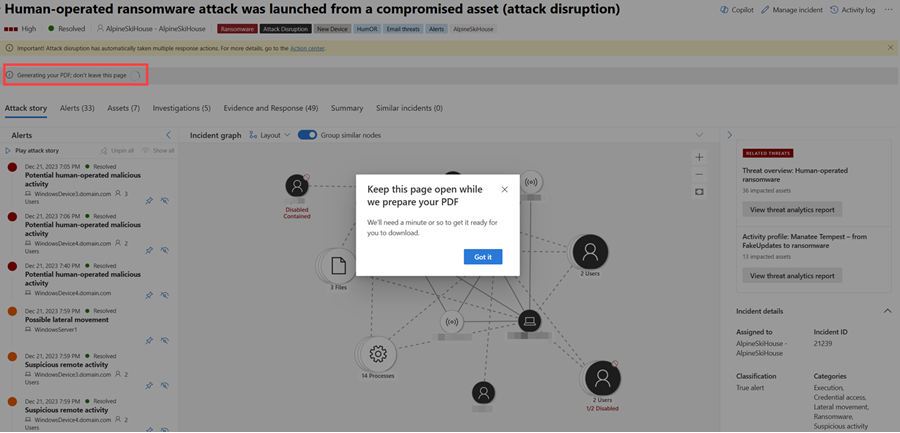
A dialog box appears, indicating that the PDF is being generated. Select Got it to close the dialog box. Additionally, a status message indicating the current state of the download appears below the incident title. The export process may take a few minutes depending on the incident's complexity and the amount of data to be exported.
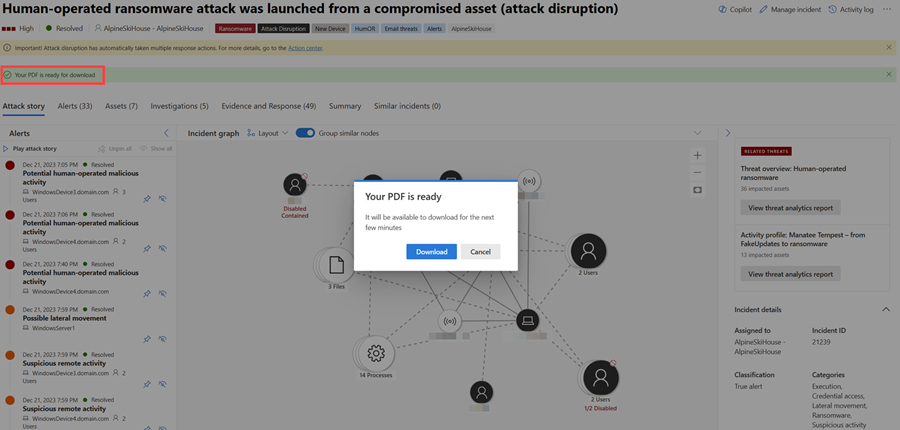
Once the PDF is ready, the status message indicates that the PDF is ready and another dialog box appears. Select Download from the dialog box to save the PDF to your device.


The report is cached for a couple of minutes. The system provides the previously generated PDF if you try to export the same incident again within a short time frame. To generate a newer version of the PDF, wait for a few minutes for the cache to expire.
Next steps
For new incidents, begin your investigation.
For in-process incidents, continue your investigation.
For resolved incidents, perform a post-incident review.
See also
Tip
Do you want to learn more? Engage with the Microsoft Security community in our Tech Community: Microsoft Defender XDR Tech Community.
Feedback
Coming soon: Throughout 2024 we will be phasing out GitHub Issues as the feedback mechanism for content and replacing it with a new feedback system. For more information see: https://aka.ms/ContentUserFeedback.
Submit and view feedback for