Use a prebuilt model to extract information from receipts in Microsoft Syntex
The prebuilt receipts model in Microsoft Syntex analyzes and extracts key information from sales receipts. The API recognizes printed and handwritten receipts and extracts key receipt information, such as merchant name, merchant phone number, transaction date, tax, and transaction total. Receipts can be of various formats and quality including printed and handwritten receipts.
To use a receipts model, follow these steps:
- Step 1: Create a receipts model
- Step 2: Upload an example file to analyze
- Step 3: Select extractors for your model
- Step 4: Apply the model
Step 1: Create a receipts model
Follow the instructions in Create a model in Syntex to create a prebuilt receipts model. Then continue with the following steps to complete your model.
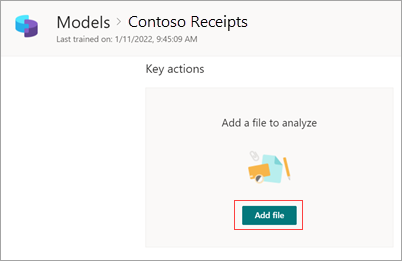
Step 2: Upload an example file to analyze
On the Models page, in the Add a file to analyze section, select Add file.
On the Files to analyze the model page, select Add to find the file you want to use.
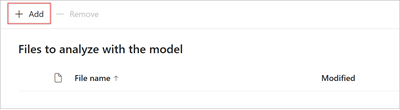
On the Add a file from the training files library page, select the file, and then select Add.

On the Files to analyze the model page, select Next.
Step 3: Select extractors for your model
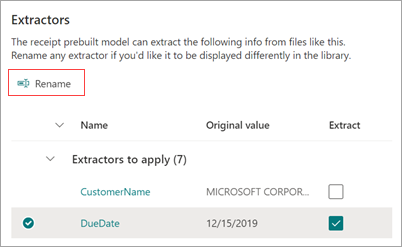
On the extractor details page, you'll see the document area on the right and the Extractors panel on the left. The Extractors panel shows the list of extractors that have been identified in the document.
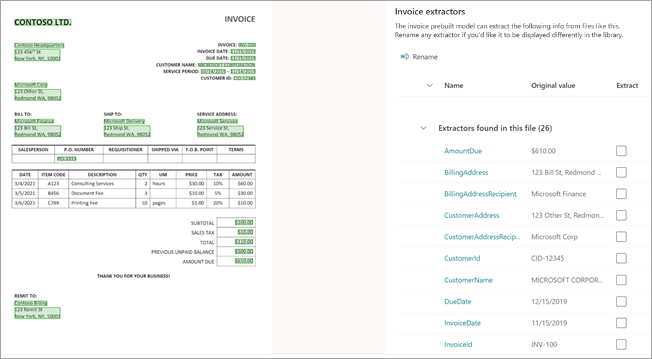
The entity fields that are highlighted in green in the document area are the items that were detected by the model when it analyzed the file. When you select an entity to extract, the highlighted field will change to blue. If you later decide not to include the entity, the highlighted field will change to gray. The highlights make it easier to see the current state of the extractors you have selected.
Tip
You can use the scroll wheel on your mouse or the controls at the bottom of the document area to zoom in or out as needed to read the entity fields.
Select an extractor entity
You can select an extractor either from the document area or from the Extractors panel, depending on your preference.
To select an extractor from the document area, select the entity field.
To select an extractor from the Extractors panel, select the checkbox to the right of the entity name.

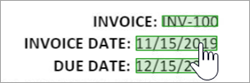
When you select an extractor, a Select extractor? box is displayed in the document area. The box shows the extractor name, the original value, and the option to select it as an extractor. For certain data types such as numbers or dates, it will also show an extracted value.

The original value is what is actually in the document. The extracted value is what will be written into the column in SharePoint. When the model is applied to a library, you can use column formatting to specify how you want it to look in the document.
Continue to select additional extractors you want to you use. You can also add other files to analyze for this model configuration.
Rename an extractor
You can rename an extractor either from the model home page or from the Extractors panel. You might consider renaming selected extractors because these names will be used as the column names when the model is applied to the library.
To rename an extractor from the model home page:
In the Extractors section, select the extractor you want to rename, and then select Rename.
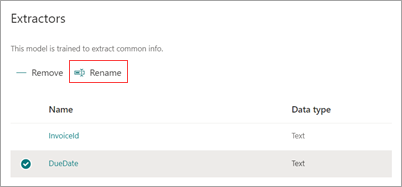
On the Rename entity extractor panel, enter the new name of the extractor, and then select Rename.
To rename an extractor from the Extractors panel:
Select the extractor you want to rename, and then select Rename.
In the Rename extractor box, enter the new name of the extractor, and then select Rename.
Step 4: Apply the model
To save changes and return to the model home page, on the Extractors panel, select Save and exit.
If you're ready to apply the model to a library, in the document area, select Next. On the Add to library panel, choose the library to which you want to add the model, and then select Add.
Feedback
Coming soon: Throughout 2024 we will be phasing out GitHub Issues as the feedback mechanism for content and replacing it with a new feedback system. For more information see: https://aka.ms/ContentUserFeedback.
Submit and view feedback for