It’s common for an app to support multiple scenarios in Microsoft Teams, but you might have designed it with a specific scope and capability in mind. Teams UI helps users to identify the default scope to install your app.
When a user installs an app from Microsoft Teams Store or uploads a custom app, the user has the option to open the app in either personal or shared scope:
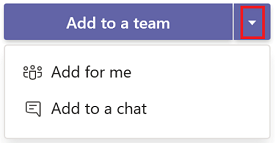
Personal scope: If an app supports personal scope, the Open option in the scope selection dialog allows to open the app in personal scope.
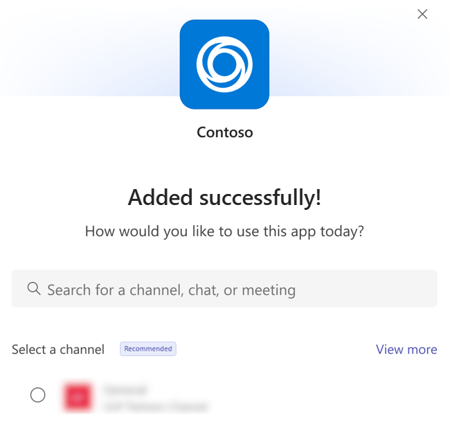
Shared scope: If an app supports shared scopes, all the supported scopes such as channel, chat, and meeting are listed to select the required scope. If your app is configured with a default install scope, a Recommended label appears adjacent to the respective scope.
If your app's primary capability is a bot and intended to work in personal scope, you can set the default capability as bot and also set the default scope as personal.
Configure your app's default install scope
You can use default install scope to specify whether your app is available for personal, channel, chat, or meeting scopes. When you configure the default install scope, you can set only one scope at a time. For more information, see app manifest.
To configure the default install scope in your app manifest:
Open your app manifest and add the defaultInstallScope property.
Set default install scope value as either personal, team, groupChat, or meetings.
JSON
"defaultInstallScope": "meetings",
App install user experience
App installation within the configured default install scope such as personal, channel, chat, or meeting scopes is quick and straightforward. The following procedures outline the user flow for installing an app within the configured scope:
Personal scope only
If an app is configured only with personal scope, here's the user flow to add the app:
Go to Apps
.
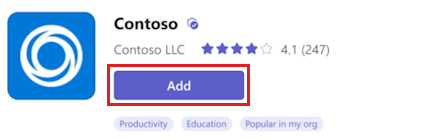
Browse and select the app that you want to install.
In the app details dialog, select Add.
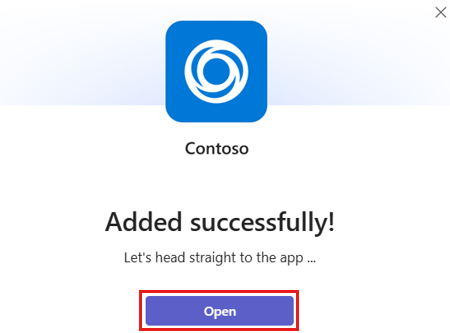
When the app is added, a dialog appears to open the app in personal scope.
Select Open. The app opens in personal scope.
Personal and shared scopes
If an app is configured with personal and shared scopes along with a default install scope, here's the user flow to add the app in the required scope:
Go to Apps
.
Browse and select the app that you want to install.
In the app details dialog, select Add.
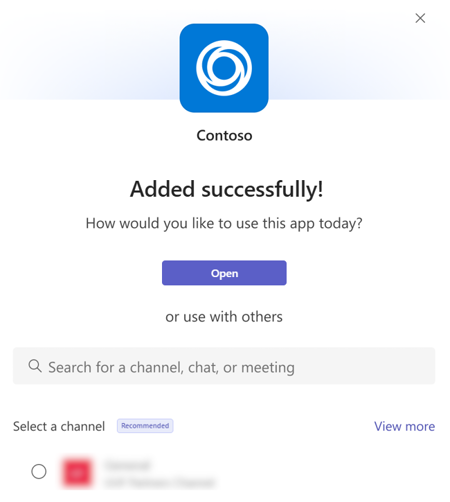
When the app is added, a dialog appears to select the scope.
Select Open to open the app in personal scope.
Alternatively, you can either select from the recommended scope or search and select the required shared scope, and move through the dialog to select Go.
The app opens in the scope that you selected.
Note
The Recommended button indicates the scope in which the app provides best usage experience.
The View more option lists the respective channel, chat, or meeting options available for the user.
Shared scope
If an app is configured with shared scopes along with a default install scope, here's the user flow to add the app in the required scope:
Go to Apps
.
Browse and select the app that you want to install.
In the app details dialog, select Add.
When the app is added, a dialog appears to select the scope.
Select either from the recommended scope or search and select the required shared scope, and move through the dialog to select Go.
The app opens in the scope that you selected.
Configure the default capability for shared scopes
Configure the default capability when your app is installed for a team, meeting, or groupchat. For more information, see app manifest.
Note
defaultGroupCapability provides the default capability that's added to the team, group chat, or meeting. Select a tab, bot, or connector as the default capability for your app, but you must ensure that you have provided the selected capability in your app definition.
To configure details in app manifest:
Open your app manifest and add the defaultGroupCapability property to it.
Set a value of team, groupchat, or meetings.
For the selected group capability, the available group capabilities are bot, tab, or connector.
Note
You can select only one default capability, bot, tab, or connector for the selected group capability.
You can configure the default landing capability for an app that supports both bot and tab capabilities in personal scope. Based on this configuration, the app opens either as a bot or a tab by default.
Bot acts as the default landing capability if its scope is defined as personal, even if you don't specify entityId as conversations in staticTabs property.
The following example demonstrates opening an app with bot as default landing capability and how a user can transition to a tab:
The app opens by default as a tab. A user can transition to the bot using the bot icon available at the top-right corner.
The app opens by default as a tab. A user can transition to the bot using the bot icon available at the top-right corner.
The staticTabs property is also used to pin personal tabs and reorder tabs. For more information, see app manifest.
Block apps by default for users until an admin approves
To enhance the user experience of a Teams app, at times, IT administrators must intervene before users use the app. For example, consider a help desk app created by Contoso Electronics for Teams. To ensure the app functions properly, Contoso Electronics wants customers to configure specific properties of the app first.
To ensure that IT admins perform the relevant tasks, developers can block an app for users until an admin allows the app. To block the app by default, set the defaultBlockUntilAdminAction property to true in the app manifest file. When the property is set to true, the status of the app in Teams admin center is Blocked by publisher in the Manage apps page.
The admins can do their due diligence about your app and they can read the app documentation that you provide before they allow their users to use your app. For example, the admins can purchase the required licenses and distribute the licenses before allowing users to use the app. To allow the app with Blocked by publisher status, an admin can select Allow in the Manage apps page in Teams admin center.
If you don't want your app to be blocked by default, update the defaultBlockUntilAdminAction setting to false and submit your updated app for publishing. After we publish the new version of your app, it's allowed by default.
Note
For custom apps built for your org, defaultBlockUntilAdminAction isn't supported. If you upload a custom app built for your organization with this property, the app isn't blocked.
Code sample
Sample name
Description
.NET
Node.js
Manifest
Hello world
This sample demonstrates how to configure default landing capability for an app that supports both bot and tab capabilities in personal scope.
The source for this content can be found on GitHub, where you can also create and review issues and pull requests. For more information, see our contributor guide.
Platform Docs feedback
Platform Docs is an open source project. Select a link to provide feedback:
Learn about different settings and policies to manage Teams apps, including which apps are allowed to install, which apps are pinned to users' app bar, and whether users can upload custom apps.
Demonstrate skills to plan, deploy, configure, and manage Microsoft Teams to focus on efficient and effective collaboration and communication in a Microsoft 365 environment.
Learn how Teams Administrators can customize your Teams app for their org by changing the app's accent color, description, logo and its outline, and app name.
Learn to publish app to Teams Store or to your org. Understand how app's endpoints comply with your Government Community Cloud (GCC) organization's requirements.
Learn how to create, package, and upload Microsoft Teams app, icons for different Teams capabilities, and ensure your app is running and accessible through HTTPS.