Note
Access to this page requires authorization. You can try signing in or changing directories.
Access to this page requires authorization. You can try changing directories.
Custom Dimensions let your add-on create new spaces outside the Overworld, Nether, and End. In this tutorial, you'll use scripting to register two void dimensions, generate safe landing platforms inside them, and send players there through a custom command and UI menu.
Note
These APIs are currently experimental and are subject to change.
This walkthrough focuses on script-managed destinations such as lobbies, arenas, and minigame rooms. Before you begin, work through the prerequisite tutorials so you're comfortable with behavior-pack structure, script modules, and TypeScript.
This tutorial covers the first set of custom dimension capabilities available to creators. We plan to add more features for creators to use with Custom Dimensions in future updates.
Video version of this article from the Minecraft Creator Channel
Prerequisites
Before going through this tutorial, you should have worked through the following tutorials that this one builds on:
- Getting Started with Add-On Development
- Introduction to Behavior Packs
- Introduction to Scripting
- Next Steps: Scripting with TypeScript
You'll also need Minecraft: Bedrock Edition 1.21.80 or later, a world with the Beta APIs experiment enabled, and a Behavior Pack that can deploy a compiled script into its scripts folder.
Note
A variant of this sample is available on the Minecraft Samples repository at https://github.com/microsoft/minecraft-samples/.
Configure the Behavior Pack
A custom-dimension script still starts as a normal Behavior Pack. The important difference is that the pack must declare a script entry point and opt into the beta server module, because registerCustomDimension is currently exposed through the beta scripting surface.
{
  "format_version": 2,
  "header": {
    "name": "Custom Dimension Pack",
    "min_engine_version": [1, 21, 80]
  },
  "modules": [
    {
      "type": "script",
      "language": "javascript",
      "entry": "scripts/main.js",
      "version": [1, 0, 0],
      "uuid": "..."
    }
  ],
  "dependencies": [
    {
      "module_name": "@minecraft/server",
      "version": "beta"
    },
    {
      "module_name": "@minecraft/server-ui",
      "version": "2.0.0"
    }
  ]
}
The script in the sample pack is written in TypeScript, and compiled into behavior_pack/scripts/main.js before deployment. Whatever build system you use, make sure the compiled file matches the entry value in the manifest.
Register Custom Dimensions during startup
Custom Dimensions must be registered during the startup phase when Minecraft exposes the registries that define new script-driven content. In most situations, that makes system.beforeEvents.startup the natural place to declare your dimension identifiers.
import { system } from "@minecraft/server";

const VOID_ARENA_ID = "custom_dim:void_arena";
const SKY_LOUNGE_ID = "custom_dim:sky_lounge";

system.beforeEvents.startup.subscribe((event) => {
  event.dimensionRegistry.registerCustomDimension(VOID_ARENA_ID);
  event.dimensionRegistry.registerCustomDimension(SKY_LOUNGE_ID);
});
The two registerCustomDimension calls create void-generator dimensions with the identifiers you provide. They do not automatically create a safe spawn location, so you should treat registration as the first step in a larger setup flow.
If you decide to expose those destinations through a command or some other trigger later, keep that work separate from the registration snippet so the dimension setup stays easy to follow.
Tip
Visit the DimensionRegistry API reference documentation for more information.
Build a landing area
Newly registered custom dimensions are empty until you place something inside them. For lobby-style destinations, the simplest approach is to wait until the world loads, force the destination chunks to stay active with a ticking area, and then place the blocks that make up your landing platform.
Store the destination data in a small configuration array, so the script can reuse the same build logic for more than one dimension:
interface PlatformConfig {
  dimensionId: string;
  blockId: string;
  radius: number;
  center: Vector3;
  decor?: boolean;
}

const PLATFORMS: PlatformConfig[] = [
  {
    dimensionId: VOID_ARENA_ID,
    blockId: "minecraft:crimson_nylium",
    radius: 8,
    center: { x: 0, y: 64, z: 0 },
  },
  {
    dimensionId: SKY_LOUNGE_ID,
    blockId: "minecraft:quartz_block",
    radius: 6,
    center: { x: 0, y: 100, z: 0 },
    decor: true,
  },
];
Once the world is ready, the script should loop through the platform definitions and ensure each destination has been prepared:
const builtDimensions = new Set<string>();

world.afterEvents.worldLoad.subscribe(() => {
  for (const platform of PLATFORMS) {
    void ensurePlatformBuilt(platform);
  }
});

async function ensurePlatformBuilt(config: PlatformConfig): Promise<void> {
  if (builtDimensions.has(config.dimensionId)) {
    return;
  }

  const dim = world.getDimension(config.dimensionId);
  const tickingAreaId = `${config.dimensionId}_platform`;

  await world.tickingAreaManager.createTickingArea(tickingAreaId, {
    dimension: dim,
    from: {
      x: config.center.x - config.radius - 2,
      y: config.center.y - 1,
      z: config.center.z - config.radius - 2,
    },
    to: {
      x: config.center.x + config.radius + 2,
      y: config.center.y + 4,
      z: config.center.z + config.radius + 2,
    },
  });

  buildPlatform(dim, config.blockId, config.radius, config.center);
  if (config.decor) {
    buildDecor(dim, config.center);
  }

  world.tickingAreaManager.removeTickingArea(tickingAreaId);
  builtDimensions.add(config.dimensionId);
}
Note
The
awaitoncreateTickingAreais doing the important work here. It guarantees that the destination chunks are loaded before you callgetBlock(...).setPermutation(...). Without that step, your script can try to place blocks into a part of the world that is not ready yet.The actual platform builder can be surprisingly simple. The sample resolves a block permutation once, fills a square floor, and then adds glass rails and optional glowstone decorations:
function buildPlatform(dim: Dimension, blockId: string, radius: number, center: Vector3) {
  const perm = BlockPermutation.resolve(blockId);

  for (let x = -radius; x <= radius; x++) {
    for (let z = -radius; z <= radius; z++) {
      dim.getBlock({ x: center.x + x, y: center.y, z: center.z + z })?.setPermutation(perm);
    }
  }
}
You can extend this same pattern to place spawn pads, command blocks, markers, or structure templates. The important habit is to build the destination only after the chunks are active, and to remove the temporary ticking area once setup is complete.
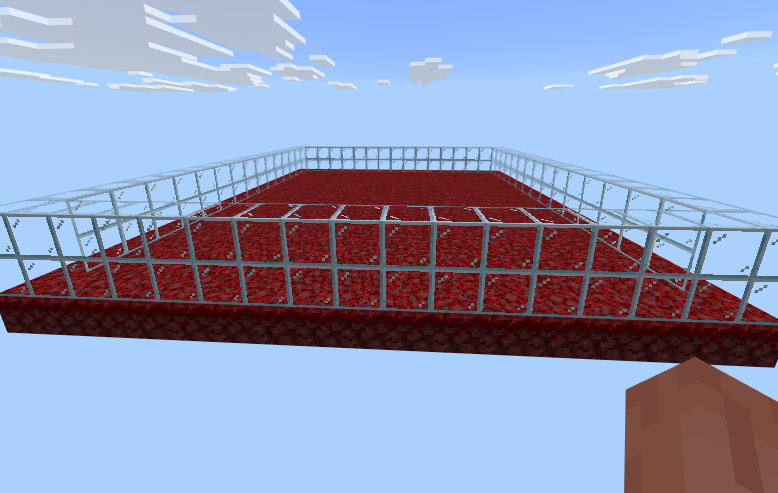
Once the script finishes building the destinations, the Void Arena should look similar to what you see below!
Send players to the Void
After the dimensions exist and the landing area is ready, all you need is a travel flow to get players to and from the Void. The sample uses ActionFormData to let players pick a destination, then treats the dimension differently from the vanilla ones to guarantee the arrival chunks are loaded before teleporting.
The menu itself can stay lightweight:
- Create the form.
- Add a button for each option.
- Ignore canceled selections.
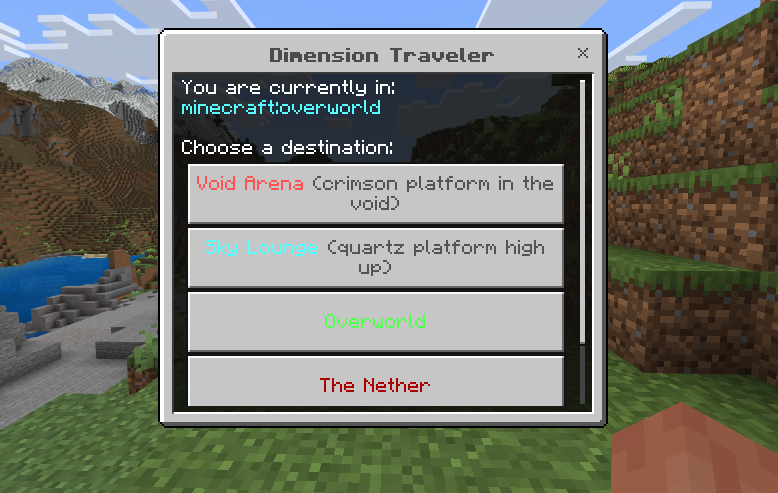
interface DimensionOption {
  label: string;
  id: string;
  spawn: Vector3;
}

const DIMENSIONS: DimensionOption[] = [
  { label: "Void Arena", id: VOID_ARENA_ID, spawn: { x: 0, y: 66, z: 0 } },
  { label: "Sky Lounge", id: SKY_LOUNGE_ID, spawn: { x: 0, y: 102, z: 0 } },
  { label: "Overworld", id: "minecraft:overworld", spawn: { x: 0, y: 64, z: 0 } },
];
In-game, the travel UI should look something like this:
What matters next is the handoff into a helper that knows how to prepare the destination:
async function teleportToCustomDimension(player: Player, destination: DimensionOption) {
  const dim = world.getDimension(destination.id);
  const tickingAreaId = `${destination.id}_teleport`;

  await world.tickingAreaManager.createTickingArea(tickingAreaId, {
    dimension: dim,
    from: { x: destination.spawn.x - 4, y: destination.spawn.y - 4, z: destination.spawn.z - 4 },
    to: { x: destination.spawn.x + 4, y: destination.spawn.y + 4, z: destination.spawn.z + 4 },
  });

  const config = PLATFORMS.find((platform) => platform.dimensionId === destination.id);
  if (config) {
    await ensurePlatformBuilt(config);
  }

  player.teleport(destination.spawn, { dimension: dim });
  world.tickingAreaManager.removeTickingArea(tickingAreaId);
}
This pattern solves two problems at once. First, it keeps the arrival area loaded until the teleport completes. Second, it lets you lazily rebuild or verify the platform right before the player arrives, which is useful if your script can reset arenas or rotate destinations between matches.
If you want to support both vanilla and Custom Dimensions in one menu, check the selected destination before teleporting. Vanilla destinations can usually call player.teleport(...) immediately, while custom destinations benefit from the extra ticking-area step.
Test the Behavior Pack
Once the pack is deployed, test it in a world instead of assuming registration worked.
Build and deploy the Behavior Pack so the compiled script is copied into the pack's
scriptsfolder.Launch Minecraft: Bedrock Edition 1.21.80 or later and create or open a world with the Beta APIs experiment enabled.
Activate the Behavior Pack on the world and enter the game.
Run
/custom_dim:dimensionsto open the travel menu.Choose Void Arena and verify that you land on a crimson nylium platform with glass rails around the edge.
Choose Sky Lounge and verify that you land on a quartz platform with glowstone corner lights.
Return to the Overworld and confirm that vanilla destinations still work from the same menu.
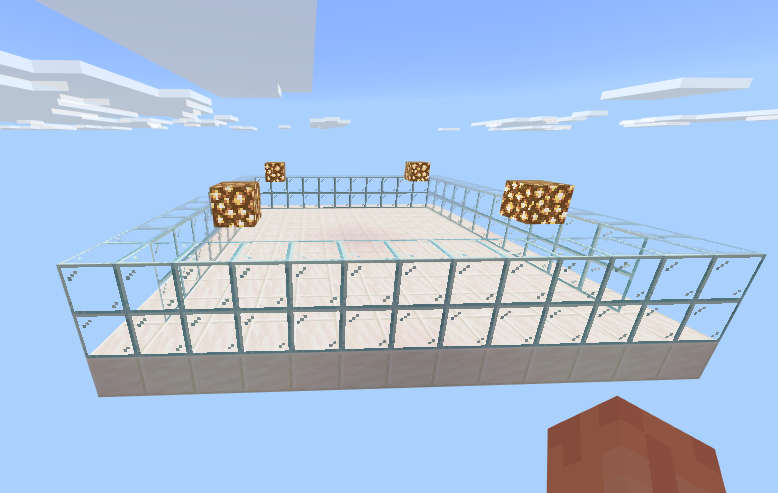
The decorated Sky Lounge destination should look similar to this once the teleport completes:
If the command does not appear or the teleport fails, check the Behavior Pack manifest first. A missing script entry, missing @minecraft/server beta dependency, or a world without Beta APIs enabled will prevent the tutorial sample from working correctly.
Putting it all together
The earlier sections isolate the dimension-specific ideas so each step is easier to follow. When you are ready to assemble the full sample, the deployed main.js brings the dimension registration, platform generation, and optional travel UI together in one script.
The example below matches the behavior-pack script for our sample, with the source map footer omitted for readability.
// src/main.ts
import {
  world,
  system,
  Player,
  BlockPermutation,
  CustomCommandStatus,
  CommandPermissionLevel
} from "@minecraft/server";
import { ActionFormData } from "@minecraft/server-ui";

// Formatting codes make the menu labels and status messages easier to scan in game.
var Color = {
  red: "\xA7c",
  aqua: "\xA7b",
  green: "\xA7a",
  darkRed: "\xA74",
  purple: "\xA75",
  yellow: "\xA7e",
  gray: "\xA77",
  darkGray: "\xA78",
  bold: "\xA7l",
  reset: "\xA7r"
};

// These IDs are the two custom destinations this pack creates.
var VOID_ARENA_ID = "custom_dim:void_arena";
var SKY_LOUNGE_ID = "custom_dim:sky_lounge";

// Register Custom Dimensions during startup, before the world begins normal play.
system.beforeEvents.startup.subscribe((event) => {
  event.dimensionRegistry.registerCustomDimension(VOID_ARENA_ID);
  event.dimensionRegistry.registerCustomDimension(SKY_LOUNGE_ID);

  // Optional: expose the travel flow through a custom command.
  event.customCommandRegistry.registerCommand(
    {
      name: "custom_dim:dimensions",
      description: "Open the dimension travel menu",
      permissionLevel: CommandPermissionLevel.Any,
      cheatsRequired: false
    },
    (origin) => {
      const player = origin.sourceEntity;
      if (!player || !(player instanceof Player)) {
        return {
          status: CustomCommandStatus.Failure,
          message: "This command can only be used by a player."
        };
      }

      system.run(() => showDimensionMenu(player));
      return { status: CustomCommandStatus.Success };
    }
  );
});

// Store the build settings for each scripted destination in one place.
var PLATFORMS = [
  {
    dimensionId: VOID_ARENA_ID,
    blockId: "minecraft:crimson_nylium",
    radius: 8,
    center: { x: 0, y: 64, z: 0 }
  },
  {
    dimensionId: SKY_LOUNGE_ID,
    blockId: "minecraft:quartz_block",
    radius: 6,
    center: { x: 0, y: 100, z: 0 },
    decor: true
  }
];

// Track which Custom Dimensions have already been initialized.
var builtDimensions = new Set();

// Once the world is loaded, make sure each custom destination has a platform.
world.afterEvents.worldLoad.subscribe(() => {
  world.sendMessage(`${Color.green}Custom Dimension Pack loaded! Use ${Color.yellow}/custom_dim:dimensions${Color.green} to travel.`);

  for (const platform of PLATFORMS) {
    ensurePlatformBuilt(platform);
  }
});

async function ensurePlatformBuilt(config) {
  if (builtDimensions.has(config.dimensionId)) {
    return;
  }

  const dim = world.getDimension(config.dimensionId);
  const tickingAreaId = `${config.dimensionId}_platform`;
  const margin = 2;

  // Keep the destination chunks active before trying to place blocks.
  await world.tickingAreaManager.createTickingArea(tickingAreaId, {
    dimension: dim,
    from: {
      x: config.center.x - config.radius - margin,
      y: config.center.y - 1,
      z: config.center.z - config.radius - margin
    },
    to: {
      x: config.center.x + config.radius + margin,
      y: config.center.y + 4,
      z: config.center.z + config.radius + margin
    }
  });

  buildPlatform(dim, config.blockId, config.radius, config.center);
  if (config.decor) {
    buildDecor(dim, config.center);
  }

  // Clean up the temporary ticking area once the destination is ready.
  world.tickingAreaManager.removeTickingArea(tickingAreaId);
  builtDimensions.add(config.dimensionId);
}

// Build the floor first, then add simple glass rails around the edges.
function buildPlatform(dim, blockId, radius, center) {
  const perm = BlockPermutation.resolve(blockId);

  for (let x = -radius; x <= radius; x++) {
    for (let z = -radius; z <= radius; z++) {
      dim.getBlock({ x: center.x + x, y: center.y, z: center.z + z })?.setPermutation(perm);
    }
  }

  const glass = BlockPermutation.resolve("minecraft:glass");
  for (let i = -radius; i <= radius; i++) {
    for (let y = 1; y <= 2; y++) {
      dim.getBlock({ x: center.x + i, y: center.y + y, z: center.z - radius })?.setPermutation(glass);
      dim.getBlock({ x: center.x + i, y: center.y + y, z: center.z + radius })?.setPermutation(glass);
      dim.getBlock({ x: center.x - radius, y: center.y + y, z: center.z + i })?.setPermutation(glass);
      dim.getBlock({ x: center.x + radius, y: center.y + y, z: center.z + i })?.setPermutation(glass);
    }
  }
}

// Add a little extra lighting to the decorated destination.
function buildDecor(dim, center) {
  const offsets = [-4, 4];
  const glowstone = BlockPermutation.resolve("minecraft:glowstone");

  for (const ox of offsets) {
    for (const oz of offsets) {
      dim.getBlock({ x: center.x + ox, y: center.y + 3, z: center.z + oz })?.setPermutation(glowstone);
    }
  }
}

// The menu includes both custom destinations and the vanilla dimensions.
var DIMENSIONS = [
  {
    label: `${Color.red}Void Arena ${Color.darkGray}(crimson platform in the void)${Color.reset}`,
    id: VOID_ARENA_ID,
    spawn: { x: 0, y: 66, z: 0 }
  },
  {
    label: `${Color.aqua}Sky Lounge ${Color.darkGray}(quartz platform high up)${Color.reset}`,
    id: SKY_LOUNGE_ID,
    spawn: { x: 0, y: 102, z: 0 }
  },
  {
    label: `${Color.green}Overworld${Color.reset}`,
    id: "minecraft:overworld",
    spawn: { x: 0, y: 64, z: 0 }
  },
  {
    label: `${Color.darkRed}The Nether${Color.reset}`,
    id: "minecraft:nether",
    spawn: { x: 0, y: 64, z: 0 }
  },
  {
    label: `${Color.purple}The End${Color.reset}`,
    id: "minecraft:the_end",
    spawn: { x: 0, y: 64, z: 0 }
  }
];

// Show a simple UI so players can pick where they want to go.
function showDimensionMenu(player) {
  const form = new ActionFormData()
    .title(`${Color.bold}Dimension Traveler`)
    .body(`You are currently in: ${Color.aqua}${player.dimension.id}\n\n${Color.reset}Choose a destination:`);

  for (const dim of DIMENSIONS) {
    form.button(dim.label);
  }

  form.show(player).then((response) => {
    if (response.canceled || response.selection === void 0) {
      return;
    }

    const selected = DIMENSIONS[response.selection];
    if (selected.id === player.dimension.id) {
      player.sendMessage(`${Color.yellow}You are already in that dimension!`);
      return;
    }

    const isCustom = PLATFORMS.some((platform) => platform.dimensionId === selected.id);
    if (isCustom) {
      teleportToCustomDimension(player, selected);
    } else {
      system.run(() => {
        player.teleport(selected.spawn, { dimension: world.getDimension(selected.id) });
        player.sendMessage(`${Color.green}Teleported to ${selected.label}${Color.green}!`);
      });
    }
  });
}

// Custom Dimensions need a loaded arrival area before the player is moved.
async function teleportToCustomDimension(player, destination) {
  const dim = world.getDimension(destination.id);
  const tickingAreaId = `${destination.id}_teleport`;
  const spawn = destination.spawn;

  player.sendMessage(`${Color.yellow}Loading ${destination.label}${Color.yellow}...`);

  // Preload the area around the destination spawn point.
  await world.tickingAreaManager.createTickingArea(tickingAreaId, {
    dimension: dim,
    from: { x: spawn.x - 4, y: spawn.y - 4, z: spawn.z - 4 },
    to: { x: spawn.x + 4, y: spawn.y + 4, z: spawn.z + 4 }
  });

  const config = PLATFORMS.find((platform) => platform.dimensionId === destination.id);
  if (config) {
    await ensurePlatformBuilt(config);
  }

  player.teleport(spawn, { dimension: dim });
  player.sendMessage(`${Color.green}Teleported to ${destination.label}${Color.green}!`);

  world.tickingAreaManager.removeTickingArea(tickingAreaId);
}
What's Next?
Scripted Custom Dimensions are a good fit for controlled destinations such as minigame arenas, instanced lobbies, and testing spaces. If you want to expand this pattern, the next step is usually to add richer script systems around the destination, or to move deeper into world-generation systems that shape the space itself. Check out these documents for more information on custom scripting for your worlds.