Events
Power BI DataViz World Championships
Feb 14, 4 PM - Mar 31, 4 PM
With 4 chances to enter, you could win a conference package and make it to the LIVE Grand Finale in Las Vegas
Learn moreThis browser is no longer supported.
Upgrade to Microsoft Edge to take advantage of the latest features, security updates, and technical support.
Important
As of August 2022, you can no longer create or manage business process flows from Power Automate outside of the solution explorer. Business process flows and instances continue to be supported through the solution explorer, Power Apps, and Dataverse table views.
This article shows you how to create a business process flow with Power Apps. To learn more about the benefits of using business process flows, go to Business process flows overview. For information on how to create mobile task flows, go to Create a mobile task flow.
When a user starts a business process flow, the stages and steps of the process display in the process bar at the top of a form.

Tip
After you create a business process flow definition, you can control who can create, read, update, or delete the business process flow instance. For example, for service-related processes, provide full access for customer service reps to change the business process flow instance, but provide read-only access for sales reps to monitor post-sales activities for their customers. To set security for a business process flow definition that you create, select Enable Security Roles on the action bar.
In Power Apps or Power Automate, select Solutions from the navigation bar on the left.
Select or create a solution to use for the business process flow.
Within the solution, select New > Automation > Process > Business process flow.
The new business process flow is created. You can now edit it with a first single stage created for you.

Add stages. If your users progress from one business stage to another in the process:
Drag a Stage component from the Components tab and drop it on a + sign in the designer.

To set the properties for a stage, select the stage, and then set the properties in the Properties tab on the right side of the screen:
Enter a display name.
If desired, select a category for the stage. The category (such as Qualify or Develop), appears as a chevron in the process bar.
![]()
When you're done changing properties, select the Apply button.
Add steps to a stage. To see the steps in a stage, select Details in the lower-right corner of the stage. To add more steps:
Drag the Step component to the stage from the Components tab.

Select the step, and then set properties in the Properties tab:
Note
Add a branch (condition) to the process. To add a branching condition:
Drag the Condition component from the Components tab to a + sign between two stages.

Select the condition, and then set properties in the Properties tab. For more information on branching properties, go to Enhance business process flows with branching. When you're finished setting properties for the condition, select Apply.
Add a workflow. To invoke a workflow:
Drag a Workflow component from the Components tab to a stage or the Global Workflow item in the designer. Where you add it depends on these conditions:
Select the workflow, and then set properties in the Properties tab:
For more information on workflows, go to Workflow processes.
To validate the business process flow, select Validate on the action bar.
To save the process as a draft while you continue to work on it, select Save in the action bar.
Important
As long as a process is a draft, people aren't able to use it.
To activate the process and make it available to your team, select Activate on the action bar.
To provide control over who can create, read, update, or delete the business process flow instance, select Edit Security Roles on the command bar of the designer. For example, for service-related processes, provide full access for customer service reps to change the business process flow instance, and read-only access for sales reps to monitor post-sales activities for their customers.
In the Security Roles screen, select the name of a role to open the security role information page. Select the Business Process Flows tab, and then assign appropriate privileges on the business process flow for a security role.
Note
The System Administrator and System Customizer security roles have access to new business process flows by default.
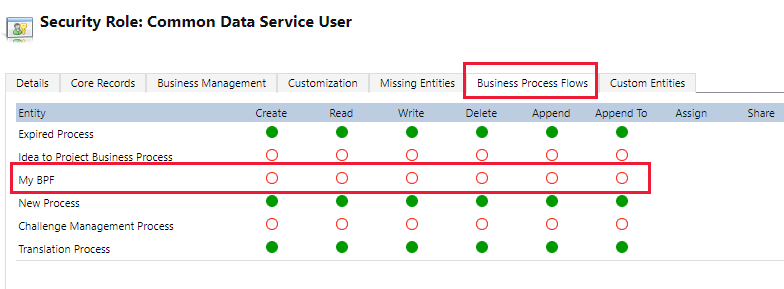
Specify privileges by selecting the appropriate radio buttons, and select Save. For more information about privileges, go to Business process flow privileges.
Next, don't forget to assign the security role to appropriate users in your organization.
Tip
Here are a few tips to keep in mind as you work on your task flow in the designer window:
Consider these points when designing business process flows with branches:
A process can span a maximum of five unique tables.
Use a maximum of 30 stages per process and 30 steps per stage.
Each branch can be no more than 10 levels deep.
Branching rules must be based on the steps in the preceding stage.
You can combine multiple conditions in a rule by using the AND operator or the OR operator, but not both operators.
When defining a process flow, optionally select a table relationship. This relationship must be a 1:N (One-to-Many) relationship.
Multiple active processes can run concurrently on the same record.
Rearrange tiles (stages, steps, conditions) on the process flow by dragging and dropping.
When merging branches using the connector command, all peer branches must merge to a single stage. Peer branches must merge to a single stage or end the process. A peer branch can't merge with other branches and end the process at the same time.
You can revisit a table used in the process multiple times (multiple closed entity loops).
A process can return to the previous stage regardless of the table type.
For example, if the active stage is Deliver Quote on a quote record, users can move the active stage back to the Propose stage on an opportunity record.
In another example, suppose a process is in the Present Proposal stage in your process flow: Qualify Lead > Identify Needs > Create Proposal > Present Proposal > Close. If the proposal requires more research to identify customer needs, users can select the Identify Needs stage of your process and choose Set Active.
To edit a business process flow, open the solution explorer, select Processes, and then select the Business Process Flow from the list of processes that you want to edit.
Select the business process flow you want to edit from the list of processes. It opens in the designer, where you can make updates. Expand Details under the name of the process to rename it or add a description, and view additional information.

Edit Stages
Business process flows can have up to 30 stages.
You can add or change the following properties of a stage:
Stage Name
Table. You can change the table for any stage except the first one.
Stage Category. A category lets you group stages by a type of action. It's useful for reports that group rows by the stage they are in. The options for the stage category come from the Stage Category global choice. You can add more options to this global choice and change the labels of existing options if you want. You can also delete these options if you wish, but we recommend that you keep the existing options. You can't add the exact same option back if you delete it. If you don’t want them to be used, change the label to ”Do not use”.
Relationship. Enter a relationship when the preceding stage in the process is based on a different table. For the stage currently being defined, choose Select relationships to identify a relationship to use when moving between the two stages. Select a relationship for the following benefits:
Relationships often have column maps defined that automatically carry over data between rows, minimizing data entry.
When you select Next stage on the process bar for a row, any rows that use the relationship are listed in the process flow, promoting reuse of rows in the process. In addition, you can use workflows to automate creation of rows so that the user simply selects it instead of creating one to further streamline the process.
Edit Steps
Each stage can have up to 30 steps.
Add branch
To learn about adding a branch to a stage, go to Enhance business process flows with branching.
To make a business process flow available for people to use, you must order the process flow, enable security roles, and activate it.
Set Process Flow Order
When you have more than one business process flow for a table (row type), you need to set which process is automatically assigned to new rows. In the command bar, select Order Process Flow. For new rows or rows that don't already have a process flow associated with them, the first business process flow that a user has access to is used.
Enable Security Roles
Users have access to a business process flow depending on the privilege defined on the business process flow in the security role assigned to the user.
By default, only the System Administrator and System Customizer security roles can view a new business process flow.
To specify privileges on a business process flow, open the business process flow for edit, and then select Edit Security Roles on the command bar of the business process flow designer. See step 13 under Create a business process flow listed earlier in this article.
Activate
Before anyone can use the business process flow, you must activate it. In the command bar, select Activate. After you confirm the activation, the business process flow is ready to use. If a business process flow has errors, you can't activate it until the errors are corrected.
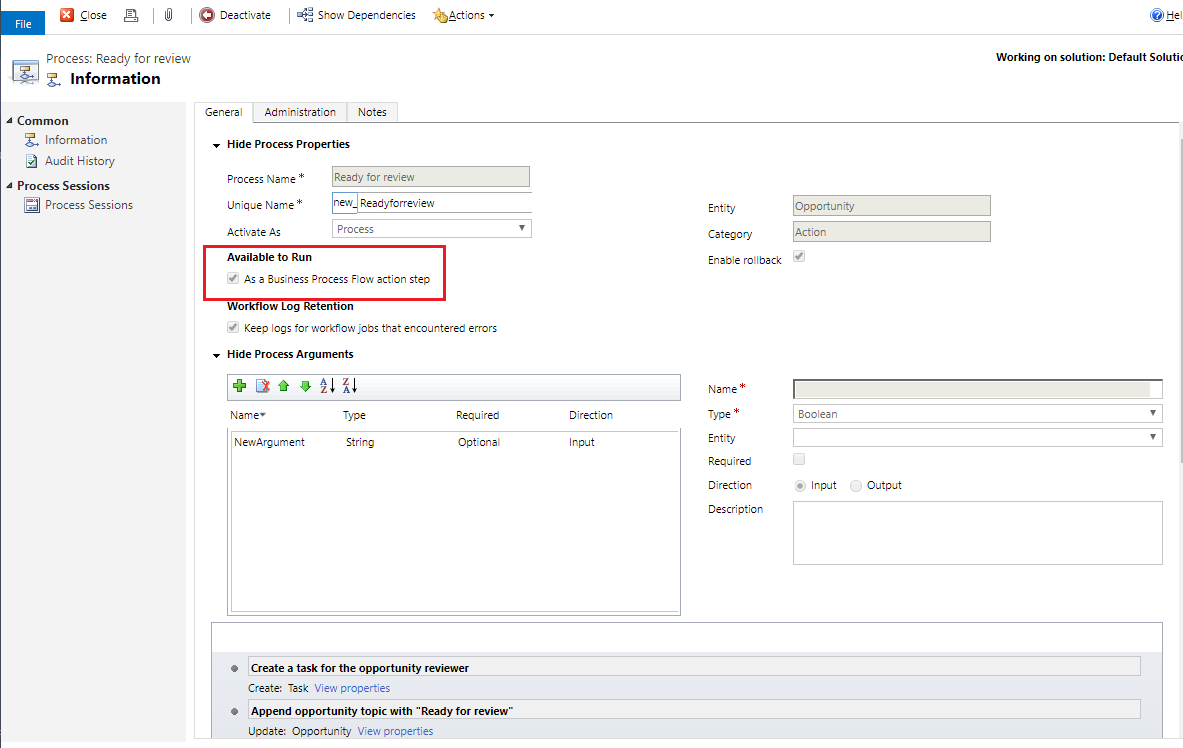
The Dynamics 365 (online), version 9.0 update introduces a business process flow feature: business process flow automation with Action Steps. You can add a button to a business process flow that triggers an action or workflow.
As part of the opportunity qualification process, Contoso requires a designated reviewer to review all opportunities. Later Contoso created an action that:
Additionally, Contoso needs to be able to run these actions on demand. To integrate these tasks into the opportunity qualification process, the actions must appear on the opportunity business process flow. To enable this functionality, select As a Business Process Flow action step.
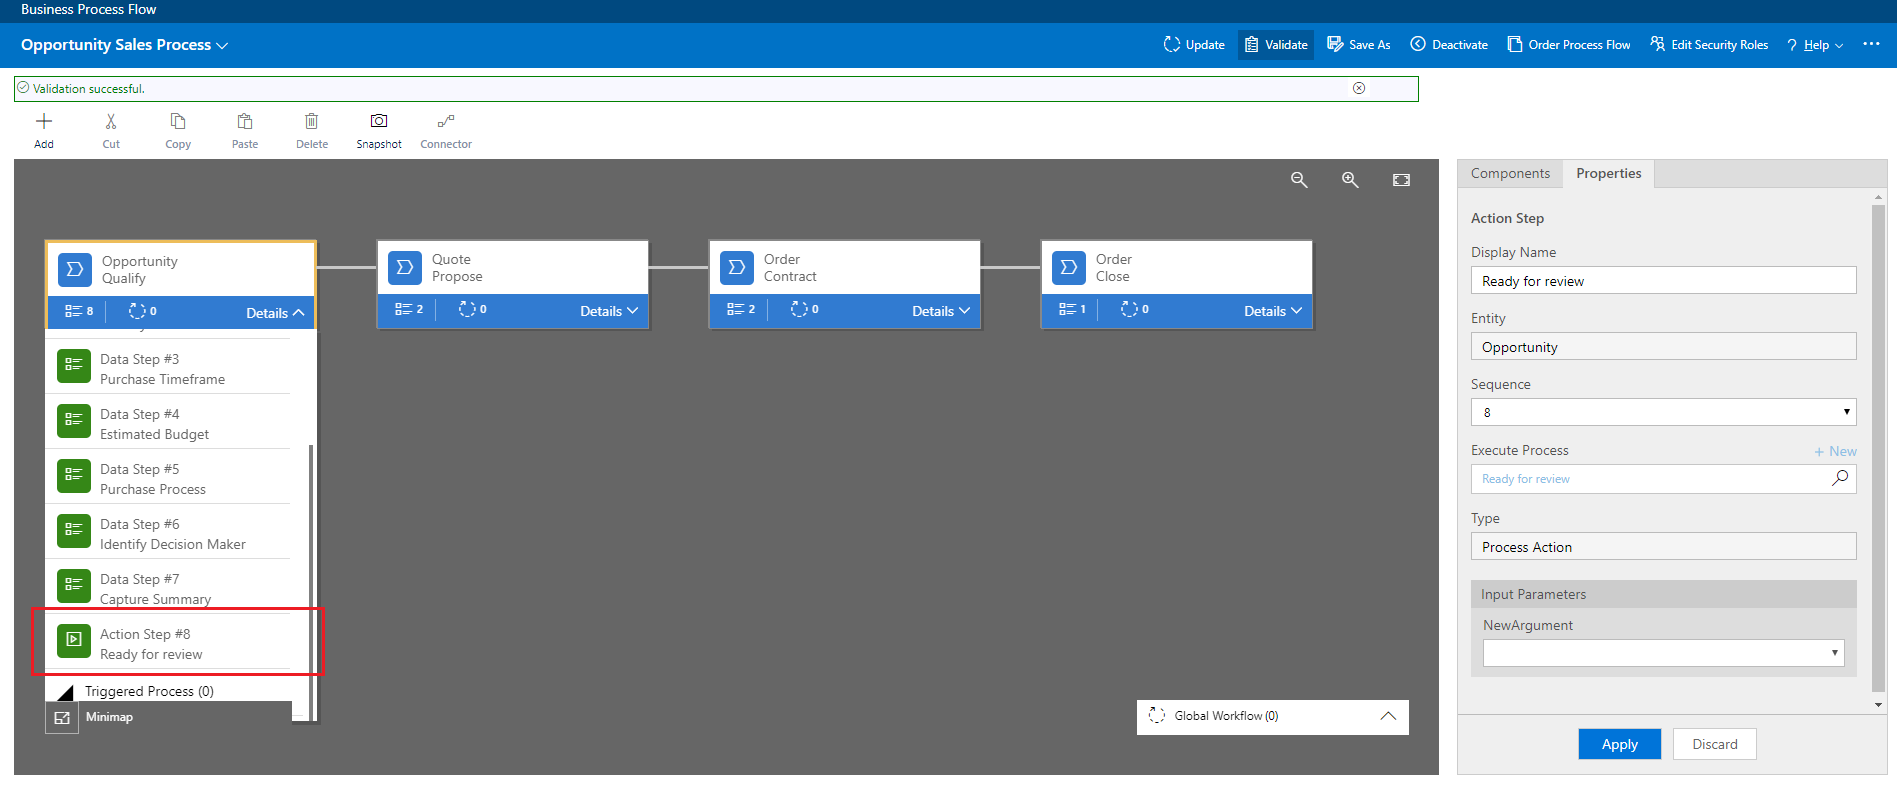
Next, the Action Step is added to Contoso’s opportunity business process flow. Then the process flow is validated and updated.
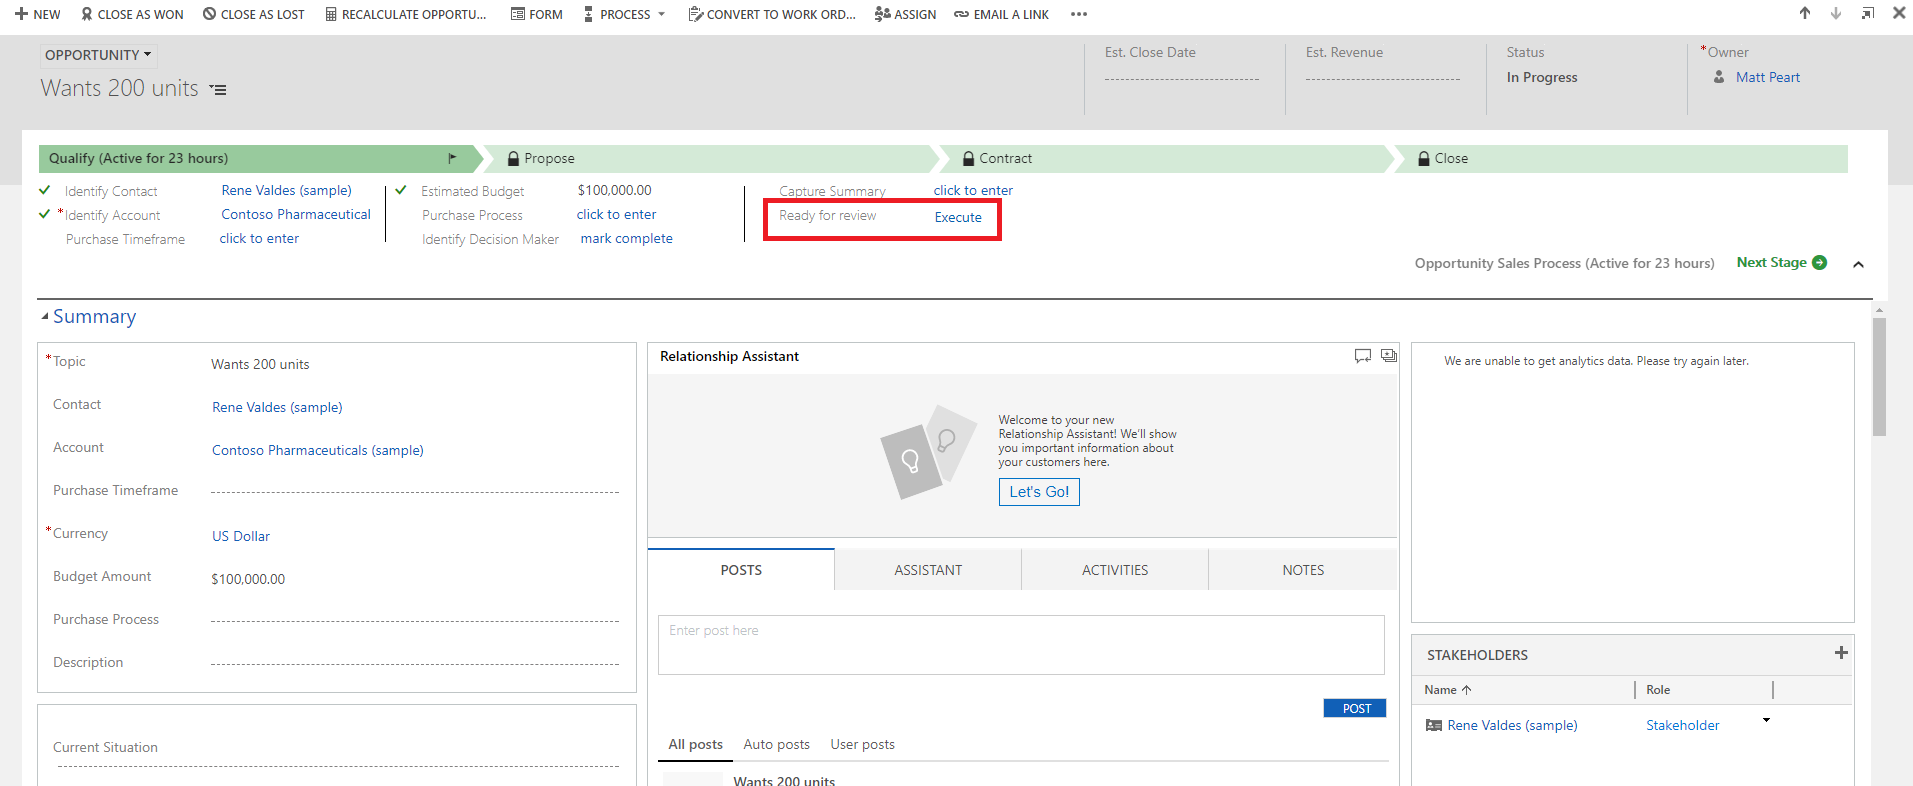
Now, members of Contoso’s salesforce can kick off the action from the Opportunity Qualify business process step, on demand, by selecting Execute.
Important
When you need to see the list of business process flows in which you're involved, check out the unified action center.


In the unified action center, you see all business processes in which you're assigned at least one Microsoft Dataverse table row that the process uses. For example, if a business process uses the Lead and Opportunity tables in Dataverse, you see all instances of this process where either the Lead or the Opportunity row is assigned to you.
View all instances that are currently being worked under the Active tab. From this tab, you can view the following details:
Select an instance to open it in a new tab, or select it to copy a link, share a link via email, abandon, or delete the instance.
Events
Power BI DataViz World Championships
Feb 14, 4 PM - Mar 31, 4 PM
With 4 chances to enter, you could win a conference package and make it to the LIVE Grand Finale in Las Vegas
Learn moreTraining
Learning path
Automate a business process using Power Automate - Training
This learning path introduces you to Power Automate, teaches you how to build workflows, and how to administer flows.
Certification
Microsoft Certified: Power Platform Functional Consultant Associate - Certifications
Demonstrate the use of Microsoft Power Platform solutions to simplify, automate, and empower business processes for organizations in the role of a Functional Consultant.
Documentation
Business process flows overview - Power Automate
Get an overview of business process flows in Power Automate.
Enhance business process flows with branching with Power Apps - Power Automate
Learn how to use branching in a business process flow
Best practices for using business process flow table columns - Power Automate
Learn the best practices for using business process flow table columns.