Automate Java applications
Currently, Power Automate for desktop supports the use of UI automation in all Java apps and applets for the following Java versions:
- Java apps: Java version 7 and above.
- Java applets: Java version 7 and version 8.
The following sections include information for enabling the UI automation in Java applets.
Installing Java configuration
In order to automate Java applications, particular settings must be in place.
To install the Java configuration manually, after Power Automate for desktop has been installed, navigate to the installation folder (C:\Program Files (x86)\Power Automate Desktop) and run the PAD.Java.Installer.exe as an administrator.
Logs for Java automation with Power Automate for desktop can be found in the %temp%/ java_automation_log folder (for example, C:\Users\username\AppData\Local\Temp\java_automation_log).
Utilization of the default UI automation instead of Java UI automation
Το prevent the recorder and the UI element picker from recognizing Java elements built with the SWT framework and make them work with the default desktop UI elements:
- Edit the configuration file located under the machine’s Program Files: Power Automate Desktop\Microsoft.Flow.RPA.Desktop.UIAutomation.Plugin.Java.dll.config.
- Set the BlockSwt property to true.
Uninstalling Java configuration
To uninstall the Java configuration (revert all changes applied to the machine by the Java installer):
Launch the Command Line tool (cmd)
Run the following command:
PAD.Java.Installer.exe -u
Troubleshooting
If you come across any issues while automating Java applications:
Make sure that you have Java installed on your machine:
Open the Command Line tool (cmd) and run the following command:
java –versionIf Java isn't installed on your machine, you'll receive an error message similar to: 'java' is not recognized as an internal or external command, operable program or batch file.
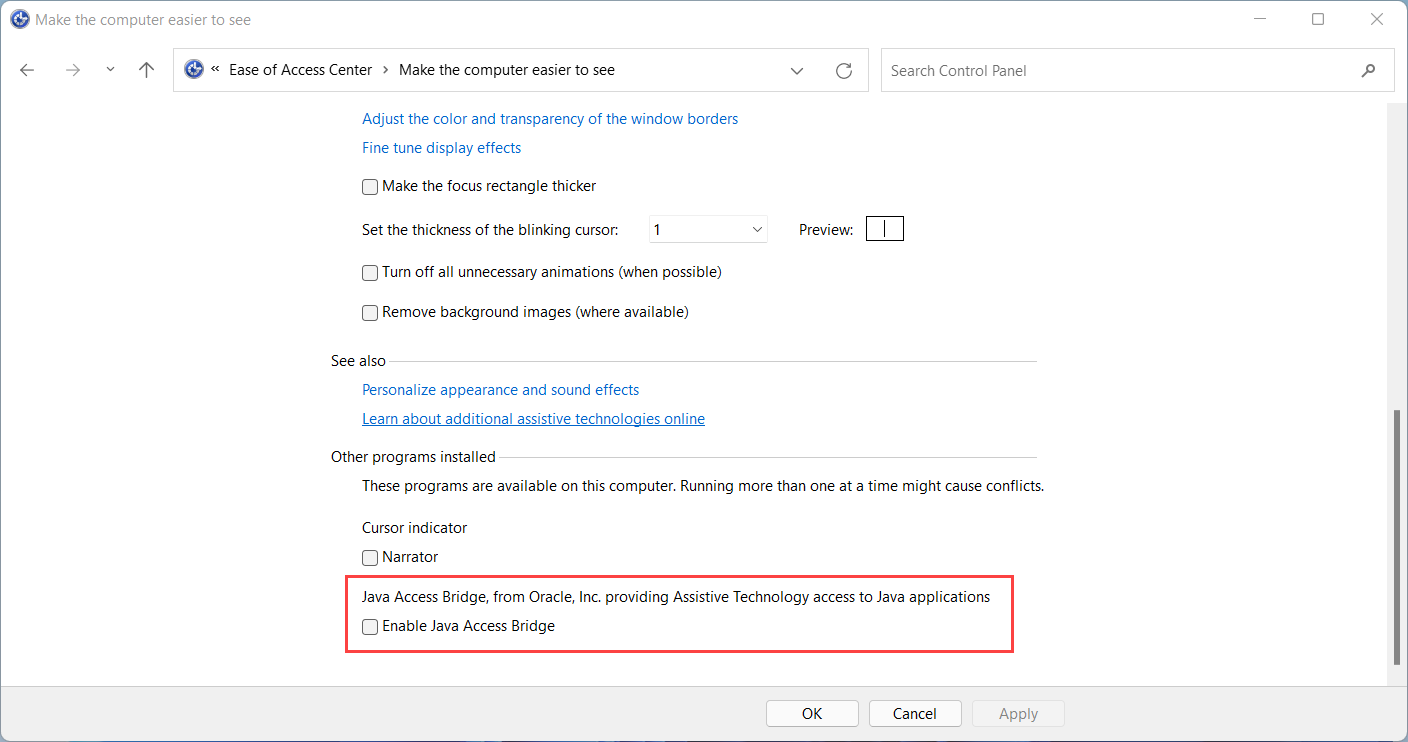
The Java Access Bridge option from the Control Panel should be disabled:
Navigate to Control Panel -> Ease of Access -> Optimize visual display -> Java Access Bridge from Oracle, Inc. Providing Assistive Technology access to Java applications and disable (uncheck) the Enable Java Access Bridge option.
Specific files have to exist in the Java folder(s) of the machine after the Power Automate for desktop installation.
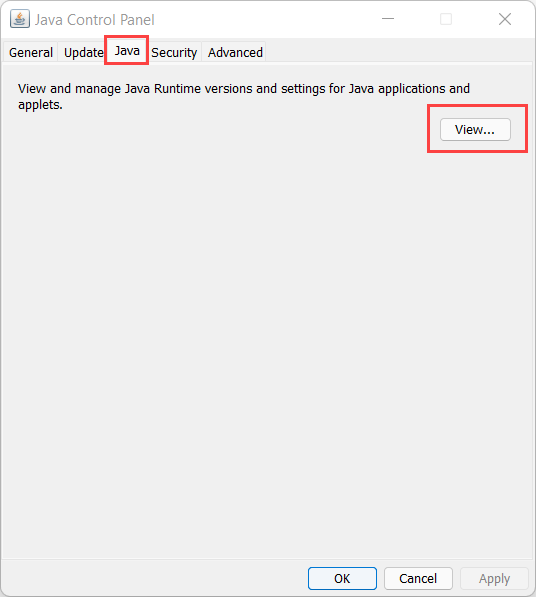
To check the installed Java version and installation path on your machine:
Type Configure Java in the Search bar of Windows
Launch the Java Control Panel
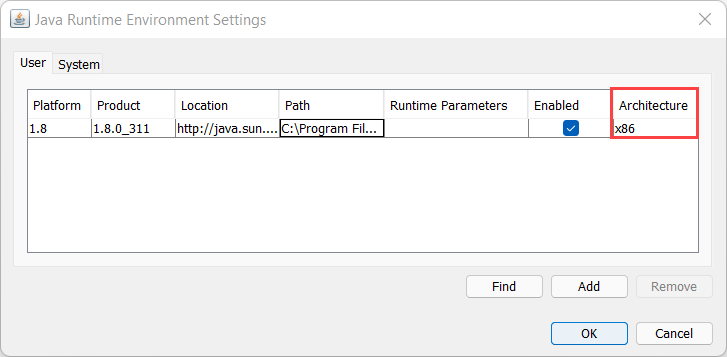
Navigate to the Java tab and select View
Check the values in the Path column. The row with Architecture equal to x86 refers to a 32-bit Java installation, while the row with value x86x64 refers to a 64-bit Java installation.
Additionally, you can check the following files:
For 64-bit Java installation:
File Microsoft.Flow.RPA.Desktop.UIAutomation.Java.Bridge.Native.dll should have been replaced in the folder C:\Program Files\Java\jre1.8.0_271\bin. (jre1.8.0_271 could be replaced with your machine’s Java installation)
File accessibility.properties should have been replaced in the folder C:\Program Files\Java\jre1.8.0_271\lib. (jre1.8.0_271 could be replaced with your machine’s Java installation)
If you edit the file with a notepad, it should have the following value: assistive_technologies=com.sun.java.accessibility.AccessBridge, microsoft.flows.rpa.desktop.uiautomation.JavaBridge
File PAD.JavaBridge.jar should have been inserted in the folder C:\Program Files\Java\jre1.8.0_271\lib\ext. (jre1.8.0_271 could be replaced with your machine’s Java installation)
For 32-bit Java installation:
- Same actions for the same files as above but in the folder path C:\Program Files (x86) \Java\….
Make sure that there isn't an .accessibility.properties file present in your user folder. Check if a file named .accessibility.properties is present in the C:\Users\user folder. If yes, then rename it.
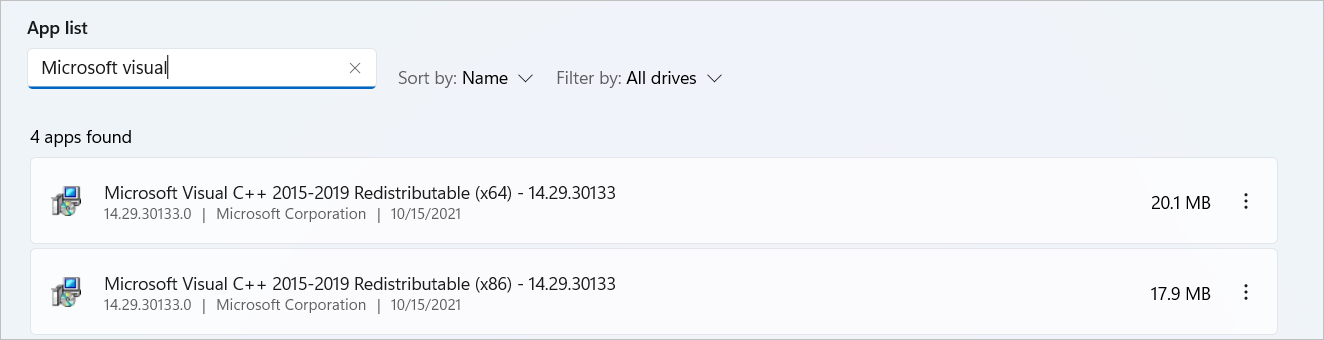
Ensure that VC_redist.x64.exe and/or VC_redist.x86.exe have been run.
Feedback
Coming soon: Throughout 2024 we will be phasing out GitHub Issues as the feedback mechanism for content and replacing it with a new feedback system. For more information see: https://aka.ms/ContentUserFeedback.
Submit and view feedback for