Check in your work to the team's codebase
Azure DevOps Services | Azure DevOps Server 2020 | Azure DevOps Server 2019 | TFS 2018 - TFS 2013
Visual Studio 2019 | Visual Studio 2017 | Visual Studio 2015 | Visual Studio 2013
Use the Pending Changes page (Keyboard: Ctrl + 0, P) in Team Explorer to check in your code into a new changeset.
Choose the files you want to check in
You can specify which file changes you want to check in by dragging them between the Included Changes and Excluded Changes sections of the Pending Changes page in Team Explorer. You can also check-in as you work in other areas of Visual Studio:
In Solution Explorer, select one of the following:
- The solution
- One or more of the code projects
- One or more files
After you select the items, right-click and select Check In.
In Source Control Explorer, select one or more items with pending changes or one or more folders that contain items with pending changes. (Items with pending changes are indicated by this symbol:
 ). Open the context menu for the selected items, and choose Check In.
Important
The Check in option is not displayed if there are no pending changes to the item selected.
Tip
If you don't see pending changes for an item, make sure that it is not already listed as an excluded change. Open Team Explorer's Pending Changes view and select the Detected: .. link under Excluded Changes. Check the changes to include from the list and select Promote to move the excluded changes into the Included Changes section. These changes can now be checked in.
Associate work items
When you check in changes, you should associate such work items with the changes. Benefits of doing so include:
- A team member who looks at the work item can link directly to the changeset to see the work that you did.
- A team member who reviews the history of a file you changed can view the changeset and see the work items that were the justification for the change.
- If you build your changes in your automated build system (for example with a CI Build or a Gated Check-in Build your team members can see in which completed build the task was completed or the bug was fixed.
To associate work items with your check-in:
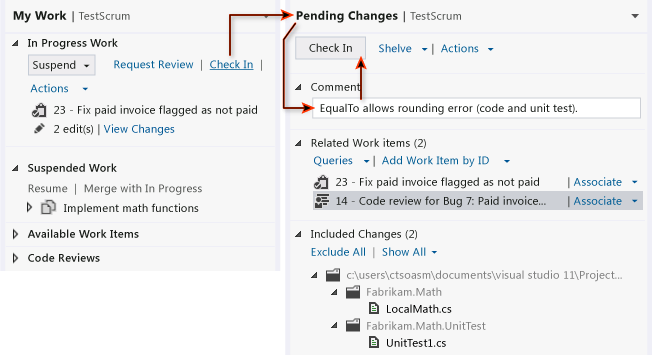
- Choose the Add Work Item by ID link in the Related Work Items section.
- Drag a work item from a work item query window from Team Explorer's Work Item page into the Related Work Items section.
Next to each work item, select how it should be related to your check-in: Associate or Resolve (available only if the work item is not already in a state that precludes this relationship, such as Resolved, Done, or Closed).
Check in your changes
In Team Explorer, choose
 Home, and then choose Pending Changes (Keyboard: Ctrl + 0, P).
On the Pending Changes page, enter a Comment so that teammates who later need to review and understand the history of your files will understand what you did. For example: Implemented shopping cart controller.
Some teams prefer that their members to provide certain kinds of information about each check-in. In some cases they even implement a check-in policy to require this. If an Administrator of your project has enabled check-in notes, then you can type the information into each field in the Notes section.
Choose the Check In button.
One of the following outcomes occurs:
Your changes are checked in
All the included file changes from your workspace along with the comment, check-in notes, and links to related work items are stored on the server as a single changeset on your server.
Conflicts block your check in
The system presents you with conflicts between your changes the latest version of the files on the server. See Resolve Team Foundation Version Control conflicts.
Your check in is blocked because it violates a check-in policy.
Administrators of your project can implement check-in policies to encourage your team to follow best practices. For example, a check-in policy can encourage team members to associate at least one work item with their changes. For more information, see Set and Enforce Quality Gates.
In some cases, you might want to override these check-in policies. In the Policy Warnings section, choose Override Warnings.
In the Reason box, explain why you chose to override the policy.
Check in changes to a folder that is controlled by a gated check-in build process
 If you are checking in changes into version control folders that are controlled by a gated check-in build process, the Gated Check-in dialog box appears. For information about how to complete your check-in operation, see Check in to a folder that is controlled by a gated check-in build process.
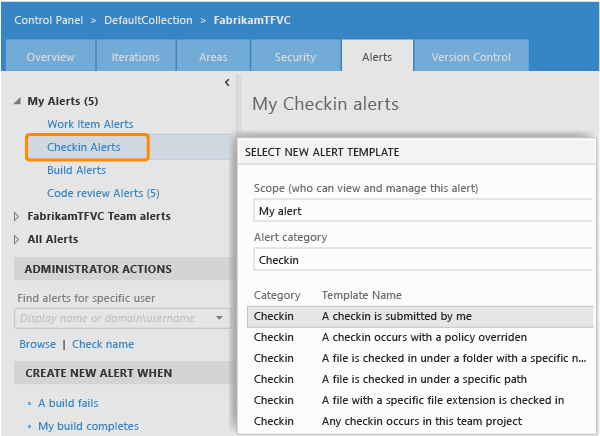
Subscribe to alerts
If you want to be notified when someone checks in code in your TFVC project, you can subscribe to receive email alerts. [Here's how]
Work from the command prompt
- Checkin command : View pending changes and check in files
Tips
 You can
  undock the Pending Changes page from Team Explorer and open it in a new window.
- You can toggle between list and tree view from the Actions menu.
- Before checking in new code, you should consider conducting a code review. See Day in the life of an devops Developer: Suspend work, fix a bug, and conduct a code review.
- You can manage and, if necessary, undo your pending changes. See Develop code and manage pending changes.
- If you need to set aside your changes, see Suspend your work and manage your shelvesets.
- A check-in is performed atomically-the operation either succeeds completely or fails completely (with one exception). If any one of the changes can't be submitted to Team Foundation Server, none of the changes are committed and a changeset is not created. For example, if you lose network connectivity in the middle of a check-in, the whole operation fails.
The exception is the association of work items with the changeset. If work item association fails but all other aspects of the check-in succeed, then the changeset is created. You can manually associate a work item with a changeset. See Manage dependencies, link work items to support traceability.