Tutorial: Configure an Azure IoT Edge device
Applies to: ![]() IoT Edge 1.1
IoT Edge 1.1
Important
IoT Edge 1.1 end of support date was December 13, 2022. Check the Microsoft Product Lifecycle for information about how this product, service, technology, or API is supported. For more information about updating to the latest version of IoT Edge, see Update IoT Edge.
In this article, we configure an Azure virtual machine running Linux to be an Azure IoT Edge device that acts as a transparent gateway. A transparent gateway configuration allows devices to connect to Azure IoT Hub through the gateway without knowing that the gateway exists. At the same time, a user interacting with the devices in IoT Hub is unaware of the intermediate gateway device. Ultimately, we'll add edge analytics to our system by adding IoT Edge modules to the transparent gateway.
Note
The concepts in this tutorial apply to all versions of IoT Edge, but the sample device that you create to try out the scenario runs IoT Edge version 1.1.
The steps in this article are typically performed by a cloud developer.
In this section of the tutorial, you learn how to:
- Create certificates to allow your gateway device to connect securely to your downstream devices.
- Create an IoT Edge device.
- Create an Azure virtual machine to simulate your IoT Edge device.
Prerequisites
This article is part of a series for a tutorial about using Azure Machine Learning on IoT Edge. Each article in the series builds on the work in the previous article. If you've arrived at this article directly, see the first article in the series.
Create certificates
For a device to function as a gateway, it needs to securely connect to downstream devices. With IoT Edge, you can use a public key infrastructure (PKI) to set up secure connections between devices. In this case, we're allowing a downstream IoT device to connect to an IoT Edge device acting as a transparent gateway. To maintain reasonable security, the downstream device should confirm the identity of the IoT Edge device. For more information about how IoT Edge devices use certificates, see Azure IoT Edge certificate usage details.
In this section, we create the self-signed certificates by using a Docker image that we then build and run. We chose to use a Docker image to complete this step because it reduces the number of steps needed to create the certificates on the Windows development machine. To understand what we automated with the Docker image, see Create demo certificates to test IoT Edge device features.
Sign in to your development VM.
Create a new folder with the path and name c:\edgeCertificates.
If it's not already running, start Docker for Windows from the Windows Start menu.
Open Visual Studio Code.
Select File > Open Folder, and then select C:\source\IoTEdgeAndMlSample\CreateCertificates.
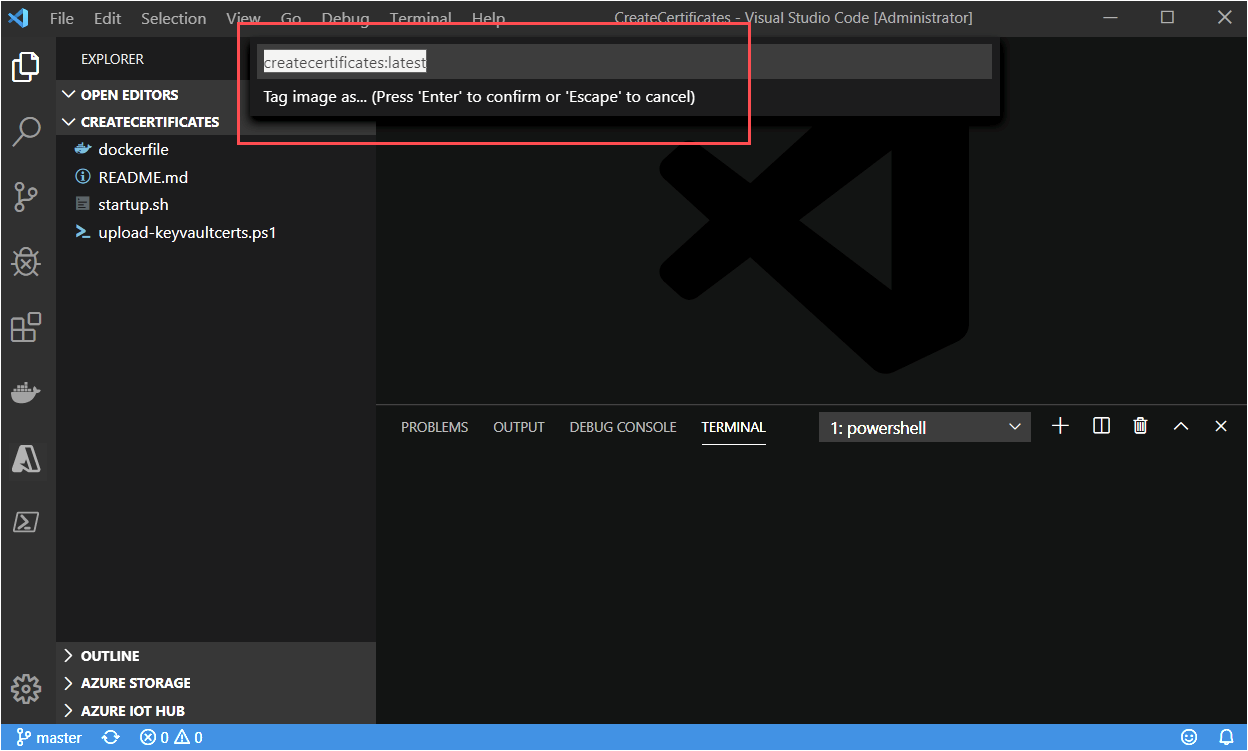
In the Explorer pane, right-click dockerfile and select Build Image.
In the dialog box, accept the default value for the image name and tag: createcertificates: latest.
Wait for the build to complete.
Note
You might see a warning about a missing public key. It's safe to ignore this warning. Likewise, you'll see a security warning that recommends you check or reset permissions on your image, which is safe to ignore for this image.
In the Visual Studio Code terminal window, run the createcertificates container.
docker run --name createcertificates --rm -v c:\edgeCertificates:/edgeCertificates createcertificates /edgeCertificatesDocker will prompt for access to the c:\ drive. Select Share it.
Provide your credentials when prompted.
After the container finishes running, check for the following files in c:\edgeCertificates:
- c:\edgeCertificates\certs\azure-iot-test-only.root.ca.cert.pem
- c:\edgeCertificates\certs\new-edge-device-full-chain.cert.pem
- c:\edgeCertificates\certs\new-edge-device.cert.pem
- c:\edgeCertificates\certs\new-edge-device.cert.pfx
- c:\edgeCertificates\private\new-edge-device.key.pem
Upload certificates to Azure Key Vault
To store our certificates securely and make them accessible from multiple devices, we'll upload the certificates into Azure Key Vault. As you can see from the preceding list, we have two types of certificate files: PFX and PEM. We'll treat the PFX file as Key Vault certificates to be uploaded to Key Vault. The PEM files are plain text, and we'll treat them as Key Vault secrets. We'll use the Key Vault instance associated with the Azure Machine Learning workspace we created by running the Jupyter notebooks.
From the Azure portal, go to your Azure Machine Learning workspace.
From the overview page of the Machine Learning workspace, find the name for Key Vault.

On your development machine, upload the certificates to Key Vault. Replace <subscriptionId> and <keyvaultname> with your resource information.
c:\source\IoTEdgeAndMlSample\CreateCertificates\upload-keyvaultcerts.ps1 -SubscriptionId <subscriptionId> -KeyVaultName <keyvaultname>If you're prompted, sign in to Azure.
The script will run for a few minutes with output that lists the new Key Vault entries.

Register an IoT Edge device
To connect an Azure IoT Edge device to an IoT hub, we first register a device in the hub. We take the connection string from the device identity in the cloud and use it to configure the runtime on our IoT Edge device. After a configured device connects to the hub, we can deploy modules and send messages. We can also change the configuration of the physical IoT Edge device by changing its corresponding device identity in IoT Hub.
For this tutorial, we register the new device identity by using Visual Studio Code. You can also complete these steps by using the Azure portal or the Azure CLI. Whichever method you choose, make sure you obtain the device connection string of your IoT Edge device. The device connection string can be found on the details page of your device on the Azure portal.
On your development machine, open Visual Studio Code.
Expand the Azure IoT Hub frame from the Visual Studio Code Explorer view.
Select the ellipsis, and select Create IoT Edge Device.
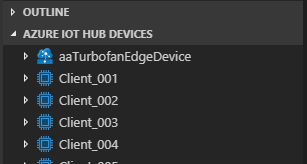
Give the device a name. For convenience, we use the name aaTurbofanEdgeDevice so that it sorts to the top of listed devices.
The new device appears in the list of devices.
Deploy an Azure virtual machine
We use an Ubuntu 18.04 LTS virtual machine with the Azure IoT Edge runtime installed and configured. The deployment uses an Azure Resource Manager template maintained in the iotedge-vm-deploy project repository. It provisions the IoT Edge device your registered in the previous step using the connection string you supply in the template.
You can deploy the virtual machine using the Azure portal or Azure CLI. We will show the Azure portal steps. See Run Azure IoT Edge on Ubuntu Virtual Machines for more information.
Deploy using Deploy to Azure Button
To use the
iotedge-vm-deployARM template to deploy your Ubuntu 18.04 LTS virtual machine, click the button below:On the newly launched window, fill in the available form fields.
Field Description Subscription The active Azure subscription to deploy the virtual machine into. Resource group An existing or newly created Resource Group to contain the virtual machine and it's associated resources. DNS Label Prefix A required value of your choosing that is used to prefix the hostname of the virtual machine. Admin Username A username, which will be provided root privileges on deployment. Device Connection String A device connection string for a device that was created within your intended IoT Hub. VM Size The size of the virtual machine to be deployed Ubuntu OS Version The version of the Ubuntu OS to be installed on the base virtual machine. Location The geographic region to deploy the virtual machine into, this value defaults to the location of the selected Resource Group. Authentication Type Choose sshPublicKey or password depending on your preference. Admin Password or Key The value of the SSH Public Key or the value of the password depending on the choice of Authentication Type. When all fields have been filled in, select the checkbox at the bottom of the page to accept the terms and select Review + create and Create to begin the deployment.
Navigate to your virtual machine in the Azure portal. You can find it through your resource group or by selecting Virtual machines under Azure services on the portal landing page.
Make note of the DNS name of your virtual machine. You will need it to log on to your virtual machine.
Connect to your IoT Edge device
Open a command prompt, and use following command to log on to your virtual machine. Enter your own information for username and DNS name based on the previous section.
ssh <adminUsername>@<DNS_name>When you're prompted to validate the authenticity of the host, enter yes and select Enter.
When you're prompted, provide your password.
Ubuntu displays a welcome message, and then you should see a prompt like
<username>@<machinename>:~$.
Download Key Vault certificates
Earlier in this article, we uploaded certificates to Key Vault to make them available for our IoT Edge device and our downstream device. The downstream device uses the IoT Edge device as a gateway to communicate with IoT Hub.
We'll deal with the downstream device later in the tutorial. In this section, download the certificates to the IoT Edge device.
From the SSH session on the Linux virtual machine, sign in to Azure with the Azure CLI.
az loginYou'll be prompted to open a browser to a Microsoft device sign-in page and provide a unique code. You can perform these steps on your local machine. Close the browser window when you're done authenticating.
When you successfully authenticate, the Linux VM will sign in and list your Azure subscriptions.
Set the Azure subscription that you want to use for Azure CLI commands.
az account set --subscription <subscriptionId>Create a directory on the VM for the certificates.
sudo mkdir /edgeMlCertificatesDownload the certificates that you stored in the key vault: new-edge-device-full-chain.cert.pem, new-edge-device.key.pem, and azure-iot-test-only.root.ca.cert.pem.
key_vault_name="<key vault name>"
sudo az keyvault secret download --vault-name $key_vault_name --name new-edge-device-full-chain-cert-pem -f /edgeMlCertificates/new-edge-device-full-chain.cert.pem
sudo az keyvault secret download --vault-name $key_vault_name --name new-edge-device-key-pem -f /edgeMlCertificates/new-edge-device.key.pem
sudo az keyvault secret download --vault-name $key_vault_name --name azure-iot-test-only-root-ca-cert-pem -f /edgeMlCertificates/azure-iot-test-only.root.ca.cert.pem
Update the IoT Edge device configuration
The IoT Edge runtime uses the file /etc/iotedge/config.yaml to persist its configuration. We need to update two pieces of information in this file:
- Certificates: The certificates to use for connections made with downstream devices
- Hostname: The fully qualified domain name (FQDN) of the VM IoT Edge device
Update the certificates and hostname by directly editing the config.yaml file.
Open the config.yaml file.
sudo nano /etc/iotedge/config.yamlUpdate the certificates section of the config.yaml file by removing the leading # and setting the path so the file looks like the following example:
certificates:
  device_ca_cert: "/edgeMlCertificates/new-edge-device-full-chain.cert.pem"
  device_ca_pk: "/edgeMlCertificates/new-edge-device.key.pem"
  trusted_ca_certs: "/edgeMlCertificates/azure-iot-test-only.root.ca.cert.pem"
Make sure the certificates: line has no preceding white space and that each of the nested certificates is indented by two spaces.
Right-clicking in nano will paste the contents of your clipboard to the current cursor position. To replace the string, use your keyboard arrows to go to the string you want to replace, delete the string, and then right-click to paste from the buffer.
In the Azure portal, go to your virtual machine. Copy the DNS name (FQDN of the machine) from the Overview section.
Paste the FQDN into the hostname section of the config.yml file. Make sure the name is all lowercase.
hostname: '<machinename>.<region>.cloudapp.azure.com'Save and close the file by selecting Ctrl+X, Y, and Enter.
Restart the IoT Edge daemon.
sudo systemctl restart iotedgeCheck the status of the IoT Edge daemon. After the command, enter :q to exit.
systemctl status iotedge
Troubleshooting
If you see errors (colored text prefixed with "[ERROR]") in the status, examine daemon logs for detailed error information.
journalctl -u iotedge --no-pager --no-full
For more information on addressing errors, check out the troubleshooting page.
Clean up resources
This tutorial is part of a set where each article builds on the work done in the previous ones. Wait to clean up any resources until you complete the final tutorial.
Next steps
We just completed configuring an Azure VM as an IoT Edge transparent gateway. We started by generating test certificates that we uploaded to Key Vault. Next, we used a script and Resource Manager template to deploy the VM with the Ubuntu Server 16.04 LTS + Azure IoT Edge runtime image from Azure Marketplace. With the VM up and running, we connected via SSH. Then we signed in to Azure and downloaded certificates from Key Vault. We made several updates to the configuration of the IoT Edge runtime by updating the config.yaml file.
Continue to the next article to build IoT Edge modules.