title: A Guide to Designing and Building RESTful Web Services with WCF 3.5 TOCTitle: WCF REST Starter Kit ms:assetid: cb9c4ca6-8c1e-4cd1-8d3c-021d50a64562 ms:mtpsurl: https://msdn.microsoft.com/en-us/library/Dd203052(v=MSDN.10) ms:contentKeyID: 19214639 ms.date: 02/20/2009 mtps_version: v=MSDN.10 dev_langs:
- csharp
- xml
- jscript
A Guide to Designing and Building RESTful Web Services with WCF 3.5
Aaron Skonnard, Pluralsight
October 2008
Overview
From the point of view of REST, a “real” Web service is a service designed to embrace the “Web” from the ground up. The Web has become the most successful distributed computing platform ever developed, thanks to years of investment and widespread usage. The Web platform includes concepts that you’re probably already familiar with like URIs, HTTP, and common data formats like XML, RSS/ATOM, and JSON. Ultimately, services that embrace these core concepts will immediately derive the valuable benefits they provide.
REST defines an architectural style based on a set of constraints for building things the “Web” way. REST is not tied to any particular technology or platform – it’s simply a way to design things to work like the Web. People often refer to services that follow this philosophy as “RESTful services.” In this whitepaper, we’ll cover the fundamental REST design principles and show you how to build RESTful services with Windows Communication Foundation (WCF), the WCF REST Starter Kit, and ADO.NET Data Services.
The Web Platform
Before immersing ourselves in the world of REST, we should review the essence of the Web platform as we know it today. We call it the “Web” because the architecture provides a framework for creating and navigating a Web of resources. A resource could be anything. Some resources are simply data like files, images, or videos while others are temporal services that produce dynamic output (e.g., Pluralsight’s upcoming course schedule). Some services even run complex algorithms behind the scenes. You can think of the Web as a resource-oriented architecture for building large-scale distributed systems.
Resource-Oriented Architecture
On the Web, every resource is given a unique identifier, also known as a universal resource identifier (URI). The most common type of URI used on the Web today is a uniform resource locator (URL). As an example, the URL – http://www.pluralsight.com/main/ilt/schedule.aspx – identifies and locates Pluralsight’s upcoming training course schedule, a popular resource made available on our site.
Since a given URI uniquely identifies a resource, it can be saved for future use and shared with others. For example, when you find a resource you want to get back to later, you can: try to remember it, write it down on a napkin, save it to disk (as a browser bookmark), or store it in a database of bookmarks on the Web, in which case the bookmark itself becomes a new Web resource. You can also share the resource with others by telling them the URI or emailing it to them so they can easily browse to it themselves. Many companies try hard to create easy-to-remember URIs that can be successfully conveyed via advertising and will hopefully spread via word-of-mouth. In the end, as long as you have the URI, you can enter it into a Web browser and retrieve the resource at some future point in time.
Now, the reason it’s called the “Web” is because resources can contain hyperlinks to other resources, thereby creating a Web of resources. Hyperlinks make it possible to navigate from one resource to another by using the target resource URI. For example, in HTML you link to another resource through the anchor element. When a browser renders an anchor element, it provides a visual cue showing that you can click on the anchor text to issue a GET request for the target resource URI. Humans play an important role in most Web applications because they’re the ones viewing the page, entering data in forms, and clicking links. Humans are really the client-side engine navigating the Web of resources.
When you retrieve a resource using a Web browser, you’re really retrieving a representation of that resource. This implies that there could be multiple representations of a particular resource. There are many standard and common formats used on the Web today to represent resources that virtually all browsers understand. One of the most common formats is (X)HTML but others are common as well, including JPEG and GIF, WMV and SWF, RSS and ATOM, CSS and JavaScript/JSON to name a few. When a browser receives one of these representations, it does its best to render it for human viewing.
Fundamental HTTP Concepts
The Web platform also comes with a standard communication protocol – HTTP – for interacting with resources and their representations. HTTP defines a standard set of methods, status codes, and headers for interacting with resources on the Web. Figure 1 describes the most commonly used HTTP methods, their semantics, and whether they’re defined to be safe and idempotent .
The GET method allows you to retrieve a resource representation, while PUT allows you to create or update a resource with the supplied representation, and DELETE allows you to delete a resource. In short, GET, PUT, and DELETE provide basic CRUD operations (create, retrieve, update, and delete) for the Web. HEAD and OPTIONS, on the other hand, provide the ability to retrieve resource metadata, allowing you to discover out how to interact with resources at run time.
Say we have a resource representing a course description at Pluralsight. You’d issue a GET request to retrieve the course description from a particular URI. If you wanted to update the course description with some changes, you’d issue a PUT request to the same URI supplying the modified course description. If you PUT the course description to a new URI, you’d effectively be creating a new course description resource. And, of course, you’d delete a course description by issuing a DELETE request.
Figure 1: Some common HTTP methods
| Method | Description | Safe | Idempotent |
|---|---|---|---|
GET |
Requests a specific representation of a resource |
Yes |
Yes |
PUT |
Create or update a resource with the supplied representation |
No |
Yes |
DELETE |
Deletes the specified resource |
No |
Yes |
POST |
Submits data to be processed by the identified resource |
No |
No |
HEAD |
Similar to GET but only retrieves headers and not the body |
Yes |
Yes |
OPTIONS |
Returns the methods supported by the identified resource |
Yes |
Yes |
Although HTTP fully supports CRUD, HTML 4 only supports issuing GET and POST requests through its various elements. This limitation has held Web applications back from making full use of HTTP, and to work around it, most applications overload POST to take care of everything but resource retrieval. HTML 5, which is currently under development, plans to fix this by adding new support for PUT and DELETE.
GET, HEAD, and OPTIONS are all examples of safe methods that aren’t intended to have side effects. All safe methods are also idempotent, as are PUT and DELETE, so you should be able to repeat them multiple times without harm. The POST method is something of a special case. According to the HTTP specification, POST should be used to provide a representation that can be treated as a subordinate of the target resource. For example, you could POST a new blog entry to the URI representing the blog feed, causing a new blog entry to be added to the feed. POST can also be used to process a block of data such as the data transmitted by an HTML form. The actual function performed by the POST method is defined by the server. Therefore, POST cannot be considered safe or idempotent by clients.
HTTP also defines a suite of standard status codes that specify the result of processing the request. Status codes are organized into ranges that mean different things. For example, status codes in the 200 range mean “successful” while status codes in the 400 range mean the client issued a bad request. Figure 2 describes each status code range and provides a few examples of common status codes.
Figure 2: Some common HTTP status codes
| Status Range | Description | Examples |
|---|---|---|
100 |
Informational |
100 Continue |
200 |
Successful |
200 OK |
201 |
Created |
|
202 |
Accepted |
|
300 |
Redirection |
301 Moved Permanently |
304 |
Not Modified |
|
400 |
Client error |
401 Unauthorized |
402 |
Payment Required |
|
404 |
Not Found |
|
405 |
Method Not Allowed |
|
500 |
Server error |
500 Internal Server Error |
501 |
Not Implemented |
The HTTP specification also defines a suite of headers that can be used to negotiate behavior between HTTP clients and servers. These headers provide built-in solutions for important communication concepts like redirection, content negotiation, security (authentication and authorization), caching, and compression. When you build something using HTTP, you get these solutions for free and don’t have to invest time in reinventing similar solutions in your own code. And when you’re not using HTTP, it’s likely that you’ll end up developing similar solutions for these things when your system grows in scale.
The Web platform has been around for years and countless organizations have deployed successful large-scale distributed applications using the concepts I just described. The Web’s general architectural style has been concretely described in a PhD dissertation as what’s known as “REST”.
REST Defined
While REST seems to be growing in popularity these days, it’s a term that seems to mean different things to different people. The official definition for REST is defined in Chapter 5 of Roy Fielding’s PhD dissertation entitled Architectural Styles and the Design of Network-based Software Architectures.
Roy Fielding was one of the authors of the URI and HTTP specifications, which sit at the heart of the Web. Chapter 5 of his dissertation, entitled Representational State Transfer (REST), attempts to codify the architectural style and design constraints that make the Web what it is. REST emphasizes things like separation of concerns and layers, statelessness, and caching, which are common in many distributed architectures because of the benefits they provide. These benefits include interoperability, independent evolution, interception, improved scalability, efficiency, and overall performance.
However, the key design constraint that sets REST apart from other distributed architectural styles is its emphasis on a uniform interface between components. The theory is that generalizing and standardizing the component interface will ultimately simplify the overall system architecture and provide more visibility into the various interactions. REST further defines how to use the uniform interface through additional constraints around how to identify resources, how to manipulate resources through representations, and how to include metadata that make messages self-describing.
When something conforms to these REST design constraints, we commonly refer to it as “RESTful” – a term that I casually use throughout this whitepaper. The Web is indeed RESTful. The Web was built on HTTP’s uniform interface (the methods described in Figure 1) and the focus is on interacting with resources and their representations. Although in theory REST isn’t tied to any specific platform or technology, the Web is the only major platform that fully embodies REST today. So, in practical terms, if you’re going to build something that’s RESTful today, you’ll probably do it on the Web using HTTP.
Uniform Interface
Some argue that generalizing the component interface limits the capabilities of the system, but this is simply not true. There is great power in the simplicity of a uniform interface because of the value it adds at larger scales. The REST model is Turing-complete and can be used to implement complex systems.
A comparison might help explain how this is possible – let’s consider the popular LEGO® building blocks as an example. If you’ve played with LEGO® products before, you know there are only a few ways to connect them together, which represents the LEGO® uniform interface. All LEGO® products, regardless of when or where you buy them, can connect with one another through its uniform interface. When new LEGO® products are released, they can be incorporated into existing LEGO® systems and the user doesn’t have to learn anything new. The new components work just like all other LEGO® products.
You might wonder if the limited number of connection possibilities will constrain what you’re able to build with LEGO® products. But if you’ve ever been to LEGOLAND®, you’ll know it doesn’t. You’ll find some incredibly complex objects at LEGOLAND® – including replicas of cars, buildings, even dinosaurs – which were all built from a variety of LEGO® products, connected through the LEGO® uniform interface.
HTTP defines a similar model for the Web. The various methods defined by the HTTP specification (see Figure 1) provide a uniform interface for interacting with resources on the Web. All Web browsers, servers, intermediaries, and custom applications understand this uniform interface and the semantics of each operation. This allows them to connect to one another and exchange information without issues, despite platform and technology differences. And new Web components can be added at any time without causing disruption or requiring changes to the other components already in existence.
The idea of a uniform interface is often hard to accept for many developers, especially those who are used to working with RPC-based component technologies. With RPC, every new component introduces a new interface – a new set of methods – for accessing the component’s functionality. Hence, the component developer is focused on designing and implementing methods, and therefore, new application protocols. It’s been this way for years, and few technologies move away from this trend.
Before clients can take advantage of a new component, they must learn the intricacies of the new interface (application protocol) and the semantics of each operation. Ultimately, as the number of interfaces increases, so does the overall complexity of the system. This complexity can become unwieldy to manage over time and often leads to brittle systems that can’t cope with versioning and change.
A system built around a uniform interface for communication provides stability because it rarely changes and there are only a few methods for everyone to learn. Applications using a uniform interface are free to change at any time while the communication methods connecting them remain stable over time. This is how the Web has always worked, and one of the primary reasons it has worked so well.
RESTful Services
The move towards RESTful services is ultimately about moving towards a programmable Web, one where we can replace humans with application code. It’s essentially about applying the principles of REST to the domain of Web services. Ultimately, designing RESTful services is no different than designing RESTful Web applications except we need to facilitate removing humans from the equation.
When you design a RESTful service, you have to think about things differently. You no longer focus on designing methods. Instead, you focus on the resources that make up your system, their URIs, and their representations. RESTful services conform to the HTTP uniform interface – you simply need to decide which of those methods you’ll support for each resource. In order to remove humans from the equation, you’ll need to use resource representations that are easy to programmatically consume.
Unlike traditional RPC-style frameworks that attempt to hide communication details, RESTful services actually embrace HTTP and its features and fully take advantage of them as much as possible. As a result, RESTful services automatically receive the valuable benefits inherent in the Web platform including the built-in security features, caching controls, compression, and ultimately improved performance and scalability. And best of all, you don’t have to wait for it – the Web platform is ready today – complete with products, infrastructure, and helpful resources available for immediate use.
Designing RESTful Services
In this section, we’ll start from a traditional RPC-based service and redesign it to become a RESTful service. To accomplish this, first we’ll extract the resources that make up the existing service. Then we’ll design a URI scheme for identifying the resources and decide which HTTP methods they’ll support. And finally, we’ll design the resource representations that will be supported by each method.
A Traditional RPC-based Service
Let’s suppose your company provides an online bookmarking service similar to what’s provided by Windows Live Favorites, Google Bookmarks, or delicious. We’ll assume it was originally implemented using SOAP with an RPC-based design. The service supports the list of operations described in Figure 3.
Figure 3: An RPC-based bookmarking service
| Operation | Description |
|---|---|
createUserAccount |
Creates a new user account |
getUserAccount |
Retrieves user account details for the authenticated user |
updateUserAccount |
Updates user account details for the authenticated user |
deleteUserAccount |
Deletes the authenticated user’s account |
getUserProfile |
Retrieves a specific user’s public profile information |
createBookmark |
Creates a new bookmark for the authenticated user |
updateBookmark |
Updates an existing bookmark for the authenticated user |
deleteBookmark |
Deletes one of the authenticated user’s bookmarks |
getBookmark |
Retrieves a specific bookmark (anyone can retrieve a public bookmark; only authenticated users can retrieve a private bookmark) |
getUserBookmarks |
Retrieves the user’s private bookmarks, allows filtering by tags |
getUserPublicBookmarks |
Retrieves the user’s public bookmarks, allows filtering by tags |
getPublicBookmarks |
Retrieves all public bookmarks, allows filtering by tags |
Several of these operations are publicly accessible including createUserAccount, getUserProfile, getUserPublicBookmarks, getPublicBookmarks, and getBookmark (assuming the bookmark is public). Anyone can use these operations without authentication. The remaining operations, however, require the user to provide valid credentials and can be used only by valid, authenticated users. For example, only an authenticated user can modify or delete his account or create, update, and delete bookmarks.
Also, bookmarks can be marked as “public” or “private” and they can be labeled with arbitrary textual “tags.” Anyone can retrieve public bookmarks, but only authenticated users can access private bookmarks. Plus, all of the operations that return bookmark collections can be filtered by “tags.”
Moving from Verbs to Nouns
The first step in designing a RESTful service is to identify the resources the service will expose. From inspecting the operations in Figure 3, it looks like there are just a few resources in play:
- Users
- Bookmarks
However, we need to get a little more specific than this since we’ll need the ability to operate on individual bookmarks as well as different collections of bookmarks. After analyzing the current functionality, it’s apparent we’ll need the ability to address the following types of resources:
- An individual user account
- A specific user’s public profile
- An individual bookmark
- A user’s collection of private bookmarks
- A user’s collection of public bookmarks
- The collection of all public bookmarks
You can think of these things as the “nouns” that make up the service. The original service design outlined in Figure 3 focused on “verbs” and not the underlying nouns. This is where RESTful design takes a radical turn. With REST, you focus first on the nouns first (e.g., the resources) because you’ll rely on a standard set of verbs (the uniform interface) to operate on them within the service.
Designing the URI Templates
Now that we’ve identified the fundamental resources that make up our service, our next task is to define identifiers for them. Since we plan to host this service on the “Web,” we’ll rely on the Web’s URI syntax for identifying these resources.
To keep things simple for consumers, we’ll use the service’s base address to identify the list of all public bookmarks. So if our service were hosted at https://contoso.com/bookmarkservice, we’d browse to that address to retrieve the list of all public bookmarks. Since the list of all public bookmarks can get quite large, we should probably also provide a way to filter the collection of bookmarks somehow. We can accomplish this by building additional scoping information into the URI design. For example, we can use the following query string to identify all public bookmarks marked with a particular tag:
?tag={tag}
In this case, the “tag” is providing additional scoping information that consumers can use to reduce the identified collection’s size. The syntax I’m using here is referred to as URI template syntax.
Anything within curly braces represents a variable, like tag in this case. Everything else in the URI (not enclosed within curly braces) is considered a static part of the URI. Later, when we implement the service, you’ll see how to map these URI variables to method parameters in our WCF code.
The URI template in this case is relative to the service’s base URI. So you can identify all public bookmarks marked with the “rest” tag using https://contoso.com/bookmarkservice?tag=rest.
We can further filter the list of public bookmarks by username. In this case, we’ll use the username as part of the path to filter the collection by user before applying the tag scoping information:
{username}?tag={tag}
For example, you can identify all of skonnard’s bookmarks marked with “wcf” using https://contoso.com/bookmarkservice/skonnard?tag=wcf. And you can access all of onion’s bookmarks marked with “silverlight” using https://contoso.com/bookmarkservice/onion?tag=silverlight.
Next, let’s think about how to identify a particular user. Since we’ve already used a variable in the first path segment (for identifying a user’s public bookmarks), we’ll need to specify a literal string in that first segment to change the meaning of what comes next. For example, we can say that all URIs starting with “users” will identify a specific user. We’ll use the following templates to identify the user resources:
/users/{username}
/users/{username}/profile
And we can identify a user’s complete list of bookmarks by adding “bookmarks” instead:
/users/{username}/bookmarks
Plus, like before, we can filter bookmarks by using “tag” scoping information:
/users/{username}/bookmarks?tag={tag}
When it comes to identifying individual bookmarks, we have to make a decision about how to do that. If we assign each bookmark a unique Id, we could potentially use a simpler URI template for identifying individual bookmarks based on the Id. However, since bookmarks really belong to a specific user, it might make sense to make individual bookmark identifiers relative to a particular user as shown here:
/users/{username}/bookmarks/{id}
Figure 4 summarizes the URI design for our RESTful bookmark service. Now that we know what resources we’re dealing with and how to identify them, we can turn our attention to thinking about which methods on the uniform interface we’ll support for each of these resources.
Figure 4: The BookmarkService URI design
| Operation | Description |
|---|---|
A collection of all public bookmarks |
?tag={tag} |
A user’s collection of public bookmarks |
{username}?tag={tag} |
An individual user account |
users/{username} |
A specific user’s public profile |
users/{username}/profile |
A user’s collection of bookmarks |
users/{username}/bookmarks?tag={tag} |
An individual bookmark |
users/{username}/bookmarks/{id} |
Applying the Uniform HTTP Interface
For the publicly accessible bookmark collections and the public user profile resource, we’ll only support GET requests. You can think of these as read-only resources. We’ll return a 200 (“OK”) when the requests are successful. If the URI doesn’t identify a known user, we’ll return 404 (“Not Found”).
The remaining resources will allow creating and modifying resources so you can think of them as read/write resources. For example, we’ll support GET, PUT, and DELETE on user account resources to replace the equivalent operations in the RPC version. We’ll use PUT to create new user accounts, GET to retrieve them, PUT (again) to update them, and DELETE to delete them.
We can use PUT to create new user accounts because the client is the one picking the username that forms the new resource’s URI. If the client is successful, the service will return a 201 (“Created”) response. If the client attempts to use an existing username, the service will return a 401 (“Unauthorized”) response. When issuing the PUT request to create a user account, the client will provide a user account representation in the HTTP request body containing the user’s information.
Once created, a user can retrieve her account resource by issuing a GET request to her account URI. She can issue a PUT request to update her account resource by supplying an updated user account representation. She can also issue a DELETE request (with no representation) to delete her account. When these operations are successful, the service returns a 200 (“OK”) response. If the client attempts to update or delete a non-existent account, the service will return a 404 (“Not Found”) response.
For individual bookmark resources, we’ll support GET, POST, PUT, and DELETE requests. If a particular bookmark is marked as private, only the owner can retrieve it, but if it’s public, anyone can retrieve it. When a user creates a new bookmark, the service is responsible for assigning it a unique bookmark Id. Hence, the client won’t know the Id to use in the URI ahead of time. So, instead of using a PUT request, we’ll have users POST bookmarks to the user’s bookmark collection resource. The handler for the POST request will create the new bookmark, assign it an Id, and return a 201 (“Created”) to the client, specifying the URI of the new bookmark resource in the Location header.
This explains when to use POST or PUT for creating new resources. The answer ultimately lies in who is responsible for determining the new resource’s URI. If the client is in charge, the client can use PUT to the new URI (like we did for user accounts) and the service can return a response code of 201 (“Created”). However, if the service is in charge of generating the new URI, the client should POST the new resource to a factory URI like we’ve done for bookmarks. Then, the service can return a response code of 201 (“Created”) along with the URI of the new resource in the response “Location” header.
Once clients know the bookmark ID’s, they can issue PUT and DELETE requests to individual bookmark URIs to update and delete bookmarks. If successful, the service will return a 200 (“OK”). If the client uses a URI that doesn’t exist, the service will return a 404 (“Not Found”) response.
Figure 5 summarizes the final design of our RESTful interface for bookmark resources, showing which HTTP methods we’ll support with each resource. We’ve been able to completely replace the functionality found in the original RPC service through HTTP’s uniform interface.
Figure 5: RESTful interface for user accounts
| Method | URI Template | Equivalent RPC Operation |
|---|---|---|
PUT |
users/{username} |
createUserAccount |
GET |
users/{username} |
getUserAccount |
PUT |
users/{username} |
updateUserAccount |
DELETE |
users/{username} |
deleteUserAccount |
GET |
users/{username}/profile |
getUserProfile |
POST |
users/{username}/bookmarks |
createBookmark |
PUT |
users/{username}/bookmarks/{id} |
updateBookmark |
DELETE |
users/{username}/bookmarks/{id} |
deleteBookmark |
GET |
users/{username}/bookmarks/{id} |
getBookmark |
GET |
users/{username}/bookmarks?tag={tag} |
getUserBookmarks |
GET |
{username}?tag={tag} |
getUserPublicBookmarks |
GET |
?tag={tag} |
getPublicBookmarks |
Security Considerations
Our service requires the ability to authenticate users so we can authorize the resources and methods they’re allowed to access. For example, only authenticated users can access their own user account resources and operate on them. And only authenticated users can create new bookmarks and operate on them. If an unauthenticated user attempts to do so – or a user attempts to operate on another user’s resources – the service needs to return a 401 (“Unauthorized”) response and deny access.
So we need to figure out how we’ll identify users in order to authenticate them. HTTP comes with some built-in authentication mechanisms, the most popular of which is basic access authentication. This is one of the most popular authentication schemes used on the Web today because it’s so easy and widely supported, but it’s also one of the most unsecure, because passwords are sent across the wire in a simple-to-decode plain text format. One way around this is to require SSL (HTTPS) for all HTTP traffic that will be using basic authentication, thereby encrypting the pipe carrying the passwords.
Another approach is to use digest authentication, another authentication scheme built into HTTP. Digest authentication prevents eavesdropping by never sending the password across the wire. Instead, the authentication algorithm relies on sending hash values computed from the password and other values known only by the client and server. This makes it possible for the server to recompute the hash found in an incoming message to validate that client has possession of the password.
Here’s how it works. When a client attempts to access a protected resource, the server returns a 401 (“Unauthorized”) response to the client along with a “WWW-Authenticate” header indicating that it requires digest authentication along with some supporting data. Once the client receives this, it can generate an “Authorization” header containing the computed hash value and send an identical request back to the server including the new header. Assuming the client generates a valid “Authorization” header, the server will allow access to the resource. Digest authentication is better than basic but it’s still subject to offline dictionary and brute force attacks (unless you enforce a really strong password policy), and it’s not as widely supported by Web browsers and servers.
Another approach is to avoid both basic and digest authentication and implement a custom authentication scheme around the “Authorization” header. Many of these schemes use a custom Hash Message Authentication Code (HMAC) approach, where the server provides the client with a user id and a secret key through some out-of-band technique (e.g., the service sends the client an e-mail containing the user id and secret key). The client will use the supplied secret key to sign all requests.
For this approach to work, the service must define an algorithm for the client to follow when signing the requests. For example, it must outline how to canonicalize the message and which parts should be included in the HMAC signature along with the secret key. This is important because the client and service must follow the same algorithm for this to work. Once the client has generated the HMAC hash, it can include it in the “Authorization” header along with the user id:
Authorization: skonnard:uCMfSzkjue+HSDygYB5aEg==
When the service receives this request, it will read the “Authorization” header and split out the user id and hash value. It can find the secret for the supplied user id and perform the same HMAC algorithm on the message. If the computed hash matches the one in the message, we know the client has possession of the shared secret and is a valid user. We also know that no one has tampered with whatever parts of the message were used to compute the HMAC hash (and that could be the entire message). In order to mitigate replay attacks, we can include a timestamp in the message and include it in the hash algorithm. Then the service can reject out-of-date messages or recently seen timestamp values.
The HMAC approach is superior to both basic and digest authentication, especially if the generated secrets are sufficiently long and random, because it doesn’t subject the password to dictionary or brute force attacks. As a result, this technique is quote common in today’s public facing RESTful services.
For the service we’re designing, we could pick any of these techniques to authenticate users. We’ll assume an HMAC approach for our service, and that each user will be assigned a secret key through an out-of-band e-mail after creating a new user account. And for all of the non-public resources, we’ll look for a valid HMAC hash in the “Authorization” header and return a 401 (“Unauthorized”) when necessary.
Now that we have a way for users to prove who they are, we’ll need logic to authorize their requests, in other words, to decide what they are allowed to do. For example, any authenticated or anonymous user may retrieve any public bookmark, while private bookmarks may only be retrieved by the authenticated user who owns them. We’ll see how to implementation this authorization logic later in the paper.
Designing the Resource Representations
Now we need to decide how we’re going to represent the resources exposed by our service. There are many different data formats commonly used to represent resources on the Web including plain text, form-encoding, HTML, XML, and JSON, not to mention the variety of different media formats used to represent images, videos, and the like. XML is probably the most popular choice for RESTful services, although JSON has been growing in popularity thanks to the Web 2.0/Ajax movement.
XML is easier to consume in most programming languages (e.g., .NET) so it’s often the default format. However, for browser-based scenarios (which abound), the JavaScript Object Notation (JSON) is actually easier to consume because it’s a JavaScript native format. For the service we’re designing, we’ll support both XML and JSON to accommodate both client scenarios equally well.
An important thing to think about while designing resource representations is how to define the relationships between different resources. Doing so will allow consumers to navigate the “Web” of resources exposed by your service, and even discover how to use navigate service by actually using it.
Let’s begin by designing the XML representation for a user account. When creating a new user account, we need the user to supply only a name and e-mail address (remember, the username is represented in the URI). The following is the XML format we’ll use for creating new user accounts:
<User>
<Email>aaron@pluralsight.com</Email>
<Name>Aaron Skonnard</Name>
</User>
However, when a user retrieves his user account resource, the service will supply a different representation containing a little more information, in this case an Id and a link. We’ll provide the Id that links back to this particular user resource and a link to this user’s list of public bookmarks:
<User>
<Bookmarks>https://contoso.com/bookmarkservice/skonnard</Bookmarks>
<Email>aaron@pluralsight.com</Email>
<Id>https://contoso.com/bookmarkservice/skonnard</Id>
<Name>Aaron Skonnard</Name>
</User>
There may be other pieces of information that make sense only in either the request or response representations. A valid user can update this representation with a new e-mail address or a different name and PUT it back to the same URI to perform an update.
A user’s public profile will provide yet another representation because we probably don’t want to share one user’s e-mail address with another. Here’s what we’ll use for the user profile resource:
<UserProfile>
<Bookmarks>https://contoso.com/bookmarkservice/skonnard</Bookmarks>
<Id>https://contoso.com/bookmarkservice/skonnard</Id>
<Name>Aaron Skonnard</Name>
</UserProfile>
Now let’s turn our attention to bookmark resources. For our example, a bookmark is a pretty simple data set. When a user creates a bookmark, it must provide a title, a URL, some optional tags, and a public/private flag. We’ll support the following representation for creating new bookmarks:
<Bookmark>
<Public>true</Public>
<Tags>REST,WCF</Tags>
<Title>Aaron’s Blog</Title>
<Url>http://pluralsight.com/aaron</Url>
</Bookmark>
And we’ll use a slightly enhanced representation when returning bookmark resources that includes an Id, additional information about the user who created it, and a last-modified time:
<Bookmark>
<Id>https://contoso.com/bookmarkservice/users/skonnard/bookmarks/13</Id>
<LastModified>2008-03-12T00:00:00</LastModified>
<Public>true</Public>
<Tags>REST,WCF</Tags>
<Title>Aaron's Blog</Title>
<Url>http://pluralsight.com/aaron</Url>
<User>skonnard</User>
<UserProfile>https://contoso.com/bookmarkservice/users/skonnard/profile
</UserProfile>
</Bookmark>
A list of bookmarks will simply be represented by a <Bookmarks> element, containing a list of child <Bookmark> elements as shown here:
<Bookmarks>
<Bookmark>
<Id>https://contoso.com/bookmarkservice/users/skonnard/bookmarks/13</Id>
<LastModified>2008-03-12T00:00:00</LastModified>
<Public>true</Public>
<Tags>REST,WCF</Tags>
<Title>Aaron's Blog</Title>
<Url>http://pluralsight.com/aaron</Url>
<User>skonnard</User>
<UserProfile>https://contoso.com/bookmarkservice/users/skonnard/profile
</UserProfile>
</Bookmark>
<Bookmark>...</Bookmark>
<Bookmark>...</Bookmark>
</Bookmarks>
These representations make is possible to navigate between different types of resources, and they are simple to consume in any programming framework that includes a simple XML API.
Supporting Alternate Representations
We can expose our resources in several representations to accommodate different client scenarios. For example, some clients (like Web browsers) will have an easier time dealing with JSON representations than XML. But if we decide to support multiple formats, we’ll need the client to specify which format it wants somehow. There are a few ways to handle this, either by using HTTP’s content negotiation headers (e.g., Accept) or by encoding the desired resource format into the URI.
Both approaches are completely RESTful, but I prefer the latter because it allows the URI to contain all of the necessary information. We’ll assume XML is the default representation for our URIs, and we’ll extend them to support JSON by adding “?format=json” to the end of each URI template:
?tag={tag}&format=json
{username}?tag={tag}&format=json
users/{username}?format=json
users/{username}/profile?format=json
...
This is an example of what the new user account resource would look like in JSON:
{User:{Email:'aaron@pluralsight.com', Name:'Aaron Skonnard'}}
This is just another representation of the same resource. Again, the reason for supporting multiple formats is to make things easier for certain types of clients. It wouldn’t be hard to also support form-encoding to simplify things for Web browser forms or other text-based formats (e.g., CSV) in order to accommodate even more client application scenarios (e.g., Microsoft Excel).
Standard Representations: XHTML & Atom
The problem with using a custom XML vocabulary is you’ll have to provide metadata (like an XML Schema definition) and documentation for clients consuming your resources. If you can use a standard format, on the other hand, you will immediately have an audience that knows how to consume your service. There are two standard formats that are quite popular today: XHTML and Atom/AtomPub .
One of the benefits of using XHTML as the representation format is that it can be rendered in a Web browser for human viewing during development. With XHTML, you can represent lists of items and you can use forms to encode additional metadata that describes how to interact with other linked resources.
AtomPub is another popular choice because it was specifically designed to represent and manipulate collections of resources. There are many feed-aware clients (including modern Web browsers) that know how to render Atom feeds, providing a human view that can prove helpful during development.
The main downside to using either of these formats is that they are somewhat constrained in terms of the data set the XML vocabulary was designed to model (e.g., there’s not a natural way to map a purchase order into an Atom entry). Both of these formats do provide extensibility elements for injecting custom XML fragments, also commonly referred to as micro-formats. However, introducing micro-formats begins to counteract the benefit of using a standard representation format.
For our bookmark service, in addition to the XML format we’ve defined, we’ll also expose the public bookmarks as an Atom feed. If we’re going to support Atom feeds, we should probably also support RSS feeds since they’re very similar formats and it might open the door for more feed readers. Hence, we’ll support both by adding “feed” to the URI along with a “format” parameter to indicate “atom” or “rss”:
feed?tag={tag}&format={format}
Now let’s look at how we can represent bookmarks using Atom. Atom defines a standard format for representing feeds, which are essentially just lists of time-stamped entries that can really represent anything. For example, we can represent a list of bookmarks using this type of Atom feed:
<feed xmlns="http://www.w3.org/2005/Atom">
<title>Public Bookmarks</title>
<updated>2008-09-13T18:30:02Z</updated>
<id>https://contoso.com/bookmarkservice/feed</id>
<entry>
<author>
<name>Aaron Skonnard</name>
</author>
<title>Aaron’s Blog</title>
<link href="http://pluralsight.com/aaron"/>
<id>https://contoso.com/bookmarkservice/users/skonnard/bookmarks/13</id>
<updated>2008-09-13T18:30:02Z</updated>
<category term="REST,WCF"/>
</entry>
<entry>...</entry>
<entry>...</entry>
</feed>
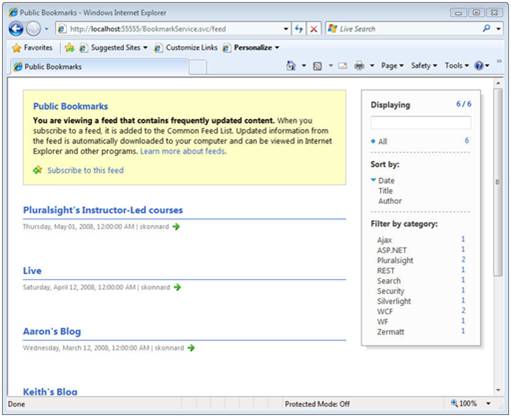
We’ve simply defined a mapping between our bookmark fields and the elements that make up an Atom <entry>. Once you have your data in Atom/RSS format, it can be easily consumed by any Atom/RSS compatible client. Figure 6 shows an Atom bookmark feed rendered in Internet Explorer and notice how we’re able to search, sort and filter this feed within the browser using the right-hand control pane.
Figure 6: An Atom feed rendered in Internet Explorer
AtomPub defines a standard way to represent a service document, which is a high-level description of the collections supported by a service. AtomPub also defines a standard API for manipulating entries using the standard Atom feed format along with GET, POST, PUT, and DELETE requests. The following shows an example AtomPub service document describing our service’s bookmarks collections:
<service xmlns="http://www.w3.org/2007/app"
xmlns:atom="http://www.w3.org/2005/Atom">
<workspace>
<atom:title>Contoso Bookmark Service</atom:title>
<collection href="https://contoso.com/bookmarkservice/" >
<atom:title>Public Bookmarks</atom:title>
</collection>
<collection href="https://contoso.com/bookmarkservice/skonnard" >
<atom:title>Aaron Skonnard's Public Bookmarks</atom:title>
</collection>
<collection>...</collection>
</workspace>
</service>
Figuring out the right representation to use for your RESTful service is primarily about figuring out what types of clients you want to accommodate and what scenarios you want to facilitate.
Providing Resource Metadata
The things you have to discover when using a RESTful service include the URI templates, the HTTP methods supported by each resource, and the representations supported by each resource. Today, most developers discover these things through either human-readable documentation or by actually interacting with the service. For example, once you know the URI templates for the service resources, you can browse to the various retrievable resources to inspect their representations, and you can use HEAD and OPTION requests to figure out what methods and headers a resource supports.
A HEAD request works just like a GET request but it returns only the response headers and no entity body, allowing the client to determine what the service is capable of returning. An OPTION request allows you to query a resource to figure out what HTTP methods it supports. The service can return the comma-separated list of supported HTTP methods to the client in the “Allow” header. The following example shows how to issue an OPTIONS request for a user’s bookmark collection:
OPTIONS https://contoso.com/bookmarkservice/skonnard/bookmarks HTTP/1.1
Assuming the client is authenticated as “skonnard”, the service will return the following response indicating that the resource supports GET and POST requests:
HTTP/1.1 200 OK
Allow: GET, POST
However, if someone other than “skonnard” issues the same OPTIONS request, the service will return the following response indicating that only GET requests are supported:
HTTP/1.1 200 OK
Allow: GET
HTTP also comes with a sophisticated built-in content negotiation mechanism. Clients can provide the “User-Agent” and the various “Accept” headers to indicate what media types (or representations) are acceptable for the response. The server can then pick a representation best suited for that particular client. When multiple acceptable representations might exist, the server can return a 300 (“Multiple Choices”) response including the URIs for each supported resource representation. The combination of HEAD, OPTIONS, and the content negotiation headers provides a foundation for runtime discovery.
If you want to make it possible for clients to discover the exact representation formats, you can provide clients with schema definitions that can be used to generate the client-side processing logic. Or you can choose to use a standard format like XHTML or Atom that removes the need for this altogether.
In addition to all of this, there are a few service description languages that can be used to fully describe RESTful services. WSDL 2.0 is one such language and the Web Application Description Language (WADL) is another, but not many toolkits provide support for either today. Although having WSDL-based code-generation would be a huge win for some consumers, not having it hasn’t been a huge show-stopper thus far. After all, there are many large-scale RESTful services around getting by just fine without it. Nevertheless, my hope is that we’ll see additional innovation in this area in the years ahead.
Avoiding RPC Tendencies
During URI design, beware of letting RPC tendencies slip into your URI templates. It’s often tempting to include a verb in the URI (e.g., /users?method=createUserAccount or even /users/create). Although this may seem obvious at first, there are several popular services on the Web today that break this rule. A service designed like this isn’t fully RESTful – it’s more of a hybrid REST/RPC service .
This type of design misuses HTTP’s uniform interface and violates the semantics for GET, which can cause big problems down the road when dealing with retries and caching. Like we learned earlier, GET is intended to be a safe operation (no side effects) but these operations do cause side effects. This can lead to problems since other components will make incorrect assumptions about these resources.
The primary reason some services do things this way is because many of today’s Web browsers and firewalls only allow GET and POST requests. Due to this limitation, many sites overload GET or POST to fake PUT and DELETE requests. This can be accomplished by specifying the real HTTP method in a custom HTTP header. A common HTTP header used for this purpose is the X-HTTP-Method-Override header, which you can use to overload POST with a DELETE operation as shown in this example:
POST /bookmarkservice/skonnard/bookmarks/123 HTTP/1.1
X-HTTP-Method-Override: DELETE
Using this technique is widely considered an acceptable practice for working around the limitations of today’s Web infrastructure because it allows you to keep your URI design free of RPCisms.
Building RESTful Services with WCF
Designing RESTful services properly is probably more challenging than actually implementing them once you know exactly what you’re trying to accomplish. However, the key to a successful and smooth implementation is choosing a programming framework designed to simplify working with HTTP.
Today, Microsoft offers exceptional support for HTTP across a variety of programming frameworks. First, .NET comes with the System.Web and System.Net assemblies, which contain the foundational classes for building HTTP clients and servers. ASP.NET builds on this foundation and provides a higher-level HTTP framework that simplifies the process of building Web applications for human consumption.
Although ASP.NET could be used to build RESTful services, the framework wasn’t designed with that goal in mind. Instead, Microsoft’s service-oriented investments have gone into WCF, the unified programming model for connecting applications on the .NET platform. Although WCF began as a SOAP framework, it has quickly evolved into a first-class framework for both SOAP and REST-based services. Now, WCF is the default choice for building services regardless of which approach you wish to use.
Using WCF 3.5 to build RESTful services offers communication and hosting flexibility, a simple model for mapping URI templates to methods, and simplified support for numerous representations including XML, JSON, RSS and Atom. In addition to this core support, Microsoft is now shipping the WCF REST Starter Kit, which provides additional APIs, extension methods, and various Visual Studio project templates to simplify REST development. The WCF REST Resource Kit is expected to evolve through CodePlex, and some of its features may make their way into future versions of the .NET framework.
The ADO.NET team was able to leverage the WCF REST support when they built ADO.NET Data Services, a higher-level REST framework that almost fully automates the process of exposing RESTful services around underlying data/object entities using AtomPub. ADO.NET Data Services is a great example of what’s possible when using WCF as your underlying REST communication framework.
Throughout this section, we’ll take a closer look at the built-in REST support found in WCF 3.5, the REST Starter Kit, and ADO.NET Data Services. But first, let’s look at how you’d have to do it without WCF.
The Motivation for a REST Framework
If you were going to implement our RESTful bookmark service using an IHttpHandler-derived class, there are several things that you’d have to manage yourself. IHttpHandler provides only a single entry point – ProcessRequest – for processing all incoming HTTP requests. In order to implement the RESTful interface we’ve designed, your implementation of ProcessRequest will have to perform the following tasks:
- Inspect the incoming URI and figure out which resource it identifies.
- Extract any variables found within the URI and map them to variables.
- Authenticate and authorize the user responsible for the request.
- Determine the HTTP method used in the request and whether it’s allowed for the resource.
- Read the resource representation found in the entity body (if any).
- Use all of this information to perform the underlying service logic.
- Generate an appropriate HTTP response, including the proper status code, description, and outgoing resource representation in the response entity body (if any).
Check out Figure 7 to get a feel for what this code might look like. I’ve provided a few methods that abstract away a lot of details like Matches and ExtractVariables but there is still a lot of tedious work going on around the actual service logic (e.g., dealing with user accounts and bookmarks).
Figure 7: A sample IHttpHandler implementation
public class BookmarkService : IHttpHandler
{
    public bool IsReusable { get { return true;  } }
    public void ProcessRequest(HttpContext context)
    {
        Uri uri = context.Request.Url;
        // compare URI to resource templates and find match
        if (Matches(uri, "{username}?tag={tag}"))
        {
            // extract variables from URI
            Dictionary<string, string> vars =
                ExtractVariables(uri, "{username}?tag={tag} ");
            string username = vars["username"];
            string tag = vars["tag"];
            // figure out which HTTP method is being used
            switch (context.Request.HttpMethod)
            {
                // dispatch to internal methods based on URI and HTTP method
                // and write the correct response status & entity body
                case "GET":
                    List<Bookmark> bookmarks = GetBookmarks(username, tag);
                    WriteBookmarksToResponse(context.Response, bookmarks);
                    SetResponseStatus(context.Response, "200", "OK");
                    break;
                case "POST":
                    Bookmark newBookmark = ReadBookmarkFromRequest(context.Request);
                    string id = CreateNewBookmark(username, newBookmark);
                    WriteLocationHeader(id);
                    SetResponseStatus(context.Response, "201", "Created");
                    break;
                default:
                    SetResponseStatus(context.Response, "405", "Method Not Allowed");
            }
        }
        if (Matches(uri, "users/{username}/bookmarks/{id}"))
        {
            // dispatch to internal methods based on URI and HTTP method
            // and write the correct response status & entity body
            ...
        }
        ... // match addition URI templates here
    }
}
WCF 3.5 provides a programming model that shields you from the tedious aspects of this code – it shields you from most HTTP protocol details, URIs, and the resource representations transmitted on the wire. It accomplishes this by providing a built-in URI template programming model that makes it easy to match URIs and extract variables. It also provides a new set of attributes for mapping HTTP method + URI template combinations to method signatures, and some serialization improvements for supporting different types of resource representations. And, of course, it provides the underlying runtime components that know how to bring these new RESTful programming constructs to life.
Introducing the WCF “Web” Programming Model
WCF 3.5 shipped with a new assembly called System.ServiceModel.Web.dll, which contains a variety of new classes that provide an easy-to-use “Web-based” programming framework for building RESTful services. To begin using this new “Web” programming model, simply add a reference to System.ServiceModel.Web.dll, a using statement to System.ServiceModel.Web, and you’re ready to go.
The first thing to realize is that the WCF “Web” model is still based on mapping a service interface to a set of methods. The only difference for a RESTful service is what the interface looks like. Instead of exposing a set of RPC-based operation names to the world, we’re going to define the service interface in terms of HTTP’s uniform interface and a set of URI templates. We’ll accomplish this by first defining a set of logical operations for performing the resource logic, and then we can apply the new “Web” attributes to define the mapping between the HTTP methods, our URI design, and the corresponding methods.
Modeling Resource Representations in WCF
WCF supports a variety of different mechanisms for working with the resource representations that will be transmitted in the HTTP request/response messages. You can always work directly with the raw request/response messages, if you want, by defining your method signatures in terms of System.ServiceModel.Channels.Message. If you take this route, you’re free to use your favorite XML or JSON API to process the messages; however, most developers prefer using a serialization engine that automatically moves between messages and .NET objects that are easier to consume.
WCF supports several different serializers out-of-the-box including the DataContractSerializer (the default), the DataContractJsonSerializer, and even the XmlSerializer from ASP.NET Web services. These serializers all perform essentially the same task, but they each do it a little bit differently, and each comes with its pros and cons. For example, the DataContractSerializer is very efficient and streamlined but supports only a small subset of XML Schema. XmlSerializer, on the other hand, allows you to build more advanced structures not supported by DataContractSerializer. WCF allows you to choose the serializer you want to use on a per-method basis when defining your service contracts.
For our bookmarking service, the DataContractSerializer should be sufficient for our needs. So we’ll define a few classes that will work with DataContractSerializer to represent our resources (see Figure 8).
Figure 8: User Account and Bookmark Resource Classes
public class User
{
    public Uri Id { get; set; }
    public string Username { get; set; }
    public string Name { get; set; }
    public string Email { get; set; }
    public Uri Bookmarks { get; set; }
}
public class UserProfile
{
    public Uri Id { get; set; }
    public string Name { get; set; }
    public Uri Bookmarks { get; set; }
}
public class Bookmark
{
    public Uri Id { get; set; }
    public string Title { get; set; }
    public Uri Url { get; set; }
    public string User { get; set; }
    public Uri UserLink { get; set; }
    public string Tags { get; set; }
    public bool Public { get; set; }
    public DateTime LastModified { get; set; }
}
[CollectionDataContract]
public class Bookmarks : List<Bookmark>
{
    public Bookmarks() { }
    public Bookmarks(List<Bookmark> bookmarks) : base(bookmarks) {}
}
As of .NET Framework 3.5 SP1, DataContractSerializer now supports serializing plain-old CLR objects (POCO, for short) without any serializer attributes as shown in the example above. Before SP1, we would have had to annotate the User and Bookmark classes with [DataContract] and [DataMember]; now you don’t have to. If you want more control over naming, default values, and ordering, you can always add these attributes back to the class definition but for this example, we’ll just accept the default mapping. In this case I still had to annotate the collection class with [CollectionDataContract] in order to make the name of the root element <Bookmarks> instead of the default <ArrayOfBookmark>.
DataContractSerializer treats all of the fields found on User and Bookmark as optional by default, so these classes can handle the input/output representations for each resource. We’ve also defined a couple of custom collection types for modeling lists of users and bookmarks. These classes all conform to the resource representations we defined earlier in the previous section.
Defining the Logical HTTP Methods
The next step is to model the logical HTTP methods we need to support (as outlined in Figure 4 and Figure 5 and) with method signatures that use the resource classes we just defined. Figure 9 shows the definition of a BookmarkService class that contains a method for each resource operations.
Figure 9: Modeling the logical HTTP methods
public class BookmarkService
{
    Bookmarks GetPublicBookmarks(string tag) {...}
    Bookmarks GetUserPublicBookmarks(string username, string tag) {...}
    Bookmarks GetUserBookmarks(string username) {...}
    UserProfile GetUserProfile(string username) {...}
    User GetUser(string username) {...}
    void PutUser(string username, User user) {...}
    void DeleteUser(string username) {...}
    Bookmark GetBookmark(string username, string id) {...}
    void PostBookmark(string username, Bookmark newValue) {...}
    void PutBookmark(string username, string id, Bookmark bm) {...}
    void DeleteBookmark(string username, string id) {...}
}
You’ll notice that most of these methods operate on User and Bookmark objects or their respective collection classes. Some of them also require extra parameters like username, id, and tag, which we’ll harvest from the incoming URI according to the URI template variables.
Implementing the URI Design with UriTemplate
The next thing we need to figure out is how to model the various URI templates we defined in Figure 4 and Figure 5 so we can use them in conjunction with the methods we just defined. The .NET Framework comes with the System.Uri class for modeling URIs, but it doesn’t contain the variable or matching logic. Hence, WCF provides a few additional classes for specifically dealing with URI templates, variables, and matching. These classes include UriTemplate, UriTemplateMatch, and UriTemplateTable.
When you construct a UriTemplate object, you supply a URI template string like the ones we used in Figure 4 and Figure 5. These templates may contain variables within curly braces (“{username}?tag={tag}”) and even an asterisk (“*”), which acts as a wildcard, when you want to match anything from that point on in the path. You can also specify default variable values within the template, making it possible to omit that part of the path. For example, a template of “{username}/{tag=all}” means that the variable “tag” will have the default value of “all” when that path segment is omitted.
Once you have a UriTemplate object, you can call the Match method, passing in a candidate Uri to see if it matches the template. If it does, it returns a UriTemplateMatch object containing the bound variables; otherwise, it simply returns null. You can also go the other direction – you can call BindByPosition or BindByName to generate a new URI from the template, supplying the required variable values. The following example illustrates how to use Match and BindByPosition to move in both directions:
Uri baseUri = new Uri("https://contoso.com/bookmarkservice");
UriTemplate uriTemplate = new UriTemplate(
   "users/{username}/bookmarks/{id}");
// generate a new bookmark URI
Uri newBookmarkUri = uriTemplate.BindByPosition(baseUri, "skonnard", "123");
// match an existing bookmark URI
UriTemplateMatch match = uriTemplate.Match(baseUri, newBookmarkUri);
System.Diagnostics.Debug.Assert(match != null);
Console.WriteLine(match.BoundVariables["username"]);
Console.WriteLine(match.BoundVariables["id"]);
The UriTemplateTable class provides a mechanism for managing a collection of UriTemplate objects. This makes it easy to call Match on the table to find all templates that match the supplied Uri. Alternatively, you can call MatchSingle to ensure it matches only a single UriTemplate in the table.
The WCF “Web” programming model makes it easy to map UriTemplate objects to your method signatures through the new [WebGet] and [WebInvoke] attributes. Once you have these attributes enabled, WCF will perform its internal method dispatching based on UriTemplate matching logic.
Defining the HTTP Interface: [WebGet] and [WebInvoke]
Now that we have an understanding of UriTemplate, we can use a few different WCF attributes to define the HTTP interface that our service will support. First, it’s important to know that all WCF service contracts must be annotated with [ServiceContract] and [OperationContract] regardless of whether you’re planning to use SOAP or REST. These attributes control what operations are ultimately exposed through the service. So we’ll first need to add these attributes to our class.
Once we have those attributes in place, we can add the new [WebGet] and [WebInvoke] attributes to our method signatures to define the specific mapping to the HTTP uniform interface. The reason they provided two attributes is because GET requests are fundamentally different from all the others, in that they are safe, idempotent, and highly cacheable. If you want to map an HTTP GET request to one of your service methods, you use [WebGet], and for all other HTTP methods, you use [WebInvoke].
The main thing you specify when using [WebGet] is the UriTemplate that the method is designed to handle. You can map the various UriTemplate variables to the method parameters by simply using the same name in both places. Figure 10 shows how we can map the various GET requests from our URI design (in Figure 4 and Figure 5 and) to our new BookmarkService class.
Figure 10: Applying [WebGet] to BookmarkService
[ServiceContract]
public partial class BookmarkService
{
    [WebGet(UriTemplate = "?tag={tag}")]
    [OperationContract]
    Bookmarks GetPublicBookmarks(string tag) {...}
    [WebGet(UriTemplate = "{username}?tag={tag}")]
    [OperationContract]
    Bookmarks GetUserPublicBookmarks(string username, string tag) {...}
    [WebGet(UriTemplate = "users/{username}/bookmarks?tag={tag}")]
    [OperationContract]
    Bookmarks GetUserBookmarks(string username, string tag) {...}
    [WebGet(UriTemplate = "users/{username}/profile")]
    [OperationContract]
    UserProfile GetUserProfile(string username) {...}
    [WebGet(UriTemplate = "users/{username}")]
    [OperationContract]
    User GetUser(string username) {...}
    [WebGet(UriTemplate = "users/{username}/bookmarks/{bookmark_id}")]
    [OperationContract]
    Bookmark GetBookmark(string username, string bookmark_id) {...}
    ...
}
We’ll handle the remaining HTTP methods with the [WebInvoke] attribute. It works a lot like [WebGet], but with a couple of key differences. Since it can be used with any HTTP method, you must specify which HTTP method it will handle via the Method property. And for PUT and POST methods, where the client will be supplying an entity body, you’ll need to add one more parameter to the method signature capable of holding the deserialized entity body. It should come after all of the UriTemplate parameters. Figure 11 shows how to complete our HTTP mapping for the bookmark service using [WebInvoke].
Figure 11: Applying [WebInvoke] to BookmarkService
[ServiceContract]
public partial class BookmarkService
{
    [WebInvoke(Method = "PUT", UriTemplate = "users/{username}")]
    [OperationContract]
    void PutUserAccount(string username, User user) {...}
    [WebInvoke(Method = "DELETE", UriTemplate = "users/{username}")]
    [OperationContract]
    void DeleteUserAccount(string username) {...}
    [WebInvoke(Method = "POST", UriTemplate = "users/{username}/bookmarks")]
    [OperationContract]
    void PostBookmark(string username, Bookmark newValue) {...}
    [WebInvoke(Method = "PUT", UriTemplate = "users/{username}/bookmarks/{id")]
    [OperationContract]
    void PutBookmark(string username, string id, Bookmark bm) {...}
    [WebInvoke(Method = "DELETE", UriTemplate = "users/{username}/bookmarks/{id}")]
    [OperationContract]
    void DeleteBookmark(string username, string id) {...}
    ...
}
Notice how each of these methods takes either a User or Bookmark object as the final parameter in the method signature – WCF will deserialize the request body and pass it to us through this parameter.
Implementing the Uniform Interface Methods
If you compare this implementation to the one I showed back in Figure 7, you should appreciate how much simpler WCF makes things on the HTTP front. Now, when we implement the methods, we can focus primarily on the business logic around managing the user account and bookmark resources. The WCF programming model has effectively shielded us from most HTTP programming details.
However, there are still some aspects of the HTTP programming model that we do need to manage from within your method implementations. For example, in most of our methods, we’ll need to inject response headers, set the response status code and description, and generate outbound links. So how do we get access to the underlying HTTP methods within our WCF method implementations?
This is where the WebOperationContext class comes into play. WebOperationContext provides properties for accessing the IncomingRequest and OutgoingResponse messages, which you can use to inspect the HTTP request or to manipulate the HTTP response before it’s sent. For example, you can simply call WebOperationContext.Current.OutgoingResponse.SetStatusAsNotFound() to return a 404 (“Not Found”) response to the client. WebOperationContext is your primary interface to HTTP.
You simply need to implement the logical HTTP operations for each of the resources exposed by your service. To help you get a feel for the type of code you’ll be writing within each method body, I’ve provided a few complete method implementations for you to inspect in Figure 12. Notice how they set different HTTP response codes, headers, and create outbound links through helper methods. The GetUserLink help generates an outbound link based on the same UriTemplates used by the service.
Figure 12: Sample method implementations for user account resources
[ServiceContract]
public partial class BookmarkService
{
    // in-memory resource collections
    Dictionary<string, User> users = new Dictionary<string, User>();
    Dictionary<string, Bookmark> bookmarks = new Dictionary<string, Bookmark>();
    [WebGet(UriTemplate = "users/{username}")]
    [OperationContract]
    User GetUserAccount(string username)
    {
        if (!IsUserAuthorized(username))
        {
            WebOperationContext.Current.OutgoingResponse.StatusCode =
                HttpStatusCode.Unauthorized;
            return;
        }
        User user = FindUser(username);
        if (user == null)
        {
            WebOperationContext.Current.OutgoingResponse.SetStatusAsNotFound();
            return null;
        }
        return user;
    }
    [WebInvoke(Method = "PUT", UriTemplate = "users/{username}")]
    [OperationContract]
    void PutUserAccount(string username, User newValue)
    {
        User user = FindUser(username);
        if (user == null)
        {
            // set status to created and include new URI in Location header
            WebOperationContext.Current.OutgoingResponse.SetStatusAsCreated(
                GetUserLink(username));
            ... // process new user backend logic
        }
        else if (!IsUserAuthorized(username))
        {
            WebOperationContext.Current.OutgoingResponse.StatusCode =
               HttpStatusCode.Unauthorized;
            return;
        }
        // create or update new user, but don't let user set Id/Bookmarks
        newValue.Id = GetUserLink(username);
        newValue.Bookmarks = GetUserBookmarksLink(username);
        users[username] = newValue;
    }
    ... // remaining methods ommitted
}
Hosting and Configuring WCF “Web” Services
WCF provides a great deal of flexibility around hosting services. Thanks to this flexibility, you can host your RESTful services over HTTP in any application of your choosing, or you can choose to host them within IIS/ASP.NET. The latter is probably the best choice if you’re building large-scale “Web” services.
When hosting your RESTful WCF services, there are two key components that you need to configure in order to enable the new “Web” behavior within the runtime. First, you need to expose an endpoint that uses the new binding for RESTful services – WebHttpBinding. Then, you need to configure the “Web” endpoint with the WebHttpBehavior. The new binding instructs WCF to not use SOAP anymore, but rather plain XML messages while the new behavior injects custom dispatching logic based on the [WebGet] and [WebInvoke] attributes and their corresponding UriTemplates.
Figure 13 illustrates how to accomplish this in your application configuration file.
Figure 13: Configuring WCF "Web" Services
<configuration>
   <system.serviceModel>
     <services>
        <service name="BookmarkService">
            <endpoint binding="webHttpBinding" contract="BookmarkService"
                      behaviorConfiguration="webHttp"/>
        </service>
     </services>
     <behaviors>
        <endpointBehaviors>
            <behavior name="webHttp">
                <webHttp/>
            </behavior>
        </endpointBehaviors>
     </behaviors>
  </system.serviceModel>
<configuration>
With this configuration in place, you can simply create a ServiceHost instance based on BookmarkService and open it to get your RESTful service up and running:
ServiceHost host = new ServiceHost(typeof(BookmarkService),
new Uri("https://localhost:8080/bookmarkservice"));
host.Open();
... // keep the host open until you want to shut it down
In this example, we specified the base URI for the service when constructing the ServiceHost, and that same address will be used for the endpoint, since we didn’t specify an address on the endpoint itself.
If the hosting experience I just described feels a little tedious to you, worry not, WCF has made things even easier through a custom ServiceHost-derived class called WebServiceHost. When you use WebServiceHost instead of ServiceHost, it will automatically create a Web endpoint for you using the base HTTP address and configure the injected endpoint with the WebHttpBehavior. So this example is equivalent to the prior example, only this time we don’t need a configuration file at all:
WebServiceHost host = new WebServiceHost(typeof(BookmarkService),
new Uri("https://localhost:8080/bookmarkservice"));
host.Open();
... // keep the host open until you want to shut it down
This little gem also greatly simplifies the process of hosting WCF “Web” services within IIS/ASP.NET through .svc files. By specifying the mapping from the .svc file to the service class name, we can take advantage of the Factory attribute to specify the WebServiceHostFactory as shown here:
<%@ ServiceHost Service="BookmarkService"
Factory="System.ServiceModel.Activation.WebServiceHostFactory"%>
This custom ServiceHostFactory intercepts the ServiceHost creation process at run time and generates WebServiceHost instances instead. In this case, the base URI of the service will simply be the URI of the .svc file and no further configuration is necessary, unless you need to configure additional behaviors.
If you’re hosting your WCF “Web” services in IIS/ASP.NET, it’s also a good idea to enable the ASP.NET compatibility mode within the WCF runtime. Doing so makes it possible for you to access the HttpContext object managed by ASP.NET from within your WCF methods. You enable ASP.NET compatibility by adding the following global flag to your Web.config file:
<configuration>
<system.serviceModel>
<serviceHostingEnvironment aspNetCompatibilityEnabled="true"/>
</system.serviceModel>
</configuration>
Then, you’ll also want to declare on your service class whether you allow, require, or don’t allow ASP.NET compatibility mode as illustrated here:
[AspNetCompatibilityRequirements(RequirementsMode =
AspNetCompatibilityRequirementsMode.Allowed)]
[ServiceContract]
public partial class BookmarkService
{
...
You will most likely end up hosting your WCF “Web” services in IIS/ASP.NET using .svc files like I’ve just shown you. One issue with using this technique is what the final URIs will look like. If the .svc file is located at https://localhost/bookmarkservice.svc, the final service URIs end up like this:
https://localhost/bookmarkservice.svc/skonnard?tag=wcf
https://localhost/bookmarkservice.svc/users/skonnard/bookmarks/13
...
The .svc portion of the URI is really a .NET implementation detail and not something that you probably want to have in the URI. The easiest way to work around this issue today is to leverage the Microsoft URL Rewrite Module for IIS 7.0, which makes it possible to remove the “.svc” from the path segment. For a complete example on how to do this, see Rob Bagby’s blog post on Controlling the URI. Once you’ve applied the URL Rewrite Module to remove “.svc”, your URIs will look like this:
https://localhost/bookmarkservice/skonnard?tag=wcf
https://localhost/bookmarkservice/users/skonnard/bookmarks/13
...
Once you have your WCF service implemented, configured, and hosted, you can begin testing your RESTful service by simply browsing to it (see
Figure 14). You can also use any HTTP client utility to test the non-GET operations for creating, updating, and deleting resources at this point.
Figure 14: Browsing to your WCF RESTful service

WCF Support for Ajax & JSON
Now that we’ve seen how to develop, host, and configure WCF “Web” services, we’re ready to explore supporting additional representation formats besides our custom XML vocabulary. We decided during our design phase that we wanted to support JSON message formats to simplify things for Ajax-based client applications. WCF makes this trivial to accomplish.
Both [WebGet] and [WebInvoke] expose two properties called RequestFormat and ResponseFormat. These properties are of type WebMessageFormat, an enum that contains two values, Xml and Json. The default value for these properties is WebMessageFormat.Xml, which is why our service currently returns XML. If you want a specific operation to support JSON, you simply need to set RequestFormat or ResponseFormat to WebMessageFormat.Json.
Since we want to support both message formats on our service, we’ll need to add another complete set of method signatures and new UriTemplates that are JSON-specific. Both method versions (XML and JSON) can call the same internal method to perform the operation logic, so we won’t be duplicating any code. WCF will simply perform the message-to-object translation differently based on the target URI.
Figure 15 shows how to begin defining the JSON-specific interface to our bookmarking service. Notice how we’ve added “?format=json” to the end of the UriTemplate strings we’ve been using for the equivalent XML operations (whose attributes have remained unchanged, by the way). We’ve also added the RequestFormat/ResponseFormat properties, specifying WebMessageFormat.Json, where applicable.
Figure 15: Defining a JSON-specific interface
[ServiceContract]
public partial class BookmarkService
{
    ...
    [WebInvoke(Method = "POST", RequestFormat=WebMessageFormat.Json,
        UriTemplate = "users/{username}/bookmarks?format=json")]
    [OperationContract]
    void PostBookmarkAsJson(string username, Bookmark newValue)
    {
        HandlePostBookmark(username, newValue);
    }
    [WebGet(ResponseFormat= WebMessageFormat.Json,
        UriTemplate = "users/{username}/bookmarks/{id}?format=json")]
    [OperationContract]
    Bookmark GetBookmarkAsJson(string username, string id)
    {
        HandleGetBookmark(username, id);
    }
    ...
}
Notice how these methods are also dispatching to internal methods called HandlePostBookmark and HandleGetBookmark, which are format independent. Both the XML and JSON methods can call these same internal methods to perform the business logic, reducing code duplication.
If you navigate to one of the JSON URIs in a browser, you’ll be prompted to save the file to disk. Go ahead and save the file as a .txt file and you can inspect the JSON response. With JSON enabled, Ajax clients can more easily communicate with our RESTful service and consume the data we send back.
WCF even goes one step further on the Ajax front by providing a special behavior that can automatically expose a WCF service as an Ajax-friendly JSON service. This is made possible by EnableWebServiceBehavior, which is wired-up when you use the new WebScriptServiceHost to host your services. This behavior not only exposes your WCF service, it also adds behavior to automatically generate Javascript proxies for Web browsers upon request. If you browse to your service’s base address and add “/js” to the end, you’ll get the auto-generated Javascript proxy. This makes it really simple for Javascript code running in a browser to call your service.
This technique is only useful for simple Ajax-based services that are primarily serving up data to Web pages. You cannot use UriTemplates in conjunction with this type of Ajax-based service because the auto-generated JavaScript proxies aren’t capable of dealing with them properly today.
WCF Support for Atom Feeds and AtomPub
In addition to the JSON support, WCF 3.5 also comes with built-in support for feeds, including both RSS 2.0 and Atom feed formats. They’ve provided a common API for building logical feeds regardless of the format you intend to use for the feed. The API consists of various classes found in System.ServiceModel.Syndication, including SyndicationFeed, SyndicationItem, SyndicationContent, etc.
Once you have a SyndicationFeed object, you can format it using either the Atom10FeedFormatter or the RSS20FeedFormatterClass. This gives you the ability to support multiple feed formats when you need to accommodate different client scenarios and make your feeds as widely consumable as possible. Figure 16 illustrates how to build a SyndicationFeed instance containing all of the public bookmarks. It allows the client to specify what type of feed to retrieve in the URI.
Figure 16: Building a SyndicationFeed containing the public bookmarks
[WebGet(UriTemplate ="feed?tag={tag}&format=atom")]
[ServiceKnownType(typeof(Rss20FeedFormatter))]
[ServiceKnownType(typeof(Atom10FeedFormatter))]
[OperationContract]
SyndicationFeedFormatter GetPublicBookmarksFeed(string tag, string format)
{
    Bookmarks publicBookmarks = HandleGetPublicBookmarks(tag);
    WebOperationContext ctx = WebOperationContext.Current;
    List<SyndicationItem> items = new List<SyndicationItem>();
    foreach (Bookmark bm in publicBookmarks)
    {
        SyndicationItem item = new SyndicationItem(bm.Title, "", bm.Url,
            bm.Id.ToString(), new DateTimeOffset(bm.LastModified));
        foreach (string c in bm.Tags.Split(','))
            item.Categories.Add(new SyndicationCategory(c));
        item.Authors.Add(new SyndicationPerson("", bm.User, ""));
        items.Add(item);
    }
    SyndicationFeed feed = new SyndicationFeed()
    {
        Title = new TextSyndicationContent("Public Bookmarks"),
        Id = ctx.IncomingRequest.UriTemplateMatch.RequestUri.ToString(),
        LastUpdatedTime = DateTime.Now,
        Items = items
    };
    if (format.Equals("atom"))
        return new Atom10FeedFormatter(feed);
    else
        return new Rss20FeedFormatter(feed);
}
Notice how in Figure 16 the method is defined to return a SyndicationFeedFormatter type but the implementation actually returns an instance of either Rss20FeedFormatter or Atom10FeedFormater. To make this work, we had to annotate the method with two [ServiceKnownType] attributes, one specifying each of the derived SyndicationFeedFormatter types we needed to return.
This type of feed can be consumed and viewed by any RSS/Atom reader, which includes most of today’s modern Web browsers (see Figure 6), and it can be easily syndicated by other feed-savvy sites. There is a great deal of RSS/Atom infrastructure available on the Web today, so exposing your data this way opens up numerous possibilities around how the data can be harvested.
WCF also provides built-in classes for AtomPub, a standard API for interacting with Atom-based collections using a RESTful interface. You can think of AtomPub as a standard application of the HTTP uniform interface but applied specifically to Atom feeds, which are modeled as collections of entries.
The WCF AtomPub support is found across several classes including ServiceDocument, ServiceDocumentFormatter, AtomPub10ServiceDocumentFormatter, and Workspace all found in the System.ServiceModel.Syndication namespace. Figure 17 illustrates how to use these classes to generate an AtomPub service document describing the feeds provided by our service.
Figure 17: Generating an AtomPub service document describing our feeds
ServiceDocument HandleGetServiceDocument()
{
    List<ResourceCollectionInfo> collections = new List<ResourceCollectionInfo>();
    collections.Add(new ResourceCollectionInfo(
        new TextSyndicationContent("Public Bookmarks"),
        GetPublicBookmarksFeedLink()));
    foreach (string user in users.Keys)
        collections.Add(
            new ResourceCollectionInfo(
                new TextSyndicationContent(
                    string.Format("Public Bookmarks by {0}", user)),
                    GetUserBookmarksFeedLink(user)));
    List<Workspace> workspaces = new List<Workspace>();
    workspaces.Add(new Workspace(
        new TextSyndicationContent("Contoso Bookmark Service"), collections));
    return new ServiceDocument(workspaces);
}
To fully support the AtomPub protocol, we’d need to redesign our service quite a bit to do everything in terms of Atom feeds and entries. In other words, we’d no longer use our current representations for user accounts and bookmarks. Instead, we’d figure out a way to represent user accounts and bookmarks within the AtomPub format and implement the appropriate HTTP methods (according to the AtomPub specification) using the [WebGet] and [WebInvoke] attributes.
Implementing Authentication and Authorization
Now we need to implement the HMAC authentication scheme I described earlier. The easiest way to accomplish this is to simply add a method called AuthenticateUser to your service implementation and call it from each service operation that we need to restrict access to. Figure 18 shows how to implement HMAC authentication by simply signing the URL with the secret key.
Figure 18: Implementing HMAC authentication
private bool AuthenticateUser(string user)
{
    WebOperationContext ctx = WebOperationContext.Current;
    string requestUri = ctx.IncomingRequest.UriTemplateMatch.RequestUri.ToString();
    string authHeader = ctx.IncomingRequest.Headers[HttpRequestHeader.Authorization];
    // if supplied hash is valid, user is authenticated
    if (IsValidUserKey(authHeader, requestUri))
        return true;
    return false;
}
public bool IsValidUserKey(string key, string uri)
{
    string[] authParts = key.Split(':');
    if (authParts.Length == 2)
    {
        string userid = authParts[0];
        string hash = authParts[1];
        if (ValidateHash(userid, uri, hash))
            return true;
    }
    return false;
}
bool ValidateHash(string userid, string uri, string hash)
{
    if (!UserKeys.ContainsKey(userid))
        return false;
    string userkey = UserKeys[userid];
    byte[] secretBytes = ASCIIEncoding.ASCII.GetBytes(userkey);
    HMACMD5 hmac = new HMACMD5(secretBytes);
    byte[] dataBytes = ASCIIEncoding.ASCII.GetBytes(uri);
    byte[] computedHash = hmac.ComputeHash(dataBytes);
    string computedHashString = Convert.ToBase64String(computedHash);
    return computedHashString.Equals(hash);
}
You can simply call this method from each [WebGet] and [WebInvoke] operation that requires authentication as illustrated here:
if (!AuthenticateUser(username))
{
WebOperationContext.Current.OutgoingResponse.StatusCode =
HttpStatusCode.Unauthorized;
return;
}
Once we’ve authenticated a user, we can save the user’s identity somewhere (e.g., as a user principal). In this example, I’m storing in the message properties so that we’ll be able to authorize the user within operations that need to further control access to certain resources. You could make this implementation more elegant by integrating with [PrincipalPermission] or by providing your own security attributes.
We could have also implemented this logic as a custom WCF channel, thereby removing the need to make calls to AuthenticateUser altogether and simplifying reuse, but building a custom channel is not an easy proposition. The WCF REST Starter Kit simplifies this by introducing a new request interception model specifically for situations like this when using the WebHttpBinding.
WCF REST Starter Kit
Up to this point, we’ve walked through all of the WCF 3.5 framework support for building RESTful services. WCF 3.5 makes building RESTful services quite easy today. Nevertheless, the WCF team wants to make building RESTful services even easier through a suite of new helper classes and Visual Studio project templates that they’ve packaged up and called the WCF REST Starter Kit.
The WCF REST Starter Kit has been commissioned as a CodePlex project, which is where you can download the code today. Microsoft plans to continue investing in the WCF REST Starter Kit through iterative releases that continue to introduce new features and capabilities to further ease the REST implementation challenges you might face with today’s support. The WCF team will eventually take some of these features and roll them into the next version of the .NET framework when appropriate. If you’re serious about building RESTful services with WCF, keep your eyes on this CodePlex project.
Microsoft.ServiceModel.Web Extensions
Once you start building RESTful services, you’ll begin running into some common pain points that feel tedious or cumbersome, even when using a modern framework like WCF (for example, writing the various HTTP status codes and descriptions to the response message). Hence, the WCF REST Starter Kit provides a new suite of APIs designed to address some of those common pain points in an effort to make building RESTful services even easier with WCF moving forward. These new classes and extension methods are found in the new Microsoft.ServiceModel.Web assembly and namespace.
As an example, the WCF REST Starter Kit introduces a new WebProtocolException class that you can throw in your service logic to specify an HTTP status code, which feels much more natural to a typical .NET developer. In addition to this, the WCF REST Starter Kit also comes with a new WebServiceHost2 class and the corresponding WebServiceHost2Factory class, which provides a zero-config experience tailored for a RESTful service. This custom service host introduces some new extensions and behaviors including support for an automatic help page that describes your RESTful service.
This new help page is a huge step forward for RESTful service development. By default, you navigate to it at “/help”. And you can annotate your “Web” operations with [WebHelp] to provide human-readable descriptions for each operation found on your service. This help pages makes it easy for consumers to figure out the service’s URI design, retrieve resource schemas, and view examples of them. The obvious next step is to provide a REST-savvy client experience on top of this complete with code generation.
The WCF REST Starter Kit also provides a simpler model for controlling caching through the [WebCache] attribute that you can declaratively apply to your service operations. And it adds numerous extension methods to the WebOperationContext class that address some common REST-oriented tasks.
And finally, the WCF REST Starter Kit introduces a new request interception model (based on RequestInterceptor) that you can use for different types of HTTP interception tasks such as authentication. This model makes it much easier to introduce your own request interception logic without having to deal with writing a custom WCF message inspector and an associated behavior. (see Figure 19)
Figure 19: Automatic help page for RESTFul services
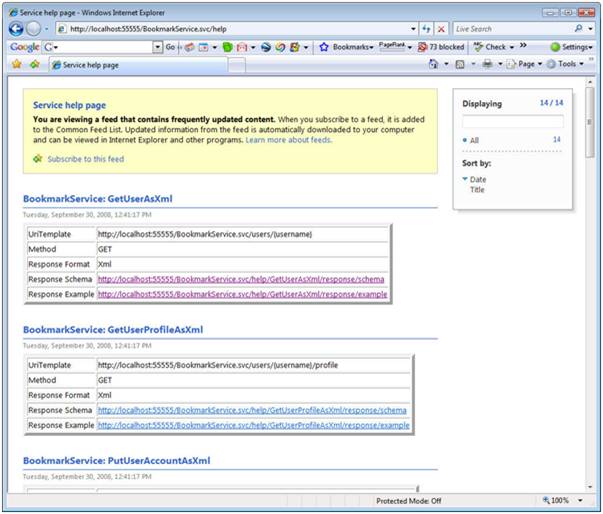
Project Templates for RESTful Services
There are certain types of RESTful services that require a lot of boilerplate code (for example, an Atom feed service or an AtomPub service) that you shouldn’t necessarily have to write by hand. Hence, the WCF REST Starter Kit comes with some valuable project templates that provide the necessary boiler plate code for certain types of services, which should greatly reduce the code you have to write. Once you’ve installed the WCF REST Starter Kit, you’ll see a suite of new project templates in the Visual Studio New Project dialog (see Figure 20). You simply need to choose one, enter the remaining project details, and press OK. Then you’ll end up with a skeleton REST project to start building on.
See The REST Singleton Service produces a service that exposes the full HTTP interface (GET, POST, PUT, and DELETE) around a singleton resource, and it automatically provides both XML and JSON representations for the underlying resource. The REST Collection Service does the same thing only it exposes a collection of underlying resources, as opposed to a singleton resource. This is probably where you want to start.
The HTTP Plain XML Service is different in that the generated service doesn’t support the full HTTP interface. Instead, it provides simple GET and POST operations for those who don’t care about fully conforming to the RESTful design principles we’ve discussed and would rather build a REST/RPC hybrid service by overloading GET and POST. I personally wouldn’t recommend this approach.
The last few Atom-related project templates add value when working with feeds. The Atom Feed Service template provides a sample implementation that shows how to programmatically generate and return a SyndicationFeed instance. You simply need to change the implementation to fill in your business data as appropriate. And finally, the Atom Publishing Protocol Service template provides a complete skeleton implementation for a fully compliant AtomPub service, greatly reducing the amount of code you have to write for this scenario, and allowing you to focus primarily on how to map your resources to Atom.
Figure 21 for a description of each project template. When you use one of these project templates, your remaining tasks include modifying the resource class definitions, propagating those changes throughout the implementation (you can use Visual Studio refactoring here), refining the URI design when needed, and implementing the method stubs for each HTTP operation.
Figure 20: The WCF REST Starter Kit project templates

The REST Singleton Service produces a service that exposes the full HTTP interface (GET, POST, PUT, and DELETE) around a singleton resource, and it automatically provides both XML and JSON representations for the underlying resource. The REST Collection Service does the same thing only it exposes a collection of underlying resources, as opposed to a singleton resource. This is probably where you want to start.
The HTTP Plain XML Service is different in that the generated service doesn’t support the full HTTP interface. Instead, it provides simple GET and POST operations for those who don’t care about fully conforming to the RESTful design principles we’ve discussed and would rather build a REST/RPC hybrid service by overloading GET and POST. I personally wouldn’t recommend this approach.
The last few Atom-related project templates add value when working with feeds. The Atom Feed Service template provides a sample implementation that shows how to programmatically generate and return a SyndicationFeed instance. You simply need to change the implementation to fill in your business data as appropriate. And finally, the Atom Publishing Protocol Service template provides a complete skeleton implementation for a fully compliant AtomPub service, greatly reducing the amount of code you have to write for this scenario, and allowing you to focus primarily on how to map your resources to Atom.
Figure 21: WCF REST Starter Kit project template descriptions
| Project Template | Description |
|---|---|
HTTP Plain XML Service |
Produces a service with simple GET and POST methods that you can build on for plain-old XML (POX) services that don’t fully conform to RESTful design principles, but instead rely only on GET and POST operations. |
REST Singleton Service |
Produces a service that defines a sample singleton resource (SampleItem) and the full HTTP interface for interacting with the singleton (GET, POST, PUT, and DELETE) with support for both XML and JSON representations. |
REST Collection Service |
Similar to the REST Singleton Service only it also provides support for managing a collection of SampleItem resources. |
Atom Feed Service |
Produces a service that produces a sample Atom feed with dummy data. |
Atom Publishing Protocol Service |
Produces a full-fledged AtomPub service capable of managing collections of resources as well as media entries. |
Let’s walk through a few examples using the WCF REST Starter Kit to help illustrate how it can simplify the process of building these types of RESTful services.
Using the “REST Collection Service” Project Template
Let’s start by creating a bookmark collection service similar to what we built manually earlier in this whitepaper. First, we’ll create a new project by selecting the REST Collection Service template. Then, we’d end up with a WCF project containing a resource class named SampleItem along with a service class that implements a RESTful HTTP interface. From this point, we need to make only a few changes.
The first thing we need to change is the name of the resource class – we’ll change it from “SampleItem” to “Bookmark” and I’ll take advantage of Visual Studio refactoring to propagate the change throughout the project. Now I can fill in the Bookmark class with the fields I need for representing a bookmark resource. I’ll make this Bookmark class look like the one we’ve been using thus far:
public class Bookmark
{
public Uri Url { get; set; }
public string User { get; set; }
public string Title { get; set; }
public string Tags { get; set; }
public bool Public { get; set; }
public DateTime LastModified { get; set; }
}
The template also provides a class called SampleItemInfo, which contains an individual Bookmark and the URL that links to it directly. I’ll change the name to BookmarkItemInfo and use refactoring to propagate the change. I’m also going to change the name of the “Item” field to “Bookmark”. Here’s what the BookmarkItemInfo class looks like for this example:
public class BookmarkItemInfo
{
public Bookmark Bookmark { get; set; }
public Uri Link { get; set; }
}
With these changes in place, my new bookmark collection service is ready to test. Simply press F5 in Visual Studio and it will load the service into the ASP.NET Development Server, and once it does, you should be able to access the service. When the browser first comes up to test the service, you’ll see an empty <ArrayOfBookmarkItemInfo> element because the collection is currently empty.
At this point you can either use an HTTP client utility to add some bookmarks to the collection (via POST) or you can pre-populate the Bookmark items collection in the service constructor. Once you’ve populated the Bookmark collection, you’ll get some <BookmarkItemInfo> elements back when you browse to the service’s root address (e.g., “https://localhost:59256/Service.svc”), which essentially requests the entire collection of bookmark resources. See Figure 22 for some sample results.
You can then browse to an individual bookmark resource by following one of the <Link> elements returned in the <BookmarkItemInfo> element. For example, you can retrieve the Bookmark with an Id of “3” by browsing to “https://localhost:59256/Service.svc/3” in this particular example (see Figure 23).
At this point you can also use POST, PUT, and DELETE operations without any additional coding – the generated project template already contains a default implementation for each one. You can POST new <Bookmark> elements to the service’s root address and it will generate a new Bookmark resource and assign it a new Id, and return a 201 Created response with the corresponding Location header. You can also PUT <Bookmark> elements to individual bookmark URIs to perform updates. And you can send DELETE requests to individual bookmark resources to remove them from the collection.
As you can see, for this particular type of RESTful service (a collection-oriented service), the WCF REST Starter Kit made it possible to get our implementation up and running with very little coding on our part. And it provides mostly the same functionality that I built myself in our BookmarkService example. It wouldn’t be hard to build on this starting point to add user accounts and the remaining functionality.
Figure 22: Browsing to the Bookmark collection service

Figure 23: Browsing to an individual bookmark resource
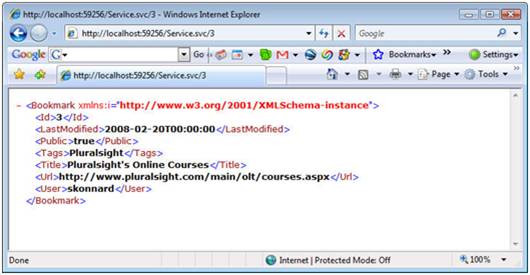
Using the “Atom Feed Service” Project Template
When you need to generate a simple Atom feed service, create a new project of type “Atom Feed Service” from the WCF REST Starter Kit. It will generate a WCF service with a sample feed implementation like the one shown in Figure 24. This service will run as-is and produce a sample Atom feed. You simply need to modify the code to insert your data into the SyndicationFeed instance.
Figure 24: Default implementation for an Atom Feed Service
[ServiceBehavior(IncludeExceptionDetailInFaults = true,
    InstanceContextMode = InstanceContextMode.Single,
    ConcurrencyMode = ConcurrencyMode.Single)]
[AspNetCompatibilityRequirements(
    RequirementsMode = AspNetCompatibilityRequirementsMode.Allowed)]
[ServiceContract]
public partial class FeedService
{
    [WebGet(UriTemplate = "?numItems={i}")]
    [OperationContract]
    public Atom10FeedFormatter GetFeed(int i)
    {
        SyndicationFeed feed;
        // TODO: Change the sample content feed creation logic here
        if (i == 0) i = 1;
        // Create the list of syndication items. These correspond to Atom entries
        List<SyndicationItem> items = new List<SyndicationItem>();
        for (int j = 1; j <= i; ++j)
        {
            items.Add(new SyndicationItem()
            {
                // Every entry must have a stable unique URI id
                Id = String.Format(
                    CultureInfo.InvariantCulture, "http://tmpuri.org/Id{0}", j),
                Title = new TextSyndicationContent(
                    String.Format("Sample item '{0}'", j)),
                // Every entry should include the last time it was updated
                LastUpdatedTime = new DateTime(
                    2008, 7, 1, 0, 0, 0, DateTimeKind.Utc),
                // The Atom spec requires an author for every entry.
                Authors =
                {
                    new SyndicationPerson()
                    {
                        Name = "Sample Author"
                    }
                },
                // The content of an Atom entry can be text, xml, a link or
                // arbitrary content. In this sample text content is used.
                Content = new TextSyndicationContent("Sample content"),
            });
        }
        // create the feed containing the syndication items.
        feed = new SyndicationFeed()
        {
            // The feed must have a unique stable URI id
            Id = "http://tmpuri.org/FeedId",
            Title = new TextSyndicationContent("Sample feed"),
            Items = items,
            Links =
            {
                // A feed should have a link to the service that produced the feed.
                GetSelfLink(),
            }
        };
        WebOperationContext.Current.OutgoingResponse.ContentType = AtomContentType;
        return feed.GetAtom10Formatter();
    }
    ...
}
Using the “Atom Publishing Protocol Service” Project Template
When you want to implement a service that conforms to the Atom Publishing Protocol, you should use the “Atom Publishing Protocol Service” project template that comes with the WCF REST Starter Kit. This template generates a complete AtomPub service that exposes a single sample collection.
You can test the service immediately by browsing to the service.svc file and the service will return an AtomPub service document describing the collections it supports (see Figure 28). As you can see from Figure 28, this service exposes a collection called “Sample Collection” that you can access by adding “collection1” to the end of the service’s root URL. When you access the collection, the service returns an Atom feed representing the sample collection (see Figure 29). The service also supports adding, updating, and deleting Atom entries through the standard AtomPub HTTP interface.
Figure 25: Browsing to the AtomPub service
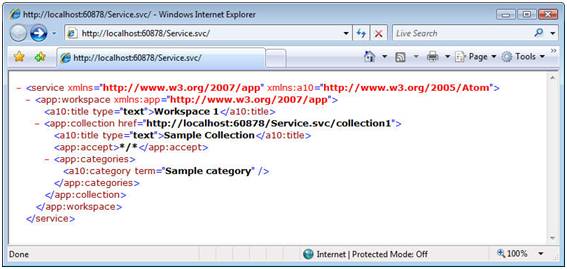
Figure 26: Browsing to the sample collection exposed by the AtomPub service
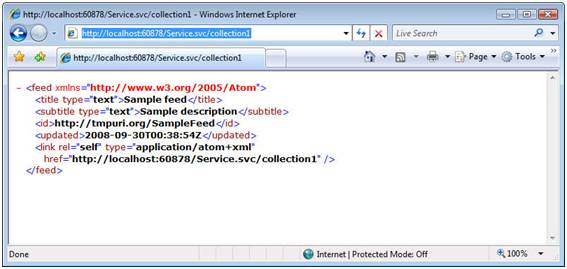
When you build AtomPub services using the WCF REST Starter Kit, your job is to focus on the logical collections you want to expose. You’ll need to define a mapping between your business entity collections and AtomPub collections exposed by the service, which essentially boils down to defining a mapping between your custom business entity classes and the WCF SyndicationFeed/Item classes.
ADO.NET Data Services
When building data-oriented services (that focus primarily on CRUD operations), there’s an even easier solution than the WCF REST Starter Kit. .NET Framework 3.5 SP1 introduced a new technology called ADO.NET Data Services, which almost automates the process of exposing data entities as fully functional RESTful services using the Atom Publishing Protocol. Interestingly, ADO.NET Data Services builds on the WCF REST infrastructure we just discussed. With ADO.NET Data Services, you define the entities you want to expose and the infrastructure takes care of everything else. Let’s walk through a few examples.
Using the ADO.NET Entity Data Model
If you’re building your service on top of a database resource, the easiest way to build an ADO.NET Data Service is to first add an ADO.NET Entity Data Model (EDM) to your project. This launches a wizard that walks you through the process of connecting to a database and defining a new entity mapping. Once you’re done, the wizard generates an EDM definition within your project. The class that sits behind the EDM definition derives from ObjectContext, and as a result, it’s usable with ADO.NET Data Services.
Assume that I’ve walked through the wizard and called the new model “BookmarksEntities”. Next, you add an ADO.NET Data Service item to your site as illustrated in Figure 27.
Figure 27: Creating a new ADO.NET Data Service
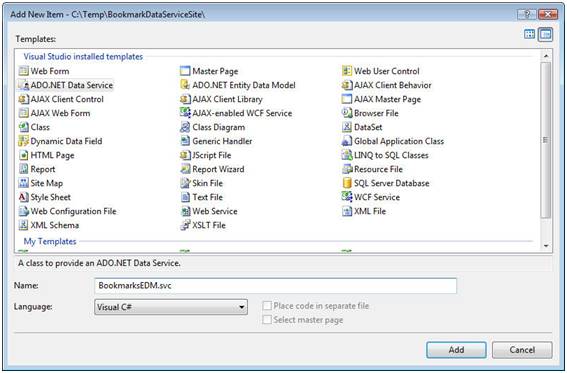
Doing this adds a new WCF BookmarksEDM.svc endpoint to your site and a code-behind file containing a single class deriving from DataService<T>, which looks like this:
public class BookmarksEDM : DataService< /* TODO: your data source class name */ >
{
// This method is called only once to initialize service-wide policies.
public static void InitializeService(IDataServiceConfiguration config)
{
// TODO: set rules to indicate which entity sets are visible, updatable, etc.
// Examples:
// config.SetEntitySetAccessRule("MyEntityset", EntitySetRights.AllRead);
// config.SetServiceOperationAccessRule("MyServiceOperation",
// ServiceOperationRights.All);
}
}
Since we already have a data source class (the one I generated using the EDM wizard), we can simply modify this to use my BookmarksEntities class. We’ll also need to uncomment the call to SetEntitySetAccessRule to allow access to the “Bookmarks” entity. Here’s what the final class looks like:
public class BookmarksEDM : DataService<BookmarksModel.BookmarksEntities>
{
public static void InitializeService(IDataServiceConfiguration config)
{
config.SetEntitySetAccessRule("Bookmarks", EntitySetRights.All);
}
}
We now have a fully functional RESTful service built around the Bookmarks entity model. If you navigate to the BookmarksEDM.svc file at this point, you should get an AtomPub service document back that looks like the one show in Figure 28, listing the collections exposed by the service.
Figure 28: The AtomPub service document returned by ADO.NET Data Services
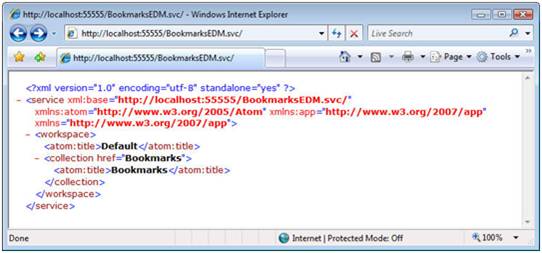
Now, if you browse to the Bookmarks collection by simply adding “Bookmarks” to the end of the URL, you should get an Atom feed containing the list of Bookmarks found in the database (see Figure 29).
Notice that the Bookmark class properties have been serialized within the Atom <content> element. You can further filter your GET queries using the standard URI syntax defined by ADO.NET Data Services, which includes a variety of operators and functions for performing logical data comparisons. For example, the following URL retrieves the bookmarks only for the User named “skonnard":
https://localhost:55555/BookmarksEDM.svc/Bookmarks?$filter=User%20eq%20'skonnard'
The service is also capable of handling POST, PUT, and DELETE requests according to the AtomPub protocol. We now have a fully functional AtomPub service and we hardly wrote any code. The ADO.NET Data Services Framework was able to hide nearly all of the WCF/REST implementation details.
Figure 29: The Atom feed returned for the Bookmarks collection
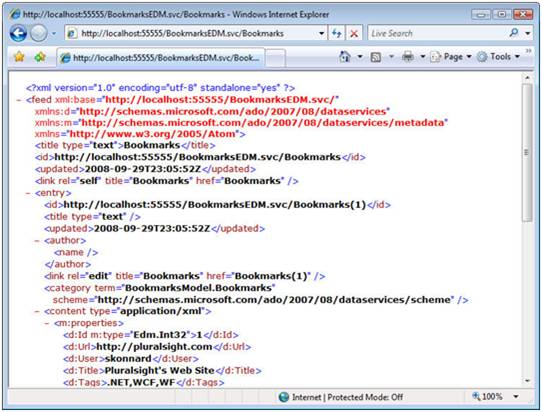
Using an In-Memory Entity Model
You can also use ADO.NET Data Services to expose collections of in-memory objects. The process is similar to what I just described, only you’re not going to use an EDM definition this time. Instead, you’ll have to write an in-memory data source class to replace the EDM definition. Figure 30 provides a complete implementation showing how to expose an in-memory collection of Bookmark objects.
Figure 30: Implementing an ADO.NET Data Service over an in-memory collection
[DataServiceKey("Id")]
public class Bookmark
{
    public string Id { get; set; }
    public string Url { get; set; }
    public string User { get; set; }
    public string Title { get; set; }
    public string Tags { get; set; }
    public bool Public { get; set; }
    public DateTime LastModified { get; set; }
}
// this class replaces the EDM definition - it provides an in-memory data source
public class BookmarkService
{
    static List<Bookmark> bookmarks = new List<Bookmark>();
    static BookmarkService()
    {
        ... // initialize 'bookmarks' collection with a bunch of objects
    }
    public IQueryable<Bookmark> Bookmarks
    {
        get { return bookmarks.AsQueryable<Bookmark>(); }
    }
}
public class BookmarkDataService : DataService<BookmarkService>
{
    public static void InitializeService(IDataServiceConfiguration config)
    {
        config.SetEntitySetAccessRule("Bookmarks", EntitySetRights.All);
    }
}
At this point you end up with an AtomPub service capable responding to GET requests for your in-memory resources. If you want the service to support POST, PUT, and DELETE requests, you must also implement IUpdateable (which was handled for us when using the EDM approach).
ADO.NET Data Services is a great example of an automated REST framework built on the WCF REST framework. For more information, see the ADO.NET Data Services learning center on MSDN.
Consuming RESTful Services
The easiest way to consume a RESTful service is with a Web browser –just browse to the URIs supported by the service and view the results – but this obviously works only for GET operations. You’ll need to use an HTTP client utility/library to test the non-GET methods. In general, the process for programmatically consuming RESTful services is a bit different than the process for consuming SOAP services, because RESTful services typically don’t come with a WSDL definition. However, since all RESTful services implement the same uniform interface, consumers inherently know the basic mechanics for interacting with the service through a traditional HTTP library. On the Microsoft platform, you can use MSXML2.XMLHTTP, System.Net, or WCF. Let’s look at a few client-side examples.
Consuming RESTful Services with JavaScript
Figure 31 provides the complete code for a simple HTTP command-line client utility written in JavaScript. It uses the MSXML2.XMLHTTP component that you’d use from scripting running within a Web browser (Ajax) application. The nice thing about this particular utility is that you can use it from a command prompt to quickly test your non-GET operations. Simply copy and paste this text into a text file and name it httputility.js. Then you can run it from a command window to issue HTTP requests.
Figure 31: A Simple JavaScript HTTP Client
if (WScript.Arguments.length < 2)
{
   WScript.echo("Client HTTP Request Utility\n");
   WScript.echo("usage: httprequest method uri [options]");
   WScript.echo();
   WScript.echo("  -f filename");
   WScript.echo("  -h headerName headerValue");
   WScript.Quit(1);
}
var method = WScript.Arguments.Item(0);
var uri = WScript.Arguments.Item(1);
var req = new ActiveXObject("MSXML2.XMLHTTP");
var filename = null;
req.Open(method, uri, false);
WScript.echo();
WScript.echo("********* Request ********* ");
WScript.echo(method + " " + uri + " HTTP/1.1");
for (i=2; i < WScript.Arguments.length; i++)
{
    var option = WScript.Arguments.Item(i);
    if (option == "-f")
        filename = WScript.Arguments.Item(i+1);
    if (option == "-h")
    {
        WScript.echo(WScript.Arguments.Item(i+1) + ": " +
            WScript.Arguments.Item(i+2));
        req.setRequestHeader(WScript.Arguments.Item(i+1),
            WScript.Arguments.Item(i+2));
    }
}
try
{
       if (filename != null)
       {
          WScript.echo();
          var fso = new ActiveXObject("Scripting.FileSystemObject");
          var file = fso.OpenTextFile(filename, 1, false);
          var fileContents = file.ReadAll();
          file.Close();
          WScript.echo(fileContents);
          req.Send(fileContents);
          printResponse(req);
       }
       else
       {
          req.send();
          printResponse(req);
       }
}
catch(e)
{
   WScript.echo();
   WScript.echo("******* Response ********* ");
   WScript.echo(e.message);
}
function printResponse(req)
{
   WScript.echo();
   WScript.echo("******* Response ********* ");
   WScript.echo("HTTP/1.1" + " " + req.status + " " + req.statusText);
   var headers = req.getAllResponseHeaders();
   WScript.echo(headers);
   WScript.echo(req.responseText);
}
Consuming RESTful Services with System.Net
If you’re writing .NET code, you can take advantage of the System.Net classes to programmatically issue HTTP requests and process the responses. The following code illustrates how easy this can be by using the HttpWebRequest and HttpWebResponse classes:
static void GetPublicBookmarks()
{
string uri = "https://localhost:55555/bookmarkservice.svc/";
HttpWebRequest req = WebRequest.Create(uri) as HttpWebRequest;
HttpWebResponse resp = req.GetResponse() as HttpWebResponse;
Bookmarks bookmarks = DeserializeBookmarks(resp.GetResponseStream());
foreach (Bookmark bm in bookmarks)
Console.WriteLine("{0}\r\n{1}\r\n", bm.Title, bm.Url);
}
It’s not hard to imagine how you could build a REST client library around your services (that uses code like this) to make them even easier for .NET clients to consume them. It’s also not hard to imagine how you could write a generic REST client on top of these classes that can be used with all your services.
Consuming RESTful Services with WCF
WCF 3.5 provides an abstraction over HTTP for consuming RESTful services the “WCF” way. To use this technique, you need a client-side interface definition containing [WebGet] & [WebInvoke] signatures for each operation you want to consume. You can use the same UriTemplate variable techniques in the client-side method definition. Here’s an example of how to get started:
[ServiceContract]
public interface IBookmarkService
{
[WebGet(UriTemplate = "?tag={tag}")]
[OperationContract]
Bookmarks GetPublicBookmarks(string tag);
...
}
Then you can create a WCF channel based on this interface definition using the new WebChannelFactory class that ships with WCF 3.5. This factory knows how to create channels that are aware of the [WebGet] & [WebInvoke] annotations and know how to map the method calls to the uniform HTTP interface. Here’s an example of how you can retrieve the public bookmarks tagged with “wcf”:
WebChannelFactory<IBookmarkService> cf = new WebChannelFactory<IBookmarkService>(
    new Uri("https://localhost:55555/BookmarkService.svc"));
IBookmarkService channel = cf.CreateChannel();
Bookmarks bms = channel.GetPublicBookmarks("WCF");
foreach (Bookmark bm in bms)
    Console.WriteLine("{0}\r\n{1}", bm.Title, bm.Url);
If you happened to define your server-side service contract using an interface definition, you can simply share that same interface definition with your WCF client applications. But unfortunately, there’s no way to automatically generate the client side RESTful contract from a service description.
Consuming ADO.NET Data Services
Because ADO.NET Data Services uses a standard AtomPub representation, it was also able to provide a simple service description language known as the Conceptual Schema Definition Language (CSDL), originally defined for the ADO.NET Entity Data Model. You can browse to the metadata for a particular ADO.NET Data Service by adding “$metadata” to the service’s base URL (see Figure 32).
This description contains enough information to generate client-side proxies. ADO.NET Data Services comes with a client utility called DataServiceUtil.exe for automatically generating the client-side classes. You can also perform an “Add Service Reference” command within Visual Studio to do the same thing. Once you’ve generated the client-side classes, you can write code like this to query your service:
BookmarkService bookmarkService = new BookmarkService(
    new Uri("https://localhost:55555/Bookmarks.svc/"));
// this generates the following URL:
// https://localhost:55555/Bookmarks.svc/Bookmarks()?$filter=substringof('WCF',Tags)&
// $orderby=LastModified
var bookmarks = from b in bookmarkService.Bookmarks
                where b.Tags.Contains("WCF")
                orderby b.LastModified
                select b;
foreach (Bookmark bm in bookmarks)
    Console.WriteLine("{0}\r\n{1}", bm.Title, bm.Url);
This illustrates the potential of code generation combined with a truly RESTful design. The client is interacting with a resource-centric model, yet all of the HTTP details have been abstracted away.
Figure 32: Browsing to ADO.NET Data Service metadata
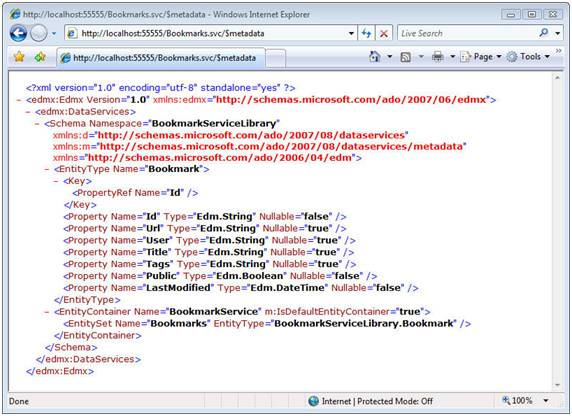
Beyond the Basics: Q&A
The following is a collection of common questions that come up when developers first begin looking at REST and comparing it with the SOAP and WS-* feature set, which has become quite popular today.
How does REST compare to SOAP?
SOAP defines a simple XML-based protocol for exchanging and processing XML payloads that can be annotated with XML headers. The XML headers can influence behavior around routing, security, reliability, and transactions. Over the past several years, the W3C and OASIS have been busy codifying a suite of SOAP header specifications (e.g., WS-Security, WS-ReliableMessaging, WS-AtomicTransactions, etc) that we collectively refer to as “WS-*”. SOAP + WS-* can be used to implement distributed systems that have complex security and reliability requirements without sacrificing interoperability or requiring you to use a specific transport protocol. This is one key area where SOAP and REST differ – while SOAP is transport-neutral, REST is very transport-centric in that it embraces HTTP for the features it needs.
One of the reasons SOAP has gained so much traction throughout the industry is because of its support for client-side code generation. Thanks to the Web Services Description Language (WSDL) and a variety of supporting code generation tools, SOAP developers have been able to generate client-side proxy classes that make it easy to begin consuming a service in a variety of different programming languages, while hiding the nasty details of the various WS-* protocols being used on the wire. This fact alone is why many major corporations have standardized on SOAP for their services. This is another area where SOAP and REST differ – most REST services don’t come with this type of code-generation support.
Although WSDL makes SOAP easy from an integration perspective, it doesn’t necessarily simplify the overall system design. In fact, despite SOAP’s attempt to move away from RPC, most SOAP frameworks still push developers towards an RPC model. This can become problematic because it’s widely believed that RPC doesn’t work as well at larger scales, where a more loosely-coupled document-oriented usually works better. At that point, many will realize that most SOAP services are no different than COM+ components, at least from a versioning perspective. REST, on the other hand, encourages a document-oriented model through a uniform interface (although noun versioning remains an issue).
Once you understand these realities, it raises some tough questions around which of these models – REST or SOAP – makes the most sense for a particular system. Anyone who tells you that one of them is always the right choice (regardless of which one), is probably trying to sell something or push an agenda. The reality is: both models provide design philosophies and tools for solving problems, each with their pros and cons. It’s your job as an architect/developer to analyze the differences and make a choice.
How do you go beyond CRUD?
Most of the examples we’ve seen thus far have simply modeled data entities and the basic CRUD operations. More complex concepts like business processes and transactions can also be handled using the uniform interface and RESTful principles. It requires you to think about those concepts as resources themselves, and then you can deal with them like any other resource.
For example, if you’re building a banking service, it’s easy to see how account information could be modeled using REST principles, but harder to see how you’d deal with something like the “transfer funds between accounts” process. However, once you start treating “transfers” as a resource, it begins to make more sense. You perform transfers issuing a POST request to a “transfers” resource. Any business process can potentially be modeled as a resource this way, although it may not feel as natural or as simple as defining a new verb/operation like you normally would in an RPC model.
What about advanced security?
Some argue that RESTful services are limited on the security front since they can’t use the WS-Security specifications. While it’s true they can’t use WS-Security, in my experience this hasn’t been a major show-stopper in the real world. The fact is: WS-Security provides a transport-neutral security framework that essentially provides the same features that SSL does for HTTP. In other words, SSL already provides most of the security features that WS-* enables for SOAP-based services.
So what does WS-Security (and the related specifications) enable over the built-in SSL features? It provides a few key features: 1) a single security framework capable of dealing with multiple intermediaries and potentially multiple transports, and 2) support for federated security. The idea of multiple intermediaries is interesting in theory, but doesn’t seem to be a common requirement out in the real world. However, support for federated security is becoming more common in large distributed systems so it’s a requirement that often pushes people towards SOAP and WS-* today.
Although you can implement federated security without SOAP and WS-*, there isn’t much .NET support for the alternate protocols. There are a variety of specifications that defined HTTP-centric federated security solutions including the SAML 2.0 HTTP bindings, OpenID, and OAuth to name a few. However, since WCF doesn’t provide built-in support for any of these specifications today, you either have to find a third-party library or go after it yourself, which isn’t a trivial proposition. This is one area where today’s REST frameworks need to play catch-up. It’s likely that the WCF REST Starter Kit will provide additional features and guidance in this area in a future release.
What about reliable messaging?
WS-ReliableMessaging adds a TCP-like reliability layer to SOAP, which makes it possible to implement HTTP-based services that have exactly-once ordered delivery guarantees. While this can be very attractive in some distributed scenarios, it’s an area of the WS-* that isn’t widely used in my experience. You can ensure exactly-once delivery over native HTTP by using idempotent operations (PUT/DELETE) and relying on consumers to retry when they don’t receive a confirmation of success. Idempotency is highly underutilized in today’s Web designs – it’s the key to reliability in your RESTful services.
What about distributed transactions?
HTTP doesn’t come with a built-in transaction protocol equivalent to WS-AtomicTransactions or the related specifications. However, it’s interesting to note that you can implement the notion of logical transactions in a RESTful service, again by treating the “transaction” as a resource. You can create a new “transaction” resource through a POST operation. Then you can PUT/DELETE other resources to transaction resource (reliably via idempotent retries). Along the way, you can retrieve the transaction itself by issuing a GET request for the “transaction” resource. And you can commit or roll back the transaction by issuing either a PUT or DELETE request to the “transaction” resource. This is another area where something is possible in REST, but probably not the simplest approach to solving the problem.
Conclusion
Designing Web services that embrace RESTful principles allows your systems to enjoy the benefits inherent in the Web platform immediately. RESTful design moves you away from traditional RPC and instead requires you to focus on resources, how your resources are identified, and how you interact with your resources through a uniform interface. In my experience, making this mental shift is the most challenging aspect of moving towards the REST architectural style; the remaining details are easy.
Microsoft is strongly committed to REST moving forward. As you’ve seen, WCF 3.5 makes it easy to support either REST or SOAP, so you can pick what best suits your problem space. The new “Web” programming model introduced in 3.5 by [WebGet], [WebInvoke], UriTemplate, and SyndicationFeed lowers the bar for authoring RESTful services. And with the introduction of the new WCF REST Starter Kit, they’ve lowered the bar even further. The project templates make it possible to get RESTful services up and running in minutes. And for exposing data in your database in traditional CRUD scenarios, it couldn’t be easier with ADO.NET Data Services, which practically automate the process of building RESTful data-oriented services.
Biography
Aaron Skonnard is a cofounder of Pluralsight, a premier Microsoft .NET training provider offering both instructor-led and online training courses. Aaron is the author of numerous books, articles, and whitepapers, as well as Pluralsight’s REST, Windows Communication Foundation, and BizTalk courses. Aaron has spent years developing courses, speaking at conferences, and teaching developers throughout the world. You can reach him at http://pluralsight.com/aaron.