Authentication and Authorization in WCF Services - Part 2
Robert Green
MCW Technologies
Download
Articles in this series
- Introduction to Windows Communication Foundation
- Hosting Windows Communication Foundation Services
- Self Hosting Windows Communication Foundation Services
- Creating and Maintaining Service and Data Contracts
- Fault Handling in WCF Services
- Sessions, Instancing and Concurrency in WCF Services
- Transactions in WCF Services
- Message Patterns in WCF Services
- Authentication and Authorization in WCF Services - Part 1
- Authentication and Authorization in WCF Services - Part 2
Introduction
When client applications and WCF services communicate, they do so by passing XML messages. Securing these messages is an important part of building, hosting and calling WCF services. In this two-part tutorial, you will ask questions related to security. For example:
- Can any client call the service or do you want to control who can call the service?
- Can any client call any method of the service or do you want to control what clients can call what methods?
- Can any client execute all of the code in a method or do you want to control what clients can execute what code?
The answers to these questions determine your use of authentication and authorization. Authentication enables you to identify clients that call the service. Authorization enables you to determine what operations authenticated clients can access. You will typically base authorization on roles.
To authorize, you first need to authenticate. To do that, you must be able to identify clients. Clients can identify themselves by providing evidence such as a Windows account, a user name / password or a certificate. Clients must also know that they are calling the service they intend to call. Services can identify themselves by providing a certificate.
In this two-part tutorial, you will see how to authenticate clients and control their access in the following three scenarios:
- Internal Self-Hosted Services. You are self-hosting a WCF service on the corporate network. You want anyone who can log onto the network to be able to access the service. You want only certain users to be able to call particular methods.
- Internal Web-Hosted Services. You are hosting a WCF service using Internet Information Services on the corporate intranet. Both employees and guests have access to the wireless network. You want only employees to be able to call the service. You want only certain users to be able to call particular methods.
- Public Web-Hosted Services. You are hosting a WCF service publicly on the Internet. You want to limit access to the service to users with a valid user name and password. You want only certain users to be able to call particular methods.
Part 1 of this tutorial explored the first scenario. You will explore the other scenarios here.
Control Access to and Usage of Private Web-Hosted Services
The second example in this tutorial involves an internal Web-hosted service. In this scenario, you are hosting a WCF service using Internet Information Services (IIS) on the corporate intranet. Only clients with a valid user name and password should be able to call the service and only certain users should be able to call particular methods.
If the only way to reach the Web server is by logging onto the corporate network, then you can use the same techniques you used in the previous scenario. If you use the WSHttpBinding binding, the client will pass the logged-in user’s credentials to the service. You can then check whether the user is in a particular role and if not, deny access to methods or blocks of code.
In the scenario here, however, suppose there is a wireless network available. Guests can log onto the wireless network and therefore could call the WCF service. To authenticate clients, you will require users to log in with their network credentials. You will pass these to the WCF service. This is known as basic authentication. You can then authorize as needed.
To explore authentication and authorization in this scenario, start Visual Studio 2008 and select File | Open | Project/Solution to display the Open Project dialog box. Navigate to the folder where you downloaded this tutorial’s sample project. Navigate to the InternalWebHostedServiceDemo folder. Select InternalWebHostedServiceDemo.sln and click OK to open the project. The sample application includes two projects. The SecureServiceLibrary project contains the same WCF service you saw in the first scenario.
To review, the WCF service contains SayHello and ReportSales methods. The code for these methods is in the SecureService file and is as follows:
// C#
public string SayHello()
{
return string.Format("Hello {0}",
System.Threading.Thread.CurrentPrincipal.Identity.Name);
}
public decimal ReportSales()
{
var currentUser = new WindowsPrincipal((WindowsIdentity)
System.Threading.Thread.CurrentPrincipal.Identity);
if (currentUser.IsInRole(WindowsBuiltInRole.BackupOperator))
{
return 10000M;
}
else
{
return -1M;
}
}
' Visual Basic
Public Function SayHello() As String Implements ISecureService.SayHello
Return String.Format("Hello {0}", _
Threading.Thread.CurrentPrincipal.Identity.Name)
End Function
Public Function ReportSales() As Decimal _
Implements ISecureService.ReportSales
Dim currentUser As New WindowsPrincipal(CType( _
Threading.Thread.CurrentPrincipal.Identity, WindowsIdentity))
If currentUser.IsInRole(WindowsBuiltInRole.BackupOperator) Then
Return 10000D
Else
Return -1D
End If
End Function
The SayHello method returns a string containing the name of the logged-in user. The ReportSales method returns $10,000 if an authorized user calls the method. Otherwise, it returns -1. For more information on the code in these methods, see the Authentication and Authorization Part 1 tutorial.
For this scenario, you need to enable basic authentication in IIS. Select Control Panel from the Windows Start menu. In the Control Panel window, select Programs. In In the Windows Explorer window that appears, click the Turn Windows features on and off link to display the Windows Features dialog box.
Expand the Internet Information Services node. Then expand the World Wide Web Services node. Next, expand the Security node and check Basic Authentication (see Figure 1). Click OK to close the dialog box.
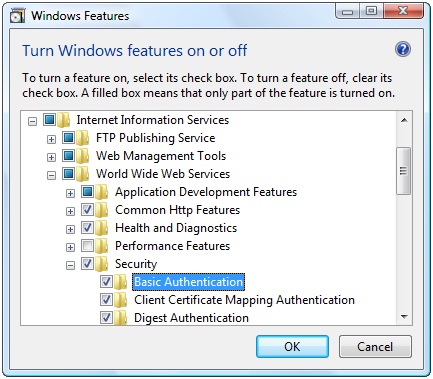
Figure 1. Enable basic authentication for Internet Information Services.
When you create the Web site to host the WCF service, you will use HTTPS and SSL to encrypt communications. SSL requires a digital certificate, so you must next create and specify a certificate to use.
Select Control Panel | Administrative Tools from the Windows Start menu. If you have not configured the Start menu to display Administrative Tools, open the Control Panel, click Classic View and then click on Administrative Tools. In the Windows Explorer window that appears, double-click the Internet Information Services (IIS) Manager shortcut to display the IIS Manager applet.
First, ensure the Web server is set up for basic authentication. In the Connections pane, expand the Sites node. Select Default Web Site. Double-click Authentication in the IIS section to display the Authentication page. Confirm that Basic Authentication has a status of Enabled. If it does not, right-click Basic Authentication and select Enable (see Figure 2).
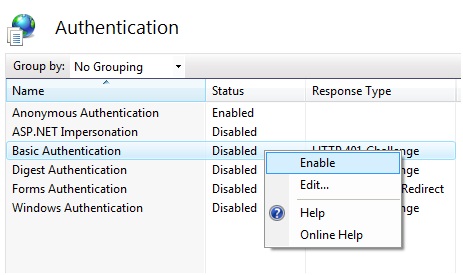
Figure 2. Enable basic authentication for the Web site if necessary.
Next you will create a certificate. In the Connections pane, select the top node (the node with the name of your computer. Double-click Server Certificates in the IIS section to display the Server Certificates page. In the Actions pane, select Create Self-Signed Certificate to display the Create Self-Signed Certificate dialog box. Name the cerificate WCFSecurityTutorial (see Figure 3). Click OK to close the dialog box. You should see the certificate listed in the Server Certificates page (see Figure 4).

Figure 3. Name the self-signed certificate.

Figure 4. You have created a self-signed certificate.
In a production environment, you should not use a self-signed certificate. You should use a certificate from your organization or a trusted third party. You should only use a self-signed certificate for development and testing purposes on your own computer.
Next, you need to configure IIS to enable Web sites to communicate using SSL and the certificate you just created. In the Connections pane, right-click Default Web Site and select Edit Bindings to display the Site Bindings dialog box. Click Add to display the Add Site Binding dialog box. Select https from the Type drop-down list (see Figure 5). Next, select the WCFSecurityTutorial from the SSL certificate drop-down list (see Figure 6).

Figure 5. Add a binding based on HTTPS.

Figure 6. Select the certificate to enable HTTPS.
Click View to display the Certificate dialog box. Select the Details tab. In the Field list, select Thumbprint (see Figure 7). Write down the certificate’s thumbprint. You will use it shortly.

Figure 7. You will use the certificate’s thumbprint shortly.
Click OK to dismiss the Certificate dialog box. Click OK to close the Add Site Binding dialog box. Click Close to dismiss the Site Bindings dialog box.
You now need to configure a port with the certificate. You will need a GUID so return to Visual Studio and select Tools | Create GUID to display the Create GUID dialog box. Select Registry Format. Visual Studio creates a GUID and displays it in the dialog box (see Figure 8). Click Copy to copy the GUID and then click Exit to close the dialog box.
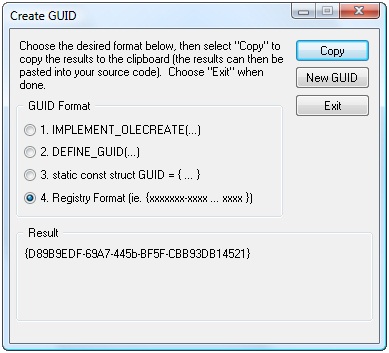
Figure 8. Use this dialog box to create a GUID.
Select Run from the Windows Start menu to display the Run menu. Enter cmd and press OK to display the command prompt. You need to run the command prompt with Administrator privileges. If this does not happen automatically, select All Programs then Accessories from the Windows Start menu. Right-click on Command Prompt and select Run as administrator.
In the command prompt, type the following, with appropriate substitutions, all on one line:
netsh http add sslcert ipport=0.0.0.0:8080
certhash=5097b55f7c32cebbe651beccd50e81e26ff30843
appid={D89B9EDF-69A7-445b-BF5F-CBB96DB14521}
The value of the certhash parameter is the certificate’s thumbprint without spaces. Use the value you wrote down earlier. The value of the appid parameter is the GUID you generated in Visual Studio.
Press ENTER. You should see the following in the command prompt:
SSL Certificate successfully added
Enter Exit to close the command prompt.
You will next create a Web site to host the service. Return to Visual Studio. In the Solution Explorer, right-click the InternalWebHostedServiceDemo solution and select Add | New Web Site to display the Add New Web Site dialog box. Select WCF Service in the Templates list. Select HTTP from the Location drop-down list. Select Visual C# or Visual Basic from the Language drop-down list. In the Location text box, enter https://localhost/InternalWebHostedServiceDemo. In this scenario, you will use basic authentication and SSL, so you specify https in the Web site address. Click OK.
In the Solution Explorer, expand the App_Code folder under the new web site project you just created. Delete the IService and Service files. In the Solution Explorer, right-click the InternalWebHostedServiceDemo project, and select Add Reference from the context menu. In the Projects tab of the Add Reference dialog box, select SecureServiceLibrary. Click OK to add the reference to the service.
Rename the Service1.svc file to SecureService.svc. Open the file by double clicking on the file name in the Solution Explorer. Since you are referencing an existing service, change the contents of this file to the following:
<%@ ServiceHost Service="SecureServiceLibrary.SecureService" %>
In the Solution Explorer, double-click Web.config. In the system.web section, make the following change in bold to enable debugging of the service at runtime:
// C#
<compilation debug="true" strict="false" explicit="true">
' Visual Basic
<compilation debug="true">
Scroll down to the system.serviceModel section. Make the following changes in bold:
<service name="SecureServiceLibrary.SecureService"
behaviorConfiguration="ServiceBehavior">
<!-- Service Endpoints -->
<endpoint address="" binding="wsHttpBinding"
bindingConfiguration="WsHttpBindingConfig"
contract="SecureServiceLibrary.ISecureService">
Add the following XML in bold to configure the WSHttpBinding binding to use Transport security and to expect the client to pass the user name and password:
<system.serviceModel>
<bindings>
<wsHttpBinding>
<binding name="WsHttpBindingConfig">
<security mode="Transport">
<transport clientCredentialType="Basic" />
</security>
</binding>
</wsHttpBinding>
</bindings>
<services>
<service name="SecureServiceLibrary.SecureService"
Save your changes and select Build | Build Web Site.
You are now ready to complete the client application. Return to Visual Studio. In the Solution Explorer window, right-click on the WindowsClient project and select Add Service Reference to display the Add Service Reference dialog box. Enter https://localhost/InternalWebHostedServiceDemo/SecureService.svc in the Address text box and click Go. Visual Studio displays the security alert shown in Figure 9.
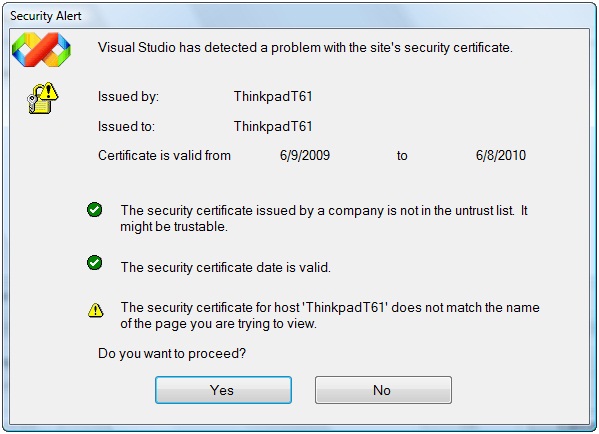
Figure 9. Your use of a self-signed certificate generates this security alert.
Visual Studio displays this message because the WCF runtime does not trust self-signed certificates. Ordinarily, you would not continue at this point, but for the purposes of this tutorial, click Yes to continue. Visual Studio displays the message shown in Figure 10. You have configured the service to use basic authentication, which requires valid login credentials. Click Yes. Visual Studio displays the Discovery Credential dialog box (see Figure 11). Enter your user name and password and click OK.

Figure 10. You need to pass your credentials to the service.

Figure 11. Enter your name and password to authenticate your call to the service.
In the Services pane of the Add Service Reference dialog box, select SecureService. Enter SecureService in the Namespace text box and click OK to add the service reference.
In the Solution Explorer, double-click Form1. The form (see Figure 12) has textboxes for user name and password. When the user clicks Log in, the form’s code will create a new instance of the service proxy class.

Figure 12. This is the sample application’s form.
Double-click the Log in button and add the following code to the logInButton_Click method:
// C#
proxy = new SecureServiceClient("WSHttpBinding_ISecureService");
proxy.ClientCredentials.UserName.UserName = nameTextBox.Text;
proxy.ClientCredentials.UserName.Password = passwordTextBox.Text;
' Visual Basic
proxy = New SecureServiceClient("WSHttpBinding_ISecureService")
proxy.ClientCredentials.UserName.UserName = nameTextBox.Text
proxy.ClientCredentials.UserName.Password = passwordTextBox.Text
This code passes to the service the user name and password as credentials. If the credentials are not valid, the service will throw an exception. Add the following code in bold to the sayHelloButton_Click method to catch this exception:
// C#
try
{
MessageBox.Show(proxy.SayHello());
}
catch (MessageSecurityException)
{
MessageBox.Show("You do not have permission to call this service");
}
catch (FaultException faultEx)
{
MessageBox.Show(faultEx.Message);
}
' Visual Basic
Try
MessageBox.Show(proxy.SayHello())
Catch messageSecurityEx As MessageSecurityException
MessageBox.Show("You do not have permission to call this service")
Catch faultEx As FaultException
MessageBox.Show(faultEx.Message)
Add the following code in bold to the reportSalesButton_Click method to catch the exception:
// C#
try
{
decimal sales = proxy.ReportSales();
if (sales != -1)
{
MessageBox.Show(String.Format(
"Today's sales are {0:C}", sales));
}
else
{
MessageBox.Show(
"You are not authorized to view sales numbers");
}
}
catch (MessageSecurityException)
{
MessageBox.Show("You do not have permission to call this service");
}
catch (SecurityAccessDeniedException securityEx)
{
MessageBox.Show(securityEx.Message);
}
' Visual Basic
Try
Dim sales As Decimal = proxy.ReportSales
If sales <> -1 Then
MessageBox.Show(String.Format( _
"Today's sales are {0:C}", sales))
Else
MessageBox.Show( _
"You are not authorized to view sales numbers")
End If
Catch messageSecurityEx As MessageSecurityException
MessageBox.Show("You do not have permission to call this service")
Catch securityEx As SecurityAccessDeniedException
MessageBox.Show(securityEx.Message)
Save your changes and build the solution. Press F5 to run the application. Enter your user name and password and click Log in. Click Say hello. The application should display a message similar to the one shown in Figure 13, but with your logged in user name.
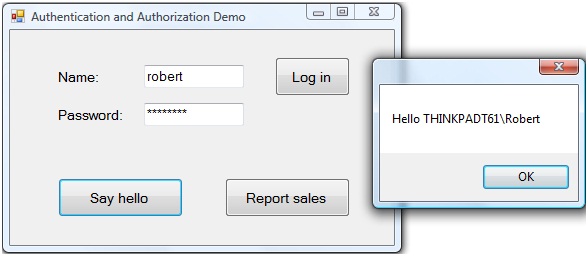
Figure 13. The service returns to the client a greeting with your name.
Click OK to dismiss the message. Click Report sales. The application should display the message shown in Figure 14.
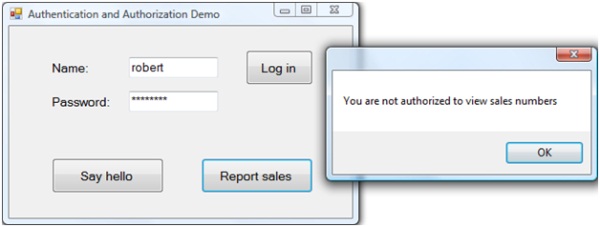
Figure 14. You are not authorized to see the sales number.
You receive this message because the service is configured to only allow members of the Windows built-in Backup Operators group to view sales numbers. Click OK to dismiss the message. Enter a password other than your correct one and click Log in. Click Say hello. The application should display the message shown in Figure 15.

Figure 15. You do not have permission to call the service.
Click OK to dismiss the message. Close the form.
Control Access to and Usage of Public Web-Hosted Services
You just explored how to control access to a WCF service hosted internally using Internet Information Services. In the final scenario in this tutorial, you will explore how to control access to a service hosted externally. You will still require users to log in and pass credentials. If the users of the service all have network logins, then you can use the same techniques you just saw. The only difference would be the address of the WCF service.
However, suppose you want your service to be publicly available but only to customers or subscribers. Further, suppose you want to group your users into roles to control who can access what code. You can use ASP.NET membership and roles to accomplish this. You can store user names, passwords and roles in a SQL Server database. You can then configure WCF to use the ASP.NET membership and roles providers to validate user names and passwords and to see if users are in particular roles.
This tutorial assumes you have configured SQL Server to work with these providers. If you have not, see the Creating the Application Services Database for SQL Server Help topic (https://msdn.microsoft.com/en-us/library/x28wfk74.aspx).
To explore authentication and authorization in this scenario, select File | Open | Project/Solution to display the Open Project dialog box. Navigate to the folder where you downloaded this tutorial’s sample project. Navigate to the PublicWebHostedServiceDemo folder. Select PublicWebHostedServiceDemo.sln and click OK to open the project. The sample application includes two projects. The SecureServiceLibrary project contains the same WCF service you saw in the previous two scenarios.
You will next create a Web site to host the service. In the Solution Explorer, right-click the PublicWebHostedServiceDemo solution and select Add | New Web Site to display the Add New Web Site dialog box. Select WCF Service in the Templates list. Select HTTP from the Location drop-down list. Select Visual C# or Visual Basic from the Language drop-down list. In the Location text box, enter https://localhost/PublicWebHostedServiceDemo. You will not use SSL here, so you do not need to specify https in the Web site address. Click OK.
In the Solution Explorer, expand the App_Code folder under the new web site project you just created. Delete the IService and Service files. In the Solution Explorer, right-click the PublicWebHostedServiceDemo Web site, and select Add Reference from the context menu. In the Projects tab of the Add Reference dialog box, select SecureServiceLibrary. Click OK to add the reference to the service.
Rename the Service.svc file to SecureService.svc. Open the file by double clicking on the file name in the Solution Explorer. Since you are referencing an existing service, change the contents of this file to the following:
<%@ ServiceHost Service="SecureServiceLibrary.SecureService" %>
In the Solution Explorer, double-click Web.config. In the system.web section, make the following change in bold to enable debugging of the service at runtime:
// C#
<compilation debug="true" strict="false" explicit="true">
' Visual Basic
<compilation debug="true">
Scroll down to the system.serviceModel section. Make the following changes in bold:
<service name="SecureServiceLibrary.SecureService"
behaviorConfiguration="ServiceBehavior">
<!-- Service Endpoints -->
<endpoint address="" binding="wsHttpBinding"
contract="SecureServiceLibrary.ISecureService">
Configure Membership and Roles
You will now configure the Web site to support ASP.NET membership and roles. In the Solution Explorer, select the PublicWebHostedServiceDemo Web site. Select Website | ASP.NET Configuration. This opens the Web Site Administration Tool in the browser (see Figure 16).

Figure 16. Use the Web Site Administration Tool to configure security for the Web site.
Select the Security link. Select the Use the security Setup Wizard to configure security step by step link to start the Security Setup Wizard. On the Welcome page of the wizard, click Next. In Step 2, select From the internet to use Forms based authentication. Click Next. The wizard informs you that your application is configured to use advanced provider settings. This means the application will store user names, passwords and roles in a SQL Server Express database. Click Next.
In Step 4 of the wizard, check Enable roles for this Web site. Click Next. Enter Everyone in the New Role Name text box and click Add Role (see Figure 17). To create a second role, enter Member in the New Role Name text box and click Add Role. Click Next.

Figure 17. Create a new role by entering its name.
In Step 5 of the wizard, you will create a new user. Enter Robert as the user name and P@ssword1 as the password. You must enter an e-mail address and a security question and answer. You can enter anything you like. Click Create User to add the user and when you see the confirmation page, click Continue.

Figure 18. Create a new user.
Enter a second user with the name Manny. Use the same password. Click Create User to add the user and when you see the confirmation page, click Next.
In Step 6 of the wizard, you will deny access to anonymous users. Anyone wishing to call the WCF service must log in. Select Anonymous Users in the Rule applies to list. In the Permission list, select Deny (see Figure 19). Click Add This Rule to create the rule. Click Next and then click Finish. The Web Site Administration Tool should look like Figure 20.

Figure 19. Anonymous users will not be able to call the WCF service.

Figure 20. The Web Site Administration Tool should look like this.
You will next assign users to roles. Select the Manage users link. Select the Edit roles link associated with Manny. Check Everyone to assign Manny to that role (see Figure 21).

Figure 21. Assign a user to a role.
Select the Edit roles link associated with Robert. Check Everyone and Member to assign Robert to those roles. Click Back. Close the browser.
Return to Visual Studio. In the Web.config file, add the following XML in bold to configure the WCF service to expect that clients pass a user name and password to the service:
<system.serviceModel>
<bindings>
<wsHttpBinding>
<binding name="WsHttpBindingConfig">
<security mode="TransportWithMessageCredential">
<transport clientCredentialType="None" />
<message clientCredentialType="UserName" />
</security>
</binding>
</wsHttpBinding>
</bindings>
<services>
<service name="SecureServiceLibrary.SecureService"
behaviorConfiguration="ServiceBehavior">
<!-- Service Endpoints -->
<endpoint address="" binding="wsHttpBinding"
bindingConfiguration="WsHttpBindingConfig"
contract="SecureServiceLibrary.ISecureService">
Next, add the following XML in bold to configure the WCF service to use the ASP.NET membership provider to authenticate users and to use the ASP.NET roles provider to determine what roles users have so you can control their actions:
<behaviors>
<serviceBehaviors>
<behavior name="ServiceBehavior">
<serviceMetadata httpGetEnabled="true"/>
<serviceDebug includeExceptionDetailInFaults="false"/>
<serviceCredentials>
<userNameAuthentication
userNamePasswordValidationMode="MembershipProvider"
membershipProviderName="AspNetSqlMembershipProvider"/>
</serviceCredentials>
<serviceAuthorization
principalPermissionMode="UseAspNetRoles"
roleProviderName="AspNetSqlRoleProvider" />
</behavior>
</serviceBehaviors>
</behaviors>
</system.serviceModel>
Now that you have configured the WCF service to use the ASP.NET membership and role providers, you will write the code in the service to control who can call the ReportSales method.
In the Solution Explorer, right click on the SecureServiceLibrary project and select Add Reference to display the Add Reference dialog box. In the Component Name list, select System.Web and click OK to add the reference.
In the Solution Explorer, double-click on the SecureService file. Add the following to the top of the code file:
// C#
using System.Security.Principal;
using System.Web.Security;
' Visual Basic
Imports System.Security.Principal
Imports System.Web.Security
Replace the code in the ReportSales method with the following:
// C#
IIdentity currentUser =
ServiceSecurityContext.Current.PrimaryIdentity;
if (Roles.IsUserInRole(currentUser.Name, "Member"))
{
return 10000M;
}
else
{
return -1;
}
' Visual Basic
Dim currentUser As IIdentity = _
ServiceSecurityContext.Current.PrimaryIdentity
If Roles.IsUserInRole(currentUser.Name, "Member") Then
Return 10000D
Else
Return -1
End If
The ServiceSecurityContext class is in the System.ServiceModel namespace and represents the security context of the client. The PrimaryIdentity property is based on the credentials the client sends to the service. This property returns an instance of the IIdentity interface and represents the user on whose behalf the code is running.
The Roles class is in the System.Web namespace and manages users in roles. The code above uses the IsInRole method to check if the user is in the Member role. If so, the method returns today’s sales.
Save your changes. In the Solution Explorer, select the Web site and select Build | Build Web Site.
You are now ready to complete the client application. In the Solution Explorer window, right-click on the WindowsClient project and select Add Service Reference to display the Add Service Reference dialog box. Enter https://localhost/PublicWebHostedServiceDemo/SecureService.svc in the Address text box and click Go. In the Services pane of the Add Service Reference dialog box, select SecureService. Enter SecureService in the Namespace text box and click OK to add the service reference.
Save your changes and build the solution. Press F5 to run the application. Enter Robert in the Name text box and P@ssword1 in the Password text box and click Log in. Click Say hello. The application should display a message shown in Figure 22.

Figure 22. The service returns to the client a greeting with the user’s name.
Click OK to dismiss the message. Click Report sales. The application should display the message shown in Figure 23. Robert is in the Everyone and Member roles, so he can view sales numbers.

Figure 23. The user is authorized to see the sales number.
Enter Manny in the Name text box and P@ssword1 in the Password text box and click Log in. Click Report sales. The application should display the message shown in Figure 24. Manny is not in the Member role, so he cannot view sales numbers.

Figure 24. The user is not authorized to see the sales number.
Click OK to dismiss the message. Enter a password other than the correct one in the Password text box and click Log in. Click Say hello. The application should display the message shown in Figure 25.

Figure 25. You do not have permission to call the service.
Click OK to dismiss the message. Close the form.
Conclusion
In this tutorial, saw how to use authentication and authorization in two scenarios where you are hosting a WCF service using Internet Information Services. In the first scenario, you are hosting the service on the corporate intranet. Both employees and guests have access to the wireless network. You saw that you could use basic authentication and SSL to require users pass their user name and password to the service in order to call it. You then saw how to limit use of a method to certain users.
In the second scenario, you are hosting the service on the public Internet. You saw how to configure the service to use the ASP.NET membership provider to authenticate users. You then saw how to configure the service to use the ASP.NET role provider to limit use of a method to certain users.
The completed versions of this tutorial’s sample applications are included in the download accompanying this article. The app.config file in the WindowsClient project for the InternalWebHostedServiceDemo solution includes the following endpoint:
<endpoint
address=
"https://thinkpadt61/InternalWebHostedServiceDemo/SecureService.svc"
binding="wsHttpBinding"
bindingConfiguration="WSHttpBinding_ISecureService"
contract="SecureService.ISecureService"
name="WSHttpBinding_ISecureService">
The app.config file in the WindowsClient project for the PublicWebHostedServiceDemo solution includes the following endpoint:
<endpoint
address=
"https://thinkpadt61/PublicWebHostedServiceDemo/SecureService.svc"
binding="wsHttpBinding"
bindingConfiguration="WSHttpBinding_ISecureService"
contract="SecureService.ISecureService"
name="WSHttpBinding_ISecureService">
You can build the two solutions from scratch by following the steps in this tutorial. If you do that, your endpoints will include the name of your Web server computer. You can also use the completed versions of these solutions. If you do that, you will need to replace thinkpadt61 with the name of your Web server computer.
For additional information on securing WCF services, you should review the Microsoft patterns & practices Improving Web Services Security Guide at https://www.codeplex.com/WCFSecurityGuide.
About the Author
Robert Green is a developer, writer, and trainer. He is a senior consultant with MCW Technologies. Robert is a Visual Studio Tools for the Office system MVP and is a co-author of AppDev courseware for Microsoft Visual Basic, Microsoft Visual C#, LINQ and Microsoft Windows Workflow Foundation. Before joining MCW, Robert worked at Microsoft as a Product Manager and also a Program Manager.