Azure Sphere – WolfSSL API
This sample application demonstrates how to use the wolfSSL API with Azure Sphere to download a web page over HTTPS. For details about using the wolfSSL library with Azure Sphere, see Use wolfSSL for TLS connections.
The sample has four stages, each of which is handled asynchronously:
- It connects to
example.comport 443 (HTTPS) using a Linux AF_INET socket. - It uses wolfSSL to perform the TLS handshake.
- It sends an HTTP GET request to retrieve a web page.
- It reads the HTTP response and prints it to the console.
The sample uses the following Azure Sphere libraries.
| Library | Purpose |
|---|---|
| eventLoop | Invokes handlers for timer events. |
| log | Displays messages in the Device Output window during debugging. |
| networking | Gets the network connectivity status. |
| storage | Gets the path to the certificate file that is used to authenticate the server. |
| wolfssl | Handles the SSL handshake. |
Contents
| File/folder | Description |
|---|---|
app_manifest.json |
Application manifest file, which describes the resources. |
CMakeLists.txt |
CMake configuration file, which Contains the project information and is required for all builds. |
CMakePresets.json |
CMake presets file, which contains the information to configure the CMake project. |
launch.vs.json |
JSON file that tells Visual Studio how to deploy and debug the application. |
LICENSE.txt |
The license for this sample application. |
main.c |
Main C source code file. |
README.md |
This README file. |
.vscode |
Folder containing the JSON files that configure Visual Studio Code for deploying and debugging the application. |
Prerequisites
The sample requires the following hardware:
Setup
Complete the following steps to set up this sample.
Ensure that your Azure Sphere device is connected to your computer, and your computer is connected to the internet.
Ensure that you have Azure Sphere SDK version 24.03 or above. At the command prompt, run
az sphere show-sdk-versionto check. Upgrade the Azure Sphere SDK for Windows or Linux as needed.Ensure that the Azure CLI is installed. At a minimum, the Azure CLI version must be 2.45.0 or later.
Install the Azure Sphere extension.
Enable application development, if you have not already done so, by entering the
az sphere device enable-developmentcommand in the command prompt.Clone the Azure Sphere samples repository and find the WolfSSL_HighLevelApp sample in the WolfSSL folder or download the zip file from the Microsoft samples browser.
Note that the sample can connect only to websites listed in the AllowedConnections capability of the app_manifest.json file. The sample is set up to connect to the website
example.com:"Capabilities": { "AllowedConnections": [ "example.com" ], },You can revise the sample to connect to a different website for downloading, as described in the Rebuild the sample to download from a different website section of this README.
Configure networking on your device. You must either set up WiFi or set up Ethernet on your development board, depending on the type of network connection you are using.
Build and run the sample
To build and run this sample, follow the instructions in Build a sample application.
This sample sends an HTTP GET request to retrieve a web page and prints the HTTP response to the console. If an error occurs, use the wolfSSL manual to interpret error codes.
Rebuild the sample to download from a different website
To download data from a website other than the default website, you'll need to get the root CA certificate from the website, modify the sample to use the new website and its certificate, and build and run the modified sample.
Complete the steps described in the following sections.
Download the root CA certificate
If the website uses SSL/TLS, you may need to use a different root CA certificate. To download the certificate from the website, the following steps are provided for users of recent Edge or Chrome(ium) browsers:
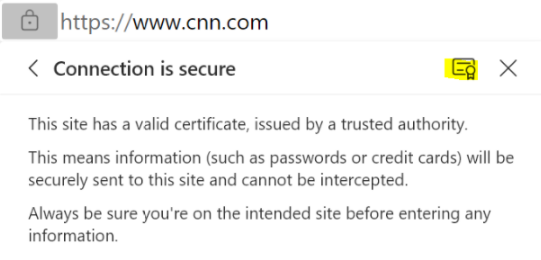
Open the browser and click the Secure icon, which is a padlock in the address bar.
Select Connection is secure; then click the certificate icon (highlighted yellow), if using Edge, otherwise select Certificate is valid (not pictured), if using Chrome(ium):
Select the Details tab.
Select the top certificate in the hierarchy and then select Export.
In the Save As window, select the Base64-encoded ASCII, single certificate (.pem;.crt) option, from the Save as type drop-down.
Type the file name to which to export the certificate and then click Save.
Rename the downloaded certificate file to have the .pem extension.
Modify the sample to use the new website
Complete the following steps to modify the sample to use the new website.
In the
app_manifest.jsonfile, add the hostname of the new website to the AllowedConnections capability. For example, the following addsContoso.comto the list of allowed websites."Capabilities": { "AllowedConnections": [ "example.com", "Contoso.com"], },Note: Sometimes there may be more than one hostname for the same website. For example, a website may have the hostnames
www.contoso.comandcontoso.com, both of which will resolve to the same IP address. In this case, you must choose which hostname to use and use it consistently throughout your code.Open
main.c, go to the following statement, and change SERVER_NAME to the hostname of the website you want to connect to, PORT_NUM to the port number and certPath[] to the certificate path.Ensure that your server name and AllowedConnections hostname are identical. For example, if you specified
contoso.comin AllowedConnections, you must also specifycontoso.com(notwww.contoso.com) for the server name:#define SERVER_NAME "example.com" static const uint16_t PORT_NUM = 443; static const char certPath[] = "certs/DigiCertGlobalRootCA.pem";Update the sample to use a different root CA certificate, if necessary:
- Put the trusted root CA certificate in the
certs/folder (and optionally remove the existing DigiCert Global Root CA certificate). - Update
CMakeLists.txtto include the new trusted root CA certificate in the image package, instead of the DigiCert Global Root CA certificate. Pass the new the certificate file name to azsphere_target_add_image_package. - In
main.c, pass the certificate file name to Storage_GetAbsolutePathInImagePackage.
- Put the trusted root CA certificate in the
If the website uses TLS version 1.2, use wolfTLSv1_2_client_method instead of wolfTLSv1_3_client_method to initialize the pointer to the WOLFSSL_METHOD structure.
In
main.c, find the following line of code:WOLFSSL_METHOD *wolfSslMethod = wolfTLSv1_3_client_method();Change the code to use wolfTLSv1_2_client_method as shown in the following code:
WOLFSSL_METHOD *wolfSslMethod = wolfTLSv1_2_client_method();Note: Exit 17 will be returned if the TLS handshake fails. A possible cause could be an incorrect TLS version.
Build and run the sample modified to use the new website
To build and run the modified sample, follow the instructions in the Build and run the sample section of this README.
Rebuild the sample to use a different protocol
To rebuild the sample to use a protocol other than HTTP, complete the following steps:
- Modify the sample by replacing the WriteData and ReadData functions, which send the HTTP request and read the response, with the appropriate logic for another protocol.
- Follow the instructions in the Build and run the sample section of this README.
Rebuild the sample to use SNI with wolfSSL
In this sample, wolfSSL is used to perform the TLS handshake. TLS supports server name indication (SNI), which is useful when a server hosts multiple websites. The wolfSSL_CTX_UseSNI function is used to perform a TLS handshake with a server that uses SNI.
To rebuild the sample to use SNI with wolfSSL, complete the following steps:
- Modify the sample to call wolfSSL_CTX_UseSNI after allocating the context with wolfSSL_CTX_new. For more information, see Using Server Name Indication (SNI) with wolfSSL.
- Follow the instructions in the Build and run the sample section of this README.
Next steps
- For an overview of Azure Sphere, see What is Azure Sphere.
- To learn more about Azure Sphere application development, see Overview of Azure Sphere applications.
- For network troubleshooting, see Troubleshoot network problems.