Single Sign-on (SSO) sample Outlook add-in
Applies to: Outlook on Windows | Outlook on Mac | Outlook on the web
Summary
The sample implements an Outlook add-in that uses Office's SSO feature to give the add-in access to Microsoft Graph data. Specifically, it enables the user to save all attachments to their OneDrive. It also shows how to add custom buttons to the Outlook ribbon. The sample illustrates the following concepts:
- Use the SSO access token to call the Microsoft Graph API without prompting the user
- If the SSO token is not available, authenticate to the user's OneDrive using the Microsoft Authentication Library (MSAL).
- Use the Microsoft Graph API to create files in OneDrive
- Implement a WebAPI that uses the Microsoft identity platform and OAuth 2.0 On-Behalf-Of flow to exchange the user's access token for a new access token with permissions to Microsoft Graph and OneDrive.
Register the add-in with Microsoft identity platform
Use the following values for the subsequent app registration steps.
| Placeholder or section | Value |
|---|---|
<add-in-name> |
AttachmentDemo |
<fully-qualified-domain-name> |
localhost:44355 |
| Microsoft Graph permissions | profile, openid, Files.ReadWrite, Mail.Read |
Follow the steps in Register an Office Add-in that uses single sign-on (SSO) with the Microsoft identity platform.
Configure the Sample
Before you run the sample, you'll need to do a few things to make it work properly.
- In Visual Studio, open the AttachmentDemo.sln solution file for this sample.
Update AttachmentDemo.xml
In the Solution Explorer, open AttachmentDemo > AttachmentDemoManifest > AttachmentDemo.xml.
Find the
<WebApplicationInfo>section near the bottom of the manifest. Then replace theEnter_client_ID_herevalue, in both places where it appears, with the application ID you generated as part of the app registration process.Note: Make sure that the port number in the
Resourceelement matches the port used by your project. It should also match the port you used when registering the application.
Update appsettings.json
- In the Solution Explorer, open AttachmentDemo-ASPNETCore > appsettings.json.
- Replace the
Enter_client_ID_hereplaceholder value with the application ID you generated as part of the app registration process. - Replace the
Enter_client_secret_hereplaceholder value with the client secret you generated as part of the app registration process.
Update authconfig.js
- In the Solution Explorer, open AttachmentDemo-ASPNETCore > wwwroot > js > authConfig.js.
- Replace the
Enter_client_ID_hereplaceholder value with the application ID you generated as part of the app registration process.
Provide user consent to the app
If you want to try the add-in using a different tenant than the one where you registered the app, you need to do this step.
You have two choices for providing consent:
- All users. Use an administrator account and consent once for all users in your Office 365 tenant
- Single user. Use any account to consent for just that user
Provide admin consent for all users
If you have access to a tenant administrator account, this method allows you to provide consent for all users in your organization, which can be convenient if you have multiple developers that need to develop and test your add-in.
- Browse to
https://login.microsoftonline.com/common/adminconsent?client_id={application_ID}&state=12345, where{application_ID}is the application ID shown in your app registration. - Sign in with your administrator account.
- Review the permissions and click Accept.
The browser will attempt to redirect back to your app, which may not be running. You might see a "this site cannot be reached" error after clicking Accept. This is OK, the consent was still recorded.
Provide consent for a single user
If you don't have access to a tenant administrator account, or you just want to limit consent to a few users, this method allows you to provide consent for a single user.
- Browse to
https://login.microsoftonline.com/common/oauth2/authorize?client_id={application_ID}&state=12345&response_type=code, where{application_ID}is the application ID shown in your app registration. - Sign in with your account.
- Review the permissions and click Accept.
The browser will attempt to redirect back to your app, which may not be running. You might see a "this site cannot be reached" error after clicking Accept. This is OK, the consent was still recorded.
Run the Sample
- In the Solution Explorer, right-click the AttachmentDemo project and select Properties.
- In the Properties window, set the following property values.
| Property | Value |
|---|---|
Start Action |
Office Desktop client or an installed browser. |
Email Address |
The email address of a user in your test tenant. |
Use multi-factor auth |
True |
Press F5 to build and debug the project. You may be prompted to trust the developer certificate.
You should be prompted for a user account and password. Provide a user in your Office tenant, or an Outlook.com account. The add-in will be installed for that user, and either Outlook on the web or Outlook on Windows will open.
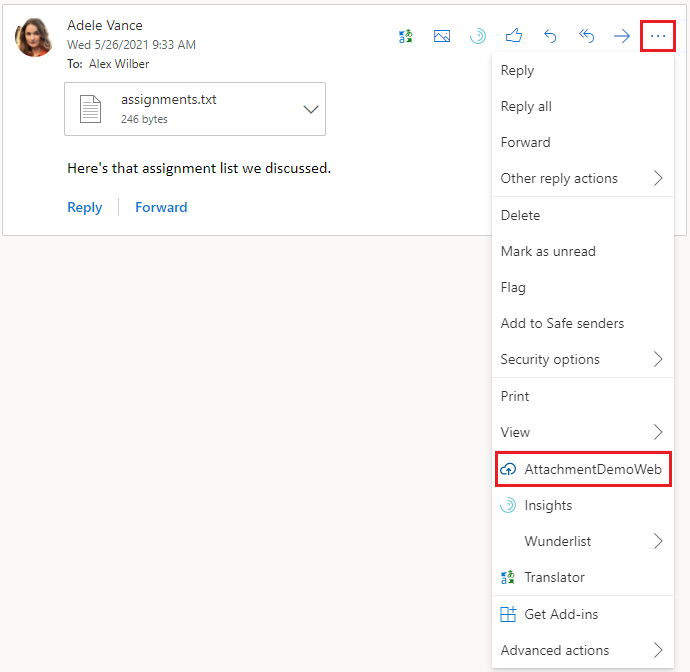
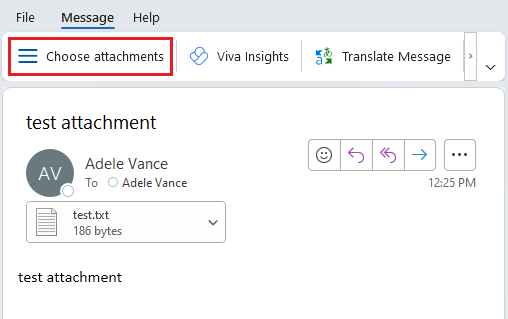
Select any message, that has one or more attachments.
Open the task pane:
- If you're in Outlook on the web: Select the ... (More actions) drop down menu, and then choose AttachmentDemoWeb.
- If you're in Outlook on Windows or Mac: On the Home tab, select Choose attachments. Note that if the Outlook app window is too small, that Choose attachments will instead be located on the Home tab's ... (More commands) button.
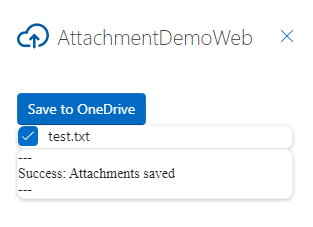
In the AttachmentDemoWeb task pane that opens, select the attachments you want to save.
Choose Save to OneDrive.
You should see a success message in the task pane.
- Open OneDrive and you should see the attachments saved in a new folder named Outlook Attachments.

Testing the fallback dialog
It's recommended to test all paths when working with SSO. In some scenarios, you'll have to use the fallback dialog by modifying the code as follows:
In Visual Studio, open the MessageRead.js file.
Change the authSSO value to false.
let authSSO = false;
There is also a MockError method available in the Saveattachments.cs controller to throw various MSAL or Microsoft Graph errors for testing.
Troubleshoot manifest issues
Visual Studio may show a warning or error about the WebApplicationInfo element being invalid. The error may not show up until you try to build the solution. As of this writing, Visual Studio has not updated the schema files to include the WebApplicationInfo element. To work around this problem, use the updated schema file in this repository: MailAppVersionOverridesV1_1.xsd.
- On your development machine, locate the existing MailAppVersionOverridesV1_1.xsd. This should be located in your Visual Studio installation directory under
./Xml/Schemas/{lcid}. For example, on a typical installation of VS 2017 32-bit on an English (US) system, the full path would beC:\Program Files (x86)\Microsoft Visual Studio\2017\Enterprise\Xml\Schemas\1033. - Rename the existing file to
MailAppVersionOverridesV1_1.old. - Move the version of the file from this repository into the folder.
Questions and feedback
- Did you experience any problems with the sample? Create an issue and we'll help you out.
- We'd love to get your feedback about this sample. Go to our Office samples survey to give feedback and suggest improvements.
- For general questions about developing Office Add-ins, go to Microsoft Q&A using the office-js-dev tag.
Copyright
Copyright (c) 2021 Microsoft Corporation. All rights reserved.
This project has adopted the Microsoft Open Source Code of Conduct. For more information, see the Code of Conduct FAQ or contact opencode@microsoft.com with any additional questions or comments.
Note: The Index.cshtml file contains an image URL that tracks diagnostic data for this sample add-in. Please remove the image tag if you reuse this sample in your own code project.