Microsoft Monitoring Agent Setup
The Microsoft Monitoring Agent must be installed and configured on the data collection machine. It must also be installed on the Log Analytics Gateway if deploying that scenario.
For detailed information about the Microsoft Monitoring Agent including system requirements, network firewall configuration requirements, TLS 1.2 requirements, download, and installation instructions, see the Agent Windows article
The information below list the proxy and firewall configuration information required for the Linux and Windows agent to communicate with Log Analytics within the Azure commercial cloud. For complete and up to date information on the networking requirements for the MMA as well as networking requirements for Azure Government or other sovereign Azure Log Analytics services, see the article
| Agent Resource | Ports | Direction | Bypass HTTPS inspection |
|---|---|---|---|
| * .ods.opinsights.azure.com | Port 443 | Outbound | Yes |
| * .oms.opinsights.azure.com | Port 443 | Outbound | Yes |
| * .blob.core.windows.net | Port 443 | Outbound | Yes |
| * .azure-automation.net | Port 443 | Outbound | Yes |
Download and install the Microsoft Monitoring Agent (MMA) setup file from Azure Log Analytics
On the designated data collection machine and Log Analytics Gateway (if using) complete the following steps. If Log Analytics Gateway scenario is being deployed, then install and configure the MMA on the gateway first.
Note
If the collection machine does not have an Internet connection, perform the first 3 steps from an Internet Connected machine.
- In the Azure portal, go to Log Analytics, select your workspace and click the Advanced Settings Icon.
- Click Connected Sources, and then select Windows Servers.

- Click the Download Windows Agent link that is applicable to your computer processor type to download the setup file. If the agent is downloaded on another machine, copy the Setup file over to the data collection machine or Log Analytics Gateway server.

Note
If a monitoring client was installed for System Center Operations Manager (SCOM), the setup only offers to Upgrade the agent, preserving existing settings. The upgrade for SCOM agent does not include any of the configuration steps below.
The next steps apply to installations where no monitoring client was installed for SCOM. Refer to the Microsoft Monitoring Agent Upgrade section in this document when you are performing an upgrade of the Monitoring Agent for SCOM.
- Run Setup to install the agent.
- On the Welcome page, click Next.
- On the License Terms page, read the license and then click I Agree.
- On the Destination Folder page, change or keep the default installation folder and then click Next.
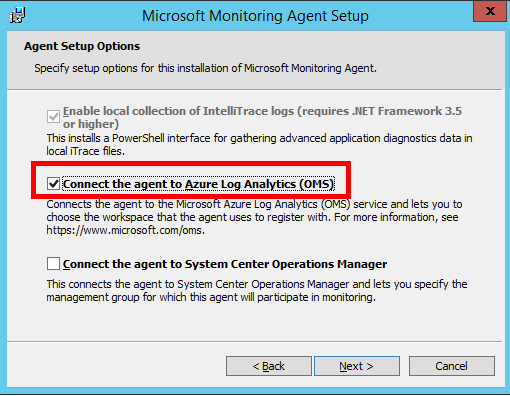
- On the Agent Setup Options page, choose the Connect the agent to Azure Log Analytics (OMS) option. Click Next.

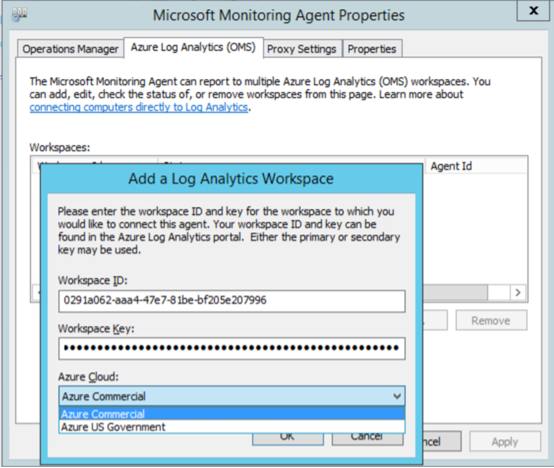
On the Overview, Settings Dashboard page, click Connected Sources, and then copy and paste the Workspace ID and Workspace Key (Primary Key) from the log analytics portal. (Hint: Click the copy button then paste in the corresponding Agent Setup field). Select Azure Commercial or if you are using an Azure US Government cloud select Azure US Government from the Azure Cloud drop down menu and click OK.
If you are currently installing the agent on the data collection machine and using an Log Analytics Gateway deployment scenario, or if your company requires access through a proxy server, click the Advanced button to provide HTTP proxy configuration. If you do not use any of the above, click Next and go to step 12.
Specify the fully qualified domain name (FQDN) or the IP address and port of the Log Analytics Gateway. If you use a proxy server instead of a Log Analytics Gateway, add the information for your proxy server and, if required, authentication credentials (not required for the Log Analytics Gateway), then click Next twice.

- On the Microsoft Update page, optionally select Use Microsoft Update when I check for updates (recommended), then click Next.
- On the Ready to Install page, review your choices, and then click Install.
- On the Microsoft Monitoring Agent configuration completed successfully page, click Finish.

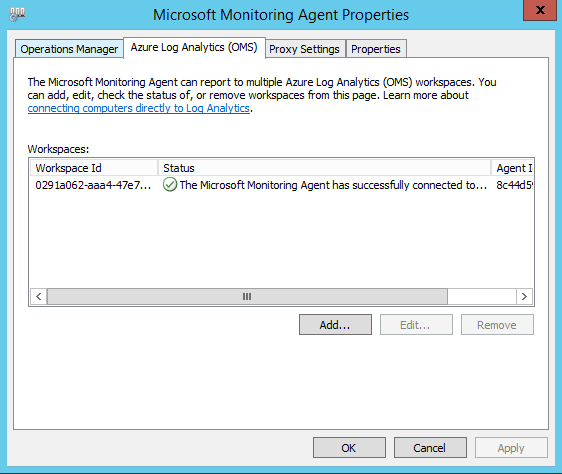
- When complete, the Microsoft Monitoring Agent appears in Control Panel. You can review your configuration there and verify that the agent is connected to Azure Log Analytics. When connected to Log Analytics, the agent displays a message stating: The Microsoft Monitoring Agent has successfully connected to the log analytics service.


Note
If you have been installing the Microsoft Monitoring Agent on the Log Analytics Gateway, you need to repeat the installation steps above on the data collection machine.
After setting up the data collection machine, continue getting started with On-demand Assessments by selecting the Configure Microsoft On-demand Assessments article in the Table of Contents.
Microsoft Monitoring Agent Upgrade
If a monitoring agent is already installed, the Microsoft Monitoring Agent setup will only display the upgrade option. The upgrade will keep the existing configuration and adds a new option to configure a Log Analytics workspace.
Follow the steps below to perform an upgrade and configure the agent for the Log Analytics Workspace.
- Run Setup to install the agent
- On the Welcome page, click Next
- On the License Terms page, read the license and then click I Agree
- On the begin Upgrade page, click Upgrade
- On the Completion page, click Finish
- Once the agent installation completed, go to the Control Panel

- Click Microsoft Monitoring Agent
- If the Log Analytics Gateway scenario is chosen or a Proxy server is in place go to the Proxy Settings tab. When this scenario is not used go to step 9

Select Use a proxy server and specify the fully qualified domain name (FQDN) or the IP address and port of the Log Analytics Gateway. If you use a proxy server instead of a Log Analytics Gateway, add the information for your proxy server and if required, authentication credentials (not required for the Log Analytics Gateway), then Select Apply 9. Select the Azure Log Analytics (OMS) tab and click Add.

- Copy and paste the Workspace ID and Workspace Key (Primary Key) from the log analytics portal. (Hint: Click the copy button then paste in the corresponding Agent Setup field). Select Azure Commercial or, if you are using an Azure US Government cloud select Azure US Government from the Azure Cloud drop down menu and click OK.
- An exclamation mark will be visible in the Workspaces pane. Click Apply. This will stop and start the agent, and the Workspaces pane should look like the following example after a few seconds.

- Click OK to finish
- Click OK to finish the Microsoft Monitoring Agent upgrade for Log Analytics.
After setting up the data collection machine, continue getting started with On-demand Assessments by selecting the Configure Microsoft On-demand Assessments article in the Table of Contents.
Feedback
Coming soon: Throughout 2024 we will be phasing out GitHub Issues as the feedback mechanism for content and replacing it with a new feedback system. For more information see: https://aka.ms/ContentUserFeedback.
Submit and view feedback for