Granting access via Azure AD App-Only
When using SharePoint Online you can define applications in Azure AD and these applications can be granted permissions to SharePoint, but also to all the other services in Office 365. This model is the preferred model in case you're using SharePoint Online, if you're using SharePoint on-premises you have to use the SharePoint Only model via based Azure ACS as described in here.
Important
Using Azure ACS (Access Control Services) for SharePoint Online has been retired as of November 27th 2023, checkout the full retirement announcement to learn more. Using Azure ACS outside of the context of SharePoint was already retired on November 7th, 2018 and is end-of-life now.
Retirement means that the feature will not get any new investments, but it's still supported. End-of-life means that the feature will be discontinued and is no longer available for use.
Setting up an Azure AD app for app-only access
In Azure AD when doing app-only you typically use a certificate to request access: anyone having the certificate and its private key can use the app and the permissions granted to the app. Below steps walk you through the setup of this model.
You are now ready to configure the Azure AD Application for invoking SharePoint Online with an App Only access token. To do that, you have to create and configure a self-signed X.509 certificate, which will be used to authenticate your Application against Azure AD, while requesting the App Only access token. First you must create the self-signed X.509 Certificate, which can be created using the makecert.exe tool that is available in the Windows SDK, through a provided PowerShell script which does not have a dependency to makecert or with a PnP PowerShell command. Using the PowerShell script is the preferred method and is explained in this chapter.
Important
It's important that you run the below scripts with Administrator privileges.
To create a self signed certificate with this script:
.\Create-SelfSignedCertificate.ps1 -CommonName "MyCompanyName" -StartDate 2017-10-01 -EndDate 2019-10-01
Note
The dates are provided in ISO date format: YYYY-MM-dd
The certificate key algoritm must be RSA, this is the only supported algorithm currently
The actual script can be copied from here:
#Requires -RunAsAdministrator
<#
.SYNOPSIS
Creates a Self Signed Certificate for use in server to server authentication
.DESCRIPTION
.EXAMPLE
PS C:\> .\Create-SelfSignedCertificate.ps1 -CommonName "MyCert" -StartDate 2015-11-21 -EndDate 2017-11-21
This will create a new self signed certificate with the common name "CN=MyCert". During creation you will be asked to provide a password to protect the private key.
.EXAMPLE
PS C:\> .\Create-SelfSignedCertificate.ps1 -CommonName "MyCert" -StartDate 2015-11-21 -EndDate 2017-11-21 -Password (ConvertTo-SecureString -String "MyPassword" -AsPlainText -Force)
This will create a new self signed certificate with the common name "CN=MyCert". The password as specified in the Password parameter will be used to protect the private key
.EXAMPLE
PS C:\> .\Create-SelfSignedCertificate.ps1 -CommonName "MyCert" -StartDate 2015-11-21 -EndDate 2017-11-21 -Force
This will create a new self signed certificate with the common name "CN=MyCert". During creation you will be asked to provide a password to protect the private key. If there is already a certificate with the common name you specified, it will be removed first.
#>
Param(

   [Parameter(Mandatory=$true)]
   [string]$CommonName,

   [Parameter(Mandatory=$true)]
   [DateTime]$StartDate,

   [Parameter(Mandatory=$true)]
   [DateTime]$EndDate,

   [Parameter(Mandatory=$false, HelpMessage="Will overwrite existing certificates")]
   [Switch]$Force,

   [Parameter(Mandatory=$false)]
   [SecureString]$Password
)

# DO NOT MODIFY BELOW

function CreateSelfSignedCertificate(){

    #Remove and existing certificates with the same common name from personal and root stores
    #Need to be very wary of this as could break something
    if($CommonName.ToLower().StartsWith("cn="))
    {
        # Remove CN from common name
        $CommonName = $CommonName.Substring(3)
    }
    $certs = Get-ChildItem -Path Cert:\LocalMachine\my | Where-Object{$_.Subject -eq "CN=$CommonName"}
    if($certs -ne $null -and $certs.Length -gt 0)
    {
        if($Force)
        {

            foreach($c in $certs)
            {
                remove-item $c.PSPath
            }
        } else {
            Write-Host -ForegroundColor Red "One or more certificates with the same common name (CN=$CommonName) are already located in the local certificate store. Use -Force to remove them";
            return $false
        }
    }

    $name = new-object -com "X509Enrollment.CX500DistinguishedName.1"
    $name.Encode("CN=$CommonName", 0)

    $key = new-object -com "X509Enrollment.CX509PrivateKey.1"
    $key.ProviderName = "Microsoft RSA SChannel Cryptographic Provider"
    $key.KeySpec = 1
    $key.Length = 2048
    $key.SecurityDescriptor = "D:PAI(A;;0xd01f01ff;;;SY)(A;;0xd01f01ff;;;BA)(A;;0x80120089;;;NS)"
    $key.MachineContext = 1
    $key.ExportPolicy = 1 # This is required to allow the private key to be exported
    $key.Create()

    $serverauthoid = new-object -com "X509Enrollment.CObjectId.1"
    $serverauthoid.InitializeFromValue("1.3.6.1.5.5.7.3.1") # Server Authentication
    $ekuoids = new-object -com "X509Enrollment.CObjectIds.1"
    $ekuoids.add($serverauthoid)
    $ekuext = new-object -com "X509Enrollment.CX509ExtensionEnhancedKeyUsage.1"
    $ekuext.InitializeEncode($ekuoids)

    $cert = new-object -com "X509Enrollment.CX509CertificateRequestCertificate.1"
    $cert.InitializeFromPrivateKey(2, $key, "")
    $cert.Subject = $name
    $cert.Issuer = $cert.Subject
    $cert.NotBefore = $StartDate
    $cert.NotAfter = $EndDate
    $cert.X509Extensions.Add($ekuext)
    $cert.Encode()

    $enrollment = new-object -com "X509Enrollment.CX509Enrollment.1"
    $enrollment.InitializeFromRequest($cert)
    $certdata = $enrollment.CreateRequest(0)
    $enrollment.InstallResponse(2, $certdata, 0, "")
    return $true
}

function ExportPFXFile()
{
    if($CommonName.ToLower().StartsWith("cn="))
    {
        # Remove CN from common name
        $CommonName = $CommonName.Substring(3)
    }
    if($Password -eq $null)
    {
        $Password = Read-Host -Prompt "Enter Password to protect private key" -AsSecureString
    }
    $cert = Get-ChildItem -Path Cert:\LocalMachine\my | where-object{$_.Subject -eq "CN=$CommonName"}

    Export-PfxCertificate -Cert $cert -Password $Password -FilePath "$($CommonName).pfx"
    Export-Certificate -Cert $cert -Type CERT -FilePath "$CommonName.cer"
}

function RemoveCertsFromStore()
{
    # Once the certificates have been been exported we can safely remove them from the store
    if($CommonName.ToLower().StartsWith("cn="))
    {
        # Remove CN from common name
        $CommonName = $CommonName.Substring(3)
    }
    $certs = Get-ChildItem -Path Cert:\LocalMachine\my | Where-Object{$_.Subject -eq "CN=$CommonName"}
    foreach($c in $certs)
    {
        remove-item $c.PSPath
    }
}

if(CreateSelfSignedCertificate)
{
    ExportPFXFile
    RemoveCertsFromStore
}
You will be asked to give a password to encrypt your private key, and both the .PFX file and .CER file will be exported to the current folder.
Note
The self-signed certificate can also be generate through the New-PnPAzureCertificate command.
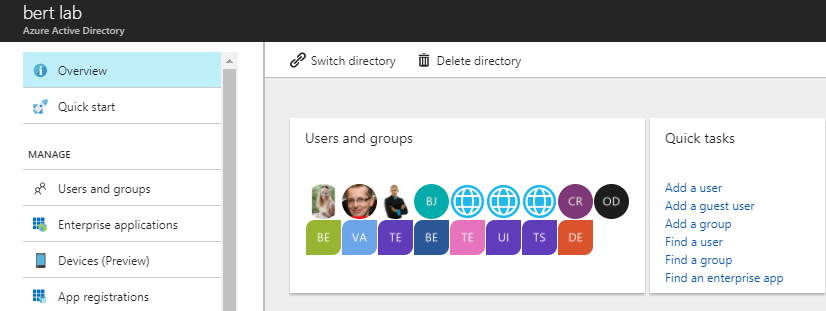
Next step is registering an Azure AD application in the Azure Active Directory tenant that is linked to your Office 365 tenant. To do that, open the Office 365 Admin Center (https://admin.microsoft.com) using the account of a user member of the Tenant Global Admins group. Click on the "Azure Active Directory" link that is available under the "Admin centers" group in the left-side treeview of the Office 365 Admin Center. In the new browser's tab that will be opened you will find the Microsoft Azure portal. If it is the first time that you access the Azure portal with your account, you will have to register a new Azure subscription, providing some information and a credit card for any payment need. But don't worry, in order to play with Azure AD and to register an Office 365 Application you will not pay anything. In fact, those are free capabilities. Once having access to the Azure portal, select the "Azure Active Directory" section and choose the option "App registrations". See the next figure for further details.
In the "App registrations" tab you will find the list of Azure AD applications registered in your tenant. Click the "New registration" button in the upper left part of the blade. Next, provide a name for your application and click on "Register" at the bottom of the blade.
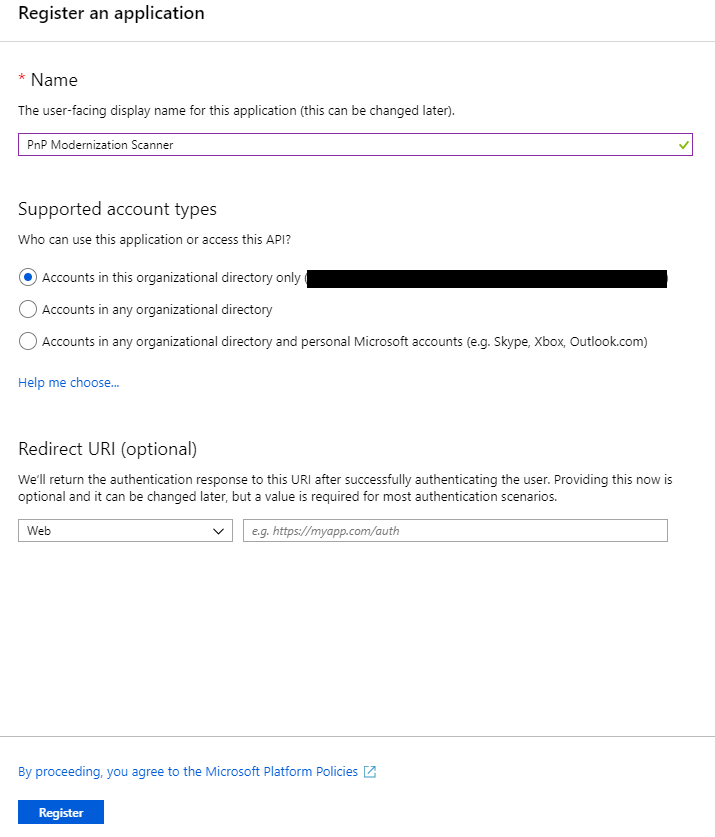
Important
Once the application has been created copy the "Application (client) ID" as you'll need it later.
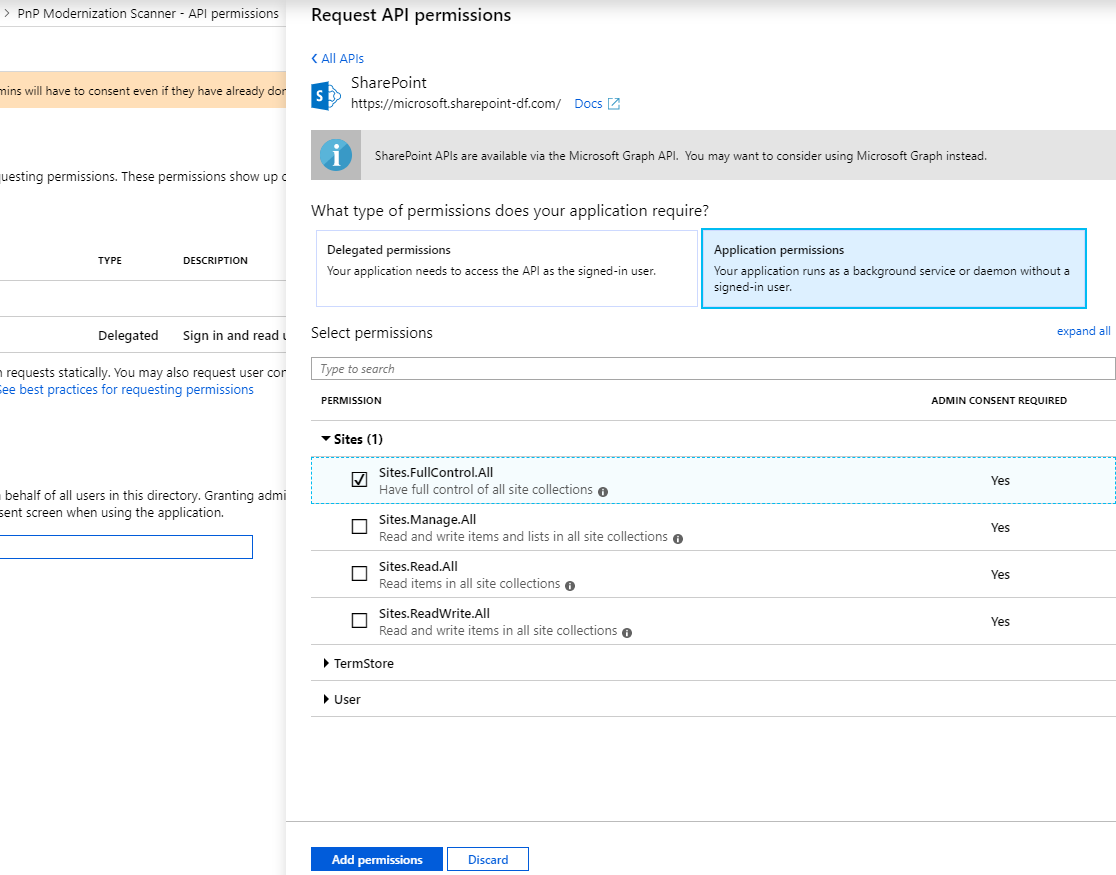
Now click on "API permissions" in the left menu bar, and click on the "Add a permission" button. A new blade will appear. Here you choose the permissions that you will grant to this application. Choose i.e.:
- SharePoint
- Application permissions
- Sites
- Sites.FullControl.All
- Sites
- Application permissions
Click on the blue "Add permissions" button at the bottom to add the permissions to your application. The "Application permissions" are those granted to the application when running as App Only.
Final step is "connecting" the certificate we created earlier to the application. Click on "Certificates & secrets" in the left menu bar. Click on the "Upload certificate" button, select the .CER file you generated earlier and click on "Add" to upload it.
To confirm that the certificate was successfully registered, click on "Manifest" in the left menu bar. Search for the keyCredentials property. It should look like:
  "keyCredentials": [
    {
      "customKeyIdentifier": "<$base64CertHash>",
      "endDate": "2021-05-01T00:00:00Z",
      "keyId": "<$guid>",
      "startDate": "2019-05-01T00:00:00Z",
      "type": "AsymmetricX509Cert",
      "usage": "Verify",
      "value": "<$base64Cert>",
      "displayName": "CN=<$name of your cert>"
     }
  ],
If you see a section looking somewhat similar to this, the certificate has been added successfully.
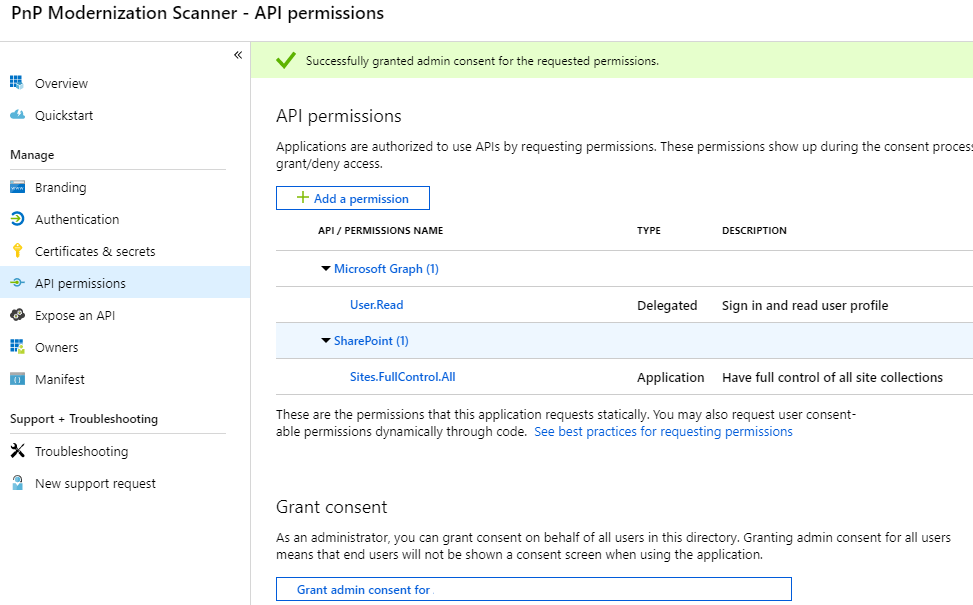
In this sample the Sites.FullControl.All application permission require admin consent in a tenant before it can be used. In order to do this, click on "API permissions" in the left menu again. At the bottom you will see a section "Grant consent". Click on the "Grant admin consent for {{organization name}}" button and confirm the action by clicking on the "Yes" button that appears at the top.
Using this principal with PnP PowerShell
If you want to use this AAD App Only principal with PnP PowerShell, after you have installed the PnP PowerShell module, you can connect to your SharePoint Online environment using:
Connect-PnPOnline -ClientId <$application client id as copied over from the AAD app registration above> -CertificatePath '<$path to the PFX file generated by the PowerShell script above>' -CertificatePassword (ConvertTo-SecureString -AsPlainText "<$password assigned to the generated certificate pair above>" -Force) -Url https://<$yourtenant>.sharepoint.com -Tenant "<$tenantname>.onmicrosoft.com"
You can now perform operations through PnP PowerShell against your SharePoint Online environment using this certificate App Only trust.
Note
PnP PowerShell is an open-source solution with active community providing support for it. There is no SLA for the open-source tool support from Microsoft.
Using this principal in your application using the SharePoint PnP Framework library
In a first step, you add the PnP Framework library NuGet package: https://www.nuget.org/packages/PnP.Framework.
Once that's done you can use below code construct:
using PnP.Framework;
using System;

namespace AzureADCertAuth
{
    class Program
    {
        static void Main(string[] args)
        {
            var authManager = new AuthenticationManager("<application id>", "c:\\temp\\mycert.pfx", "<password>", "contoso.onmicrosoft.com");
            using (var cc = authManager.GetContext("https://contoso.sharepoint.com/sites/demo"))
            {
                cc.Load(cc.Web, p => p.Title);
                cc.ExecuteQuery();
                Console.WriteLine(cc.Web.Title);
            };
        }
    }
}
Note
PnP Framework is an open-source solution with active community providing support for it. There is no SLA for the open-source tool support from Microsoft.
Using this principal in your Powershell script using the PnP Framework library
When making use of Azure Automation Runbooks, first add the certificate (.pfx) using the Certificates option (under Shared Resources), then use the Get-AutomationCertificate cmdlet to retrieve the certificate to be used in the script.
Note
You need to add the PnP.Framework module to your Automation Account first. This module contains everything needed to make the authentication call.
# path to installed modules
$path = "C:\Modules\User\SharePointPnPPowerShellOnline"

# reference to needed assemblies
Add-Type -Path "$path\Microsoft.SharePoint.Client.dll"
Add-Type -Path "$path\Microsoft.SharePoint.Client.Runtime.dll"
Add-Type -Path "$path\PnP.Framework.dll"
Add-Type -Path "$path\PnP.Core.dll"
Add-Type -Path "$path\Microsoft.Identity.Client.dll"

# reference to the certificate
$cert = Get-AutomationCertificate -Name 'NameOfCertificate'

# set the variables
$siteUrl = "https://<tenant>.sharepoint.com"
$appId = "<guid of the App>"
$domain = "<tenant>.onmicrosoft.com"
$azureEnv = [PnP.Framework.AzureEnvironment]::Production

try {
    # instantiate the object
    $clientContext = $null
    $authManager = new-object PnP.Framework.AuthenticationManager($appId, $cert, $domain, $null, $azureEnv)

    # configure the object
    $clientContext = $authManager.GetContext($siteUrl)

    # do some stuff
    $clientContext.Load($clientContext.Web)
    $clientContext.ExecuteQuery()
    $clientContext.Web.Title
}
catch {
    # catch error if needed
}
finally {
    $clientContext.Dispose()
}
Using this principal in your application and make use of the Azure KeyVault to store the certificate and retrieve it using an Azure Function
Add a Managed Identity to the Azure Function and give this identity access (GET permission on Secrets) to the KeyVault.
Below there is a slightly different call to the same AuthenticationManager method where we pass an actual certificate instead of a path to the certificate. An extra function is added to retrieve to certificate from the KeyVault using the managed identity of the Azure Function, this retrieval is seamless and transparent since the 'magic' happens in the DefaultAzureCredential.
This sample uses two libraries to access the Key Vault:
- Azure.Identity for authenticating to the Key Vault
- Azure.Security.KeyVault.Secrets for getting the certificate
using Azure.Identity;
using Azure.Security.KeyVault.Secrets;
using Microsoft.SharePoint.Client;
using System.Security.Cryptography.X509Certificates;

using (var cc = new PnP.Framework.AuthenticationManager(
    "<application id>",
    GetKeyVaultCertificate("kv-spo", "AzureAutomationSPOAccess"),
    "contoso.onmicrosoft.com").GetContext("https://contoso.sharepoint.com/sites/demo"))
{
    cc.Load(cc.Web, p => p.Title);
    cc.ExecuteQuery();
    log.Info("Via PnP, we have site: " + cc.Web.Title);
};

static X509Certificate2 GetKeyVaultCertificate(string keyvaultName, string name)
{
    // Some steps need to be taken to make this work
    // 1. Create a KeyVault and upload the certificate
    // 2. Give the Function App the permission to GET certificates via Access Policies in the KeyVault
    // 3. Call an explicit access token request to the management resource to https://vault.azure.net and use the URL of our Keyvault in the GetSecret method
    Uri keyVaultUri = new Uri($"https://{keyvaultName}.vault.azure.net/");

    var client = new SecretClient(keyVaultUri, new DefaultAzureCredential());
    KeyVaultSecret secret = client.GetSecret(name);

    return new X509Certificate2(Convert.FromBase64String(secret.Value), string.Empty, X509KeyStorageFlags.MachineKeySet);
}
Using this principal with the Pnp Modernization Scanner
Now you have created the Azure Active Directory Application Registration, proceed with following the steps here to use this principal with the tool.
FAQ
Can I use other means besides certificates for realizing app-only access for my Azure AD app?
No, all other options are blocked by SharePoint Online and will result in an Access Denied message.
Feedback
Coming soon: Throughout 2024 we will be phasing out GitHub Issues as the feedback mechanism for content and replacing it with a new feedback system. For more information see: https://aka.ms/ContentUserFeedback.
Submit and view feedback for