Enable the Microsoft 365 CDN
You can use the built-in Microsoft 365 content delivery network (CDN) to host static assets to provide better performance for your SharePoint Online pages. The Microsoft 365 CDN improves performance by caching static assets closer to the browsers requesting them, which helps to speed up downloads and reduce latency. Also, the Microsoft 365 CDN uses the HTTP/2 protocol for improved compression and HTTP pipelining. The Microsoft 365 CDN service is included as part of your SharePoint Online subscription.
Note
For more information, see Use the Office 365 Content Delivery Network (CDN) with SharePoint Online
In this article, you'll learn how to enable the Microsoft 365 CDN on your SharePoint Online tenant in Microsoft 365.
Options for managing the Microsoft 365 CDN
The Microsoft 365 CDN is managed using the command line and you can use PowerShell cmdlets or the cross-platform CLI for Microsoft 365 available through SharePoint PnP Community channels.
Microsoft SharePoint Online Management Shell
The Microsoft 365 CDN is managed by tenant administrators by using the Microsoft SharePoint Online Management Shell, a PowerShell module from Microsoft used to manage your SharePoint Online subscription in Office 365.
Before using any of the cmdlets in the Microsoft SharePoint Online Management Shell module, you must first connect to SharePoint Online using the Connect-SPOService cmdlet. All CDN settings are managed using the *-SPOTenantCdn cmdlets.
Learn more here: Microsoft SharePoint Online Management Shell
CLI for Microsoft 365
The CLI for Microsoft 365 is a cross-platform command-line interface that can be used on any platform, including Windows, macOS, and Linux. The CLI implements the same calls made by the SharePoint Online Management Shell without using PowerShell.
Before using any of the commands in the CLI for Microsoft 365, you must first connect to Microsoft 365 tenant using the m365 login command.
Learn more here: CLI for Microsoft 365
Note
The CLI for Microsoft 365 is an open-source solution with active community providing support for it. There is no SLA for the open-source tool support from Microsoft.
Get the Microsoft 365 CDN status
Get the current status of public CDN settings from the tenant level by executing the following commands one-by-one:
Get-SPOTenantCdnEnabled -CdnType Public
Get-SPOTenantCdnOrigins -CdnType Public
Get-SPOTenantCdnPolicies -CdnType Public
Refer to the Microsoft SPO Management Shell for details on these cmdlets.
Enable public CDN in the tenant
Once you're connected to your Microsoft 365 tenant, use the following command to enable the Microsoft 365 CDN on your tenant:
Set-SPOTenantCdnEnabled -CdnType Public
Refer to the Microsoft SPO Management Shell for details on these cmdlets.
Public CDN has now been enabled in the tenant by using the default file type configuration allowed. This means that the following file type extensions are supported: CSS, EOT, GIF, ICO, JPEG, JPG, JS, MAP, PNG, SVG, TTF, and WOFF.
Enable a custom library to be backed by the Microsoft 365 CDN
You can add additional document libraries that will be managed by the Microsoft 365 CDN and the ones included by default.
Open up a browser and move to a site collection where you'd like to host your CDN library. This could be any site collection in your tenant.
In this tutorial, we create a specific document library named CDN to act as your CDN library, but you can also use a specific folder in any existing document library as the CDN endpoint.
Add a new CDN origin
In this case, we're setting the origin as */cdn, which means that any relative folder with the name of cdn acts as a CDN origin.
Add-SPOTenantCdnOrigin -CdnType Public -OriginUrl */cdn
Refer to the Microsoft SPO Management Shell for details on these cmdlets.
Verify the origin was added
Use the following command to verify the origin was added.
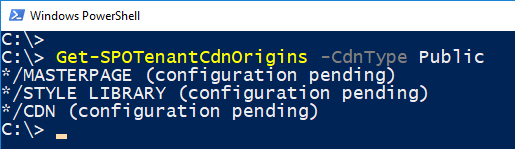
Get-SPOTenantCdnOrigins -CdnType Public
Refer to the Microsoft SPO Management Shell for details on these cmdlets.
Note
Final configuration of the origin takes approximately 15 minutes, so we can continue provisioning the extension, which is hosted from the origin after deployment is completed.
The following image displays the results from running the Microsoft SPO Management Shell command:
Note
You may have more origins listed in your Microsoft 365 Tenant. The key point to this image is to note the origin you added above: */CDN.
At this point, you've configured your Microsoft 365 CDN!
Feedback
Coming soon: Throughout 2024 we will be phasing out GitHub Issues as the feedback mechanism for content and replacing it with a new feedback system. For more information see: https://aka.ms/ContentUserFeedback.
Submit and view feedback for