Quickstart: Use Azure Data Studio to connect and query data using a dedicated SQL pool in Azure Synapse Analytics
This quickstart shows connecting to a dedicated SQL pool in Azure Synapse Analytics using Azure Data Studio.
Prerequisites
To complete this quickstart, you need Azure Data Studio, and a dedicated SQL pool in Azure Synapse Analytics.
If you don't already have a dedicated SQL pool in Azure Synapse Analytics workspace, see Quickstart: Create a dedicated SQL pool using Synapse Studio. For a standalone dedicated SQL pool (formerly SQL DW) outside of an Azure Synapse workspace, see Create a dedicated SQL pool. Remember the server name, and login credentials! For more information on the differences, see What's the difference between Azure Synapse dedicated SQL pools (formerly SQL DW) and dedicated SQL pools in an Azure Synapse Analytics workspace?.
Connect to your dedicated SQL pool
Use Azure Data Studio to establish a connection to your Azure Synapse Analytics server.
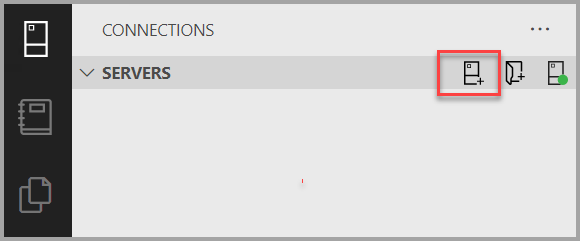
The first time you run Azure Data Studio the Connection page should open. If you don't see the Connection page, select Add Connection, or the New Connection icon in the SERVERS sidebar:
This article uses SQL Login, but Windows Authentication is also supported. Fill in the fields as follows using the server name, user name, and password for your Azure SQL server:
Setting Suggested value Description Server name The fully qualified server name For example the name should look like to this: myworkpsace.sql.azuresynapse.netfor a dedicated SQL endpoint in an Azure Synapse Analytics workspace (recommended), or for a standalone dedicated SQL pool (formerly SQL DW) outside of an Azure Synapse Analytics workspace, use the Azure SQL logical server:sqlpoolservername.database.windows.net.Authentication SQL Login SQL Authentication is used in this tutorial. User name The server admin account This is the account that you specified when you created the server. Password (SQL Login) The password for your server admin account This is the password that you specified when you created the server. Save Password? Yes or No Select Yes if you don't want to enter the password each time. Database name leave blank Server Group leave blank If your server doesn't have a firewall rule allowing Azure Data Studio to connect, the Create new firewall rule form opens. Complete the form to create a new firewall rule. For details, see Firewall rules.
After successfully connecting your server opens in the Servers sidebar.
Create a database
You can use an existing dedicated SQL pool for this exercise, including the one created by default, or you can create a new pool.
For dedicated SQL pools in Azure Synapse, navigate to the Azure Synapse Analytics workspace.
- Select Manage.
- In the Analytics pools section, select SQL pools.
- Select + New to create a new dedicated SQL pool.
- Give the dedicated SQL pool a new name
TutorialDBand pick a performance level. Set to the smallest size to reduce costs for this quickstart. - Select Create.
For standalone dedicated SQL pools (formerly SQL DW), navigate to the Dedicated SQL pool (formerly SQL DW) in the Azure portal.
- Select the link for Server name, such as
contosowdw.database.windows.net, to go to the Azure portal page for the logical SQL server. - Select + Create dedicated SQL pool (formerly SQL DW) to create another dedicated SQL pool in the logical SQL server.
- Give the dedicated SQL pool a new name
TutorialDBand pick a performance level. Set to the smallest size to reduce costs for this quickstart. - Select Review + Create.
Create a table
The query editor is still connected to the master database, but we want to create a table in the TutorialDB database.
Change the connection context to
TutorialDB:Paste the following snippet into the query editor and select Run:
Note
You can append this to, or overwrite the previous query in the editor. Note that selecting Run executes only the query that is selected. If nothing is selected, selecting Run executes all queries in the editor.
-- Create a new table called 'Customers' in schema 'dbo'
-- Drop the table if it already exists
IF OBJECT_ID('dbo.Customers', 'U') IS NOT NULL
DROP TABLE dbo.Customers
GO
-- Create the table in the specified schema
CREATE TABLE dbo.Customers
(
   CustomerId        INT     NOT NULL,
   Name      [NVARCHAR](50)  NOT NULL,
   Location  [NVARCHAR](50)  NOT NULL,
   Email     [NVARCHAR](50)  NOT NULL
);
GO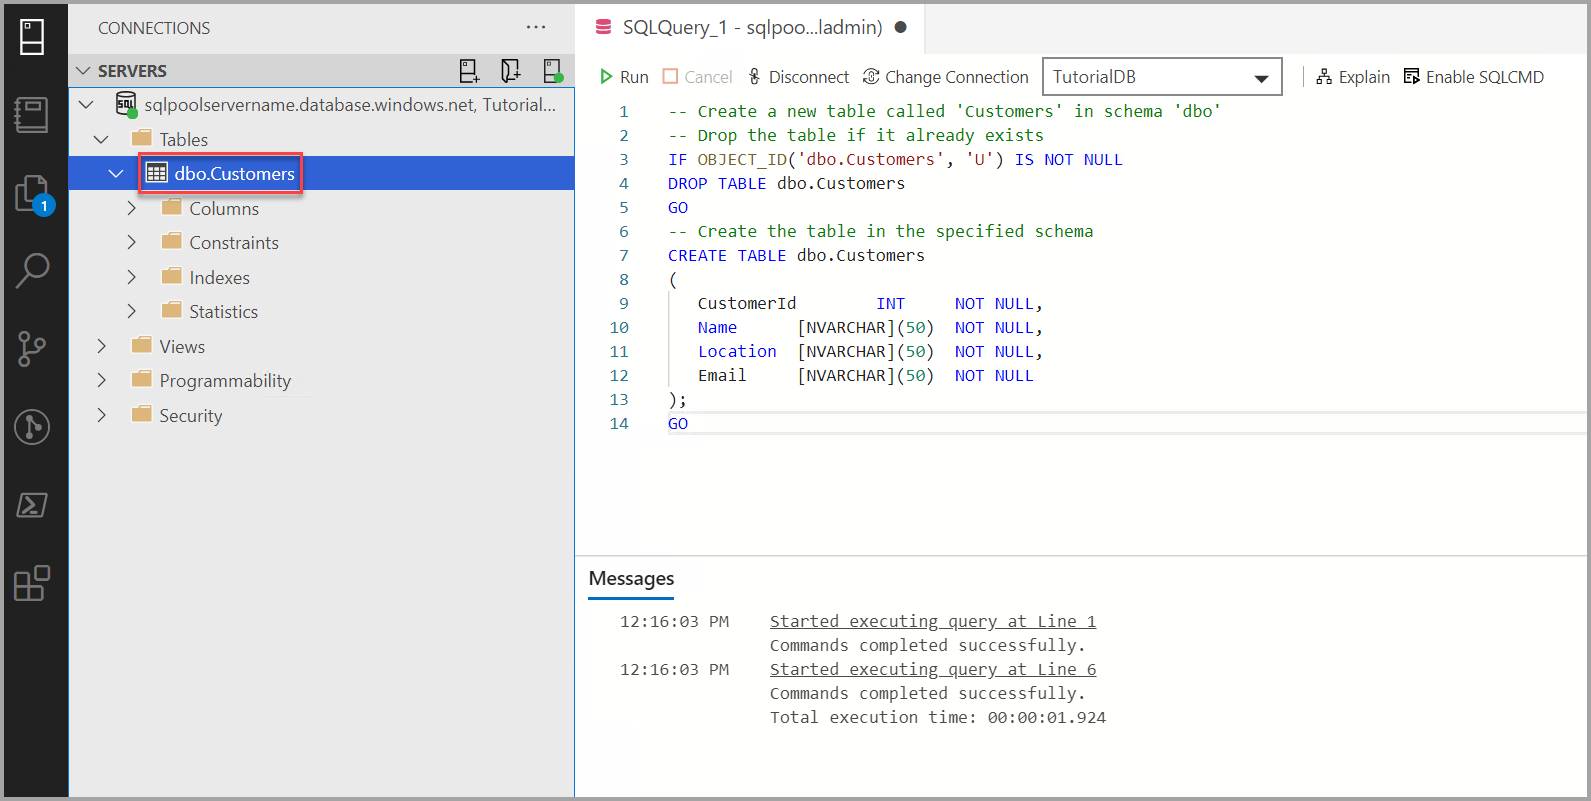
Insert rows
Paste the following snippet into the query editor and select Run:
-- Insert rows into table 'Customers'
INSERT INTO dbo.Customers
   ([CustomerId],[Name],[Location],[Email])
   SELECT 1, N'Orlando',N'Australia', N'' UNION ALL
   SELECT 2, N'Keith', N'India', N'keith0@adventure-works.com' UNION ALL
   SELECT 3, N'Donna', N'Germany', N'donna0@adventure-works.com' UNION ALL
   SELECT 4, N'Janet', N'United States', N'janet1@adventure-works.com'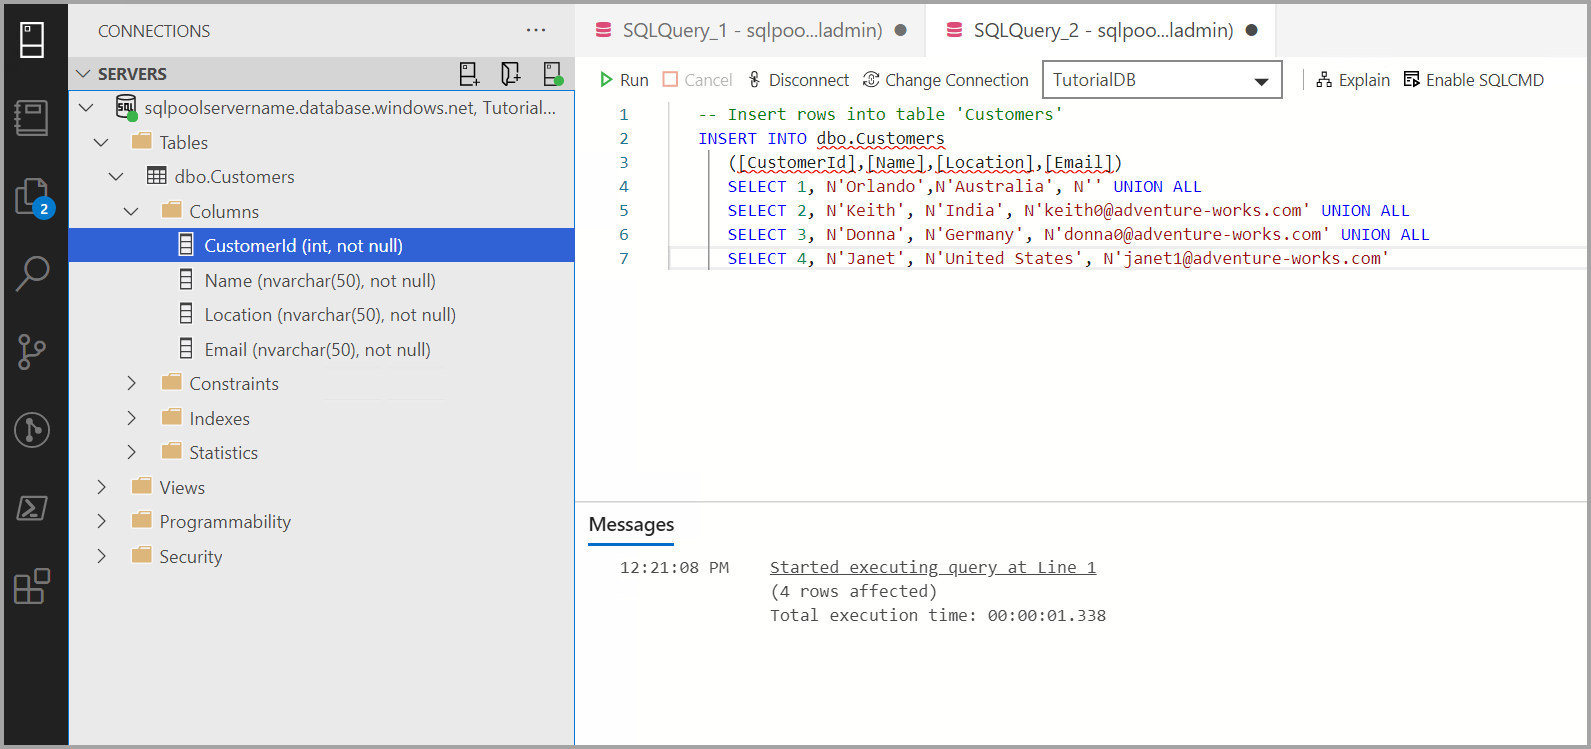
View the result
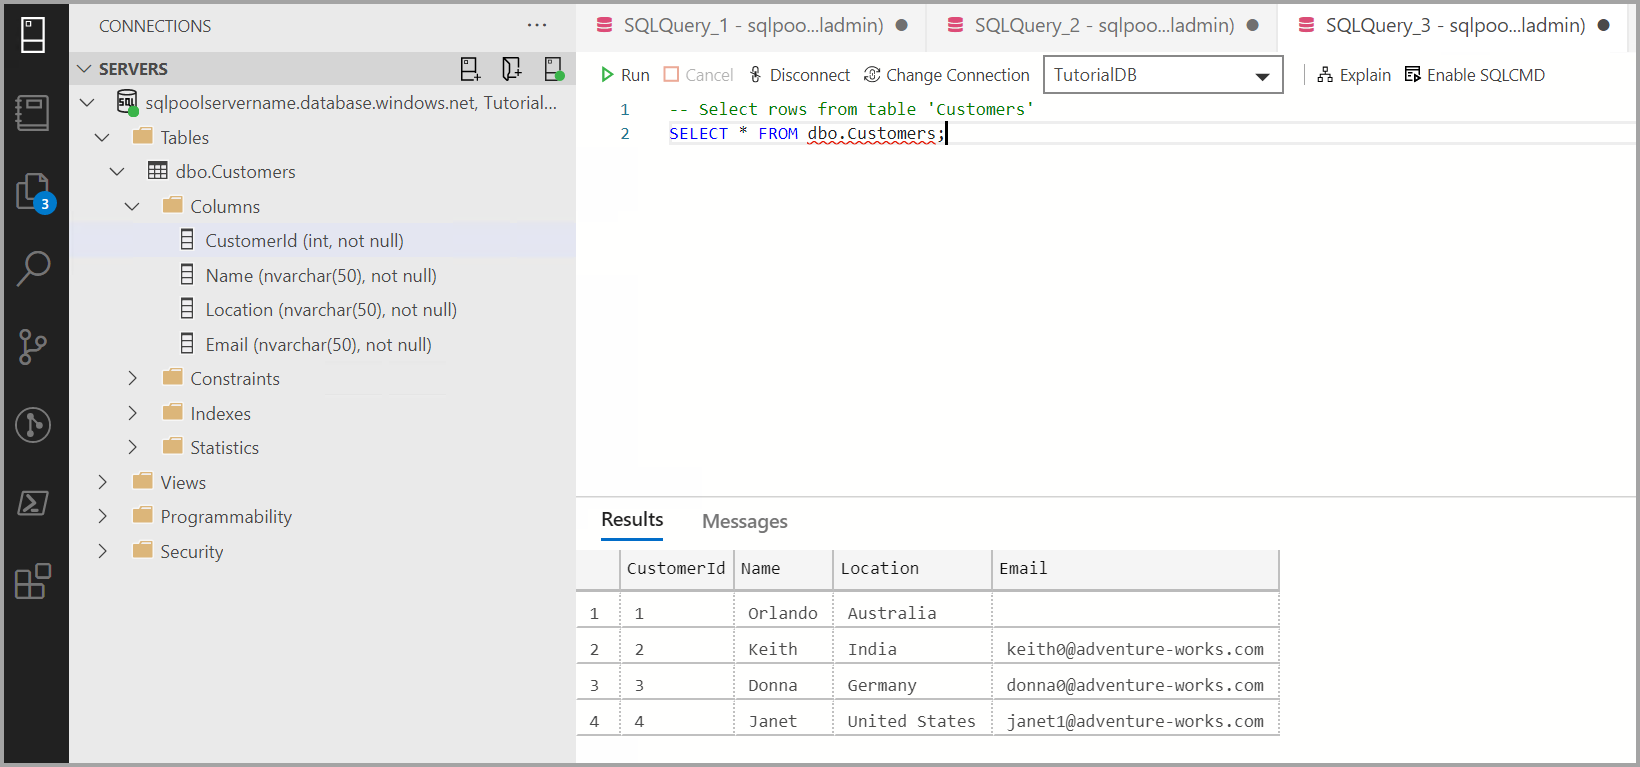
Paste the following snippet into the query editor and select Run:
-- Select rows from table 'Customers'
SELECT * FROM dbo.Customers;
The results of the query are displayed:
Clean up resources
If you don't plan to continue working with the sample databases created in this article, then delete the resource group.
Next steps
For more information, visit Connecting to Synapse SQL with Azure Data Studio.
Now that you've successfully connected to an Azure Synapse Analytics and ran a query, try out the Code editor tutorial.
Feedback
Coming soon: Throughout 2024 we will be phasing out GitHub Issues as the feedback mechanism for content and replacing it with a new feedback system. For more information see: https://aka.ms/ContentUserFeedback.
Submit and view feedback for