Configure Kubernetes on multiple machines for SQL Server big data cluster deployments
Applies to: ![]() SQL Server 2019 (15.x)
SQL Server 2019 (15.x)
Important
The Microsoft SQL Server 2019 Big Data Clusters add-on will be retired. Support for SQL Server 2019 Big Data Clusters will end on February 28, 2025. All existing users of SQL Server 2019 with Software Assurance will be fully supported on the platform and the software will continue to be maintained through SQL Server cumulative updates until that time. For more information, see the announcement blog post and Big data options on the Microsoft SQL Server platform.
This article provides an example of how to use kubeadm to configure Kubernetes on multiple machines for SQL Server Big Data Clusters deployments. In this example, multiple Ubuntu 16.04 or 18.04 LTS machines (physical or virtual) are the target. If you are deploying to a different Linux platform, you must alter some of the commands to match your system.
Tip
For sample scripts that configure Kubernetes, see Create a Kubernetes cluster using Kubeadm on Ubuntu 20.04 LTS.
For a sample script that automates a deployment of a single node kubeadm deployment on a VM and then deploys a default configuration of big data cluster on top of it, see deploy single node kubeadm cluster.
Prerequisites
- Minimum of three Linux physical machines or virtual machines
- Recommended configuration per machine:
- 8 CPUs
- 64 GB of memory
- 100 GB of storage
Important
Before starting the big data cluster deployment, ensure the clocks are synchronized across all the Kubernetes nodes the deployment is targeting. The big data cluster has built-in health properties for various services that are time sensitive and clock skews can result in incorrect status.
Prepare the machines
On each machine, there are several required prerequisites. In a bash terminal, run the following commands on each machine:
Add the current machine to the
/etc/hostsfile:echo $(hostname -i) $(hostname) | sudo tee -a /etc/hostsDisable swapping on all devices.
sudo sed -i "/ swap / s/^/#/" /etc/fstab
sudo swapoff -a
Import the keys and register the repository for Kubernetes.
curl -s https://packages.cloud.google.com/apt/doc/apt-key.gpg | sudo sudo tee /etc/apt/trusted.gpg.d/apt-key.asc
echo 'deb http://apt.kubernetes.io/ kubernetes-xenial main' | sudo tee -a /etc/apt/sources.list.d/kubernetes.list
Configure docker and Kubernetes prerequisites on the machine.
KUBE_DPKG_VERSION=1.15.0-00 #or your other target K8s version, which should be at least 1.13.
sudo apt-get update && \
sudo apt-get install -y ebtables ethtool && \
sudo apt-get install -y docker.io && \
sudo apt-get install -y apt-transport-https && \
sudo apt-get install -y kubelet=$KUBE_DPKG_VERSION kubeadm=$KUBE_DPKG_VERSION kubectl=$KUBE_DPKG_VERSION && \
curl https://raw.githubusercontent.com/kubernetes/helm/master/scripts/get | bash
Set
net.bridge.bridge-nf-call-iptables=1. On Ubuntu 18.04, the following commands first enablebr_netfilter.. /etc/os-release if [ "$VERSION_CODENAME" == "bionic" ]; then sudo modprobe br_netfilter; fi sudo sysctl net.bridge.bridge-nf-call-iptables=1
Configure the Kubernetes master
After running the previous commands on each machine, choose one of the machines to be your Kubernetes master. Then run the following commands on that machine.
First, create an rbac.yaml file in your current directory with the following command.
cat <<EOF > rbac.yaml
apiVersion: rbac.authorization.k8s.io/v1
kind: ClusterRoleBinding
metadata:
  name: default-rbac
subjects:
- kind: ServiceAccount
  name: default
  namespace: default
roleRef:
  kind: ClusterRole
  name: cluster-admin
  apiGroup: rbac.authorization.k8s.io
EOF
Initialize the Kubernetes master on this machine. The example script below specifies Kubernetes version
1.15.0. The version you use depends on your Kubernetes cluster.KUBE_VERSION=1.15.0 sudo kubeadm init --pod-network-cidr=10.244.0.0/16 --kubernetes-version=$KUBE_VERSIONYou should see output that the Kubernetes master was successfully initialized.
Note the
kubeadm joincommand that you need to use on the other servers to join the Kubernetes cluster. Copy this for later use.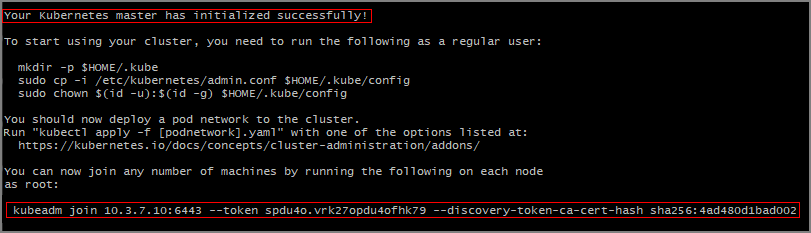
Set up a Kubernetes configuration file your home directory.
mkdir -p $HOME/.kube
sudo cp -i /etc/kubernetes/admin.conf $HOME/.kube/config
sudo chown $(id -u):$(id -g) $HOME/.kube/config
Configure the cluster and the Kubernetes dashboard.
kubectl apply -f https://raw.githubusercontent.com/coreos/flannel/master/Documentation/kube-flannel.yml
helm init
kubectl apply -f rbac.yaml
kubectl apply -f https://raw.githubusercontent.com/kubernetes/dashboard/v1.10.1/src/deploy/recommended/kubernetes-dashboard.yaml
kubectl create clusterrolebinding kubernetes-dashboard --clusterrole=cluster-admin --serviceaccount=kube-system:kubernetes-dashboard
Configure the Kubernetes agents
The other machines will act as Kubernetes agents in the cluster.
On each of the other machines, run the kubeadm join command that you copied in the previous section.

View the cluster status
To verify the connection to your cluster, use the kubectl get command to return a list of the cluster nodes.
kubectl get nodes
Next steps
The steps in this article configured a Kubernetes cluster on multiple Ubuntu machines. The next step is to deploy SQL Server 2019 big data cluster. For instructions, see the following article:
Feedback
Coming soon: Throughout 2024 we will be phasing out GitHub Issues as the feedback mechanism for content and replacing it with a new feedback system. For more information see: https://aka.ms/ContentUserFeedback.
Submit and view feedback for