Upgrade your environment to System Center 2016 - Service Manager
You can't start an upgrade to System Center 2016 - Service Manager if any data warehouse jobs or workflows are running. You can use the procedures in this section to stop the data warehouse job schedules and wait for them to complete before you upgrade the data warehouse management server. Before you upgrade the Service Manager management server, stop the Self-Service Portal, if it's installed, and then wait for 10 minutes to let any running workflows finish before you start the upgrade.
Complete the procedures in the following section, in order, to upgrade to System Center 2016 - Service Manager.
Upgrade preparation
For Service Manager data warehouse database restoration, the Reporting database also needs to be restored after you install the data warehouse.
Refer to the upgrade sequencing of System Center components at Upgrading System Center 2012 R2 - Service Manager to System Center 2016.
Don't mix Service Manager 2016 and Service Manager 2012 R2 with different Service Manager components - all should use the same version. For example, both the Self Service portal and the Service Manager management server should use the same version.
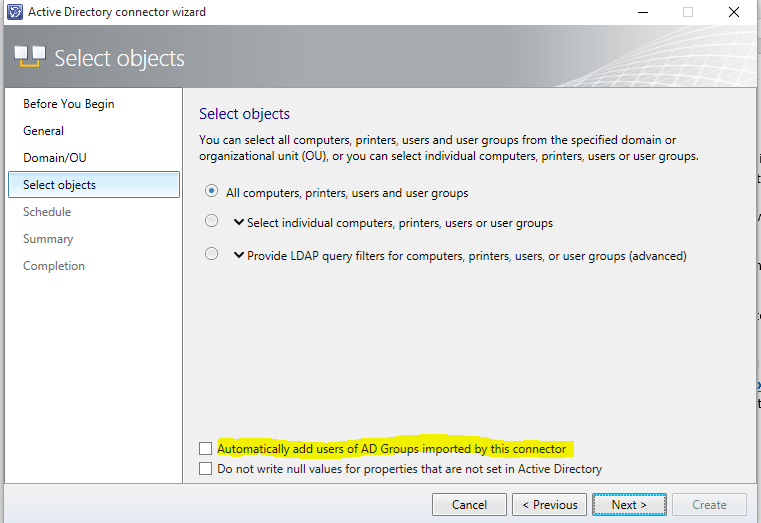
When upgrading from Service Manager 2012 R2 to Service Manager 2016, you shouldn't enable or disable the Active Directory group expansion for any of the Active Directory connectors.
In other words, if it's off, let it remain off and if it's on, let it remain on until the connector runs for the first time. See the screenshot below. This applies only to the first time that the Active Directory connector runs after you upgrade. You can change your preferences for Active Directory group expansion workflow after the first time the Active Directory connector sync completes.
Prepare Service Manager 2012 R2 for upgrade
This article describes how to prepare your System Center 2012 R2 - Service Manager environment for an upgrade. To do this, perform the following procedures for upgrading the data warehouse management server:
List the data warehouse jobs that are running and disable them.
Confirm that the data warehouse jobs have stopped running.
When the data warehouse jobs have completed, start the upgrade of the data warehouse management server.
After the data warehouse has been upgraded, perform the following procedures on the first Service Manager management server:
Wait for 10 minutes, and then start the upgrade of the Service Manager management server.
To list the data warehouse jobs by using Windows PowerShell cmdlets and disable them
On the computer that hosts the data warehouse management server, select Start, select All Programs, select Microsoft System Center 2012 R2, and select Service Manager Shell.
Enter the following commands, and then press ENTER after each command:
Set-ExecutionPolicy -force RemoteSignedcd (Get-ItemProperty -path 'HKLM:\SOFTWARE\Microsoft\Microsoft Operations Manager\3.0\Setup\').InstallDirectory Import-Module .\Microsoft.EnterpriseManagement.Warehouse.Cmdlets.psd1cd 'C:\Program Files\Microsoft System Center 2012 R2\Service Manager' Import-Module .\Microsoft.EnterpriseManagement.Warehouse.Cmdlets.psd1get-scdwjob | ? {$_.Name -match 'Extract_'} | foreach {Disable-SCDWJobSchedule -JobName $_.Name}A list of the data warehouse jobs appears.
To confirm that the data warehouse jobs have stopped running
In the Service Manager console, select Data Warehouse.
In the Data Warehouse pane, expand Data Warehouse, and select Data Warehouse Jobs.
In the Data Warehouse Jobs pane, observe the Status column for each data warehouse job. When the status for each job is listed as Not Started, proceed to the next procedure to stop the Self-Service Portal. If no Self-Service Portal exists in your environment, you can start the upgrade process.
To prevent MPSync jobs from failing
Run the SQL script below on the DWRepository database to get the SQL scripts that drop and add a constraint on the primary key in fact tables in the DWRepository database to correct the problem
;WITH FactName
AS (
       select w.WarehouseEntityName from etl.WarehouseEntity w
       join etl.WarehouseEntityType t on w.WarehouseEntityTypeId = t.WarehouseEntityTypeId
       where t.WarehouseEntityTypeName = 'Fact'
),FactList
AS (
    SELECT  PartitionName, p.WarehouseEntityName,
            RANK() OVER ( PARTITION BY p.WarehouseEntityName ORDER BY PartitionName ASC ) AS RK
    FROM    etl.TablePartition p
       join FactName f on p.WarehouseEntityName = f.WarehouseEntityName
)
, FactPKList
AS (
    SELECT  f.WarehouseEntityName, a.TABLE_NAME, a.COLUMN_NAME, b.CONSTRAINT_NAME, f.RK,
            CASE WHEN b.CONSTRAINT_NAME = 'PK_' + f.WarehouseEntityName THEN 1 ELSE 0 END AS DefaultConstraints
    FROM    FactList f
    JOIN    INFORMATION_SCHEMA.KEY_COLUMN_USAGE a ON f.PartitionName = a.TABLE_NAME
    JOIN    INFORMATION_SCHEMA.TABLE_CONSTRAINTS b ON a.CONSTRAINT_NAME = b.CONSTRAINT_NAME AND b.CONSTRAINT_TYPE = 'Primary key'
)
, FactWithoutDefaultConstraints
AS (
    SELECT  a.*
    FROM    FactPKList a
    LEFT JOIN FactPKList b ON b.WarehouseEntityName = a.WarehouseEntityName AND b.DefaultConstraints = 1
    WHERE   b.WarehouseEntityName IS NULL AND a.RK = 1
)
, FactPKListStr
AS (
    SELECT  DISTINCT f1.WarehouseEntityName, f1.TABLE_NAME, f1.CONSTRAINT_NAME, F.COLUMN_NAME AS PKList
    FROM    FactWithoutDefaultConstraints f1
    CROSS APPLY (
                    SELECT  '[' + COLUMN_NAME + '],'
                    FROM    FactWithoutDefaultConstraints f2
                    WHERE   f2.TABLE_NAME = f1.TABLE_NAME
                    ORDER BY COLUMN_NAME
                FOR
                   XML PATH('')
                ) AS F (COLUMN_NAME)
)
SELECT  'ALTER TABLE [dbo].[' + f.TABLE_NAME + '] DROP CONSTRAINT [' + f.CONSTRAINT_NAME + ']' + CHAR(13) + CHAR(10) +
        'ALTER TABLE [dbo].[' + f.TABLE_NAME + '] ADD CONSTRAINT [PK_' + f.WarehouseEntityName + '] PRIMARY KEY NONCLUSTERED (' + SUBSTRING(f.PKList, 1, LEN(f.PKList) -1) + ')' + CHAR(13) + CHAR(10)
FROM    FactPKListStr f
Upgrade to System Center 2016 - Service Manager
Use the following procedures to upgrade your Service Manager environment to System Center 2016 - Service Manager. These procedures include steps for upgrading the data warehouse management server, the Service Manager management server, and the Service Manager console.
Upgrade the Service Manager Self Service portal
Refer the instructions mentioned in the Upgrading the Service Manager Self-Service Portal article. In some upgrade scenarios, when you upgrade a management server, the Self Service Portal is also upgraded. In these cases, you need to apply a patch before you upgrade.
Upgrade steps for custom development
With the System Center 2016 - Service Manager release, the product has moved to support .NET 4.5.1. The tool set to support this movement to .NET 4.5.1 is required to break a few dependencies and has led to the movement of classes across the assemblies. Hence, the upgrade to Service Manager 2016 may break the custom solutions made in-house or by third party (non-Microsoft). Refer the steps to upgrade your custom solutions to avoid getting into this problem.
Upgrade the data warehouse management server
Use the following procedure to upgrade the data warehouse management server.
Important
Ensure that you've stopped the data warehouse jobs before you continue.
To upgrade the data warehouse management server
Sign in to the computer that will host the data warehouse management server by using an account that is a member of the Administrators group. This account must also be a local administrator.
On the Service Manager installation media, double-click the Setup.exe to start the Service Manager Setup Wizard.
On the Microsoft System Center 2016 page, select Upgrade Service Manager data warehouse management server.
On the Prepare for upgrade page, select the two items indicating that you've read the appropriate sections in the System Center 2016 - Service Manager Upgrade Guide, and select Next.
On the Product registration page, enter the appropriate information in the boxes. Read the Microsoft Software License Terms; if applicable, select I have read, understood, and agree with the terms of the license agreement; and select Next.
On the System check results page, ensure that the prerequisite check passed or at least passed with warnings, and select Next.
On the Configure Analysis Service for OLAP cubes page, in the Database server box, enter the computer name of the server that will host the SQL Server Analysis Services (SSAS) database, and then press the tab key. When Default appears in the SQL Server instance box, select Next.
Important
If you're installing SSAS on a computer other than the computer that hosts the data warehouse management server and there's a firewall in your environment, you must ensure that the proper firewall ports are opened. For more information, see Port Assignments for System Center 2016 - Service Manager in the Planning Guide for System Center 2016 - Service Manager.
On the Configure Analysis Services credential page, specify the user name, password, and domain for the account, and select Test Credentials. After you receive a message saying The credentials were accepted, select Next.
On the Diagnostic and usage data page, indicate your preference for sharing your Service Manager diagnostic and usage data with Microsoft. As an option, select Privacy statement for System Center Service Manager, and select Next.
On the Use Microsoft Update to help keep your computer secure and up-to-date page, indicate your preference for using Microsoft Update to check for Service Manager updates, and select Next.
On the Configuration Summary page, read the information that is provided, and, if it's accurate, select Install.
On The upgrade was completed successfully page, if you've already backed up the encryption key, clear the Open the Encryption Backup or Restore Wizard checkbox, and select Close.
Upgrade the Service Manager management server
Use the following procedure to upgrade the Service Manager management server.
To upgrade the Service Manager management server
Sign in to the computer that will host the Service Manager management server by using an account that is a member of the Administrators group.
On the Service Manager installation media, double-click the Setup.exe to start the Service Manager Setup Wizard.
On the Microsoft System Center 2016 page, select Upgrade Service Manager management server.
On the Prepare for upgrade page, select the two items indicating that you've read the appropriate sections in the Upgrade Guide for System Center 2016 - Service Manager, and select Next.
On the Product registration page, enter the appropriate information in the boxes. Read the Microsoft Software License Terms, and, if applicable, select I have read, understood, and agree with the terms of the license agreement, and select Next.
On the System check results page, ensure that the prerequisite check passed or at least passed with warnings, and select Next.
On the Configuration Summary page, read the information that is provided, and, if it's accurate, select Install.
On the The upgrade was completed successfully page, if you've already backed up the encryption key, clear the Open the Encryption Backup or Restore Wizard checkbox, and select Close.
Upgrade the Service Manager console
Use the following procedure to upgrade the Service Manager console.
To upgrade the Service Manager console
Sign in to the computer that will host the Service Manager console by using an account that is a member of the Administrators group.
On the Service Manager installation media, double-click the Setup.exe to start the Service Manager Setup Wizard.
On the Microsoft System Center 2016 page, select Upgrade Service Manager console.
On the Prepare for upgrade page, select the two items indicating that you've read the appropriate sections in the Upgrade Guide for System Center 2016 - Service Manager, and select Next.
On the Product registration page, read the Microsoft Software License Terms, and, if applicable, select I have read, understood, and agree with the terms of the license agreement, and select Next.
On the System check results page, ensure that the prerequisite check passed or at least passed with warnings, and select Next.
On the Configuration Summary page, read the information that is provided, and, if it's accurate, select Install.
On The upgrade was completed successfully page, select Close.
Next steps
Feedback
Coming soon: Throughout 2024 we will be phasing out GitHub Issues as the feedback mechanism for content and replacing it with a new feedback system. For more information see: https://aka.ms/ContentUserFeedback.
Submit and view feedback for