Set up a disk and a VM template to deploy shielded VMs
Important
This version of Virtual Machine Manager (VMM) has reached the end of support. We recommend you to upgrade to VMM 2022.
You deploy shielded virtual machines in the System Center - Virtual Machine Manager (VMM) compute fabric using a signed virtual machine hard disk (VHDX) and optionally with a VM template. This article describes how to add signed template disks to VMM, configure a shielding utility disk, deploy new shielded VMs, and convert the existing VMs to shielded VMs in VMM.
Before you start
- The signed template disk used to create the shielded VM template must have the family and version marked.
- The VMM library to which you add the signed template disk must be accessible to clouds from which shielded VMs will be provisioned.
- The library shared should be added to clouds from which shielded VMs will be provisioned (not in read-only mode).
Adding signed template disks for shielded VMs to the VMM library
Shielded VMs can be deployed in two ways: by deploying directly from a signed template disk or by converting an existing VM to a shielded VM.
Signed template disks assure tenants that the disk contents haven't been modified and enable tenants to securely transfer deployment secrets like administrator passwords and certificates to the VM in an encrypted manner. For this reason, it's preferred to deploy shielded VMs from signed template disks.
To prepare and add a signed template disk to the VMM library, complete the following steps:
- Prepare a signed template disk on a machine running Windows Server 2016 with Desktop Experience, or Windows 10 with the Remote Server Administration Tools installed.
- Prepare a signed template disk on a machine running Windows Server 2016 or 2019 with Desktop Experience or later, or Windows 10 or Windows 11 with the Remote Server Administration Tools installed.
Copy the template disk to a library share (\\<vmmserver>\MSSCVMMLibrary\VHDs by default), and refresh the library server.
To provide VMM with information about the operating system on the template disk, in Library, right-click the disk > Properties.
In Operating system, select the operating system installed on the disk. This indicates to VMM that the VHDX isn't blank. The shield icon next to the disk name denotes it as a signed template disk for shielded VMs. Supply the information about the Family and Release of the disk as well to make the resources available in the tenant Azure Pack self-service portal (optional).
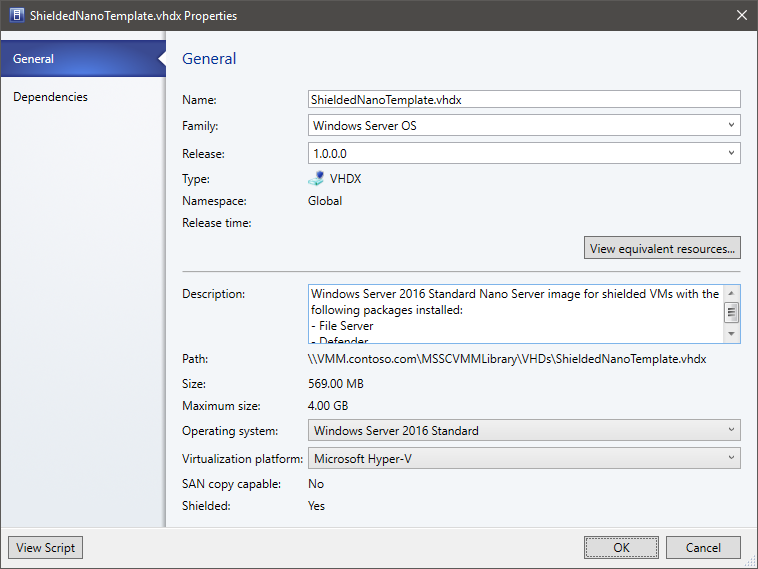
Select OK to save the properties of the signed template disk.
Create a shielded VM template
You can optionally create a shielded VM template using a signed template disk. VM templates define virtual machine resources such as CPU count, RAM, and networking for an OS disk.
Templates for shielded VMs vary slightly from a regular VM template. Some settings are fixed; for example, the VM must be a Generation 2 VM with Secure Boot enabled. Create the VM template as follows:
- Select Library > Create VM Template. In Select Source, select Use an existing VM template or a virtual hard disk stored in the library > Browse.
- Select the signed template disk, specify a template name and optional description, and select OK.
- In Configure Hardware, specify the hardware properties for the VMs you create from the template. Ensure there's at least one NIC configured and available. Tenants connect to shielded VMs over Remote Desktop Connection, Windows Remote Management, or other remote management tools that require networking.
- If you want to use static IP addressing in the tenant pool, you need to let your tenants know. Tenants need to provide an answer file with values, which specializes a shielded VM for them. There are special, well-known placeholder values required to support static IP pools.
- In Configure Operating System, specify the OS version, computer name, product key, and time zone. The tenant provides secure information, such as the administrator password in a shielding data file (.PDK), that they'll provide when provisioning a new VM. If you specify a product key, ensure it's valid for the operating system on the template disk. If it isn't, the VM won't provision successfully. After the VM template is created, ensure that it's available to the Tenant Administrator user role. Tenants can then use it to provision new VMs.
Configure the shielding helper VHD
The existing Windows VMs can also be converted to shielded VMs with the use of a shielding helper VHD. The helper VHD is a special disk prepared with tools to encrypt another VM's operating system drive. VMM must be configured with a helper VHD before you can shield the existing VMs.
- Prepare a helper VHD on a computer running Windows Server 2016 or Windows 10 with the Remote Server Administration Tools installed.
- Copy the helper VHD to a library share, and refresh the library server.
- In the VMM console, select Settings > Host Guardian Service Settings.
- In the Shielding Helper VHD section, select Browse and select the helper VHD from the list of files in the library shares.
- Select Finish to save the configuration.
With the shielding helper VHD configured, you can proceed to shield an existing VM.
Next steps
Review Provision shielded VMs to understand how to deploy shielded virtual machines in a VMM compute fabric.
Feedback
Coming soon: Throughout 2024 we will be phasing out GitHub Issues as the feedback mechanism for content and replacing it with a new feedback system. For more information see: https://aka.ms/ContentUserFeedback.
Submit and view feedback for