Manage sandbox and production environments
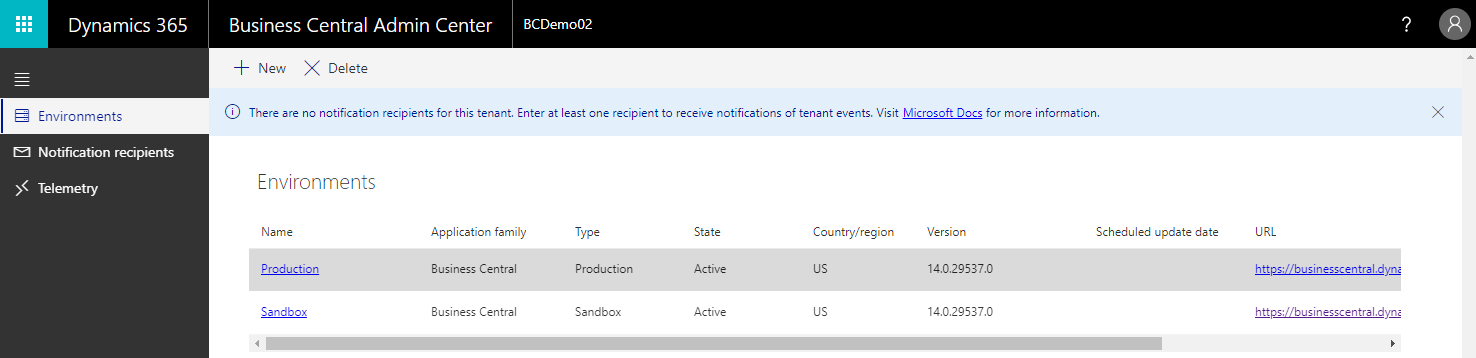
The Environments tab of the Business Central administration center allows you to view information about the Business Central production and sandbox environments for a tenant and manage updates for each environment.
Starting with 2020 release wave 2, every new Business Central customer with a Business Central Premium or Essential subscription can use one production environment and three sandbox environments, at no extra charge. They can then select to purchase an unlimited number of extra production environments, if needed, through their CSP partner. Each extra production environment comes with three extra sandbox environments and 4 GB of extra, tenant-wide database capacity. Production and sandbox environments can be created and used in any country or region where Business Central (online) is available, including the countries or regions where the existing environments are running.
Administrators can create the more environments in the Business Central admin center. On the Capacity page, you can see how many environments of each type you can create.
The environments quota is applied when you try to create a new environment, or copy an existing environment, in the Business Central admin center.
The Environments list page provides an overview of the sandbox and production environments in the tenant. You can see the details and other actions for an environment by selecting the link in the Name column of the list for the environment.
The Business Central administration center provides a simple method for
creating the production environments for a tenant. For each tenant,
administrators can create multiple production environments, including
the option for environments to be on different country-specific or
region-specific versions of Business Central.
To create a production environment, follow these steps:
On the Environments tab of the Business Central administration center, select the New action on the action ribbon.
In the Create Environment pane, select Production in the Type drop-down list.

In the Country drop-down list, select the country/region for the environment. The selected country/region determines the localization for the environment and the Microsoft Azure region in which the environment is created and stored.
Select Create.

When the new production environment is created, it's on the latest production version of Business Central.
Create a sandbox environment
A sandbox environment is a non-production instance of Business Central. Isolated from production, a sandbox environment is the place to safely explore, learn, demo, develop, and test the service without the risk of affecting the data and settings of your production environment. Each Business Central tenant is limited to three sandbox environments.
To create a sandbox environment, follow these steps:
On the Environments tab of the Business Central administration center, select the New action on the action ribbon.
In the Create Environment pane, provide a name for your environment.
Select Sandbox in the Type drop-down list.
Specify if you want the sandbox environment to contain a copy of another environment. If this option is selected, select the environment to copy. When you're creating a sandbox environment as a copy of another environment, the new environment is created on the same application version as the environment that is being copied. The new environment also contains all the per-tenant extensions and AppSource extensions that are installed and published in the environment that is being copied.
In the Country drop-down list, select the country/region for the environment. The selected country/region determines the localization for the environment and the Azure region in which the environment is created and stored.
Select the application version for the new sandbox environment from the version list. The sandbox environment isn't accessible until the State shows as Active.
A new sandbox environment (preview) only contains the CRONUS demonstration company. Actions that you perform in the sandbox environment (preview) don't affect data or settings in your production environment.
When you're creating a new sandbox environment, if the environment isn't a copy of an existing environment, you can select the application version for the new environment. The version list shows the latest production version, which is the version that is used for new production environments.
The version list might also have one or more preview versions. Preview versions are early release candidates of upcoming releases of Business Central that are made available specifically for sandbox environments. This feature allows you to review new functionality, validate extension compatibility, and perform other general testing of the upcoming release.
When a sandbox environment is created on a preview version, the environment is updated automatically to new preview versions when they become available. However, the environment isn't updated to the production version. When a sandbox environment is on a preview version, it must stay on a preview version until it's deleted. The environment might also be deleted if an update between preview versions fails. We recommend that preview versions are used only for temporary testing of an upcoming release.
Create a sandbox based on a production environment
A single, default sandbox environment can also be created from within a page in the production environment of the Business Central application.
If a sandbox is created with a copy of a production environment, several precautions are taken for that sandbox:
The job queue is automatically stopped.
Any base application integration settings are cleared.
Outbound HTTP calls from extensions are blocked by default and must be approved for each extension.
Any General Data Protection Regulation (GDPR) action must be handled separately and repeated for the sandbox. No synchronization occurs with the production environment after the sandbox has been created.
To create a sandbox environment from within your production environment, follow these steps:
Select the Search for page icon in the upper-right corner of the page, enter Create Sandbox, and then select the related link.
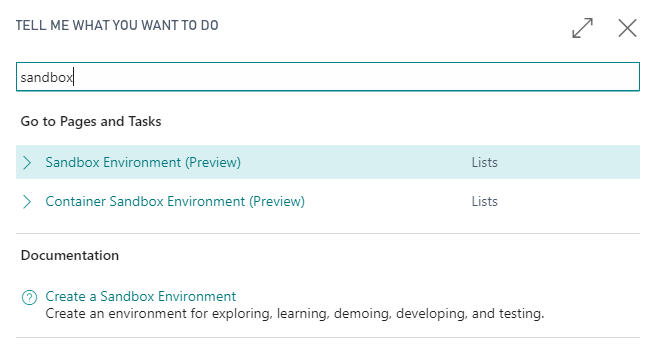
Select Sandbox Environment (Preview) > Create.


To enable outbound HTTP calls, go to the Extension Management page in Business Central and select Configure. Then, on the Extension Settings page, make sure that Allow HttpClient Requests is turned on. This setting must be enabled for each extension.
Copy environments
You can create an environment that is a copy of an existing environment, such as a sandbox that is based on production for troubleshooting, or a production environment that is based on a sandbox, for example. When you create an environment as a copy of another environment, the new environment is created on the same application version as the environment that you're copying. The new environment contains all per-tenant extensions and AppSource extensions that are installed and published in the original environment that is being copied.
To copy an environment, follow these steps.
In the Business Central administration center, select Environments, then select the environment that you want to copy.
On the Environment Details page, select the Copy action.

In the Copy environment pane, specify the type of environment that you want to create based on the current environment.
Specify a name for the new environment.
Select the Create action.

When the process starts, you can go to the list of your environments and see the status of the new environment. At first, you see the new environment with the state Preparing, and then Active once the new environment is fully up and running. Further status details of the copy operation can be found on the Operations page. The original environment that the new environment is based on remains active.
When an environment is created as a copy of another environment, many precautions are taken for that copy.
Tasks in the job queue are automatically stopped.
To see which scheduled jobs are stopped, and to decide which jobs to restart in the new environment, go to the Scheduled Tasks page in Business Central. There, you can set tasks to be ready to run in the job queue. However, only tasks that are marked as belonging to the current environment can run. For more information, see View Scheduled Tasks in the business functionality content.
Any base application integration settings are cleared.
Any irreversible features that were enabled in the original environment are also turned on in the copy.
For more information, see Features that can't be turned off.
Development extensions that are published from Azure DevOps and any extensions that depend on them are uninstalled when the source environment is a sandbox. Any data that was created in the original environment by the extensions that are now uninstalled in the copy aren't deleted. Any updates to per-tenant extensions that are slotted to be upgraded with the next minor or major upgrade are retained.
Outbound HTTP calls from extensions are blocked by default and must be approved for each extension. Otherwise instead of an external call, the system displays the following error message: The request was blocked by the runtime to prevent accidental use of production services.
To enable outbound HTTP calls, go to the Extension Management page in Business Central, and select Configure. Then, on the Extension Settings page, make sure Allow HttpClient Requests is selected. This setting must be enabled for each extension, including libraries.
Any privacy regulation action must be handled separately and repeated for the environment. There's no synchronization with the original environment after the copy has been created.
The internal administrator has the same tools and responsibilities for the copy as they do for the original environment. As a data processor, Business Central offers the same level of data protection and data handling restrictions to all types of environments, both sandboxes and production environments.
The following setups are set to a status of disabled:
Doc. Exch. Service Setup
Curr. Exch. Rate Update Setup
VAT Reg. No. Srv Config
Graph Mail Setup
CRM Connection Setup
CDS Connection Setup
All records in the Service Connection table
All records in the Exchange Sync table
The following data is cleared:
Password in the OCR Service Setup table
SMTP Server in SMTP Mail Setup
Exchange Service URL in the Marketing Setup table
The following changes are made for first-party extensions:
AMC Banking 365 Fundamentals - The Service URL in AMC Banking Setup is reset to default for Sandbox environments.
Email - Outlook REST API - All email accounts of types Microsoft 365 and Current User are deleted.
Email - SMTP Connector - SMTP Server details are deleted.
The following changes are made for specific localizations:
Spain - SII Setup is set to disabled.
United Kingdom - Password in the GovTalk Setup table is deleted.
Netherlands - All Digipoort related fields in the Elec. Tax Declaration Setup table are cleared.
Delete a sandbox
To delete a sandbox environment, choose the environment on the Environments tab of the Business Central administration center and then select Delete on the action ribbon.
Business Central comes with the promise of keeping your data safe and available to you. We give environments a state of soft-deleted for seven days after you delete them. The same terms apply when the environment is scheduled for deletion after a trial has expired. During this time, admins can restore the deleted environment in the Business Central admin center.
Environments in the soft-deleted state are visible in the admin center. Admins can restore such an environment without having to involve Microsoft support. The aim is to reduce the risk of data loss if an environment is deleted by accident, which in earlier versions would require assistance from Microsoft support.
Restoring an environment
Database backups are an essential part of any business continuity and disaster recovery strategy, because they protect your data from corruption or deletion. Business Central online service uses Azure SQL Database as the underlying database backup technology for its environments. All databases are protected by automated backups that are continuously created and maintained by the Azure SQL service. The backup retention period for Business Central databases is set to 30 days for both production and sandbox environments.
As an administrator, you can restore an existing environment from a time in the past, within the 30-day retention period. An environment can only be restored within the same Business Central version (minor and major).
Permission to restore environments is limited to specific types of users: internal and delegated administrators.
The following users are allowed to restore environments.
Delegated administrators from reselling partners
Administrators from the organization that subscribes to Business Central (online)
Also, these users must have the D365 BACKUP/RESTORE permission set assigned to their user account in the environment they're trying to export.
The following are considerations and limitations, when restoring an environment.
Environments can only be restored if the customer has a paid Business Central subscription.
Each environment can be restored up to 10 times in a calendar month.
It isn't possible to use the Business Central administration center to restore an environment that was previously deleted.
If you end up in the situation where you need to restore a deleted environment, contact Microsoft Support for help. In such cases, Microsoft doesn't guarantee a restore operation will succeed, or all data and extensions are available in the restored database. So before you decide to delete an environment, it's important to ensure that the environment is no longer needed.
An environment can only be restored within the same Azure region and country (Business Central localization) as the original environment.
A production environment can be restored to either a Production or Sandbox type environment. A sandbox environment can only be restored to a Sandbox type environment.
When restoring a sandbox environment, all development extensions (that is, extensions published directly from Visual Studio Code) aren't available in the restored environment—even if they were present at the point-in-time you're restoring to). Additionally, any per-tenant extensions that depend on such development extensions aren't available.
Per-tenant extensions you might have uploaded that target the next version of the Business Central won't be available in the restored environment even if they were uploaded at the point-in-time you're restoring to. Per-tenant extensions that were already installed are available in the restored environment.
Every AppSource and Business Central app in the restored environment will have the latest available hotfix installed automatically even if the hotfix was introduced after the point-in-time you're restoring to.
Here are a few important things to do when you're planning to restore an environment.
Make sure you communicate the plan to restore an environment within your organization upfront, in good time.
Typically, you want to stop users and external integrations from using the environment during restoration. Consider doing the following actions in the environment you're planning to restore:
Remove access to the environment for non-essential users, but make sure required users, like administrators, keep access. For more information, see Remove a user's access to the system.
Put all job queues on hold. For more information, see Use Job Queues to Schedule Task.
Consider renaming the environment. The users and external integrations can't access it by its old name.
When restoring an environment, you create a new environment that the database backup restores to. You can't use the same name for two environments of the same customer. So, if you want the restored environment to have the same name as the original environment, rename the original environment before you run the restore operation. For example, you could change the name to include
[DONOTUSE].
To restore an environment, you have to provide a name for the environment and a date/time from which to restore the database.
Select Environments, and then open the environment you want to restore.
Select Restore.
In the Restore Environment pane, specify the date and time in the past to which you want to restore the environment.
Select the type to be used for the restored environment.
Specify a name for the restored environment.
Select Restore.
If there's no backup available for date and time you chose, select the available nearest backup, when prompted. This situation can occur, for example, if the environment was being updated to a new minor or major version during the specified time.
For newly created environments, it can take up to 30 minutes for the backups to be initialized, so you might not be able to restore an environment if you just created it.
When the process starts, you can go to the list of your environments and see the status of the restored environment. At first, you see the new environment with a state of Preparing. The original environment state remains as Active.
The restore operation duration is affected by several factors. For large or highly active databases, the restore might take several hours. You can find more details about the factors that affect the recovery time at Recovery time.
Once the restore is completed, the environment state changes to Active. If the restore operation fails, you can find the failure details on the Operations page. In this case, delete the failed environment, and then try to restore again. Contact Microsoft Support if the issue persists.
After restoring an environment, you should inspect and adjust data to prepare it for users. Consider enforcing these steps during this period.
Remove access to the environment for non-essential users, but make sure required users, like administrators, keep access.
Put all job queues in the restored environment on hold immediately after restore.
If needed, you can upload the per-tenant extensions targeting the next version of Business Central again.
The original environment remains available and isn't affected by the restore operation. You can then get back to the original environment if you need to look up data. Or maybe you have to migrate some data to the restored environment. You can, for example, migrate data by using Business Central RapidStart services.
You can restore your production environment into a new production environment even if doing so results in exceeding your number of environments or database capacity quotas. You can however only exceed this quota by one extra production environment, regardless of how many production environments you have available for your subscription. This capability is provided as an exception, to ensure that you can always restore your production environment in critical situations. You must return within your quota within 30 days following the restore by either removing the original production environment or by purchasing an extra production environment. Before removing the environment, we recommend you export the environment to an Azure storage container in case you need to access some data at a later point. This exception isn't available for restoring from and to sandbox environments.
When you're satisfied with the data in the restored database, enable the users, start the job queues, and let your organization know that the restore process is now completed and they can again use the environment.
After a point-in-time restore, the tenant admin can sign in and decide which restored scheduled tasks to re-enable or cancel if no longer relevant.
After a point-in-time restore, or copy to a sandbox, all restored scheduled tasks in the tenant are paused. The internal admin can sign in and see which scheduled tasks are paused and decide about re-enabling or canceling them depending on the purpose of each task.
Transfer environments between Microsoft Entra tenants
In some cases, administrators might want to transfer their Dynamics 365 Business Central environment to another Microsoft Entra tenant (formerly Azure Active Directory tenant). For example, this could be done to consolidate environments belonging to the same company in a single tenant when one company is acquired by another, or for partners to transfer a demo environment to their customer to test with. Until now, this scenario was supported through service requests that required paperwork to ensure consents from all involved parties were in place.
The process for transferring a Business Central environment to a different Microsoft Entra tenant is a self-service scenario. Internal administrators can request an environment transfer from the source tenant, and then accept the transfer from the target tenant.

Manage access using Microsoft Entra ID groups
To manage access at the environment level, you can assign an Azure Active Directory (Microsoft Entra ID) group to the environment. By assigning a Microsoft Entra ID group to an environment, only direct and indirect members of the group are granted access to the environment. Indirect members are users in another group, which itself is a member of the group assigned to the environment. Although all licensed users in Microsoft Entra ID are added to the environment when it's synchronized with Microsoft 365, only group members can sign in.
From the Environments page, you see the currently assigned group in the Security Group column. Not set indicates that no group has been assigned. Not available indicates that the group that was assigned is no longer available in the Microsoft Entra ID.
The restrictions imposed by a security group don't apply to administrators. Local and delegated admins can freely sign into all environments, regardless of the assigned group.
Before you can assign a Microsoft Entra ID group to an environment, the group must be created in your Microsoft Entra ID tenant. For more information, see Create a basic group and add members using Microsoft Entra ID.
Select Environments, then select the environment on which you want to assign, change, or remove the group.
On the Environment Details page, the currently assigned group is shown under Security Group.
To assign a group, select (Define).
To change or remove the currently assigned group, select Modify.
The Edit Security Group pane shows the current security group, if any, followed by all the available groups in Microsoft Entra ID.
To assign or change a group, search for and select the group from the list.
To remove a group, select the trash icon under Current Security Group.
Select Save when done.
If there are more than 10,000 groups in Microsoft Entra ID, they can't all be retrieved and displayed in the admin center. Instead, you see the message You have too many groups to display them all. In this case, you have to enter the object ID of the group that you want to assign. You get the object ID from the Azure portal.
If you change or remove a group, it can take a while before the changes to take effect or access is revoked from users.
Set the update window
Business Central environments are updated on a monthly basis. Major updates occur semiannually, and minor updates occur each month where no major update occurs. The Business Central administration center gives you a level of control over the timing of updates for each environment.
The update window for an environment defines a window of time during the day in which the environment can be updated. When an update is rolling out to Business Central online, regardless of whether it's the monthly service update or a major update, the update is applied to an environment within the time frame that the update window defines. This approach helps to ensure that updates are applied outside of the customer's normal business hours, for example. The update window must be a minimum of six hours.
To set the update window for an environment, follow these steps:
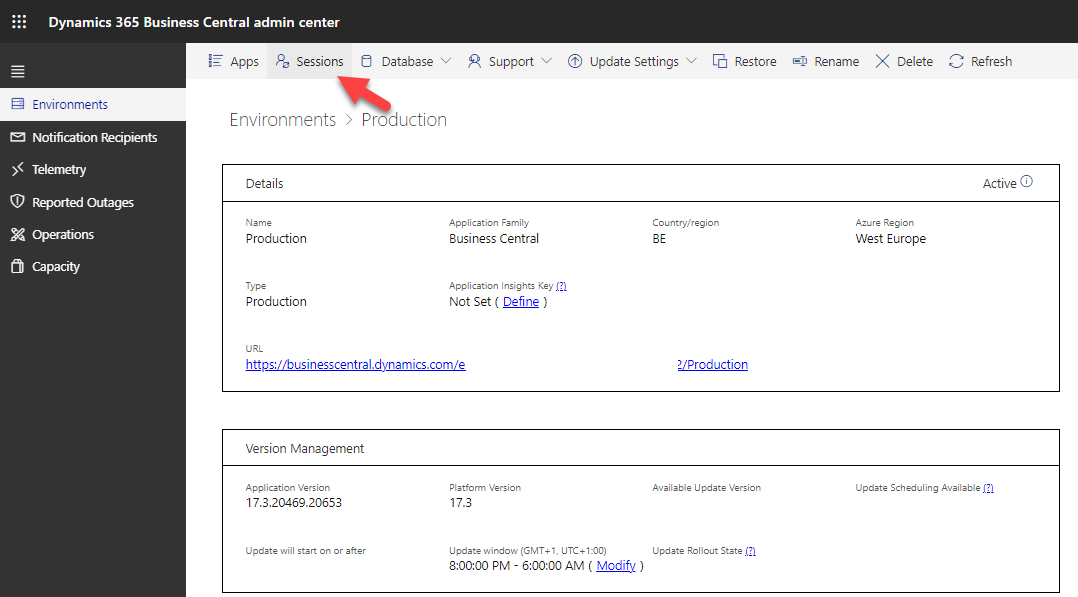
On the Environments tab of the Business Central administration center, select the Name of the relevant environment to open the environment details.
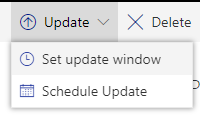
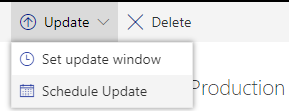
Select the Set update window action on the update list on the action ribbon.
In the Set update window pane, specify the start time and end time for the update window for the environment.
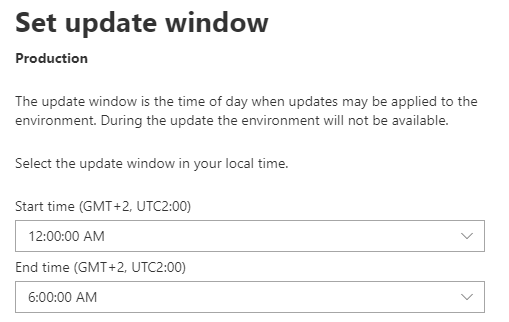
Select Save.


For major updates only, you can select a specific date on which the environment is updated. When a major update version is available, a notification is sent to the notification recipients that are listed on the Notification recipients tab of the Business Central administration center. The Update version field in the version management section of the environment details also displays the version number of the available update version.
To schedule an update date, follow these steps:
On the Environments tab of the Business Central administration center, select the Name of the relevant environment to open the environment details.
Select the Schedule Update action on the update list on the action ribbon.
In the Update pane, select the desired update date. The selected date must be within a given date range that is displayed in the pane.
Select Schedule Update.

All environments will have a default update window that guarantees that an update won't start before 8 PM and won't run after 6 AM local time, based on the environment's localization. This applies to new environments and any existing environments that didn't already have an update window set up.
When you schedule an update for a specific date, you can ignore the upgrade window that is specified for the environment. This way, you can start an upgrade immediately if it's scheduled for today. You can also allow updates to run for more than 24 hours on environments with large databases.
Start immediate environment updates in the administration center
When you receive an email notification about your environment being scheduled for an update, you can change the update date to a more convenient date by using the Business Central administration center. You can also test the update by creating a sandbox environment as a copy of your production environment.
In previous releases, newly added environments would be added to the update roll-out process within a few days, which significantly limited your ability to test the updates. With the improvements introduced to the update roll-out process in 2020 release wave 1, the newly created sandbox environment is automatically added to the update roll-out within one hour. If you added yourself as a notification's recipient in the Business Central administration center, you receive an email notification, and the update notification is also visible in the administration center.
If you want to start the update of this environment immediately, open the Environment page, then select Schedule Update from the Update menu. Change the update date to the current date and confirm your choice. The update starts immediately.
If your environment has the update window defined, the update will start in the first available window (which might be on the next day). If the update fails, you can analyze and correct the failures and repeat the update attempt again in the same way.
Timelines for major updates
The following figure illustrates the key milestones and dates for rolling out a major update. The timeline and dates are loosely based on 2020 release wave 2. The same timeline applies to all other major updates, though dates differ.

The following describes the milestones with example dates for the two release waves in any given calendar year:
Update is available - The date when the new major version of Business Central becomes generally available.
Update starts rolling out - The default date when Microsoft starts upgrading your environments. Once the update is scheduled, you can change that date, within an allowed date range, to a date that fits you better.
Last scheduled update date - The last date you can choose to extend your upgrade date to, typically 30 days after the update is available, but this was extended to 60 days for 2020 release wave 2.
Dates and times differ significantly across countries and regions. Make sure that you have set up notifications in the Business Central administration center so that you're notified when the next major update is available.
In the release plans, you can see when the next major update is generally available. Typically, the update is announced on the Dynamics 365 blog, and Microsoft starts rolling out the update to existing environments. On the same day, new customers signing up for a trial and all newly created environments (sandboxes and production) are directed to the new version.
The existing environments are scheduled to be updated to the new version gradually across the world. Microsoft strives to schedule all environments soon after the official release date, but for some environments, the update might not be available for a few weeks. In extreme cases, a given environment might be scheduled for update up to one month after the release date.
When the update becomes available for an environment, all notification recipients for that environment receive email notifications. A notification about the update availability is also shown in the Business Central administration center itself. Starting this day, you can set the date for when your environment should be updated via the Business Central administration center (schedule update). You can choose any date between that date and the date that is shown as the last available date for the update. The last available date can be between one and four weeks away.
Managing Apps
A Business Central environment is built as a collection of apps. These apps include Microsoft apps and partner apps, for example, apps from AppSource. The apps work together to provide customers with a broad set of features to address their various business, market, and industry needs.
Updates are frequently made available for these apps by Microsoft, partners, and ISVs. App updates add new features and fix known problems. To keep your environment up to date and running smoothly, you should check for and install the latest updates regularly.
To help you manage app updates, the administration center includes the Manage Apps page. Like other features in the administration center, this functionality can be used by the partner (delegated administrator) or a local customer admin.
When ISVs make new versions of their apps available on the AppSource marketplace, the partners and customer admins can discover and install the updates by using the Manage Apps page of the administration center.
The Manage Apps page can also help admins do the following:
Resolve requirements for app updates.
Understand an app's dependencies.
Analyze installation and update issues.
Trigger app updates.
In some scenarios, however, updating an app might require updating or installing other apps that it depends on. In such cases, the update of the main app will probably stop until the dependencies are updated or installed, which adds steps that can slow the update process. There's an option that lets admins review dependencies before updating and automate any steps that are needed.

The functionality is also available using the Business Central Administration API. The API enables partners and customer admins to do the above operations programmatically.
Note
The installation of the new AppSource apps, as well as updates to per-tenant extensions (PTEs), is still managed from the in-product Extensions Management page.
To get an overview and check for updates, follow these steps:
Open the Manage Apps page from the environment details page. Select Environments, select the specific environment, and then Apps.

Manage Apps lists all the apps installed on the environment and indicates whether updates are available. When first opened, the system starts checking for updates. Wait for this operation to complete.
When completed, if an update is available for an app, there are two indications:
The Latest Available Version column contains the new version number of the app.
The Available Update Action column contains one of the following actions:
Action required - This action means that you have to do something before you install the update for the app. For example, you might have to first update another app or install a new app. Select the link and read the Requirements for App Updates pane to see what is required.
Install update - This action means that the app is ready to install. Select the link to start the installation.
We recommend you always install and test an app update on a Sandbox environment first. Make sure the app update doesn't disrupt the operational flow or cause problems for the users.
The following steps provide the general flow for updating an app:
If you don't have a sandbox environment, create one.
Open the Sandbox environment and select Manage Apps.
On the Manage Apps page, find the app in the list that you want to update.
If the Available Update Action column for the app shows the Action required link, resolve the update requirements.
When the Available Update Action column for the app shows Install update, select this action to install the new version of the app.
The update will be applied immediately after you accept the confirmation dialogue. The users can continue working during update installation, but depending on the app changes coming with the update, they might receive a message asking them to sign out and sign in again. It's therefore recommended that you apply the updates outside of working hours.
Wait for the app to be installed.
Select Refresh occasionally to check the status.
If the app installs successfully, the new version displays in the Installed version column and the Available Update Action column is Up to date. If the installation fails the Available Update Action column changes to Update failed.
If the app update succeeded, sign in the Sandbox environment and test the new app version.
If the app update works as expected on the Sandbox, switch to the production environment, and repeat the installation steps for the app update.
For apps that have dependencies on other apps, you might have to update or install the dependency apps. The Requirements for App Updates page provide this information. The requirements are divided into two categories, Update requirements and Install requirements. After you resolve all requirements, the app that you want to update will be ready to install.
The Update requirements category lists existing dependency apps that have updates to be installed. To resolve these requirements, complete the following steps for each app:
Return to the Manage Apps page.
Find the app in the list and select Install update.
Wait for Available update action column to change to Up to date.
Automatically update AppSource apps with minor updates
You already can update individual apps from the App Management page in the Business Central admin center, or wait for your environment to receive a major update that automatically updates AppSource. There's also an environment-level setting that automatically updates all installed apps with every minor update, and lets you schedule individual app updates to take place during the environment's update window:
Opt in to automatically update apps installed on your environment with each minor update to the environment. This way, you can always enjoy the latest features and bug fixes from the app developers without any manual intervention.
Schedule individual app updates to run in the first upcoming update window set for your environment. This way, you can control when and how often your apps are updated, and minimize the impact on your business operations.
Using the App Update Cadence setting for your environment, you can choose whether apps update with each major update, each major and minor update, or stick to the default update cadence set by Microsoft. Currently, the default update cadence is for apps to update with each major update, but we might increase this frequency in the future.
The Install requirements category lists dependency apps that haven't been installed yet. For example, a new app was introduced that app update depends on.
You can't, however, install a new app from the Manage App page. Use the Extension Management page in the client instead. Completing this step resolves the requirement.
When an app update is installed, the new app version is starting to install immediately, following the confirmation dialogue. The new app version is published, synchronized, and updated in the background. This process usually doesn't take long, and users aren't interrupted. However, we still recommend you to install the updates outside of working hours.
When the installation of an app update fails, the Available Update Action column displays the Update failed action. Select this action to get more information. The App Update Details pane provides some details about update and what might have caused the failure.
Sometimes the update could fail because of a transient problem. Select Retry to try to install the update again. If the installation continues to fail, contact your ISV. You can find the support details of each ISV on their app page on AppSource. Contact Microsoft support if the app publisher is Microsoft.
Viewing Database Locks
A new page called Database Locks is available in the client. The page shows a snapshot of all database locks. Where possible, it displays details on the AL session that is causing the database lock.
Locking controls access to the same data at the same time by multiple users. To protect a transaction from another transaction modifying the same data, the first transaction puts a lock on the data. The lock remains until the transactions is done.
When a database lock occurs, concurrent transactions are limited in their access to the affected data resource. The limit is determined by the locking mode set by SQL Server. In the client, depending on the locking mode, users might be blocked from completing transactions on the locked data. If so, they typically get a message that indicates the lock condition.
The Database Locks page gives a snapshot of all current database locks in SQL Server. It provides information like the table and database resource affected by the lock. Or, the AL object or method that ran the transaction that caused the lock. These details can help you better understand the locking condition.
Database locking controls access by multiple users to the same data at the same time. To protect a transaction against other transactions modifying the same data, the first transaction puts a lock on the data. The lock remains until the transaction's done.
Users might be blocked from completing transactions on the locked data. They typically get a message that indicates the lock condition.
To view database locks, follow these steps:
Choose the Search for Page or Report icon, enter Database Locks.
Choose the related link.
The Database Locks page gives snapshot of all current database locks.

Viewing Table Information
When troubleshooting performance issues, sometimes it's necessary to see the distribution of data size across tables. This feature makes it easy for an administrator to look up this information.
The page 8700 Table Information provides information about all system and business tables in a Business Central solution. In particular, the page displays information about the amount of data the tables contain.
This information is useful for troubleshooting performance problems, because it lets you see the distribution of data size across tables.
To open this page, select the Search for Page or Report icon. Enter Table Information, and then select the related link.
The Table Information page shows the following:
- Company Name
- Table Name
- Table No.
- No. of Records
- Record Size
- Size (KB)

Information is shown for all companies for which the user has SUPER permissions.
Managing Sessions
Sometimes, canceling a session is the only way to unblock a customer. For example, a long-running report is locking data in a table, preventing warehouse employees from working. Prior to this feature, partners would need to contact support to locate and terminate the session.
In the Business Central administration center, an administrator can see a list of active sessions on an environment and cancel one or more of them. All existing resources consumed by a session are also canceled.
The Manage Sessions page displays information about active sessions on an environment and lets you cancel selected sessions.
To open the page, follow these steps:
Select Manage Sessions.
Use the Show session details check box to show more or fewer details.


Manage the available database and file capacity
Internal administrators and delegated administrators (partners) can get an overview of the database and file capacity available for their Business Central environments, and how much of it's currently used, in the Business Central admin center.
This overview helps administrators better control the size of the environments so that they can purchase extra capacity or free up capacity in time for when it's needed.
To open the capacity overview page, select Capacity, in the menu of the Business Central Administration Center.

Storage capacity usage of Business Central is shown on the Capacity page. Storage capacity is the sum of the 80-GB default allowance plus variable allowances depending on the number of user licenses and capacity licenses purchased for this tenant. Storage capacity is shared among all environments in the tenant and calculated as the sum of capacity consumed by each environment.
Some businesses have unique scenarios that might require extra storage. For those organizations that need more space, there's an option to purchase extra database capacity as an add-on to their existing Business Central subscriptions through their reselling CSP partner.
The Storage usage by environment section of the Capacity page provides a tenant-level view of where your organization is using storage capacity. Here you can see how much database and file storage is used by each environment. For each of your environments, you can also navigate to the Table Information page within Business Central, which lets you see the distribution of data size across tables.
Exceeding the paid database storage limit doesn't interrupt transaction processing within the existing environments. The existing environments that organically grow and eventually exceed the quota is still accessible and available for the customers to continue their business operations. However, once the capacity limits are exceeded, customers can't create new environments or copy their existing environments until the storage used by the existing environments is decreased to fit the quota or extra capacity is purchased.
There are a few things that you can do to reduce the amount of data stored in a database to keep it under its current limit.
Delete unused companies - If you have companies that are no longer needed such as test companies or the Demo company, delete these companies.
Delete documents - Over time, the database will accumulate historical data for documents, like invoiced purchase orders. If these documents are no longer needed, delete them.
Use retention policies - Retention policies allow you to specify how frequently you want Business Central to automatically delete outdated data in tables that contain log entries and archived records.
The Data Archive Extension
Over time, your business will accumulate a substantial amount of data, and as an administrator, it's probably a good idea to have a strategy for archiving data. Having lots of data can slow things down, for example, it might take slightly longer to generate reports, or even lock records. Additionally, large amounts of data can lead to increased storage costs.
The Data Archive extension provides a basic framework for archiving and backing up data as part of date compression. When you use date compression, related entries are consolidated into a single entry, and the originals are deleted. However, there might be value in keeping that data, so rather than deleting it, you can archive it for later use.
The extension is pre-installed and available on the Extension Management, so you don't need to do anything to get started. The extension is also available on Microsoft AppSource.
Your data archives are listed on the Data Archive List page. Each archive can contain data from multiple tables, and can hold up to 10,000 records. If there are more than 10,000 records in a table, a second archive is created for the next 10,000 records, and so on. For example, if you archive 10,100 G/L entries, Business Central creates one G/L Entry archive for the first 10,000 entries, and then a second archive for the remaining 100 entries.
After you archive data, you can explore it using Microsoft Excel or as a CSV file.
If you use the Excel option, the workbook contains one worksheet for each data archive table.
If you use the CSV option, you get a ZIP file with one CSV file for each data archive table.
The Excel and CSV options make it easier to use another app or service to move the data to another location, such as Azure Blob storage, or analysis tool, such as Microsoft Power BI.
The Data Archive extensions are used by the following batch jobs for date compression.
Date Comp. Item Budget Entries
Date Compress Bank Acc. Ledger
Date Compress Customer Ledger
Date Compress FA Ledger
Date Compress General Ledger
Date Compress Insurance Ledger
Date Compress Maint. Ledger
Date Compress Maint. Ledger
Date Compress Resource Ledger
Date Compress VAT Entries
Date Compress Vendor Ledger
Date Compress Whse. Entries
Date Compr. G/L Budget Entries
To start archiving data when you run one of the batch jobs, turn on the Archive Deleted Entries toggle.
The archived data is stored in the Tenant Media table. This table isn't included when database size is calculated, according to your license terms. Instead, it counts as file storage. However, we recommend that you export old archives to, for example, a CSV file, and then delete the old archive records.
Run a data compression
Select the search for page icon, enter Data Administration, and then select the related link.
Do one of the following:
To use an assisted setup guide to set up date compression for one or more types of data, select Data Administration Guide.
To set up compression for an individual type of data, select Data Compression, Compress Entries, and then select the data to compress.

Next unit: Set up tenant notifications
Having an issue? We can help!
- For issues related to this module, explore existing questions using the #Dynamics 365 training tag or Ask a question on Microsoft Q&A.
- For issues related to Certifications and Exams, post on Certifications Support Forums or visit our Credentials Help.