Design the deployment pipeline
In this unit, you design a CI/CD pipeline to support the needs of your project. You want the Contoso Video website to be published in Azure Kubernetes Service (AKS) after each successful push to the main branch that's tagged for release to production. The tagging design makes it easy to check the version of each deployment that goes to production.
You also want to deploy the website to a staging environment for testing after every push to the main branch, regardless of whether the push is tagged for release to production. You can use tags for routing different container images when you push them to Azure Container Registry.
Design the pipeline
To design the pipeline, consider the tasks and triggers.
Triggers
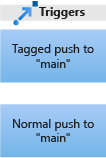
Your pipeline needs to trigger on two different events:
- A tagged push to the main branch.
- A nontagged push to the main branch.
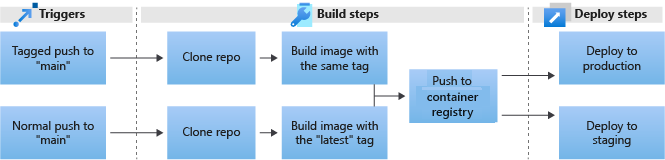
You split the two events into two separate triggers, because the actions for a tagged push are different from the actions for a nontagged push. A tagged push deploys to production, while a nontagged push deploys to the staging environment. The following diagram shows the two triggers for the pipeline:
After you define the triggers, plan the pipeline flow itself.
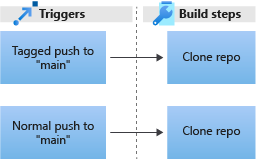
Step 1: Clone the repo
The first steps are the build steps, where you prepare a configuration and build the image before you push it to the AKS cluster. In the build steps, you set up all the information needed for the deploy step. In this case, the first build step after receiving the trigger signal is the same for both triggers, to clone the repository.
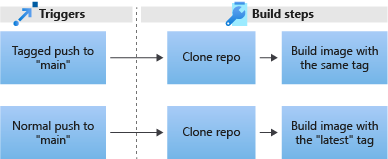
Step 2: Build the image
The next logical step is to build an image. In order to run in the AKS environment, the website must be a Docker image. You need to build the new image by using the Dockerfile that's in the root of the repository. Here's where you account for different triggers.
For the tagged commit pipeline, you build the image and then tag it by using the same tag as the push. For example, if the commit is tagged with v1.0.0, you build the image as contoso/website:v1.0.0. If you have a nontagged commit in the main branch, you build the image with the latest tag.
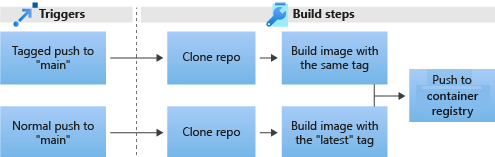
Step 3: Push the image to a container registry
After the image is built, you push it to the Contoso container registry, and you set up the AKS cluster to access the registry. The cluster downloads the images from Container Registry and runs them.
At this point, the pipeline converges into a single step. Your Container Registry instance doesn't have internal divisions, so you push both images to the same place.
Step 4: Deploy the application
The final deploy step deploys the website to the correct location. If a tagged commit triggered the pipeline, you deploy the website to the production namespace of the AKS cluster. If the pipeline was triggered with a nontagged commit, you push to the staging namespace of the same cluster.
Now that you designed the workflow pipeline, proceed to the following units to set up your project environment and create GitHub Actions to clone, build, push, and deploy on the AKS cluster.