Exercise - Data classification, dynamic data masking, and SQL audit
In this exercise, you'll combine your learnings from the module to walk through a scenario. You'll learn how to add new data classifications and dynamic data masks, and then you'll see various methods for auditing users who try to view columns that were marked for data classification. This exercise combines several of the concepts you've already learned about in the module about managing security.
Configure data classification and masking
In the Azure portal, go to your Azure SQL Database instance (not logical server).
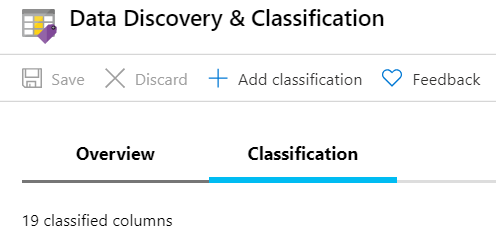
On the left pane, under Security, select Data Discovery & Classification.
Select the Classification tab, then select Add classification.
In a previous exercise, you added all the recommended column classifications. In this step, you manually add a potentially sensitive column to the list of classified columns.
In the SalesLT Customer table, Data Discovery & Classification identified
FirstNameandLastNameto be classified, but notMiddleName. Use the drop-down lists to add it now, and then select Add classification.
Select Save.
Confirm that the classification was successfully added by viewing the Overview tab, and confirm that
MiddleNameis now displayed in the list of classified columns under the SalesLT schema.On the left pane, select Overview to go back to the overview of your database.
Dynamic Data Masking (DDM) is available in both Azure SQL and SQL Server. DDM limits data exposure by masking sensitive data to nonprivileged users at the SQL Server level instead of at the application level where you have to code those types of rules. Azure SQL recommends items for you to mask, or you can add masks manually.
In the next steps, you'll mask the
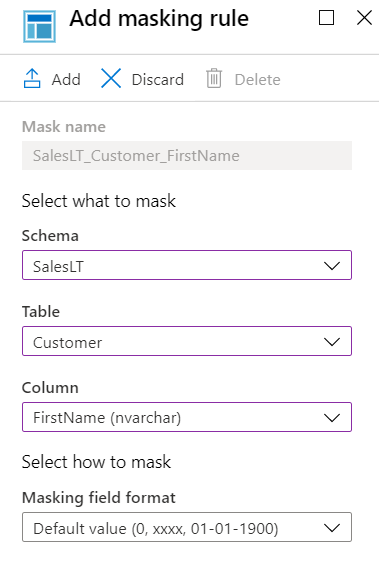
FirstName,MiddleName, andLastNamecolumns, which you reviewed in the previous step.In the Azure portal, go to your Azure SQL Database. On the left pane, under Security, select Dynamic Data Masking, then select Add mask.
In the dropdown lists, select the SalesLT schema, Customer table, and FirstName column. You can review the options for masking, but the default option is good for this scenario. Select Add to add the masking rule.
Repeat the previous steps for both MiddleName and LastName in that table.
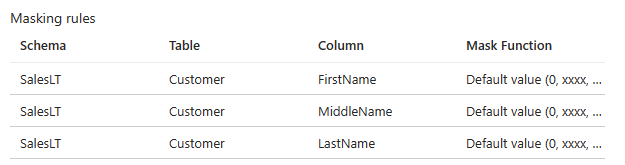
You now have three masking rules similar to those shown here:
Select Save.
On the left pane, select Overview to go back to the overview of your database.
Retrieve data that is classified and masked
Next, you'll simulate someone querying the classified columns and explore Dynamic Data Masking in action.
Go to SQL Server Management Studio (SSMS),
To create a new query in your AdventureWorks database, right-click the database, then select New Query.
Run the following query to return the classified data and, in some cases, columns marked for masked data. Select Execute to run the query.
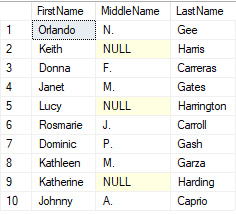
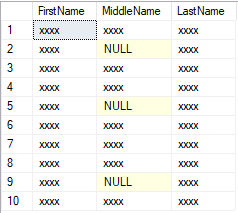
SELECT TOP 10 FirstName, MiddleName, LastName
FROM SalesLT.Customer;
Your result should display the first 10 names, with no masking applied. Why? Because you're the admin for this Azure SQL Database logical server.
In the following query, you'll create a new user and run the preceding query as that user. You'll also use
EXECUTE ASto impersonateBob. When anEXECUTE ASstatement is run, the session's execution context is switched to the login or user. This means that the permissions are checked against the login or user instead of the person executing theEXECUTE AScommand (in this case, you).REVERTis then used to stop impersonating the login or user.You might recognize the first few parts of the commands that follow, because they're a repeat from a previous exercise. Create a new query with the following commands, then select Execute to run the query and observe the results.
-- Create a new SQL user and give them a password
CREATE USER Bob WITH PASSWORD = 'c0mpl3xPassword!';

-- Until you run the following two lines, Bob has no access to read or write data
ALTER ROLE db_datareader ADD MEMBER Bob;
ALTER ROLE db_datawriter ADD MEMBER Bob;

-- Execute as our new, low-privilege user, Bob
EXECUTE AS USER = 'Bob';
SELECT TOP 10 FirstName, MiddleName, LastName
FROM SalesLT.Customer;
REVERT;
The result should now display the first 10 names, but with masking applied. Bob hasn't been granted access to the unmasked form of this data.
What if, for some reason, Bob needs access to the names and gets permission to have it?
You can update excluded users from masking in the Azure portal by going to the Dynamic Data Masking pane, under Security, but you can also do it by using T-SQL.
Right-click the AdventureWorks database and select New Query, then enter the following query to allow Bob to query the names results without masking. Select Execute to run the query.
GRANT UNMASK TO Bob;
EXECUTE AS USER = 'Bob';
SELECT TOP 10 FirstName, MiddleName, LastName
FROM SalesLT.Customer;
REVERT;
Your results should include the names in full.
You can also take away a user's unmasking privileges and confirm that action by running the following T-SQL commands in a new query:
-- Remove unmasking privilege
REVOKE UNMASK TO Bob;

-- Execute as Bob
EXECUTE AS USER = 'Bob';
SELECT TOP 10 FirstName, MiddleName, LastName
FROM SalesLT.Customer;
REVERT;
Your results should include the masked names.
Review audit logs in SSMS
As an admin, you might want to review and audit who is accessing the databases and, specifically, the classified data. Next, you can take a look at the audit files that are being sent to Azure Blob storage. The first thing you have to do is merge the audit files, if the logs span multiple files. You can do this from SSMS by doing the following:
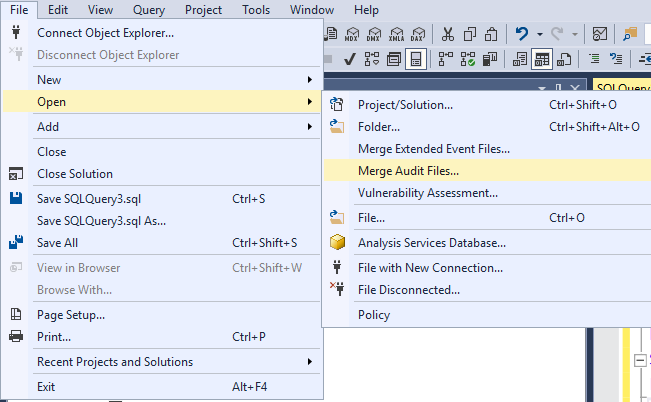
Select File > Open > Merge Audit Files.
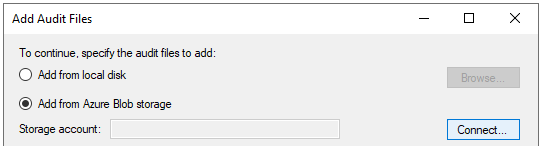
Select Add.

Select Add from Azure Blob storage, then select Connect.
Sign into Azure with the account you're using for this module.

Select the subscription, storage account, and blob container you configured the audit logs to go to. The storage account should start with
sql. The container will be calledsqldbauditlogs. If there's no container with that name, you created a different storage account for auditing; use that instead.Select your Azure SQL Database logical server and your
AdventureWorksdatabase. Make sure the From time is earlier than when you started the exercises. Select OK.The confirmation window lets you know how many files are being downloaded and merged. Select OK.
Review the files, then select OK one last time.
All the audit logs are now displayed. Look for where you were testing with masking with Bob. The listing should be near the bottom.
Select the statement, then review the information on the details pane. For example, for one of the queries where Bob tries to view classified data, under the
data_sensitivity_informationfield, you can see the data that's classified.Double-click the value of the data_sensitivity_information on the Details pane. A pop-up window opens so that you can more easily read the data.
Here's an example of what you might see under
data_sensitivity_information:<sensitivity_attributes max_rank="20" max_rank_desc="Medium"><sensitivity_attribute label="Confidential - GDPR" label_id="bf91e08c-f4f0-478a-b016-23422b2a65ff" information_type="Name" information_type_id="57845286-7598-22f5-3422-15b24aeb125e" rank="20" rank_desc="Medium"/></sensitivity_attributes>You can then export this merged file to an XEL file, a CSV file, or a table for additional analysis. You can also query the Extended Events files by using Azure PowerShell.
Review audit logs in the Azure portal
Analyzing your audit logs will depend on your preference. In this section, you'll be exposed to querying security logs in the Azure portal with Log Analytics.
In the Azure portal, go to your
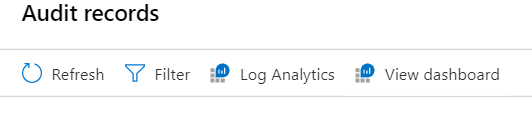
AdventureWorksdatabase. On the left pane, under Security, select Auditing, then select the View audit logs button in the task bar.You should now be able to see a query of your event records, options to run in Query Editor (run T-SQL queries through the portal), options for Log Analytics, View dashboard, and more.
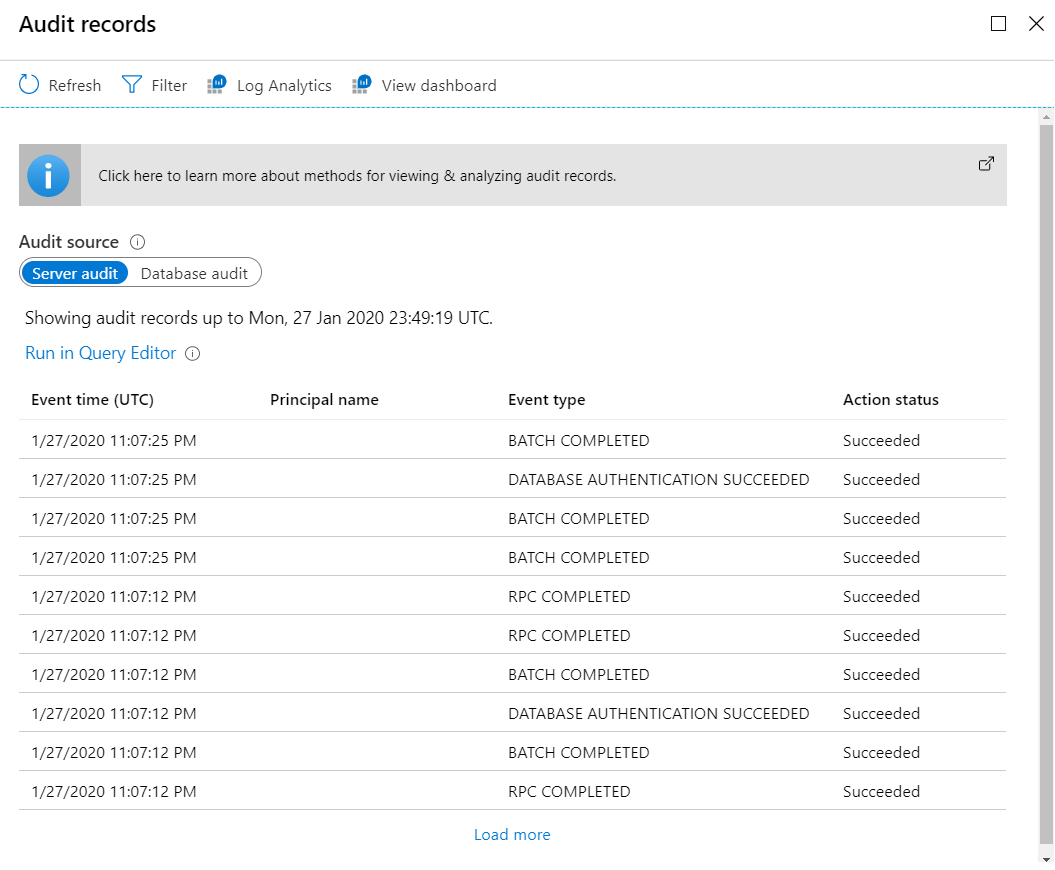
Feel free to look around to understand what some of the options are.
Select Log Analytics. You might need select Refresh to access the Log Analytics button. If you see a Get Started screen, select OK. This takes you to a query editor, but it's not a T-SQL editor. In this view, you can query logs by using the Kusto Query Language (KQL), which is meant for SQL professionals to easily use and understand.
The default query is querying the category
SQLSecurityAuditEvents. Although you might use this category now to view security-related incidents, this tool can also be used for querying other Azure logs and categories in Log Analytics. For this step, you can look for the statements where Bob tried to access sensitive information. To get the same information that you saw in SSMS, expand the row details by selecting the>button.It might take a few minutes for the results to show up here. You can refresh the query by selecting Run again.
In this activity, you won't go deep into KQL querying of logs, but there are many resources in the earlier references if you want more practice later.
In the next step, you'll see how SQL Security has built a dashboard based on Log Analytics, so that you can monitor and audit the logs and other SQL activity. To return to the Audit records pane, close the Log Analytics query window by selecting the X at the upper right.
Select View dashboard.
An overview dashboard is displayed.
Select Azure SQL - Access to Sensitive Data to view more detail.
You might need to wait three to five minutes and select Refresh for items to show up here.
You can use this detailed information to find out:
- How many queries are accessing sensitive data.
- Which types and sensitivities of data are being accessed.
- Which principals are accessing sensitive data.
- Which IPs are accessing sensitive data.
Review what's available here, and how you can audit usage with this tool. You can even select each of these and see the related logs in Log Analytics.
When you're done, close the Azure SQL - Access to Sensitive Data pane by selecting the X at the upper right.
Back on the overview pane of the auditing dashboard, select Azure SQL - Security Insights.
This dashboard displays more auditing information to help you understand database activity and gain insight into anomalies. Spend a few minutes reviewing and drilling into the options here.
In addition to viewing these insights for Azure SQL services, being in Azure lets you use Microsoft Defender for Cloud to monitor, manage, and respond to issues that arise across your entire Azure estate. If you want to look around at what is available outside of the Azure SQL Defender for Cloud, you can search for and select Microsoft Defender for Cloud in the Azure portal. Your access might be limited, depending on your subscription level.