Exercise - Create a storage account and deploy virtual cameras
In this unit, you'll create an Azure Storage account, and then implement a simulated camera array in Node.js that uploads wildlife photos to the storage account. The storage account will store photos that are taken by the cameras you deploy.
Creating a storage account and uploading wildlife photos to the account are the first steps in building an end-to-end solution that demonstrates how you can combine Azure services to create sophisticated systems that incorporate cloud services and AI.
Create a storage account
Let's begin by using Azure Cloud Shell to create an Azure Storage account. Cloud Shell provides a browser-based command line that you can use to run Azure commands. Cloud Shell is an alternative to installing the Azure CLI on your own computer.
Note
Whether to use the CLI or Cloud Shell often is a matter of personal preference. One of the advantages of Cloud Shell is that it doesn't require you to install any software. Another advantage is that you don't have to update Cloud Shell periodically like you do the CLI.
In your browser, go to the Azure portal. If you're prompted to sign in, sign in with your Microsoft account.
In the portal global controls, select Azure Cloud Shell.

Open Azure Cloud Shell
If you're prompted to choose a programming language, select Bash. If you're prompted to allow Cloud Shell to create a storage account (no storage is mounted), choose the option to create new storage. Cloud Shell will mount new storage for you and then open the Command Prompt window. You'll see a welcome message and then the command prompt.
You also can open Cloud Shell by going to https://shell.Azure.com in a separate browser window.
The next task is to create a resource group to hold the storage account and other Azure resources that make up the solution. Make sure that the language selected in Cloud Shell is Bash. Then, create a resource group named
polar-bear-rgin the Azure South Central US region:az group create --name polar-bear-rg --location southcentralusTo paste commands into Cloud Shell, select Shift+Insert. To copy text from Cloud Shell to the clipboard, select Ctrl+Insert.
Run the following command to save the name you want to use for the storage account. In the command, replace
<account-name>with the name you want to use. You'll reference the account name later in the$ACCOUNT_NAMEfield.ACCOUNT_NAME="<account-name>"Note
Storage account names must be between 3 and 24 characters in length and can contain only numbers and lowercase letters. The account name must be unique in Azure. If a command fails because the storage account name is already in use, change the name and try again.
Run the following command to create a storage account in the
polar-bear-rgresource group:az storage account create --name $ACCOUNT_NAME --resource-group polar-bear-rg --location southcentralus --sku Standard_LRSAzure Storage accounts support four types of storage: blobs, tables, files, and queues. Azure Blob Storage provides a massively scalable object store for text and binary data. Photos uploaded to your storage account will be stored as blobs. Before you can upload blobs to a storage account, you must create a container to store them in.
Run the following command to create a container named
photosin the storage account:az storage container create --name photos --account-name $ACCOUNT_NAMEIn Cloud Shell, run the following command to list the access keys for the storage account:
az storage account keys list --account-name $ACCOUNT_NAMEThe primary access key is the
key1property value, which contains a long series of letters and numbers. Copy the primary access key from the output and paste it in a text file so that you can retrieve the key later.Remember that you can select Ctrl+Insert to copy text from Cloud Shell to the clipboard.
Now, you have a storage account for storing photos and a container to store them in. Next, let's deploy some cameras to capture photos of wildlife and upload them to Blob Storage.
Deploy a simulated camera array
The next task is to create a Node.js app that simulates an array of motion-activated cameras. The cameras upload photos that are taken in the wild to the storage account's photos container.
If Node.js isn't installed on your computer, go to https://node.js.org/ and install it now. To check whether Node.js is installed and the version that's installed, in a Command Prompt or terminal window, run this command:
node -vIf Node.js is installed, the output shows the version number. If the version number is less than 8.0, download and install the latest version.
Create a directory on your hard disk to be the project directory. Then, at the command prompt, run
cdto change to that directory.Run the following command to initialize the project directory to host a Node.js project and install a package:
npm init -y
npm install azure-storage --save
The azure-storage package provides a programmatic interface to Azure Storage, including Blob Storage, for Node.js apps.
When the installation finishes, in the project directory, create a subdirectory named photos. Download a .zip file of camera images. Unzip the file, and then copy the 30 .JPG files that are in the .zip file to the photos subdirectory. The simulated cameras upload these images to Blob Storage.
The following images are a sample of the images that are in the dataset. Wildlife shown in the images includes Arctic foxes, polar bears, and walruses.

In the project directory, use Visual Studio Code to create a file named cameras.json. Paste the following JSON in the file:
[
    {
        "deviceId" : "polar_cam_0001",
        "latitude" : 75.401451,
        "longitude" : -95.722518
    },
    {
        "deviceId" : "polar_cam_0002",
        "latitude" : 75.027715,
        "longitude" : -96.041859
    },
    {
        "deviceId" : "polar_cam_0003",
        "latitude" : 74.996653,
        "longitude" : -96.601780
    },
    {
        "deviceId" : "polar_cam_0004",
        "latitude" : 75.247701,
        "longitude" : -96.074436
    },
    {
        "deviceId" : "polar_cam_0005",
        "latitude" : 75.044926,
        "longitude" : -93.651951
    },
    {
        "deviceId" : "polar_cam_0006",
        "latitude" : 75.601571,
        "longitude" : -95.294407
    },
    {
        "deviceId" : "polar_cam_0007",
        "latitude" : 74.763102,
        "longitude" : -95.091160
    },
    {
        "deviceId" : "polar_cam_0008",
        "latitude" : 75.473988,
        "longitude" : -94.069432
    },
    {
        "deviceId" : "polar_cam_0009",
        "latitude" : 75.232307,
        "longitude" : -96.277683
    },
    {
        "deviceId" : "polar_cam_0010",
        "latitude" : 74.658811,
        "longitude" : -93.783787
    }
]
This file defines 10 virtual cameras to upload photos to Blob Storage. Each camera instance contains a device ID and latitude and longitude that specify the camera's location.
The latitude and longitude values correspond to points on the coast of Northern Canada's Cornwallis Island. The island is one of the best sites in Canada to spot polar bears. Cornwallis Island is next to Bathurst Island, which is home to the Polar Bear Pass National Wildlife Area.
In the project directory, create a file named run.js. Paste the following code in the file:
'use strict';

// Connect to the storage account
var storage = require('azure-storage');

var blobService = storage.createBlobService(
    process.env.ACCOUNT_NAME,
    process.env.ACCOUNT_KEY
);

// Load image file names and create an array of cameras
var fs = require('fs');

fs.readdir('photos', (err, files) => {
    var cameras = JSON.parse(fs.readFileSync('cameras.json', 'utf8')).map(
        camera => new Camera(
            camera.deviceId,
            camera.latitude,
            camera.longitude,
            blobService,
            files
        )
    );

    // Start the cameras
    cameras.forEach(camera => {
        camera.start();
    });
});

class Camera {
    constructor(id, latitude, longitude, blobService, files) {
        this._id = id;
        this._latitude = latitude;
        this._longitude = longitude;
        this._blobService = blobService;
        this._files = files.slice(0);
        this._interval = 300000;
    }

    start() {
        // Register the first callback
        setTimeout(this.timer, Math.random() * this._interval, this);
        console.log('Started ' + this._id);
    }

    timer(self) {
        // Randomly select a photo
        var index = Math.floor(Math.random() * self._files.length);
        var filename = self._files[index]

        // Define the metadata to be written to the blob
        var metadata = {
            'latitude': self._latitude,
            'longitude': self._longitude,
            'id': self._id
        };

        // Upload the blob
        self._blobService.createBlockBlobFromLocalFile('photos', filename, 'photos/' + filename, { 'metadata': metadata }, (err, result) => {
            if (!err) {
                console.log(self._id + ': Uploaded ' + filename);
            }
            else {
                console.log(self._id + ': Error uploading ' + filename);
            }
        });

        // Register the next callback
        setTimeout(self.timer, Math.random() * self._interval, self);
    }
}
This code uses the class support in ECMAScript 6 (ES6) to define a class named
Camera. Then, it creates 10Camerainstances and starts them. Each camera uses a random timer that fires once every few minutes to upload wildlife images to thephotoscontainer in Blob Storage. Images are randomly selected from the files in the project directory's photos subdirectory. Each blob that's created contains metadata that identifies the camera that uploaded the photo and the camera's location.If you're running Windows, run the following commands to create a pair of environment variables. In the command, replace
STORAGE_ACCOUNT_NAMEwith the name of the storage account you created earlier, and replaceSTORAGE_ACCOUNT_KEYwith the storage account's access key:set ACCOUNT_NAME=STORAGE_ACCOUNT_NAME set ACCOUNT_KEY=STORAGE_ACCOUNT_KEYIf you're running Linux or macOS or you get a credential error running the Windows commands, use these commands instead:
export ACCOUNT_NAME=STORAGE_ACCOUNT_NAME
export ACCOUNT_KEY=STORAGE_ACCOUNT_KEY
At runtime, run.js reads these environment variables, and then uses the variables to connect to the storage account. Storing "secrets" like these in environment variables is more secure than embedding them in source code. If you closed the Command Prompt or terminal window in which you ran these commands, you'll need to run them again before you run run.js.
Run the following code to run run.js:
node run.jsConfirm that you see output similar to the following example. The output indicates that all 10 cameras are running:
Started polar_cam_0001
Started polar_cam_0002
Started polar_cam_0003
Started polar_cam_0004
Started polar_cam_0005
Started polar_cam_0006
Started polar_cam_0007
Started polar_cam_0008
Started polar_cam_0009
Started polar_cam_0010
Over the next minute or two, confirm that you see output similar to the following example. Each line corresponds to a photo uploaded to Blob Storage by one of the virtual cameras:
polar_cam_0001: Uploaded image_19.jpg
polar_cam_0005: Uploaded image_26.jpg
polar_cam_0003: Uploaded image_11.jpg
Because run.js uses a random number generator to decide which photos to upload and when to upload them, your results will differ from the ones shown in the preceding example.
Let run.js run until three or more blobs have been uploaded. Then, return to the Command Prompt or terminal window in which run.js is running, and select Ctrl+C to stop run.js.
In your browser, go to the Azure portal. Open the storage account that you created earlier, and then open the
photoscontainer. Confirm that the container has several .JPG images as shown in this example: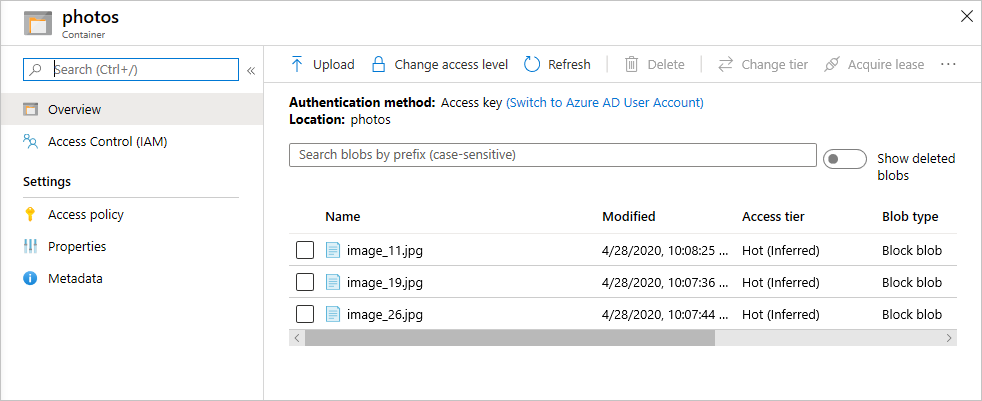
Images uploaded to the photos container
Select one of the blobs to show a blob detail and examine the blob's metadata. Confirm that the blob metadata contains properties named
latitude,longitude, andid:
View blob metadata
Open a blob to view the actual image:
- Select the ellipsis (...), and then select View > Edit. Repeat this action to view the images for several blobs.
Which images contain polar bears, and which don't?