Exercise - Manage cache settings with PowerShell
This module requires a sandbox to complete. A sandbox gives you access to free resources. Your personal subscription will not be charged. The sandbox may only be used to complete training on Microsoft Learn. Use for any other reason is prohibited, and may result in permanent loss of access to the sandbox.
Microsoft provides this lab experience and related content for educational purposes. All presented information is owned by Microsoft and intended solely for learning about the covered products and services in this Microsoft Learn module.
In the previous exercise, we performed the following tasks using the Azure portal:
- View the OS disk cache status.
- Change the cache settings of the OS disk.
- Add a data disk to the VM.
- Change the caching type on a new data disk.
Let's practice these operations using Azure PowerShell.
Note
We're going to use Azure PowerShell, but you could also use the Azure CLI, which provides similar functionality as a console-based tool. It runs on macOS, Linux, and Windows. If you're interested in learning more about the Azure CLI, check out the Manage Virtual Machines with the Azure CLI module.
We're going to use the VM we created in the previous exercise. The operations in this lab assume:
- Our VM exists and is called fotoshareVM.
- Our VM lives in a resource group called
[sandbox resource group name] .
If you used a different set of names, replace these values with yours.
Here's the current state of our VM disks from the last exercise:
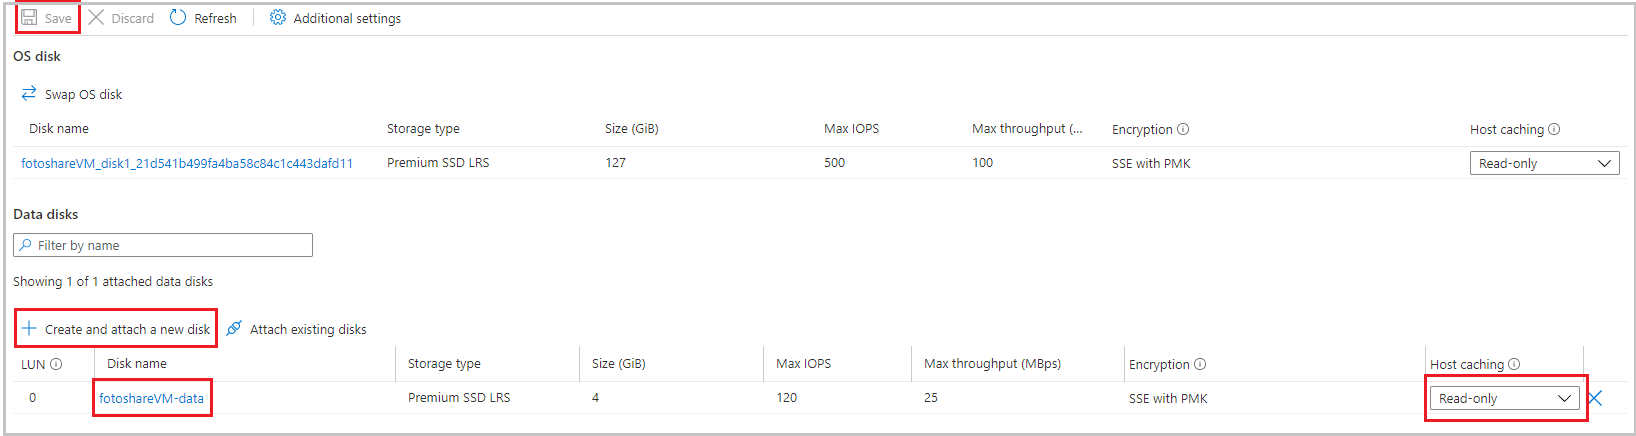
We used the portal to set the Host caching field for both the OS and data disks. Keep this initial state in mind as we work through the following steps.
Set up some variables
First, let's store some resource names so we can use them later.
In Azure Cloud Shell on the right, run the following PowerShell commands:
Note
Switch your Cloud Shell session to PowerShell before trying these commands, if it isn't already.
$myRgName = "[sandbox resource group name]"
$myVMName = "fotoshareVM"
Tip
You have to set these variables again if your Cloud Shell session times out, so if possible, work through this entire lab in a single session.
Get info about our VM
Run the following command to get the properties of the VM:
PowerShell$myVM = Get-AzVM -ResourceGroupName $myRgName -VMName $myVmNameLet's store the response in our
$myVMvariable. We can pipe the output into theselect-objectcmdlet to filter the display to specific properties:PowerShell$myVM | select-object -property ResourceGroupName, Name, Type, LocationYou should get something like the following output:
PowerShellResourceGroupName Name Type Location ----------------- ---- ---- -------- [sandbox resource group name] fotoshareVM Microsoft.Compute/virtualMachines eastus
View OS disk cache status
We can check the caching setting through the StorageProfile object by running the following command:
$myVM.StorageProfile.OsDisk.Caching
ReadOnly
Let's change it back to the default for an OS disk, which is ReadWrite.
Change the cache settings of the OS disk
We can set the value for the cache type using the same
StorageProfileobject by running the following command:PowerShell$myVM.StorageProfile.OsDisk.Caching = "ReadWrite"This command runs fast, which should tell you it's doing something locally. The command only changes the property on the
myVMobject. If you refresh the$myVMvariable by reassigning it using theGet-AzVMcmdlet, the caching value doesn't change on the VM.To make the change on the VM itself, call
Update-AzVMby running the following command:PowerShellUpdate-AzVM -ResourceGroupName $myRGName -VM $myVMNotice that this call takes a while to complete because we're updating the actual VM, and Azure restarts the VM to make the change.
OutputRequestId IsSuccessStatusCode StatusCode ReasonPhrase --------- ------------------- ---------- ------------ True OK OKIf you refresh the
$myVMvariable again by running the following command, you see the change on the object. If you look at the disk in the portal, you also see the change there.PowerShell$myVM = Get-AzVM -ResourceGroupName $myRgName -VMName $myVmName $myVM.StorageProfile.OsDisk.CachingOutputReadWrite
List data disk info
To see what data disks we have on our VM, run the following command:
$myVM.StorageProfile.DataDisks
Name            : fotoshareVM-data
DiskSizeGB      : 4
Lun             : 0
Caching         : ReadOnly
CreateOption    : Attach
SourceImage     :
VirtualHardDisk :
We have only one data disk at the moment. The Lun field is important. It's the unique Logical Unit Number. When we add another data disk, we give it a unique Lun value.
Add a new data disk to our VM
For convenience, let's store our new disk name by running the following command:
PowerShell$newDiskName = "fotoshareVM-data2"Run the following
Add-AzVMDataDiskcommand to define a new empty 1-GB data disk:PowerShellAdd-AzVMDataDisk -VM $myVM -Name $newDiskName -LUN 1 -DiskSizeinGB 1 -CreateOption EmptyYou get a response like:
PowerShellResourceGroupName : xxxxxxxx-xxxx-xxxx-xxxx-xxxxxxxx Id : /subscriptions/xxxxxxxx-xxxx-xxxx-xxx-xxxxxxx/resourceGroups/[sandbox resource group name]/providers/Microsoft.Compute/virtualMachines/fotoshareVM VmId : xxxxxxxx-xxxx-xxxx-xxxx-xxxxxxxxxxx Name : fotoshareVM Type : Microsoft.Compute/virtualMachines Location : eastus Tags : {} DiagnosticsProfile : {BootDiagnostics} HardwareProfile : {VmSize} NetworkProfile : {NetworkInterfaces} OSProfile : {ComputerName, AdminUsername, WindowsConfiguration, Secrets} ProvisioningState : Succeeded StorageProfile : {ImageReference, OsDisk, DataDisks}We gave this disk a
Lunvalue of1because it isn't taken. We defined the disk we want to create, so it's time to run theUpdate-AzVMcommand to make the actual change:PowerShellUpdate-AzVM -ResourceGroupName $myRGName -VM $myVMLet's look at our data disk info again by running the following command:
PowerShell$myVM.StorageProfile.DataDisksOutputName : fotoshareVM-data DiskSizeGB : 4 Lun : 0 Caching : ReadOnly CreateOption : Attach SourceImage : VirtualHardDisk : Name : fotoshareVM-data2 DiskSizeGB : 1 Lun : 1 Caching : None CreateOption : Empty SourceImage : VirtualHardDisk :
We now have two disks. Our new disk has a Lun of 1 and the default value for Caching is None. Let's change that value.
Change cache settings of new data disk
We can modify the properties of a virtual machine data disk by running the
Set-AzVMDataDiskcommand, as follows:PowerShellSet-AzVMDataDisk -VM $myVM -Lun "1" -Caching ReadWriteAs always, commit the changes by running the
Update-AzVMcommand:PowerShellUpdate-AzVM -ResourceGroupName $myRGName -VM $myVM
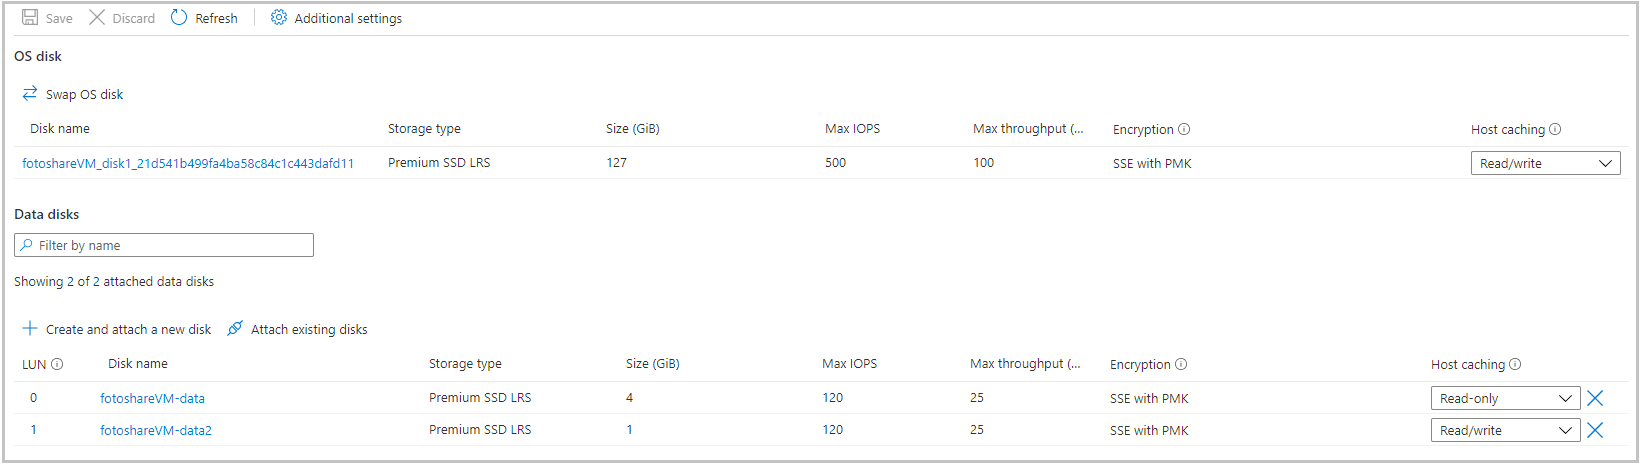
Here's a view from the portal of what we accomplished in this exercise. Our VM now has two data disks, and we adjusted all Host caching settings. We did all of that with just a few commands using the power of Azure PowerShell.
Next unit: Summary
Having an issue? We can help!
- For issues related to this module, explore existing questions using the #azure training tag or Ask a question on Microsoft Q&A.
- For issues related to Certifications and Exams, post on Certifications Support Forums or visit our Credentials Help.