Exercise - Implement multitenant data
This exercise takes you through the process of:
- Installing Azure Database for PostgreSQL in the server deployment model.
- Creating a database with sample inventory data.
- Integrating the server with Microsoft Entra ID.
- Implementing a simple Node.js-based application that queries the database by relying on Microsoft Entra authentication.
Note
This exercise illustrates a simplified approach to providing support for multiple tenants by emulating the multitenancy functionality of the Azure Database for the PostgreSQL Hyperscale deployment model. It also provides a simplified approach for implementing Microsoft Entra authentication in multitenant scenarios by relying on the Microsoft Entra B2B functionality. Microsoft Entra ID directly supports multitenant applications, but their detailed coverage is outside the scope of this module.
In this exercise, you'll:
- Create an instance of Azure Database for PostgreSQL server.
- Connect to the Azure Database for PostgreSQL server.
- Create a database and sample tables.
- Integrate the Azure Database for PostgreSQL server with Microsoft Entra ID.
- Register an application with Microsoft Entra ID.
- Implement a simple, Microsoft Entra integrated Node.js-based application.
- Validate the functionality of the Node.js-based application.
Prerequisites
To perform this exercise, you'll need:
- An Azure subscription.
- A Microsoft account or a Microsoft Entra account with the Global Administrator role in the Microsoft Entra tenant associated with the Azure subscription and with the Owner or Contributor role in the Azure subscription.
- To have completed the first exercise of this module.
Create an instance of Azure Database for PostgreSQL server
You'll start by creating an instance of Azure Database for PostgreSQL server:
If needed, start a web browser, navigate to the Azure portal and sign in to access the Azure subscription you'll be using in this module.
Use the Search resources, services, and docs text box at the beginning of the Azure portal page to search for Azure Database for PostgreSQL, and in the list of results, in the Services section, select Azure Database for PostgreSQL.
On the Azure Database for PostgreSQL servers blade, select + Create.
On the Select Azure Database for PostgreSQL deployment option blade, on the Azure Database for PostgreSQL tile, for Resource type select Single server.
Select Create.
On the Basics tab of the Single server blade, configure the following settings, and then select Review + create, while leaving all other settings with their default values:
Setting Configuration Subscription Select the name of the Azure subscription you'll be using in this module. Resource group Create a new resource group named postgresql-db-RG. Server name Enter a unique name consisting of lower-case letters, digits or dashes, and starting with a letter. Data source Select None. Location Select the Azure region closest to the location of your lab environment where you can create Azure Database for PostgreSQL instances. Version Select 11. Compute + storage Select the Configure server link. On the Configure blade, select Basic, set the vCore value to 1 and Storage to 5 GB, and then select OK. Admin username Enter student. Password Enter Pa55w0rd1234. 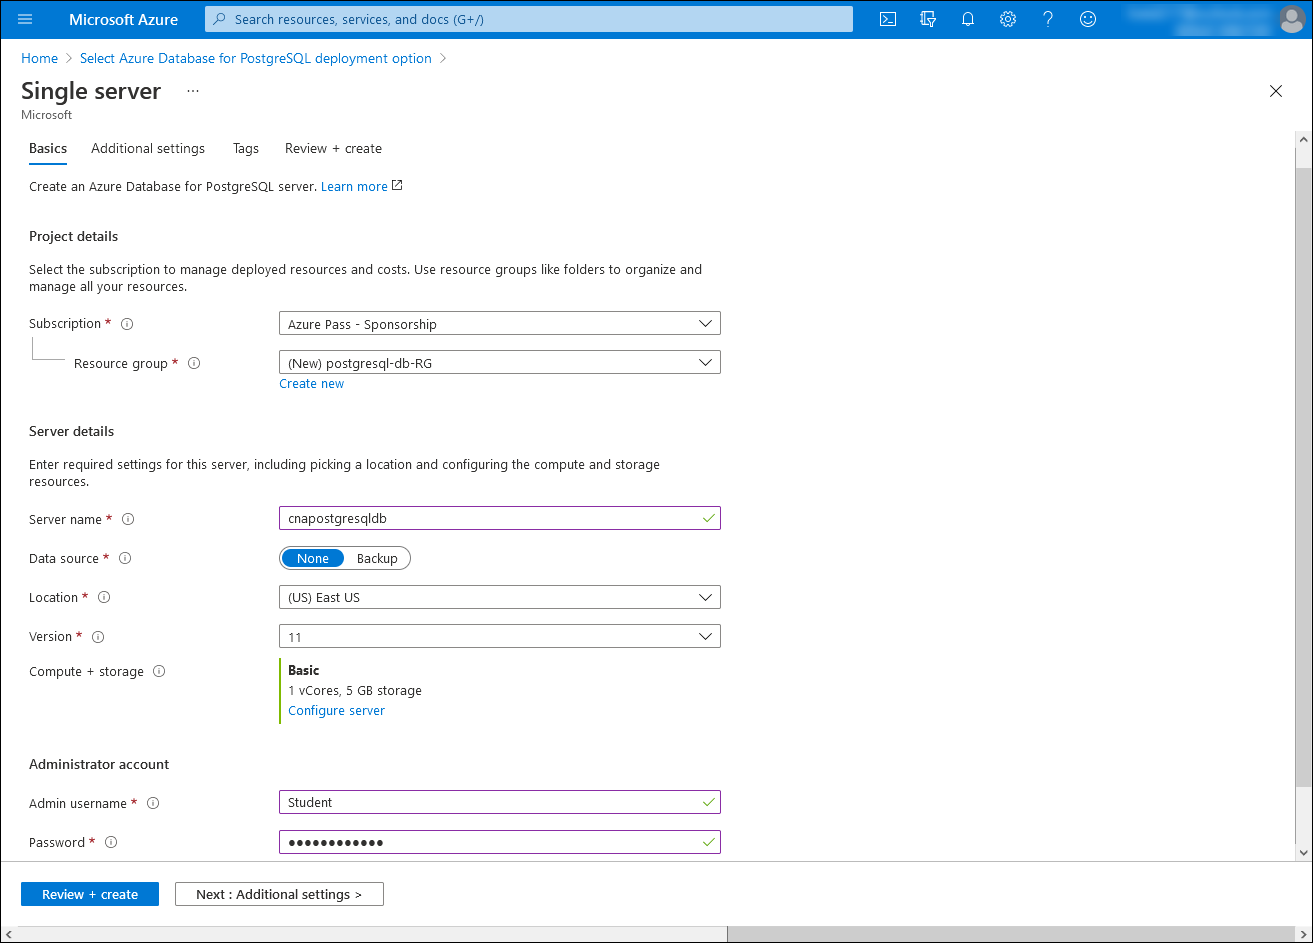
On the Review + create tab of the Single server blade, select Create.
Wait for the provisioning to complete. This might take about five minutes.
Note
The provisioning process automatically creates a database named postgres within the target server.
Connect to the Azure Database for PostgreSQL server
With the Azure Database for PostgreSQL server provisioned, you'll connect to it by using the psql tool.
In the Microsoft.PostgreSQLServer.createPostgreSqlServer Overview blade, select Go to resource.
On the Deployment blade, in the vertical menu, in the Settings section, select Connection security.
On the Connection security blade, set Allow access to Azure services to Yes, select + Add client IP, set Enforce SSL connection to DISABLED, and then select Save.
Note
These settings will allow connectivity to the database from your computer and from applications running in Azure.
Note
Disabling the SSL enforcement is meant to simplify the subsequent exercises. In general, you should keep this setting enabled.
Within the browser window displaying the Azure portal with the Deployment blade, in the vertical menu, select Overview.
In the Essentials section, identify the entries next to the Server name and Admin username labels and record their values.
Note
Note that the username includes the @ symbol followed by the server name you specified in the previous task.
Within the browser window displaying the Azure portal with the Azure Database for PostgreSQL single server blade, in the vertical menu, in the Settings section, select Connection strings.
In the list of connection strings, copy the value of the psql connection string and record it, so you can use it later in this exercise.
Note
The connection string has the following syntax, where the
<server_name>placeholder represents the name of the server you identified previously in this task:psql "host=<server_name>.postgres.database.azure.com port=5432 dbname={your_database} user=student@<server_name> password={your_password} sslmode=require"In the Azure portal, open a Bash session of the Cloud Shell by selecting its icon in the toolbar next to the search text box.
Within the Bash session on the Cloud Shell pane, paste the value of the psql connection string from the clipboard, modify it so it matches the following command, and run it to connect to the postgres database hosted on the newly deployed server instance of Azure Database for PostgreSQL. The value of the
<server_name>placeholder will be already included in the connection string you pasted from the clipboard:psql "host=<server_name>.postgres.database.azure.com port=5432 dbname=postgres user=student@<server_name>.postgres.database.azure.com password=Pa55w0rd1234 sslmode=require"Note
When you successfully connect, you'll be presented with the
postgres=>prompt.
Create a database and sample tables
In the Cloud Shell pane, from the
postgres=>prompt, run the following command to create a new database named cnamtinventory:CREATE DATABASE cnamtinventory;Run the following command to switch the connection to the newly created database:
\c cnamtinventoryRun the following command to create a tenants table:
CREATE TABLE tenants (
  id bigserial PRIMARY KEY,
  name text NOT NULL,
  created_at TIMESTAMP DEFAULT NOW()::date,
  updated_at TIMESTAMP DEFAULT NOW()::date
);
Run the following command to create an inventory table:
CREATE TABLE inventory (
id bigserial,
tenant_id bigint REFERENCES tenants (id),
name VARCHAR(50),
quantity INTEGER,
    date DATE NOT NULL DEFAULT NOW()::date,
    created_at TIMESTAMP DEFAULT NOW()::date,
    updated_at TIMESTAMP DEFAULT NOW()::date,
    PRIMARY KEY (tenant_id, id, date)
) PARTITION BY RANGE (date);

CREATE TABLE inventory_default PARTITION OF inventory DEFAULT;
Note
The data is partitioned based on the value of the date column.
Run the following command to verify that the table has been created successfully:
\dtRun the following command to load sample data into the tenants table:
INSERT INTO tenants (id, name) VALUES (1, 'adatum');
INSERT INTO tenants (id, name) VALUES (2, 'contoso');
Run the following command to load sample data into the inventory table:
INSERT INTO inventory (id, tenant_id, name, quantity) VALUES (1, 1, 'yogurt', 200);
INSERT INTO inventory (id, tenant_id, name, quantity) VALUES (2, 1, 'milk', 100);
INSERT INTO inventory (id, tenant_id, name, quantity) VALUES (1, 2, 'yogurt', 20);
INSERT INTO inventory (id, tenant_id, name, quantity) VALUES (2, 2, 'milk', 10);
Run the following command to verify that the inventory table contains the data you inserted:
SELECT * FROM inventory;Close the Cloud Shell pane.
Integrate the Azure Database for PostgreSQL server with Microsoft Entra ID
To integrate the Azure Database for PostgreSQL server instance with Microsoft Entra ID, you must provide a Microsoft Entra user account as the designated Active Directory admin of the server. You'll use for this purpose the adatumadmin1 user account you created in the previous task. You need to sign in to the server using that user account. At that point, you'll be able to create Microsoft Entra ID-based database users and assign to them database roles. You'll use for the adatumuser1, adatumgroup1, and contosouser1 Microsoft Entra objects you created in the previous exercise.
Within the browser window displaying the Azure portal with the Azure Database for PostgreSQL server blade, in the vertical menu, in the Settings section, select Active Directory admin, and then in the toolbar, select Set admin.
On the Active Directory admin blade, in the list of Microsoft Entra user accounts, select the adatumadmin1 user account you created in the previous exercise, select Select, and then select Save.
Open another web browser window in the Incognito/InPrivate mode, navigate to the Azure portal, and sign in by using the adatumadmin1 user account (with the Pa55w.rd1234 password) you created in the previous exercise.
In the Azure portal, open the Cloud Shell by selecting its icon in the toolbar next to the search text box.
When you're prompted to select either Bash or PowerShell, select Bash, and then when presented with the message You have no storage mounted, select Create storage.
Within the Bash session on the Cloud Shell pane, run the following commands to retrieve and display a Microsoft Entra access token required to access Azure Database for PostgreSQL:
FULL_TOKEN=$(az account get-access-token --resource-type oss-rdbms)
echo $FULL_TOKEN
Note
The command generates an output that includes a Base 64-encoded token, which identifies the authenticated user to the Azure Database for PostgreSQL resource.
The output uses the following format:
{
  "accessToken": "eyJ0eXAiOiJKV1QiLDJhbGciOiJSUzI1NiIsIng1dCI6Im5PbzNaRHJPRFhFSzFqS1doWHNsSFJfS1hFZyIsImtpZCI6Im5PbzNaRHJPRFhFSzFqS1doWHNsSFJfS1hFZyJ9.eyJhdWQiOiJodHRwczovL29zc3JkYm1zLWFhZC5kYXRhYmFzZS53aW5kb3dzLm5ldCIsImlzcyI6Imh0dHBzOi8vc3RzLndpbmRvd3MubmV0L2E2MTM5NTE0LTQxYTUtNDEyMy05ODFhLWVlN2JiOWU2YTNiNC8iLCJpYXQiOjE2MjE2MTc0NjUsIm5iZiI6MTYyMTYxNzQ2NSwiZXhwIjoxNjIxNjIxMzY0LCJhY3IiOiIxIiwiYWlvIjoiQVRRQXkvOFRBQUFBU1I5cXdVcm9KVVpmWEJabHY1NzRUenpmeGZFUlo1SXNDV3Z1aDVEOVBGWnZsL09SYWYzTGg3Zmx4NEFVaFpkVSIsImFtciI6WyJwd2QiXSwiYXBwaWQiOiJiNjc3YzI5MC1jZjRiLTRhOGUtYTYwZS05MWJhNjUwYTRhYmUiLCJhcHBpZGFjciI6IjIiLCJpcGFkZHIiOiIxNDIuMTA1LjQ4LjUxIiwibmFtZSI6ImFkYXR1bWFkbWluMSIsIm9pZCI6Ijc2ZTdmYWI5LTZiOTItNGQzZi1hOGI5LWY1NWNhNDQyYzZiMSIsInB1aWQiOiIxMDAzMjAwMTQ0RTNDMDBBIiwicmgiOiIwLkFYd0FGSlVUcHFWQkkwR1lHdTU3dWVhanRKRENkN1pMejQ1S3BnNlJ1bVVLU3I1OEFNay4iLCJzY3AiOiJ1c2VyX2ltcGVyc29uYXRpb24iLCJzdWIiOiJvNmhNMWlHXzM3MExaQk92UlpUQjBYeEdjSmpaOUVmN21lc1N2RkJYY3FFIiwidGlkIjoiYTYxMzk1MTQtNDFhNS00MTIzLTk4MWEtZWU3YmI5ZTZhM2I0IiwidW5pcXVlX25hbWUiOiJhZGF0dW1hZG1pbjFAbGl2ZWlkMjE3b3V0bG9vay5vbm1pY3Jvc29mdC5jb20iLCJ1cG4iOiJhZGF0dW1hZG1pbjFAbGl2ZWlkMjE3b3V0bG9vay5vbm1pY3Jvc29mdC5jb20iLCJ1dGkiOiJJdE81VndoU2lVV0o0UUZNQ04xQUFRIiwidmVyIjoiMS4wIn0.fFV3s2OjpVU52_SA8-atIDdkLN4onLgPmYrxa5eNCbuF0VbVOA5a9Ifv66H5a__6lMiLoV8n9EgTV4CpsLmvn6JFjAD9aHyEBkS2_iL_Rx-KCmlc7Vr6UHezrlrA3skf8oq3yb2Zqy_A3_kOrsnFgX8NP5uWoMmTzjWGTw3rOfjERJ7PowQC60nzlF1uCRDKIWw62SW4xiDQj23DSLDbkfUiG_Z9Swbw4DuMPTPeUVwz9AWhmg8lrqt5oawhKB-OMcpuwSf1-rE1cf2w54uthU6764DBEf5MVt8K95AKW0rey888znrIGKT-6yFenYUZZjL1aJ-jz8OIyNjuQK73XQ",
  "expiresOn": "2021-05-21 18:22:44.000000",
  "subscription": "d15bacf3-b17b-4ad5-a913-5fb904bd2f71",
  "tenant": "a6239514-41a5-4123-981a-ee7bb9e6a3b4",
  "tokenType": "Bearer"
}
Run the following command to set the value of the PGPASSWORD variable to the value of the access token from the output of the command you ran in the previous step:
export PGPASSWORD=$(echo $FULL_TOKEN | jq -r '.accessToken')Run the following command to connect to the cnamtinventory database using the psql tool and by using Microsoft Entra authentication (replace the
<server_name>placeholder with the name of the server you identified previously in this exercise):DOMAIN_NAME=$(az rest --method GET --url 'https://management.azure.com/tenants?api-version=2020-01-01' --query "value[0].defaultDomain" -o tsv) psql "host=<server_name>.postgres.database.azure.com user=adatumadmin1@$DOMAIN_NAME@<server_name> dbname=cnamtinventory sslmode=require"Note
When you successfully connect, you should be presented with the
cnamtinventory=>prompt.From the
cnamtinventory=>prompt, run the following command to create a database role corresponding to the adatumgroup1 Microsoft Entra group you created in the previous exercise:CREATE ROLE "adatumgroup1" WITH LOGIN IN ROLE azure_ad_user;Run the following command to verify that the roles have been successfully created:
SELECT rolname FROM pg_roles;Run the following command to grant the SELECT permissions on the inventory table to the adatumgroup1 you created in the previous exercise:
GRANT SELECT ON inventory TO adatumgroup1;Sign out as the adatumadmin1 user account and close the Incognito/InPrivate mode web browser window.
Register an application with Microsoft Entra ID
To implement a sample Node.js-based application that uses Microsoft Entra authentication to access an Azure Database for PostgreSQL database, you must create a Microsoft Entra application object and the corresponding security principal. This will allow the Node.js-based application to impersonate Microsoft Entra users when accessing database objects.
In the Azure portal, use the Search resources, services, and docs text box to search for Microsoft Entra ID, and in the list of results, select Microsoft Entra ID.
On the Microsoft Entra blade, in the vertical menu, in the Manage section, select App registrations.
On the App registrations blade, select + New registration.
On the Register an application blade, in the Name text box, enter cna-app. In the Supported account types section, ensure that the option Accounts in this organizational directory only (Default directory only - Single tenant) is selected. In the Redirect URI (optional) section, set the Web entry to
http://localhost:8080/redirect, and then select Register.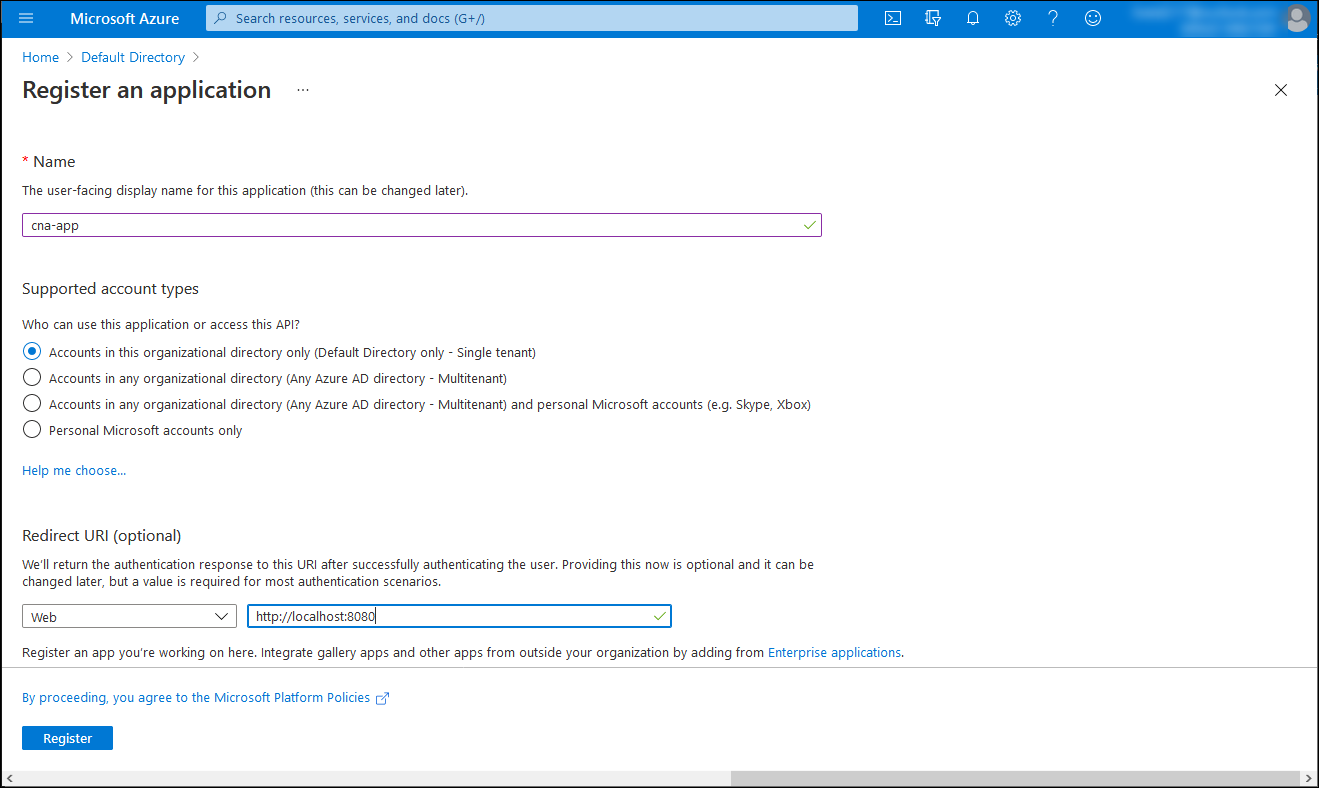
Note
You have the option of configuring multitenant support for your Microsoft Entra registered applications. However, detailed coverage of this approach is outside the scope of this module.
Note
After you deploy your application, you'll need to modify the Redirect URI (optional) value to reflect its actual URL.
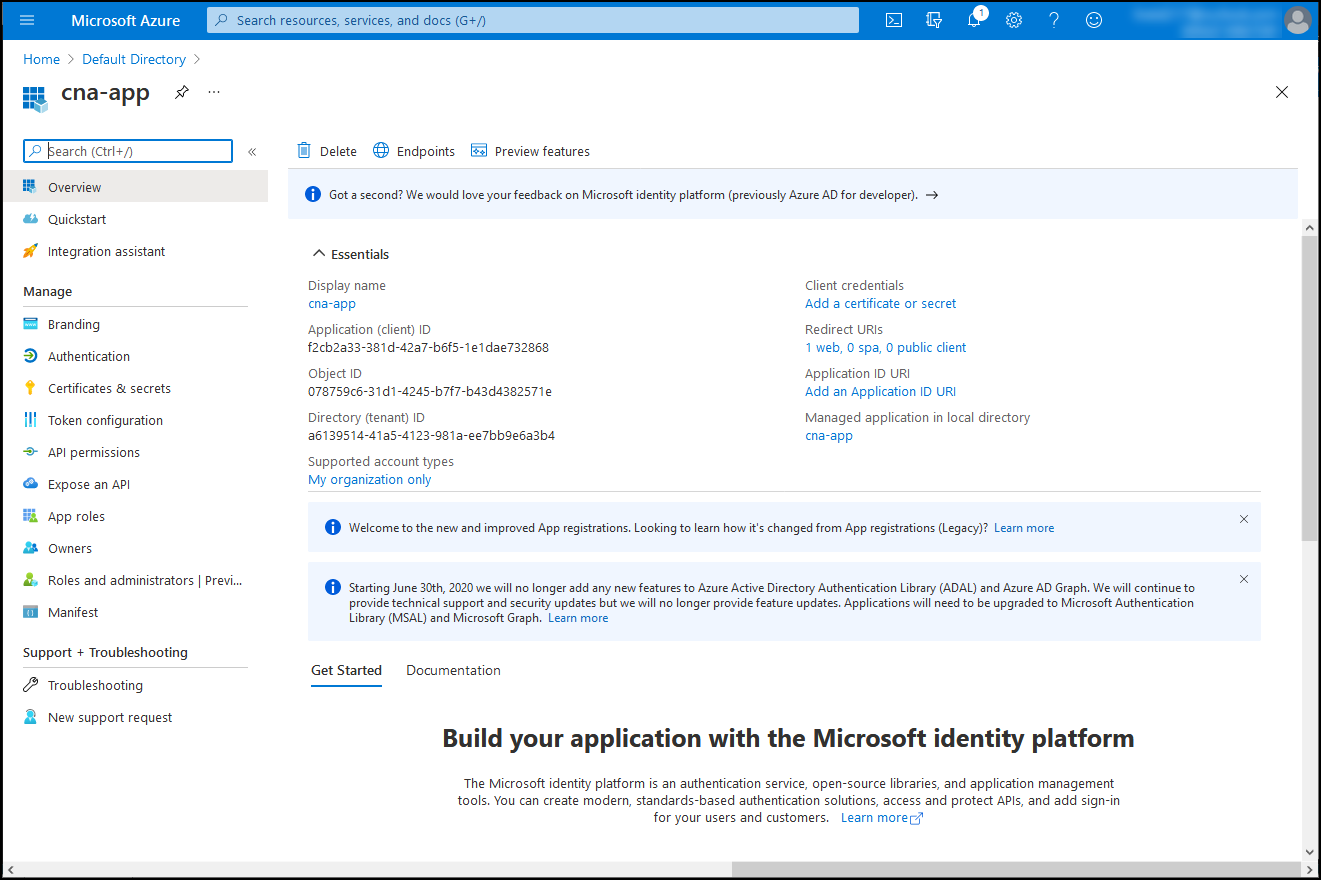
On the cna-app blade, review the resulting settings and record the values of the Application (client) ID and the Directory (tenant) ID properties.
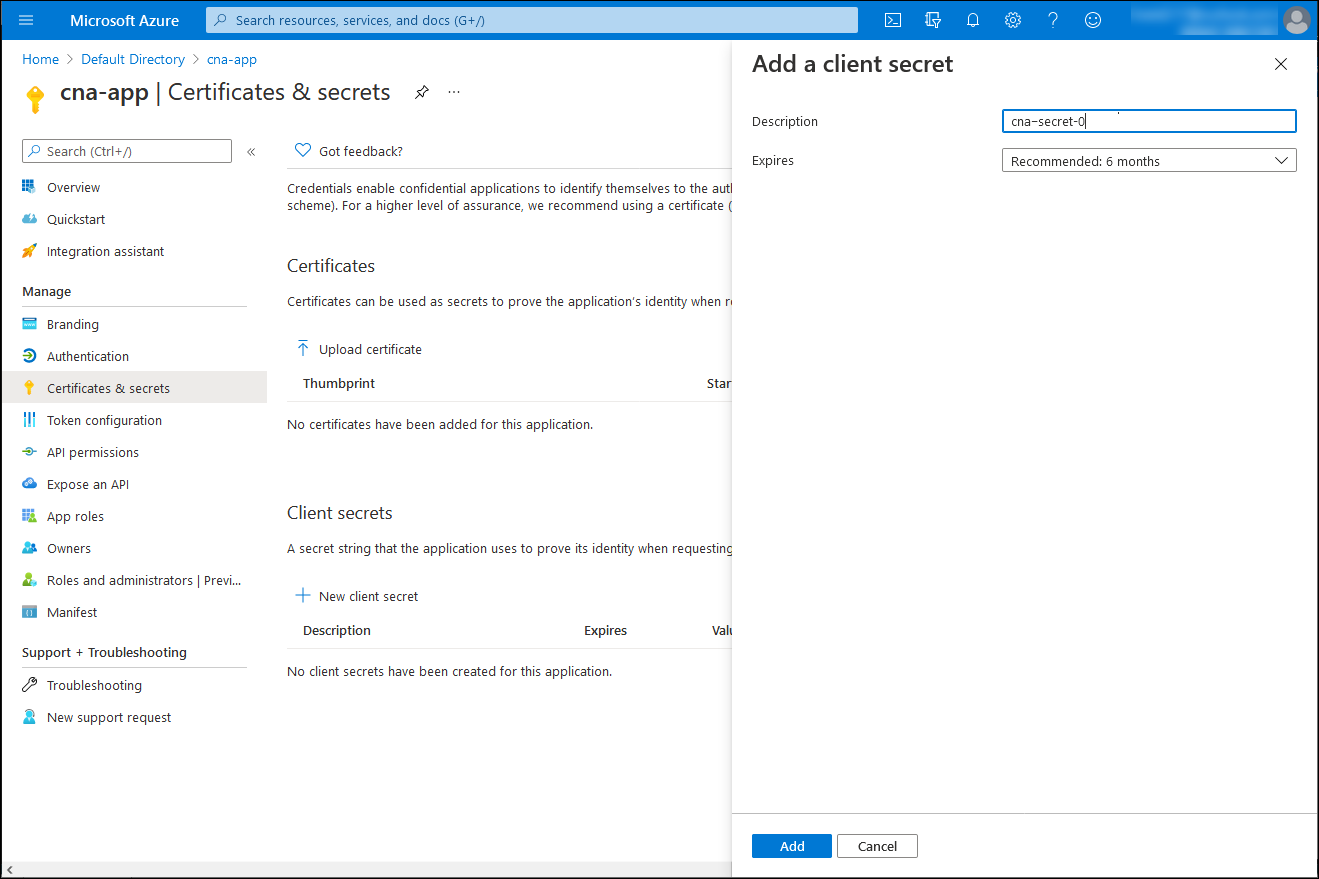
On the cna-app blade, in the Manage section, select Certificates & secrets and select + New client secret.
On the Add a client secret blade, in the Description text box, enter cna-secret-0. Leave the Expires drop-down list entry with its default value and select Add.
Back on the cna-app | Certificates & secrets blade, copy the value of the newly generated secret.
Note
Make sure to copy the value of the secret before you navigate away from this blade, because at that point, you'll no longer be able to retrieve it. If that happens, create another secret.

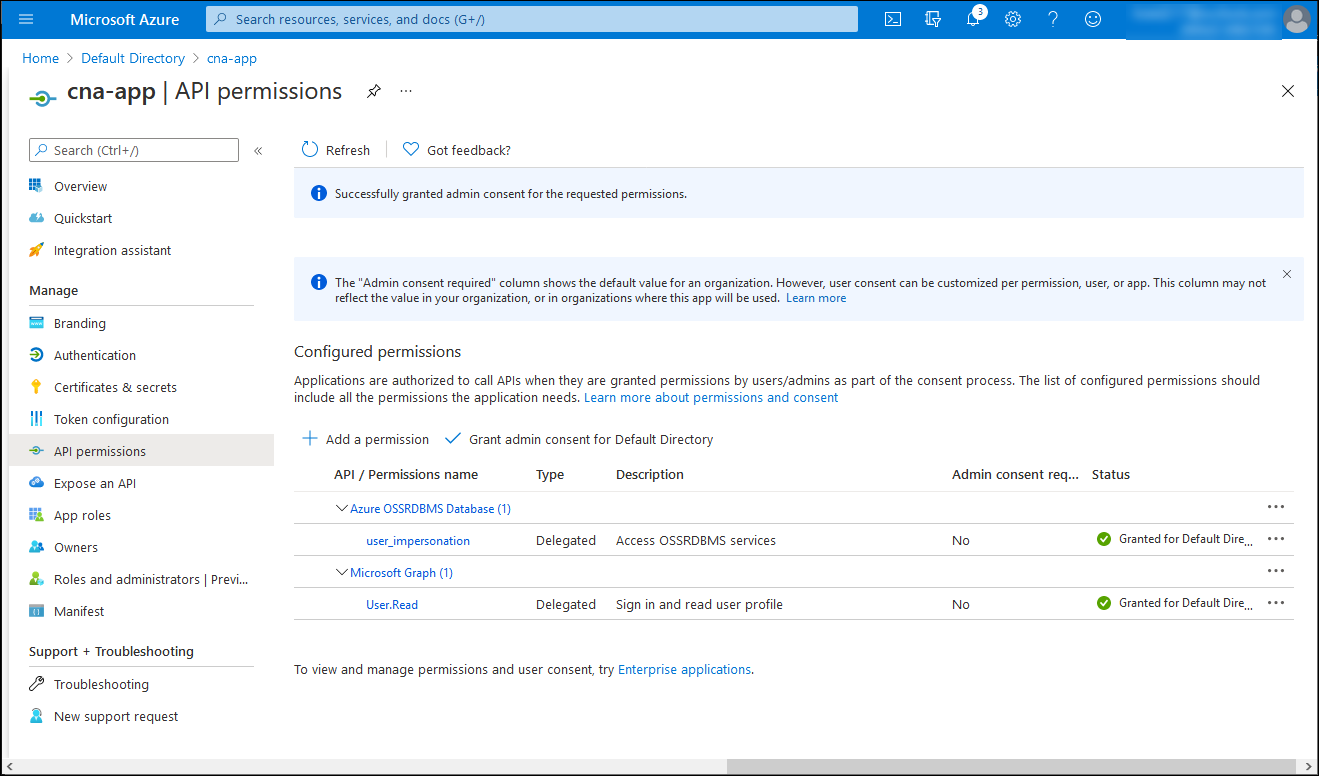
On the cna-app | Certificates & secrets blade, in the vertical menu, in the Manage section, select API permissions.
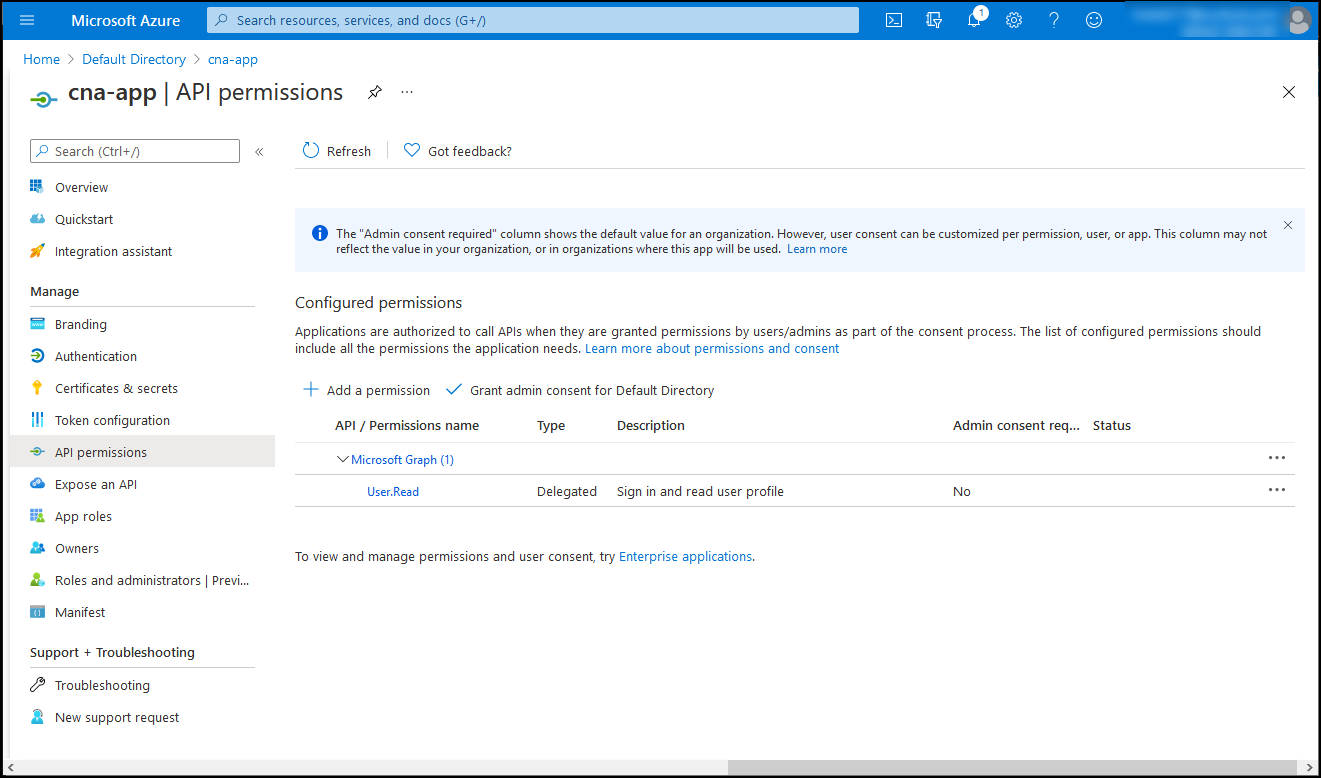
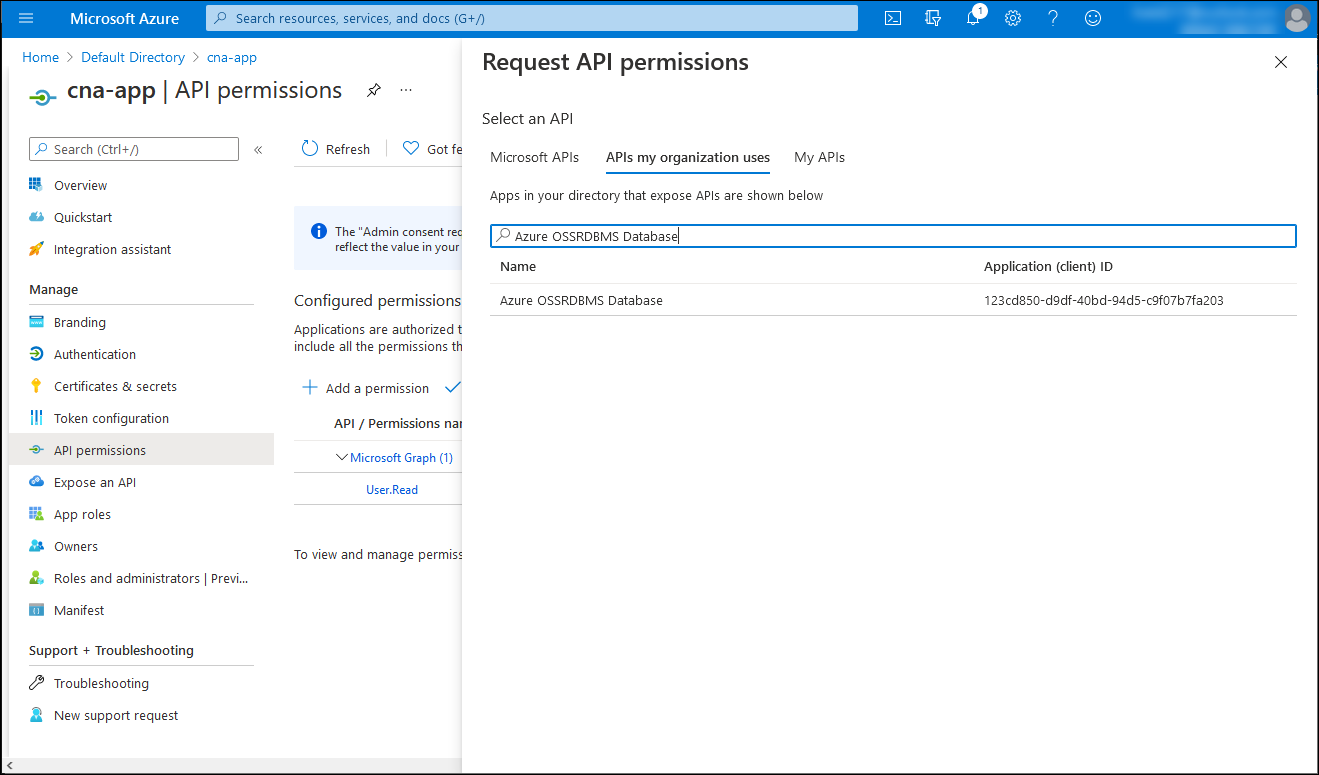
On the cna-app | API permissions blade, select + Add a permission, on the Request API permission blade, select the APIs my organization uses tab, in the search text box, enter Azure OSSRDBMS Database, and then in the list of results, select Azure OSSRDBMS Database.
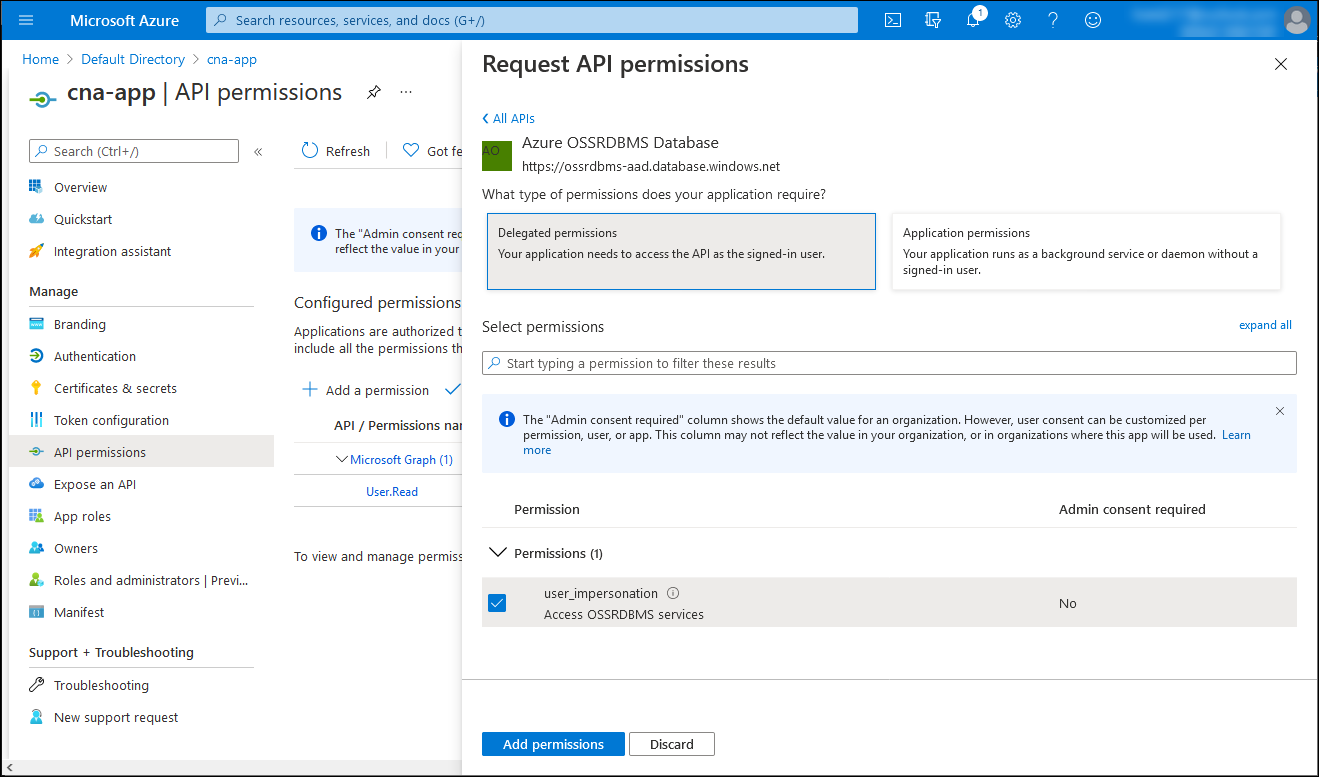
On the Request API permission blade, select Delegated permissions, select the user_impersonation checkbox, and then select Add permissions.
Back on the cna-app | API permissions blade, select Grant admin consent for Default Directory, and when prompted for confirmation, select Yes.
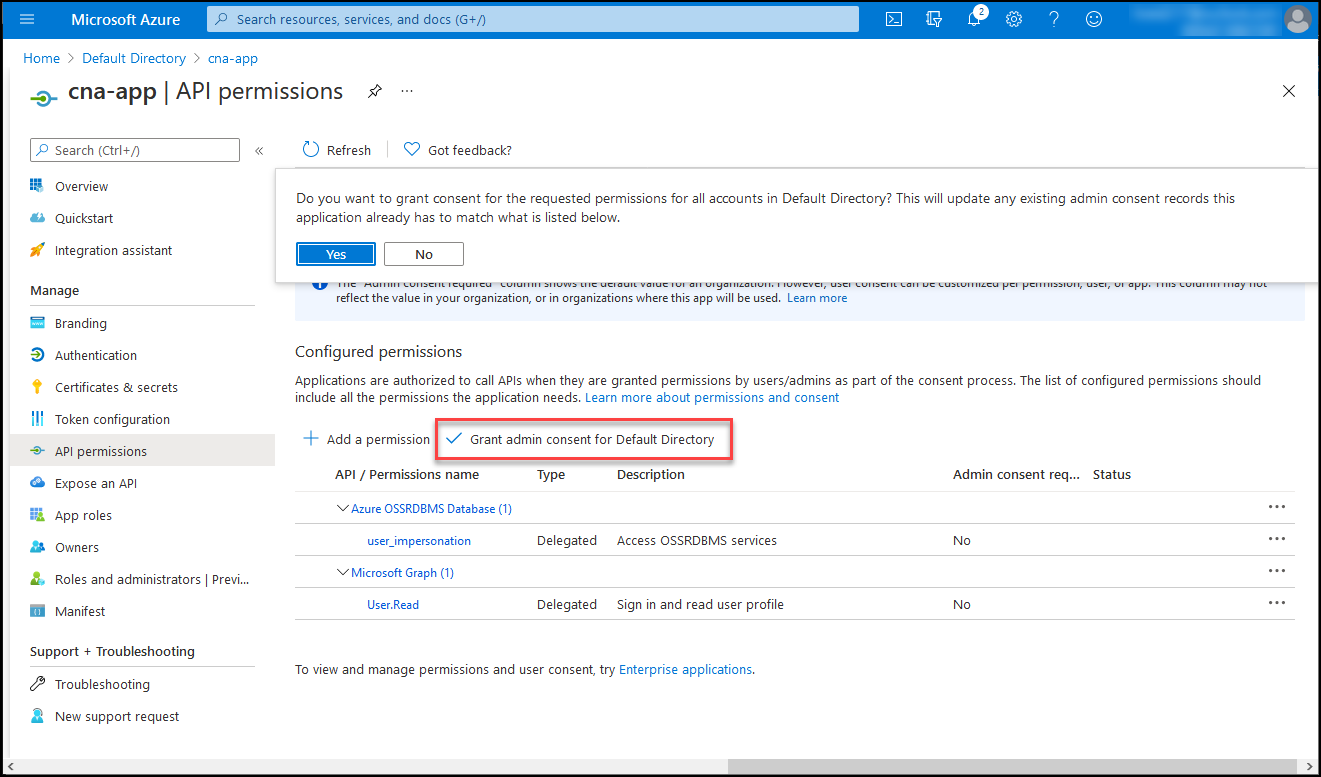
On the cna-app | API permissions blade, verify that the permissions have been granted.
Implement a simple, Microsoft Entra integrated Node.js-based application
With the application registered in the Microsoft Entra tenant, you can now proceed with its implementation.
In the Azure portal, start a Bash session within the Cloud Shell by selecting its icon in the toolbar next to the search text box.
Within the Bash session on the Cloud Shell pane, run the following commands to initialize a Node.js project in a new directory:
mkdir -p cna-aadexpress && cd cna-aadexpress
npm init -y
Run the following commands to add required packages to the project's dependency:
npm install express
npm install pg
npm install @azure/msal-node
Run the following command to create a file named index.js in the root of the project:
touch ./index.jsUse the nano editor to open the file index.js and add the following content. You'll create an app name later in this unit to replace the placeholder
<webapp_name>. Replace<client_id>,<tenant_id>,<client_secret>, and<server_name>(excluding the.postgres.database.azure.comsuffix) with their actual values you recorded earlier in this exercise:Note
The placeholders
<client_id>and<tenant_id>correspond to the Application (client) ID and the Directory (tenant) ID properties referenced earlier in this exercise.// Import dependencies const express = require("express"); const msal = require('@azure/msal-node'); const pg = require('pg'); const port = process.env.PORT || 8080 // Initialize express const app = express(); app.use(express.json()); app.listen(port, () => console.log(`Sample app is listening on port ${port}!`)) // Authentication parameters const config = { auth: { clientId: "<client_id>", authority: "https://login.microsoftonline.com/<tenant_id>", clientSecret: "<client_secret>" }, system: { loggerOptions: { loggerCallback(loglevel, message, containsPii) { console.log(message); }, piiLoggingEnabled: false, logLevel: msal.LogLevel.Verbose, } } }; var outputrows = "" // Initialize MSAL Node object using authentication parameters const cca = new msal.ConfidentialClientApplication(config); app.get('/auth', (req, res) => { redirectUri = req.hostname.toLowerCase()=="localhost" ? "http://localhost:8080/redirect" : "https://<webapp_name>.azurewebsites.net/redirect"; // Construct a request object for auth code const authCodeUrlParameters = { scopes: ["https://ossrdbms-aad.database.windows.net/user_impersonation"], redirectUri: redirectUri, }; // Request auth code, then redirect cca.getAuthCodeUrl(authCodeUrlParameters) .then((response) => { res.redirect(response); }).catch((error) => res.send(error)); }); app.get('/redirect', (req, res) => { redirectUri = req.hostname.toLowerCase()=="localhost" ? "http://localhost:8080/redirect" : "https://<webapp_name>.azurewebsites.net/redirect"; // Use the auth code in redirect request to construct a token request object const tokenRequest = { code: req.query.code, scopes: ["https://ossrdbms-aad.database.windows.net/user_impersonation"], redirectUri: redirectUri, }; // Exchange the auth code for tokens cca.acquireTokenByCode(tokenRequest) .then((response) => { //res.send(response); var username = 'adatumgroup1'; var databasename = 'cnamtinventory'; var servername = '<server_name>'; var tablename = 'inventory'; process.env.PGPASSWORD = response.accessToken; const connectionString = `postgres://${username}@${servername}@${servername}.postgres.database.azure.com:5432/${databasename}?ssl=true`; res.write(connectionString + "\n\n"); res.write(response.accessToken + "\n\n"); const client = new pg.Client(connectionString); client.connect(err => { if (err) throw err; else { queryDatabase(response.account.name); } }); function queryDatabase(tenant_id) { console.log(`Running query to PostgreSQL server: ${servername}`); switch (tenant_id) { case "adatumuser1": id = "1"; break; case "contosouser1": id = "2"; break; } const query = `SELECT * FROM ${tablename} WHERE tenant_id = ${id};`; client.query(query) .then(qresponse => { const rows = qresponse.rows; rows.map(row => { var singlerow = `${JSON.stringify(row)}`; console.log(singlerow); outputrows += singlerow + "\n"; }); res.write(outputrows); res.end(); process.exit(); }) .catch(err => { console.log(err); }); } }).catch((error) => res.write(error)); });Note
A multitenant Microsoft Entra registered application uses the generic authority URL
authority: "https://login.microsoftonline.com/common", but in your case, you need to use a single-tenant URL that includes your tenant ID.Note
Keep in mind that after you deploy the application, you'll need to replace the value of REDIRECT URL with its actual redirect URL.
Use the nano editor to edit the package.json file in the root of the project and replace it with the following content:
{
  "name": "node-express",
  "version": "1.0.0",
  "description": "Node.js express sample",
  "main": "index.js",
  "scripts": {
    "start": "node index.js"
  },
  "author": "",
  "license": "ISC",
  "dependencies": {
    "@azure/msal-node": "^1.1.0",
    "body-parser": "^1.19.0",
    "express": "^4.17.1",
    "http": "0.0.0",
    "morgan": "^1.10.0",
    "pg": "^8.6.0"
  }
}
Validate the functionality of the Node.js-based application
You're finally ready to test the functionality of your web app. While you could containerize it, for the sake of simplicity, you'll deploy it to an Azure App Service. This will provide a quick way to validate its functionality and ensure that containerizing it is a viable option.
In the Bash session on the Cloud Shell pane, run the following commands to create a resource group that will host the Azure web app, into which you'll deploy the Node.js Express app:
RG1NAME=postgresql-db-RG
LOCATION=$(az group show --resource-group $RG1NAME --query location --output tsv)
RG2NAME=cna-aadexpress-RG
az group create --name $RG2NAME --location $LOCATION
Run the following commands to create a Free-tier Azure App Service plan that will host the new Azure web app:
SPNAME=aadexpress-sp
az appservice plan create --name $SPNAME --resource-group $RG2NAME --sku F1 --is-linux
Run the following commands to create the new Node.js-based Azure web app:
WEBAPPNAME=aadexpress$RANDOM$RANDOM
az webapp create --name $WEBAPPNAME --resource-group $RG2NAME --plan $SPNAME --runtime "NODE|16-lts"
Run the following commands to identify the name of the web app:
echo $WEBAPPNAMEUse the nano editor to open the index.js file, replace two
<webapp_name>placeholders with the name you identified in the previous step, save your changes, and close the file.Note
Make sure to replace both
<webapp_name>placeholders.Open another tab in the web browser window displaying the Azure portal, navigate to the Azure portal and, if prompted, sign in to access the Azure subscription you'll be using in this module.
In the Azure portal, use the Search resources, services, and docs text box to search for Microsoft Entra ID and, in the list of results, select Microsoft Entra ID.
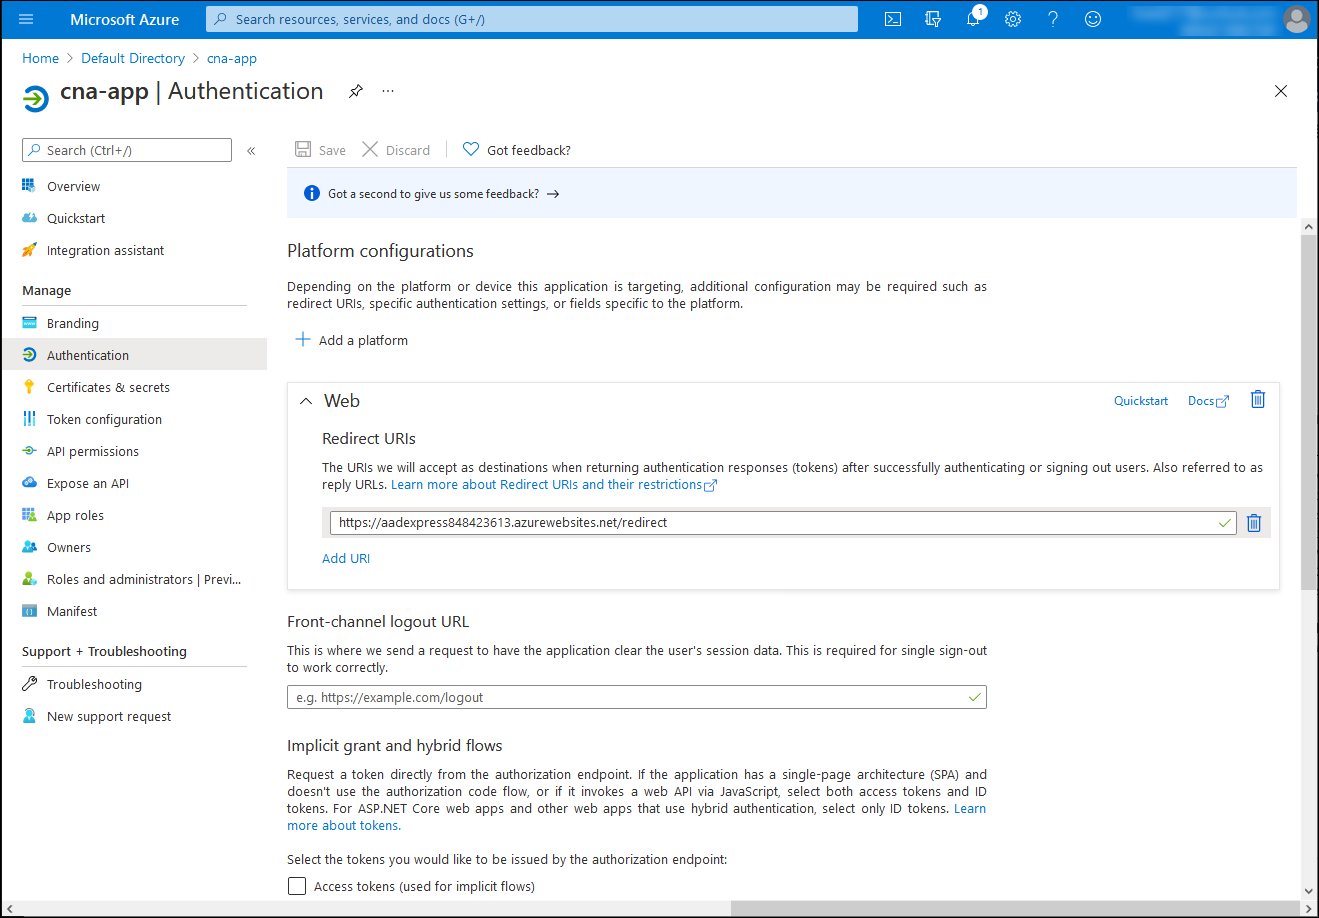
On the Microsoft Entra blade, navigate to the App registrations blade, select the cna-app entry, in the vertical menu, in the Manage section, select Authentication.
On the cna-app | Authentication blade, modify the value of the Redirect URI to match the entry you updated in the index.js file and save the change.
Switch back to the web browser tab displaying the Bash session on the Cloud Shell pane and run the following commands to initialize the local Git repository and commit all changes in the main branch:
cd ~/cna-aadexpress
git config --global user.email "user1@adatum.com"
git config --global user.name "Adatum User1"
git init
git add -A
git commit -m "Initial Commit"
Run the following commands to set up user-level deployment credentials:
DEPLOYMENTUSER=m06User$RANDOM
DEPLOYMENTPASS=m06Pass$RANDOM$RANDOM
az webapp deployment user set --user-name $DEPLOYMENTUSER --password $DEPLOYMENTPASS
Run the following commands to identify the user-level deployment credentials and record their value, because you'll need them later in this task:
echo $DEPLOYMENTUSER
echo $DEPLOYMENTPASS
Run the following commands to identify the Azure web app deployment URL that you'll use as the target of the
git pushcommand:RG2NAME=cna-aadexpress-RG WEBAPPNAME=$(az webapp list --resource-group $RG2NAME --query "[0].name" --output tsv) DEPLOYMENTURL=$(az webapp deployment source config-local-git --name $WEBAPPNAME --resource-group $RG2NAME --output tsv)Run the following command to configure the remote repo named azure, representing the deployment URL you identified in the previous step:
git remote add azure $DEPLOYMENTURLRun the following commands to create the test branch based on the main branch and push its contents to the Azure Web app (when prompted for the password that's part of the user-level deployment credentials you recorded previously in this task):
git checkout -b test
git commit -a -m "testing"
git push --set-upstream azure test
Close the Cloud Shell pane.
Open another web browser window in the Incognito/InPrivate mode, navigate to the Azure portal, and sign in by using the adatumuser1 user account you created in the previous exercise.
In the Azure portal, use the Search resources, services, and docs text box at the beginning of the Azure portal page to search for App Services.
On the App Services blade, in the list of App Service instances, select the entry representing the newly deployed Azure web app.
On the blade displaying the properties of the web app, in the Essentials section, copy the value of the Default domain URL.
Open another tab in the same browser window and in its search box, enter https://, paste the URL you just copied to the clipboard, add the /auth suffix, and select Enter.
Note
The URL should have the following format:
https://<webapp_name>.azurewebsites.net/authVerify that the resulting webpage consists of the Microsoft Entra authentication information for the currently signed-in user (the output might differ).


Results
Congratulations! You've completed the second exercise of this module. In this exercise, you installed Azure Database for PostgreSQL in the single server deployment model, created a database with sample inventory data, integrated the server with Microsoft Entra ID, and implemented a simple Node.js-based application that queries the database by relying on Microsoft Entra authentication.