Use resource locks to protect resources
In a recent conversation, your manager mentioned that there had been instances where critical Azure resources were mistakenly deleted. Because there was disorganization across their Azure environment, good intentions of cleaning up unnecessary resources resulted in accidental deletions of resources critical to other systems. You've heard of resource locks on Azure. You mention to your manager that you think you can help prevent this type of incident from happening in the future. Let's take a look at how you could use resource locks to solve this problem.
What are resource locks?
Resource locks are a setting that you can apply to any resource to block modification or deletion. You can set resource locks to either Delete or Read-only. Delete will allow all operations against the resource, but block the ability to delete it. Read-only will only allow read activities to be performed against it, blocking any modification or deletion of the resource. You can apply resource locks to subscriptions, resource groups, and to individual resources. Resource locks are inherited when applied at higher levels.
Note
Applying Read-only can lead to unexpected results, because some operations that seem like read operations actually require additional actions. For example, placing a Read-only lock on a storage account prevents all users from listing the keys. The list keys operation is handled through a POST request because the returned keys are available for write operations.
When a resource lock has been applied, you must first remove the lock in order to perform that activity. By putting an additional step in place before allowing the action to be taken on the resource, it helps protect resources from inadvertent actions, and helps protect your admins from doing something they might not intend to do. Resource locks apply regardless of RBAC permissions. Even if you're a resource owner, you must still remove the lock before you'll actually be able to perform the blocked activity.
Let's take a look at how a resource lock works in action.
Create a resource lock
Recall our msftlearn-core-infrastructure-rg resource group. You've now got two virtual networks and a storage account in it. You consider these resources to be critical pieces of your Azure environment and want to ensure that they aren't mistakenly deleted. To prevent the resource group and its contained resources from being deleted, apply a resource lock to the resource group.
In a web browser, navigate to the Azure portal if you haven't already. In the search box in the top navigation bar, search for msftlearn-core-infrastructure-rg and select the resource group.
In the left menu, in the Settings section, select Locks. You should see that the resource currently has no locks. You'll add one.
Select + Add. Name the lock
BlockDeletionand select a Lock type of Delete. Select OK.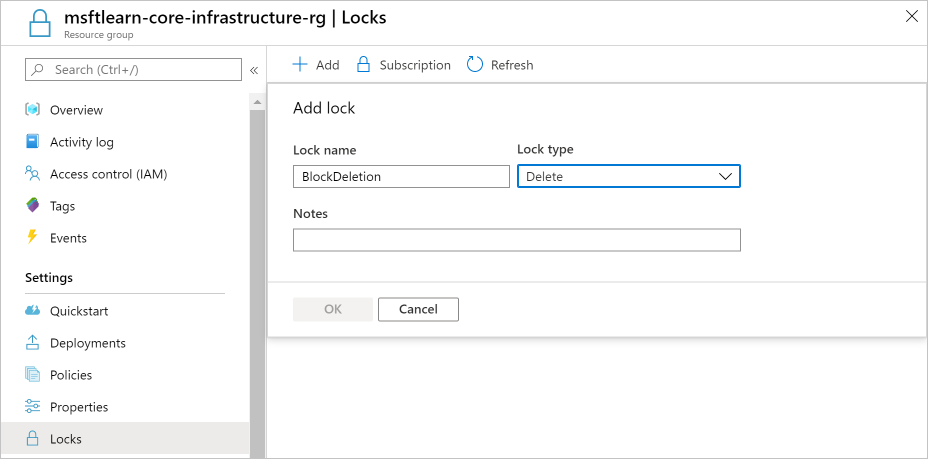
You now have a lock applied to the resource group that prevents the group from deletion. This lock is inherited by all resources within the resource group. You'll try to delete one of the virtual networks to see what happens.
Go back to Overview and select msftlearn-vnet1.
At the top of the Overview pane for msftlearn-vnet1, select Delete. You'll receive an error stating that there's a lock on the resource that prevents its deletion.
In the left menu, in the Settings section, select Locks. The msftlearn-vnet1 has a lock that is inherited from the resource group.
Return to the msftlearn-core-infrastructure-rg resource group and go to Locks. You'll remove the lock so you can clean up. Select Delete on the BlockDeletion lock.
Use resource locks in practice
You've seen how resource locks can protect from accidental deletion. To delete the virtual network, you needed to remove the lock. This concerted action helps ensure that you really intend to delete or modify the resource in question.
Use resource locks to protect those key pieces of Azure that could have a large impact if they were removed or modified. Some examples are ExpressRoute circuits, and virtual networks, critical databases, and domain controllers. Evaluate your resources and apply locks where you'd like to have an extra layer of protection from accidental actions.
Clean up the resources
Let's clean up the resources that we created. You'll need to delete the resource group you created, as well as the policy assignment and policy definition.
Go to the Azure portal in a web browser.
In the search box in the top menu bar, search for msftlearn-core-infrastructure-rg and select the resource group.
In the Overview pane, select Delete resource group. Enter the msftlearn-core-infrastructure-rg resource group name to confirm, then select Delete. Select Delete again to confirm the deletion.
Note
Because you deleted the assigned resources with the containing resource group, there won't be any assignments left in this policy. Normally, if you assign a policy to a resource, you could delete the assignment without deleting the underlying resource here. To do this, you would select Assignments, select the ellipsis (
...) for your assignment, and select Delete assignment.In the search box, search for Policy, and select the Policy service.
Select Definitions and search for the policy you created: Enforce tag on resource.
Select the
...for your definition and select Delete definition. Select Yes to confirm the deletion.