Understand and test the model
We've created a machine learning model! Let's test it and take a look at how well it performs.
Model performance
Custom Vision displays three metrics when you test your model. Metrics are indicators that can help you understand how your model is performing. The indicators don't indicate how factual or accurate the model is. The indicators tell you only how the model performed on the data you provided. How well the model performed on known data gives you an idea of how the model will perform on new data.
The following metrics are provided for the entire model and for each class:
| Metric | Description |
|---|---|
precision |
If your model predicts a tag, this metric indicates how likely it is that the correct tag was predicted. |
recall |
Of the tags the model should predict correctly, this metric indicates the percentage of tags your model did predict correctly. |
average precision |
Measures model performance by computing the precision and recall at different thresholds. |
When we test our Custom Vision model, we'll see numbers for each of these metrics in the iteration test results.
Common mistakes
Before we test our model, let's consider some of the "beginner's mistakes" to watch for when you first start to build machine learning models.
Using unbalanced data
You might see this warning when you deploy your model:
Unbalanced data detected. The distribution of images per tag should be uniform to ensure model performance.
This warning indicates that you don't have an even number of samples for each class of data. Although you have multiple options in this scenario, a common way to resolve unbalanced data is to use Synthetic Minority Over-sampling Technique (SMOTE). SMOTE duplicates training examples from your existing training pool.
Note
In our model, you might not see this warning, especially if you uploaded a fraction of the dataset. The Red-tailed Hawk (Dark morph) model data subset contains less than 60 photos compared to the other models that have more than 100 photos. Using unbalanced data is something to watch for in any machine learning model.
Overfitting the model
If you don't have enough data or if your data isn't diverse enough, your model can become overfitted. When a model is overfitted, it knows the provided dataset well, and it's overfitted to the patterns in that data. In this case, the model performs well on the training data, but it performs poorly on new data that it hasn't seen before. For this reason, we always use new data to test a model!
Using training data to test
As in overfitting, if you test the model by using the same data that you used to train the model, the model appears to perform well. But, when you deploy the model to production, it most likely will perform poorly.
Using bad data
Another common mistake is using bad data to train the model. Some data might actually decrease the accuracy of your model. For example, using data that is "noisy" might decrease a model's accuracy. In noisy data, too much information that isn't useful is in the dataset, and it causes confusion in the model. More data is better only if the data is good data that the model can use. You might need to clean up data or remove features to improve your model accuracy.
Test the model
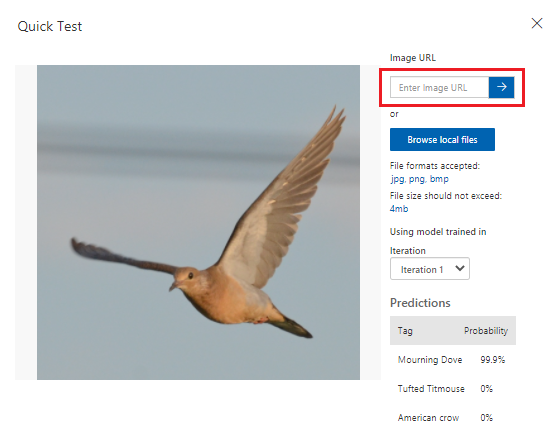
According to the metrics that Custom Vision provides, our model is performing at a satisfactory level. Let's test our model and see how it performs on unseen data. We'll use an image of a bird from an internet search.
In your web browser, search for an image of a bird that matches one of the species you trained the model to recognize. Copy the URL for the image.
In the Custom Vision portal, select the Bird Classification project.
In the top menu bar, select Quick Test.
In Quick Test, paste the URL in Image URL and then press Enter to test the model's accuracy. The prediction is shown in the window.
Custom Vision analyzes the image to test the model's accuracy and displays the results:
In the next step, we'll deploy the model. After the model is deployed, we can do more testing with an endpoint we'll create.