Exercise - Deploy a Python app to Azure
In this unit, you'll create a project in Azure Pipelines that builds and deploys that project to the Azure app service created earlier.
The GitHub repo that you forked for this project contains the source code for a basic Python web project that uses Django. In addition, it also includes some very useful unit and functional tests for validating the code both before and after deployment.
In this part, you:
- Install the Azure Pipelines extension for your GitHub repo.
- Set up an Azure DevOps project for this module.
- Create a CI/CD pipeline triggered by commits to the main branch.
- Review the pipeline tasks.
- Add tasks to run functional tests against the deployment and publish their results.
- Save the pipeline to trigger a CI/CD workflow.
Install the Azure Pipelines extension
Here you install the Azure Pipelines extension for your GitHub repository. This extension enables Azure Pipelines to access your GitHub account so that it can pull the latest source code from your repository.
- Go to the GitHub Marketplace.
- Search for Azure Pipelines and select the Azure Pipelines result.
- Select Set up a plan, locate the Free option, and select Install it for free.
- Enter any information for which you're prompted, then select Complete order and begin installation.
- Scroll down, select Only select repositories and choose the mslearn-python-django repository that you forked earlier.
- Select Install.
Set up an Azure DevOps project
The previous task links your GitHub repository to your Azure DevOps organization. To complete the process, you now create an Azure DevOps project.
Sign into your account at dev.azure.com.
Select + New project.
The Create new project dialog box opens.
In the Project name field, enter a name such as mslearn-python-django.
Under Visibility, you can choose whether to make your project public or private. For now, you can choose private.
Creators of open-source projects will often choose public visibility so that others can view active issues and build status.
Select Advanced.
Under Version control, make sure that Git is selected.
Select Create.
Create the pipeline
Here you create a CI/CD pipeline in Azure Pipelines by using one of the built-in templates. The process generates a pipelines configuration file named azure-pipelines.yml, which lives in the root directory of your Git repository.
In Azure DevOps, go to your mslearn-python-django project.
Select Pipelines, either from the project page or from the left pane.
Select Create Pipeline.
On the Connect tab, select GitHub.
If prompted, enter your GitHub credentials.
On the Select tab, select your mslearn-python-django repository.
On the Configure tab, select Python to Linux Web App on Azure.
When prompted:
- Select the Azure subscription from which you created resources earlier.
- Select Continue.
- Select the Web App name you created earlier, for example python-cicd-16353.
- Select Validate and configure.
On the Review tab, review the starter code for your pipeline configuration. Don't select Save and run just yet.
Review the pipeline tasks
The starter pipeline code provides everything you need to build, test, package, and deploy the Python application to Azure. Before you run it, let's walk through the stages and tasks it uses to build and deploy the app.
The CI trigger
The pipeline is configured to run whenever a change is committed to the main branch. You can adjust this as needed, such as if you want to include (or exclude) runs based on their branch, path, or tag.
trigger:
- main
Pipeline variables
To aid in pipeline maintenance, the default template uses variables for commonly used parameters, such as the name of the service connection string used to connect to Azure. A service connection provides secure access to your Azure subscription from Azure Pipelines.
Update the projectRoot variable to use the /Application path under the default working directory. This is where manage.py is located in the source code.
variables:

  # Azure Resource Manager connection created during pipeline creation
  azureServiceConnectionId: '00001111-0000-1111-2222-000011112222'

  # Web app name
  webAppName: 'python-cicd-16353'

  # Agent VM image name
  vmImageName: 'ubuntu-latest'

  # Environment name
  environmentName: 'python-cicd-16353'

  # Project root folder. Point to the folder containing manage.py file.
  projectRoot: $(System.DefaultWorkingDirectory)/Application

  # Python version: 3.9
  pythonVersion: '3.9'
The Build stage
A stage is a part of the pipeline that can run independently and be triggered by different mechanisms. For example, you might have one stage that builds the application, a second stage that deploys to a pre-production environment, and a final stage that deploys to production.
This pipeline is divided into two stages: Build and Deploy. The Build stage configures and performs the build tasks, which includes publishing the build artifact (a .zip file) to artifact storage.
The example defines the host agent that the stage's job will run on.
stages:
- stage: Build
  displayName: Build stage
  jobs:
  - job: BuildJob
    pool:
      vmImage: $(vmImageName)
vmImageName is defined as a variable in the previous section. It defines the newest version of Ubuntu.
Use Python Version task
The UsePythonVersion@0 task sets up the build environment for Python projects. For this pipeline, only the versionSpec parameter is needed to specify the version of the Python tools to install. To learn more about this task, see Use Python Version task.
- task: UsePythonVersion@0
  inputs:
    versionSpec: '$(pythonVersion)'
  displayName: 'Use Python $(pythonVersion)'
Like before, pythonVersion is defined as a variable in the previous section. It defines the version of Python to activate.
Running the build
The build itself is run using python and pip commands in an inline script. These commands are run from the project's root directory. The file requirements.txt specifies which components to pull in. Here, this file specifies Django.
- script: |
    python -m venv antenv
    source antenv/bin/activate
    python -m pip install --upgrade pip
    pip install setup
    pip install -r requirements.txt
  workingDirectory: $(projectRoot)
  displayName: "Install requirements"
Publishing the build
After the build completes, the ArchiveFiles@2 task packages the output. The resulting .zip file is then uploaded to artifact storage by using the alias drop for future usage and review.
- task: ArchiveFiles@2
  displayName: 'Archive files'
  inputs:
    rootFolderOrFile: '$(projectRoot)'
    includeRootFolder: false
    archiveType: zip
    archiveFile: $(Build.ArtifactStagingDirectory)/$(Build.BuildId).zip
    replaceExistingArchive: true

- upload: $(Build.ArtifactStagingDirectory)/$(Build.BuildId).zip
  displayName: 'Upload package'
  artifact: drop
Running unit tests
After the build is archived, unit tests are run. These could be run at any point after the build, but to keep things basic here, we place all the unit test tasks together. After the tests are run, their results are published by using the PublishTestResults@2 task. You can access test results from Azure Pipelines. The Tests folder, which contains the functional tests to be run after deployment, are also archived for later use during the deployment phase.
Add this code immediately after the upload task:
- script: |
    pip install setup
    pip install -r $(projectRoot)/requirements.txt
    pip install pytest
    pytest Tests/unit_tests --junitxml=$(System.DefaultWorkingDirectory)/TestResults/test-results-unit.xml
    pip install pycmd
    py.cleanup Tests/
  displayName: 'Run unit tests'

- task: PublishTestResults@2
  inputs:
    searchFolder: $(System.DefaultWorkingDirectory)
    testResultsFiles: '**/test-*.xml'
  displayName: 'Publish test results'

- publish: $(System.DefaultWorkingDirectory)/Tests
  artifact: tests
Tip
In a YAML file, whitespace is important. Ensure that the task you add here uses the same indentation as the previous task.
Deploying the build
The second stage of the pipeline deploys the application to Azure. It depends on the Build stage completing successfully, after which it uses the pipeline's Azure service connection to deploy the app to the configured target. This project deploys the app to Azure App Service.
- stage: Deploy
  displayName: 'Deploy Web App'
  dependsOn: Build
  condition: succeeded()
  jobs:
  - deployment: DeploymentJob
    pool:
      vmImage: $(vmImageName)
    environment: $(environmentName)
    strategy:
      runOnce:
        deploy:
          steps:

          - task: UsePythonVersion@0
            inputs:
              versionSpec: '$(pythonVersion)'
            displayName: 'Use Python version'

          - task: AzureWebApp@1
            displayName: 'Deploy Azure Web App : python-cicd-16353'
            inputs:
              azureSubscription: $(azureServiceConnectionId)
              appName: $(webAppName)
              package: $(Pipeline.Workspace)/drop/$(Build.BuildId).zip
Azure Web App task
The AzureWebApp@1 task deploys web apps to Azure App Service. It's a very flexible task that supports apps across a variety of platforms and includes everything needed for this Python application:
azureSubscriptionrefers to the name of your Azure service connection pipeline variable.appTypeindicates whether the app is being deployed for Linux (webAppLinux).appNamespecifies the name of the Azure App Service instance in your Azure account.runtimeStackindicates on which image the app should be run, which is required for Linux deployments.packagespecifies the path to the package to be deployed.startUpCommandspecifies the startup command to run after the app has been deployed, which is required for Linux deployments.
You can learn more about the flexibility of this task in the Azure Web App task documentation.
Running functional tests
The final stage of the pipeline runs functional tests to validate the deployment. In this case, there is a single Selenium test that confirms that the home page loads as expected. The test results are published alongside the unit test results from the build job.
Append this code to the end of the pipeline. As before, ensure that the task is indented correctly.
- script: |
    pip install selenium
    pip install pytest
    pytest tests/functional_tests/ --webAppUrl=https://$(webAppName).azurewebsites.net --junitxml=$(System.DefaultWorkingDirectory)/TestResults/test-results-functional.xml
  workingDirectory: $(Pipeline.Workspace)
  displayName: 'Run functional tests'

- task: PublishTestResults@2
  inputs:
    searchFolder: $(Pipeline.Workspace)
    testResultsFiles: '**/test-*.xml'
  displayName: 'Publish test results'
Save the pipeline to trigger a build and release
Select Save and run from the top right corner of the page. Select Save and run again to trigger the pipeline to run.
In Azure Pipelines, go to the build. Trace the build as it runs.
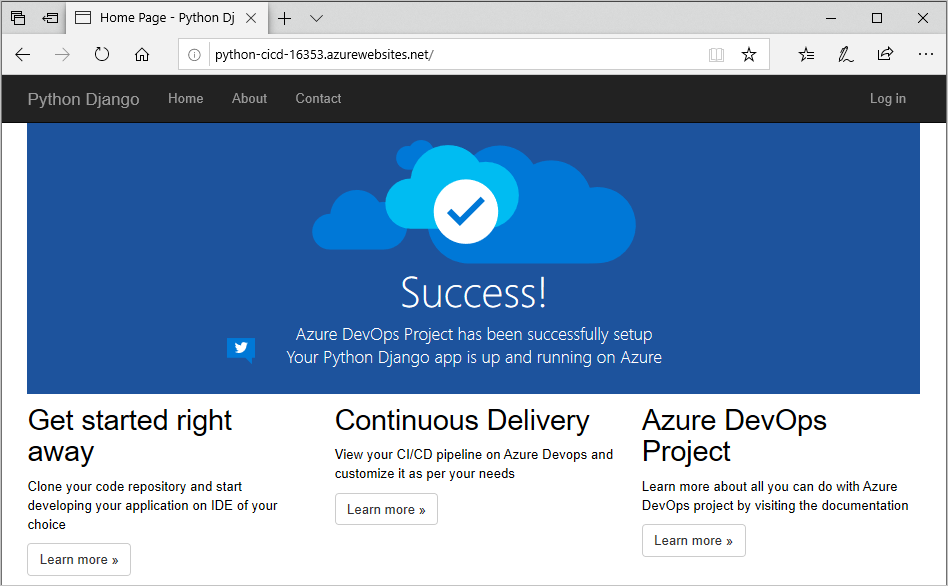
After the build has succeeded, select the web site's deploy task and select the URL to view the deployed site.
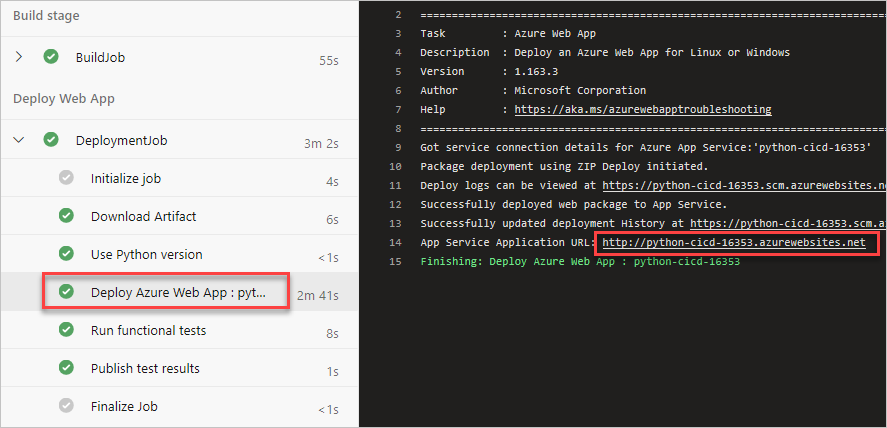
You get the site running on App Service:
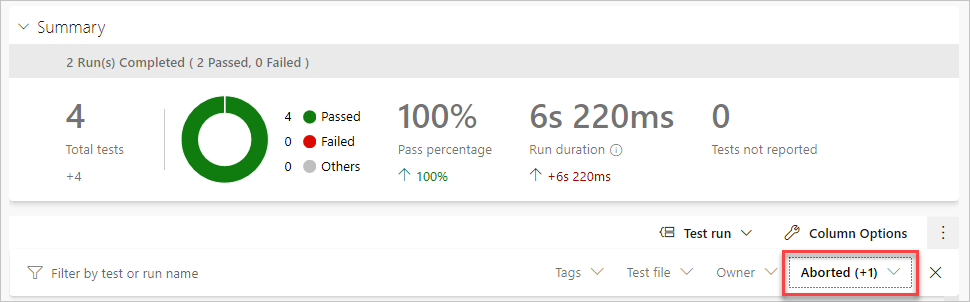
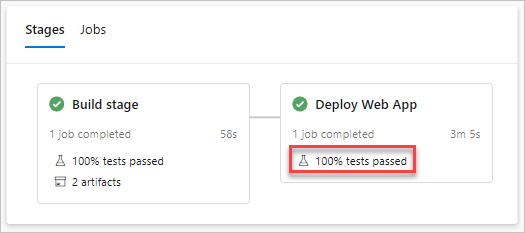
Return to the pipeline summary. You have the details of the pipeline run, which also includes the test results. Scroll down to the stages view to learn how the test run in each stage performed. Select one of the test links to view the aggregated performance.
The test run summary provides details about the test runs. If you'd like to review specific tests, you can update the filters option to include Passed tests. By default, it only shows tests that failed or were aborted.