Use the Asset Management mobile workspace
This unit includes several tasks that you can perform by using the Asset management mobile workspace. You will learn much more about how to perform these tasks in later modules in this learning path.
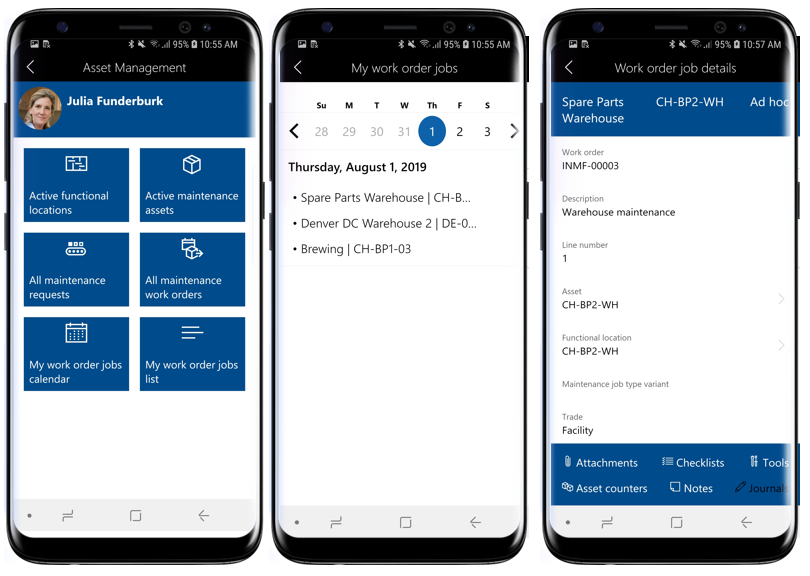
View assigned work order jobs in calendar view
Follow these steps to view assigned work order jobs in calendar view:
On your mobile device, open the Asset Management workspace.
Select My work order jobs calendar.
Select the date that you want to view work order jobs for. In the list, you'll see the asset ID and functional location ID for each work order job.
Select a work order job in the list to see job details such as asset and functional locations and other navigation links to view Attachments, Checklists, Tools, Asset counters, Notes, and Journals.
Create a work order job
Follow these steps to create a work order job:
- On your mobile device, open the Asset Management workspace.
- Select All maintenance work orders.
- Select the work order for which you want to create a new work order job.
- Select the Add line button.
- Select the Asset for which you want to create a work order job.
- Select Maintenance job type > Maintenance job type variant > Trade.
- Select Done.
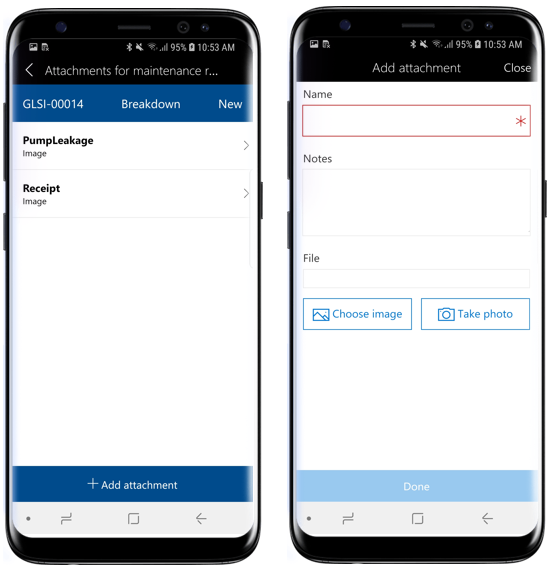
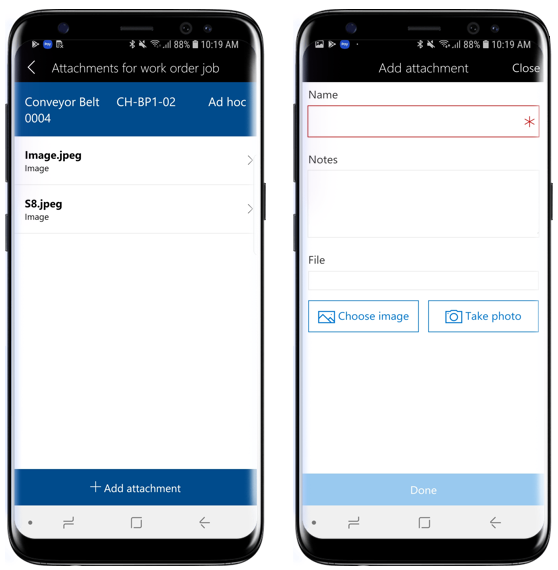
Add an attachment to a work order job
Follow these steps to add an attachment to a work order job:
On your mobile device, open the Asset Management workspace.
Select All maintenance work orders.
Select the work order and then the work order job for which you want to add an attachment.
Note
You can also select My work order jobs calendar or My work order jobs list on the home page to go to the Work order job details page.
Select Attachments on the Work order job details page.
You will see existing attachments on the work order job. Select Add attachment.
Enter the Name and specific Notes for the attachment.
Select Choose image to select a photo from your mobile gallery or Take photo to take a photo to add as an attachment.
Select Done.

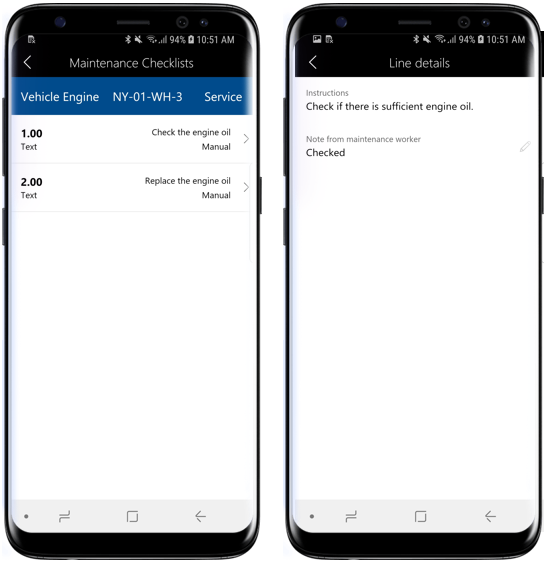
View a maintenance checklist on a work order job
Follow these steps to view a maintenance checklist on a work order job:
On your mobile device, open the Asset Management workspace.
Select All maintenance work orders.
Select the work order and then the work order job for which you want to view maintenance checklists.
Note
You can also select My work order jobs calendar or My work order jobs list on the home page to go to the Work order job details page.
Select Checklists on the Work order job details page.
You will then see a list of checklist lines that are related to the work order job. Select a checklist line to view the Instructions and add Notes.
Select the back button to return to the previous page.

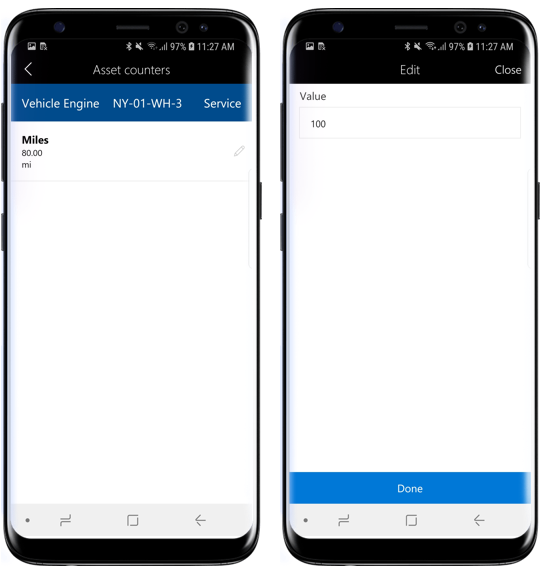
View and update asset counters on a work order job
Follow these steps to view and update asset counters on a work order job:
On your mobile device, open the Asset Management workspace.
Select All maintenance work orders.
Select the work order and then the work order job for which you want to view asset counters.
Note
You can also select My work order jobs calendar or My work order jobs list on the home page to go to the Work order job details page.
Select Asset counters on the Work order job details page.
You will see a list of asset counters that are related to the work order job. Select the pencil icon on an asset counter line to update the counter value.
Enter a new counter value and select Done.

Register consumption on a work order job
Follow these steps to register consumption on a work order job:
On your mobile device, open the Asset Management workspace.
Select All maintenance work orders.
Select the work order and then the work order job for which you want to add consumption registrations.
Note
You can also select My work order jobs calendar or My work order jobs list on the home page to go to the Work order job details page.
Select Journals on the Work order job details page.
Select Add hours to create work hour registrations.
Select the Category from the lookup.
In the Hours field, enter the number of work hours spent on the work order job.
Select the appropriate Line property.
Select Done.
Select Add items to create item registrations.
Select the Item number from the lookup.
Select the Site from the lookup.
Enter the Quantity of items consumed.
Select Done.
Select Add expense to create expense registrations.
Select the Category from the lookup.
Enter the Quantity for the expense registration.
Select the Sales currency from the lookup.
Enter the Cost price for the expense registration.
Select Done.


Update the lifecycle state on a work order
Follow these steps to update the lifecycle state on a work order:
On your mobile device, open the Asset Management workspace.
Select All maintenance work orders.
Select the work order for which you want to update the lifecycle state.
Select the Update state button at the bottom of the screen.
Select a new lifecycle state from the list.
Select Done.


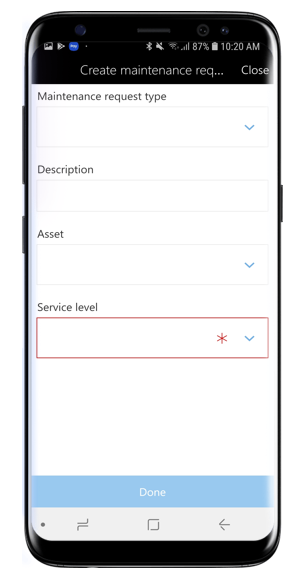
Create a maintenance request using a mobile device
Follow these steps to create a maintenance request:
On your mobile device, open the Asset Management workspace.
Select All maintenance requests.
Select Actions at the bottom of the screen and then select Create maintenance request.
If a number sequence is enabled for maintenance requests in Asset Management, the Maintenance request field is hidden because it is automatically completed. If the Maintenance request field is visible, enter a maintenance request ID.
Select a Maintenance request type.
Enter a Description for the maintenance request.
Select the Asset that you want to create the request for.
Select the Service level for the maintenance request.
Select Done.
Add an attachment to a maintenance request
Follow these steps to add an attachment to a maintenance request:
On your mobile device, open the Asset Management workspace.
Select All maintenance requests.
Select the maintenance request that you want to add an attachment to.
Select Attachments at the bottom of the screen.
Select Add attachments.
Enter a Name and Notes for the attachment.
Select Choose image to select a photo from the mobile gallery or Take photo to take a photo.
Select Done.