Implementing INotifyPropertyChanged the easy way

If you've followed through the previous lessons, you may think that implementing data binding is too great an effort. Why go through all the trouble of implementing INotifyPropertyChanged, firing events left and right, when you could simply use TimeTextBlock.Text = DateTime.Now.ToLongTime() to display the time? And it's true, in this simple case, data binding does look like overkill.
However, data binding is capable of much more. It can transfer data in both directions between the UI and the code, display lists of items, and support the editing of data. All of this with an architecture that offers a clean separation of the data your app's logic works on, and the presentation of the data.
But how can we reduce the amount of code the developer has to write? Nobody wants to enter ten lines of code for every property they need to declare. Fortunately, we can extract the common functionality and reduce the property setters to a single line of code. This lesson shows you how.
The goal
Our goal is to move all the plumbing for implementing the INotifyPropertyChanged interface to a separate class, to simplify creating a property that can notify the UI when it changes. As a reminder, here's the code we want to simplify:
private bool _isNameNeeded = true;

public bool IsNameNeeded
{
    get { return _isNameNeeded; }
    set
    {
        if (value != _isNameNeeded)
        {
            _isNameNeeded = value;
            PropertyChanged?.Invoke(this, new PropertyChangedEventArgs(nameof(IsNameNeeded)));
        }
    }
}
Automatic properties (such as public bool IsNameNeeded { get; set;}) can't be used here, because we need to do something in the setter. So, there's not much to be done about the backing field, the property declaration line. Using modern C# features, we could change the getter to get => _isNameNeeded;, but that only saves a few keystrokes. So, we need to focus our attention to the property setter. Can we turn that into a single line?
The ObservableObject class
We can create a new base class: ObservableObject. It's called observable because it can be observed by the UI, by using the INotifyPropertyChanged interface. The data and logic are hosted in classes that inherit from it, and the UI is also bound to instances of these inherited classes.

1. Create the ObservableObject class
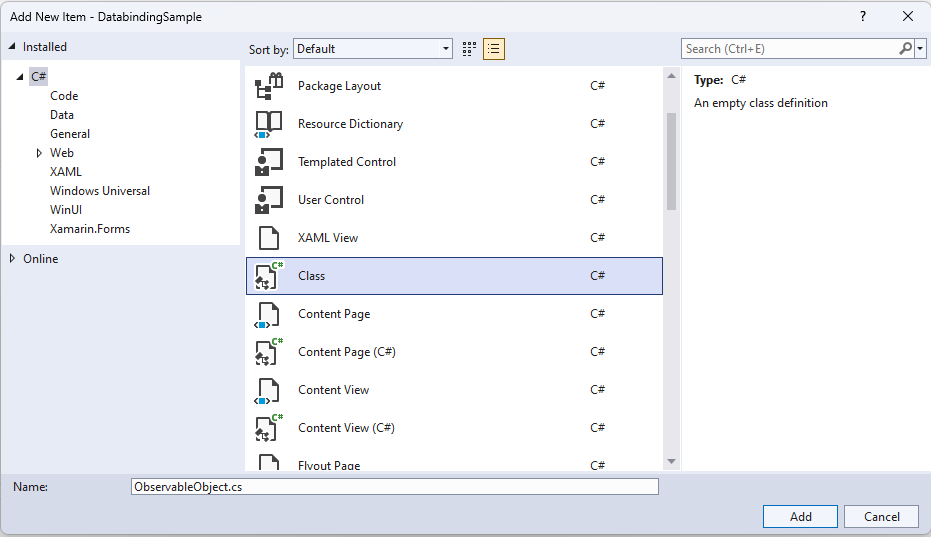
Let's create a new class called ObservableObject. Right-click the DatabindingSample project in Solution Explorer, select Add / Class, and enter ObservableObject as the class' name. Select Add to create the class.

1. Create the ObservableObject class
Let's create a new class called ObservableObject. Right-click on the DatabindingSampleWPF project in Solution Explorer, select Add / Class and enter ObservableObject as the class' name. Select Add to create the class.


2. Implement the INotifyPropertyChanged interface
Next, we have to implement the INotifyPropertyChanged interface, and make our class public. Change the signature of the class so that it looks like this:
public class ObservableObject : INotifyPropertyChanged
Visual Studio indicates that there are several issues with INotifyPropertyChanged. It resides in a non-referenced namespace. Let's add it as shown here.
using System.ComponentModel;
Next, we have to implement the interface. Add this line inside the body of the class.
public event PropertyChangedEventHandler? PropertyChanged;
3. The RaisePropertyChanged method
In previous lessons, we have often raised the PropertyChangedEvent in our code, even outside of property setters. While modern C# and the null-conditional operator or (?.) allowed us to do this in one line, we can still simplify by creating a convenience function like this:
protected void RaisePropertyChanged(string? propertyName)
{
    PropertyChanged?.Invoke(this, new PropertyChangedEventArgs(propertyName));
}
So now, in classes that inherit from ObservableObject, all we have to do to raise the PropertyChanged event is the following:
RaisePropertyChanged(nameof(MyProperty));
4. The Set<T> method
But what can we do about the setter pattern that checks whether the value is the same as it was, sets the value if not, and raises the PropertyChanged event? Ideally, we'd like to turn it into a one-liner, like this:
private bool _isNameNeeded = true;

public bool IsNameNeeded
{
    get { return _isNameNeeded; }
    set { Set(ref _isNameNeeded, value); }  // Just one line!
}
It can't really get simpler than that. We call a function, pass a reference to the backing field of the property, and set the new value. So, what does this Set method look like?
protected bool Set<T>(
    ref T field,
    T newValue,
    [CallerMemberName] string? propertyName = null)
{
    if (EqualityComparer<T>.Default.Equals(field, newValue))
    {
        return false;
    }

    field = newValue;
    RaisePropertyChanged(propertyName);
    return true;
}
Copy the preceding code into the body of the ObservableObject class. For [CallerMemberName], you also need to add the following line to the top of the file:
using System.Runtime.CompilerServices;
There's a lot of advanced C# and compiler magic going on here. Let's take a closer look.
Set<T> is a generic method, helping the compiler to make sure that the backing field and the value are of the same type. The method's third parameter, the propertyName, is decorated by the [CallerMemberName] attribute. If we don't define the propertyName when calling the method, it will take the name of the calling member, and place it in there during compile time. So, if we call Set from the setter of the IsNameNeeded method, the compiler places the string literal, "IsNameNeeded", as the third parameter. No need to hardcode strings or even use nameof()!
Next, the Set method invokes EqualityComparer<T>.Default.Equals to compare the field's current and new value. If the old and new values are equal, the Set method returns false. If not, the backing field is set to the new value, and the PropertyChanged event is raised before returning true. You can use the return value of the Set method to determine whether the value has changed.
With the ObservableObject class implemented, let's see how we can use it in our app!

5. Create the MainPageLogic class
Earlier in this lesson, we moved all our data and logic out of the MainPage class, and into a class that inherits from ObservableObject.
Let's create a new class, called MainPageLogic. Right-click the DatabindingSample project in Solution Explorer, select Add / Class, and enter MainPageLogic as the class' name. Select Add to create the class.
Change the class' signature, so that it's public and inherits from ObservableObject.
public class MainPageLogic : ObservableObject
{
}
6. Move the clock feature to the MainPageLogic class
The code for the clock feature consists of three parts: the _timer field, setting up the DispatcherTimer in the constructor, and the CurrentTime property. Here's the code as we've left it in the second lesson:
private DispatcherTimer _timer;

public MainPage()
{
    this.InitializeComponent();
    _timer = new DispatcherTimer { Interval = TimeSpan.FromSeconds(1) };

    _timer.Tick += (sender, o) =>
        PropertyChanged?.Invoke(this, new PropertyChangedEventArgs(nameof(CurrentTime)));

    _timer.Start();
}

public string CurrentTime => DateTime.Now.ToLongTimeString();
Let's move all of the code that has to do with the _timer to the MainPageLogic class. The lines in the constructor (except for the this.InitializeComponent() call) should be moved to the MainPageLogic's constructor. From the preceding code, all that should be left in the MainPage is the InitializeComponent call in the constructor.
public MainPage()
{
    this.InitializeComponent();
}
For now, only touch this part of the code. We'll come back to the rest of the MainPage class' code soon.
After the move, the MainPageLogic class looks like this:
public class MainPageLogic : ObservableObject
{
    private DispatcherTimer _timer;

    public MainPageLogic()
    {
        _timer = new DispatcherTimer { Interval = TimeSpan.FromSeconds(1) };

        _timer.Tick += (sender, o) =>
            PropertyChanged?.Invoke(this, new PropertyChangedEventArgs(nameof(CurrentTime)));

        _timer.Start();
    }

    public string CurrentTime => DateTime.Now.ToLongTimeString();
}
Remember, we have a convenience function for raising the PropertyChanged event. Let's use that in the _timer.Tick handler.
_timer.Tick += (sender, o) => RaisePropertyChanged(nameof(CurrentTime));
7. Change the XAML to use the MainPageLogic
If you try to compile the project now, you'll get an error saying that "Property 'CurrentTime' can't be found on type 'MainPage'" in MainPage.xaml. And sure enough, the MainPage class no longer has a CurrentTime property. It's been moved to the MainPageLogic class. To fix this, we'll create a property called Logic in the MainPage class. This will be of type MainPageLogic, and we'll do all our bindings through this.
Add the following to the MainPage class:
public MainPageLogic Logic { get; } = new MainPageLogic();
Next, in MainPage.xaml, find the TextBlock that displays the clock.
<TextBlock Text="{x:Bind CurrentTime, Mode=OneWay}"
           HorizontalAlignment="Right"
           Margin="10"/>
And change the binding by adding Logic. to it.
<TextBlock Text="{x:Bind Logic.CurrentTime, Mode=OneWay}"
           HorizontalAlignment="Right"
           Margin="10"/>
Now the app compiles, and if you run it, the clock is ticking as it should. Nice!
8. Move the rest of the logic
Let's pick up the pace. Move the rest of the code in the MainPage class to MainPageLogic. All that should be left is the Logic property, the constructor, and the PropertyChanged event.
9. Simplify IsNameNeeded
In MainPageLogic.cs, replace the IsNameNeeded property setter with a call to our new Set method.
public bool IsNameNeeded
{
    get { return _isNameNeeded; }
    set { Set(ref _isNameNeeded, value); }
}
10. Fix the OnSubmitClicked method
At the logic level, we no longer care about the button click event's sender or event args. It's also a good practice to reconsider the name of the method. We no longer do button clicks, we do submit logic. So, let's rename the OnSubmitClicked method to Submit, make it public, and remove the parameters.
Inside the method, there's our old way of raising the PropertyChanged event. Replace it with a call to ObservableObject.RaisePropertyChanged. In the end, the whole method should look like this:
public void Submit()
{
    if (string.IsNullOrEmpty(UserName))
    {
        return;
    }

    IsNameNeeded = false;
    RaisePropertyChanged(nameof(GetGreetingVisibility));
}
11. Change the XAML to refer to the Logic
Next, head back to MainPage.xaml, and change the remaining bindings to go through the Logic property. When all's done, the Grid should look like this:
<Grid>
    <TextBlock Text="{x:Bind Logic.CurrentTime, Mode=OneWay}"
               HorizontalAlignment="Right"
               Margin="10"/>

    <StackPanel HorizontalAlignment="Center"
                VerticalAlignment="Center"
                Orientation="Horizontal"
                Visibility="{x:Bind Logic.IsNameNeeded, Mode=OneWay}">
        <TextBlock Margin="10"
                   VerticalAlignment="Center"
                   Text="Enter your name: "/>
        <TextBox Name="tbUserName"
                 Margin="10"
                 Width="150"
                 VerticalAlignment="Center"
                 Text="{x:Bind Logic.UserName, Mode=TwoWay}"/>
        <Button Margin="10"
                VerticalAlignment="Center"
                Click="{x:Bind Logic.Submit}" >Submit</Button>
    </StackPanel>

    <TextBlock Text="{x:Bind sys:String.Format('Hello {0}!',  tbUserName.Text), Mode=OneWay}"
               Visibility="{x:Bind Logic.GetGreetingVisibility(), Mode=OneWay}"
               HorizontalAlignment="Left"
               VerticalAlignment="Top"
               Margin="10"/>
</Grid>
Note how even the Button.Click event could be bound to the Submit method in the MainPageLogic class.
If you compile the project now, you still get a warning that says that the MainPage.PropertyChanged is never used.
12. Tidy up the MainPage class
The warning occurs because we no longer need the INotifyPropertyChanged interface on the MainPage class. So, let's remove it from the class declaration, along with the PropertyChanged event.
In the end, the entire MainPage class looks like this:
public sealed partial class MainPage : Page
{
    public MainPageLogic Logic { get; } = new MainPageLogic();

    public MainPage()
    {
        this.InitializeComponent();
    }

}
This is as clean as it gets.
13. Run the app
If all went well, you should be able to run the app at this point, and verify that it works exactly as it did earlier. Congratulations!
Summary
So, what did we achieve with all this work? While the app works the same as before, we've arrived at a scalable, sustainable, and testable architecture.
The MainPage class is now very simple. It contains a reference to the logic, and simply receives and forwards a button click event. All the data flow between the logic and the UI happens through data binding, which is fast, robust, and proven.
The MainPageLogic class is now UI-agnostic. It doesn't matter whether the clock is displayed in a TextBlock or some other control. The form submission can happen in any number of ways. These ways include a button click, a press of the Enter key, or a face recognition algorithm detecting a smile. The form can also be submitted by using automatic unit tests that target the logic and ensure it works according to the project's requirements.
For these reasons, as well as others, it's a good practice to only have UI-related features in the page's codebehind, and separate the logic in a different class. More complicated apps may also have animation control and other, concrete UI-related features. As you work with more complicated apps, you'll appreciate the separation of UI and logic that we've created in this lesson.
You can re-use the ObservableObject class in your own project. After a bit of practice, you'll find that it is actually faster and easier to approach problems this way. Or take advantage of an existing, well established library, such as the MVVM Toolkit, that follows and builds upon the principles you learned in this module.

5. Modify the Clock class to take advantage of ObservableObject
Change the signature of Clock, so that it inherits from ObservableObject instead of INotifyPropertyChanged.
public class Clock : ObservableObject
Now we have the PropertyChanged event defined in both the Clock class and its base class, which results in a compiler warning. Delete the PropertyChanged event from the Clock class.
To raise the PropertyChanged event, we've created a convenience function in the ObservableObject class. To use it, replace the _timer.Tick line with this:
_timer.Tick += (sender, o) => RaisePropertyChanged(nameof(CurrentTime));
The Clock class already became simpler. But let's see what we can do with the more complex MainWindowDataContext class.
6. Modify the MainWindowDataContext class to take advantage of ObservableObject
As with the Clock class, we again start by changing the class declaration so that it inherits from ObservableObject.
public class MainWindowDataContext : ObservableObject
Make sure you delete the PropertyChanged event here, too.
Take a look at the setter of the IsNameNeeded property. This is what it looks now:
set
{
    if (value != _isNameNeeded)
    {
        _isNameNeeded = value;
        PropertyChanged?.Invoke(
            this, new PropertyChangedEventArgs(nameof(IsNameNeeded)));
        PropertyChanged?.Invoke(
            this, new PropertyChangedEventArgs(nameof(GreetingVisibility)));
    }
}
This is the standard INotifyPropertyChanged pattern, with the extra PropertyChanged event invocation if the new IsNameNeeded property value is different.
This is exactly the situation the ObservableObject.Set function was created for. The Set function even returns a bool value indicating whether the old and new values of the property are different. So, the above property setter can be simplified like this:
if (Set(ref _isNameNeeded, value))
{
    RaisePropertyChanged(nameof(GreetingVisibility));
}
Not bad!
7. Run the app
If all went well, you should be able to run the app at this point, and verify that it works exactly as it did earlier. Congratulations!
Summary
So, what did we achieve with all this work? While the app works the same as before, we've arrived at a scalable, sustainable, and testable architecture.
The MainWindow class is very simple. It contains a reference to the logic, and simply receives and forwards a button click event. All the data flow between the logic and the UI happens through data binding, which is fast, robust, and proven.
The MainWindowDataContext class is now UI-agnostic. It doesn't matter whether the clock is displayed in a TextBlock or some other control. The form submission can happen in any number of ways. These ways include a button click, a press of the Enter key, or a face recognition algorithm detecting a smile. The form can also be submitted by using automatic unit tests that target the logic and ensure it works according to the project's requirements.
For these reasons, as well as others, it's a good practice to only have UI-related features in the window's code-behind, and separate the logic in a different class. More complex apps may also have animation control and other, concrete UI-related features. As you work with more complex apps, you'll appreciate the separation of UI and logic that we've created in this lesson.
You can re-use the ObservableObject class in your own project. After a bit of practice, you'll find that it is actually faster and easier to approach problems this way. Or take advantage of an existing, well established library, such as the MVVM Toolkit, that follows and builds upon the principles you learned in this module.