Creating an interactive UI
In the previous lessons, you built a simple form UI, prompting the user to enter a name and, with a button, displayed a greeting. In this lesson, you make the form a bit more user-friendly by disabling or hiding the Submit button until at least three characters have been entered.
First, let's examine exactly when the MainPageLogic.UserName value is set through the binding.
1. Place a breakpoint
Open MainPageLogic.cs file and find the line that contains the UserName property.
public string UserName { get; set; }
Set a breakpoint on the setter by moving the caret inside the set text and pressing F9. This can also be accomplished by right-clicking set and selecting Breakpoint / Insert Breakpoint.
2. Run the app in debug mode
Next, run the app in debug mode (F5 or Debug / Start Debugging). Type something in the TextBox and notice that the breakpoint isn't hit. If you press the Tab key, it moves the input focus to the next control (in our case, the button). Losing focus on the TextBox updates the binding, so the breakpoint is hit.
3. Change the binding so that it updates on every keystroke
Stop debugging by pressing Shift+F5 or selecting Debug / Stop Debugging.
To provide accurate feedback on when the Submit button is enabled, we can't wait until focus is lost on the TextBox. Luckily, there's a way to change the behavior of the binding. You can force it to update the UserName property (which is the source, as we're talking about a TwoWay binding) whenever the text property changes. We need to change the UpdateSourceTrigger of the binding, which is set to LostFocus by default. UpdateSourceTrigger defines the circumstance that causes the source to be updated.
Open MainPage.xaml, and find the TextBox. Then, change the binding by adding UpdateSourceTrigger=PropertyChanged. The entire TextBox tag now should look like this:
<TextBox Name="tbUserName"
         Margin="10"
         Width="150"
         VerticalAlignment="Center"
         Text="{x:Bind Logic.UserName, Mode=TwoWay, UpdateSourceTrigger=PropertyChanged}"/>
If you debug the app now, you can see that the breakpoint gets hit with every keystroke and text change. Great!
You might recall that when we used UI-to-UI binding to display the greeting, every keystroke fired off the binding. In that case, the binding was defined on the TextBlock, and therefore the source was the TextBox.Text property, which does change with every keystroke. UpdateSourceTrigger affects data flow in the other direction. It flows from the binding source to the control on which the binding is defined (the binding target).
5. Add the IsSubmitAllowed property
Next, you add a Boolean property that indicates whether submitting the form is allowed. Open MainPageLogic.cs, and add a new property to the MainPageLogic class.
public bool IsSubmitAllowed => UserName?.Trim().Length > 2;
This is a very simple validation: if the text entered, trimmed of leading and trailing white-space characters, contains more than two characters, we accept it as a username.
6. Reevaluate IsSubmitAllowed after every change to UserName
We have to tell the UI framework when to reevaluate this property and reflect it on the UI. The best way to trigger this reevaluation is by calling RaisePropertyChanged in the setter of the UserName property. To be able to add code to the setter, it needs to be converted to a full property. Replace the UserName property with the following code:
private string _userName;
public string UserName
{
    get { return _userName; }
    set
    {
        _userName = value;
        RaisePropertyChanged(nameof(IsSubmitAllowed));
    }
}
We don't use INotifyPropertyChanged for this property because we don't yet have a situation where the UserName property is changed from the code. However, every time the text changes in the TextBox, we have to tell the UI that the IsSubmitAllowed property might have changed and should be reevaluated.
7. Bind the IsSubmitAllowed property to the button's IsEnabled property
Now you're done with the code. Head back to MainPage.xaml and find the Submit button. Add the IsEnabled attribute so that the button's XAML now looks like this:
<Button Margin="10"
        VerticalAlignment="Center"
        Click="{x:Bind Logic.Submit}"
        IsEnabled="{x:Bind Logic.IsSubmitAllowed, Mode=OneWay}">Submit</Button>
8. Run the app
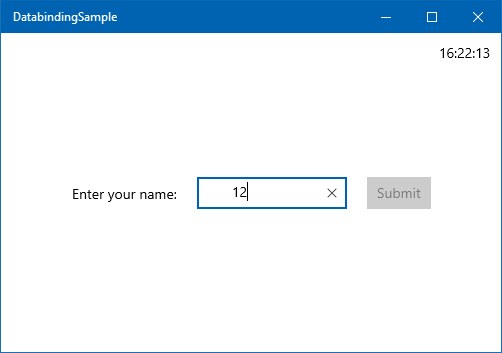
If you run the app now, you should see that the Submit button is disabled by default. It remains disabled if you type a few spaces, and only gets enabled when there are at least three non-white-space characters entered.
While this example performs some validation, UWP has a rich set of validation features that will be shown in a later module.
9. Hide the Submit button
You or your designer might decide to go one step further, and actually hide the Submit button until it can be pressed. This is an easy change to make, so let's do it now. Just edit the XAML, and change IsEnabled to Visibility.
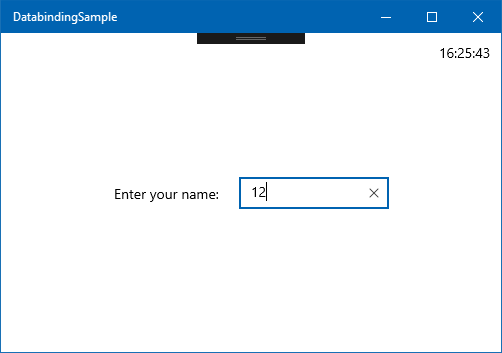
However, if you type a few characters, you see that the whole UI jumps. This is because the surrounding StackPanel is horizontally centered (HorizontalAlignment="Center"), and the width of the StackPanel is smaller when the Button is collapsed. To remedy this issue, you can put the Button in a 100 unit wide Border, like this.
<Border Width="100">
    <Button Margin="10"
            VerticalAlignment="Center"
            Click="{x:Bind Logic.Submit}"
            Visibility="{x:Bind Logic.IsSubmitAllowed, Mode=OneWay}">Submit</Button>
</Border>
With this, the width of the StackPanel doesn't change when the Button inside the Border reappears.
Summary
In this lesson, you have seen how binding can be debugged. You have learned about the UpdateSourceTrigger binding option, and have seen further examples of data binding. You have also seen an example of how the look and behavior of the UI can be changed without touching the C# code, if you're using data binding properly.
In the next lesson, we examine how you can use data binding to display multiple items in a list.

In the previous lessons, you created a simple form UI, prompting the user to enter a name and, with a button, displayed a greeting. In this lesson, you make the form a bit more user-friendly by disabling or hiding the Submit button until at least three characters have been entered.
First, let's examine exactly when the MainWindowDataContext.UserName value is set through the binding.
1. Place a breakpoint
Open the MainWindowDataContext.cs file and find the line that contains the UserName property.
public string UserName { get; set; }
Set a breakpoint on the setter by moving the caret inside the set text, and pressing F9. This can also be accomplished by right-clicking set, and selecting Breakpoint / Insert Breakpoint.
2. Run the app in debug mode
Next, run the app in debug mode (F5 or Debug / Start Debugging). Type something in the TextBox and notice that the breakpoint doesn't get hit. If you press the Tab key, it moves the input focus to the next control (in our case, the button). Losing focus on the TextBox updates the binding, so the breakpoint is hit.
3. Change the binding so that it updates on every keystroke
Stop debugging by pressing Shift+F5 or selecting Debug / Stop Debugging.
To provide accurate feedback on when the Submit button is enabled, we can't wait until focus is lost on the TextBox. Luckily, there's a way to change the behavior of the binding. You can force it to update the UserName property (which is the source, as we're talking about a TwoWay binding) whenever the text property changes. We need to change the UpdateSourceTrigger of the binding, which is set to LostFocus by default. UpdateSourceTrigger defines the circumstance that causes the source to be updated.
Open MainWindow.xaml, and find the TextBox. Then, change the binding by adding UpdateSourceTrigger=PropertyChanged. The entire TextBox tag now should look like this:
<TextBox Name="tbName"
         Margin="10"
         Width="150"
         VerticalAlignment="Center"
         Text="{Binding UserName, Mode=TwoWay, UpdateSourceTrigger=PropertyChanged}"/>
If you debug the app now, you can see that the breakpoint gets hit with every keystroke and text change. Great!
You might recall that when we used UI-to-UI binding to display the greeting, every keystroke triggered the binding. In that case, the binding was defined on the TextBlock, and therefore the source was the TextBox.Text property, which does change with every keystroke. UpdateSourceTrigger affects data flow in the other direction. It flows from the binding source to the control on which the binding is defined (the binding target).
5. Add the IsSubmitAllowed property
Next, you add a Boolean property that indicates whether submitting the form is allowed. Open MainWindowDataContext.cs and add a new property to the MainWindowDataContext class.
public bool IsSubmitAllowed => !string.IsNullOrWhiteSpace(UserName);
This property is doing a simple validation. If the text entered isn't null, empty, or solely white-space characters, we accept it as a username.
6. Reevaluate IsSubmitAllowed after every change to UserName
We have to advise the UI framework when to reevaluate this property and reflect it on the UI. The best way to trigger this reevaluation is by calling RaisePropertyChanged in the setter of the UserName property. To be able to add code to the setter, it needs to be converted to a full property. Replace the UserName property with the following code:
private string? _userName;
public string? UserName
{
    get { return _userName; }
    set
    {
        _userName = value;
        RaisePropertyChanged(nameof(IsSubmitAllowed));
    }
}
We don't use INotifyPropertyChanged for this property because we don't have a situation where the UserName property is changed from the code. However, every time the text changes in the TextBox, we have to tell the UI that the IsSubmitAllowed property might have changed and should be reevaluated.
7. Bind the IsSubmitAllowed property to the button's IsEnabled property
Now you're done with the code. Head back to MainWindow.xaml and find the Submit button. Add the IsEnabled attribute so that the button's XAML now looks like this:
<Button Margin="10"
        VerticalAlignment="Center"
        Click="OnSubmitClicked"
        IsEnabled="{Binding IsSubmitAllowed}">Submit</Button>
8. Run the app
If you run the app now, you should see that the Submit button is disabled by default. It gets enabled as soon as you type something in it.
While this example performs some basic validation, WPF has a rich set of validation features that will be demonstrated in a subsequent module.

Summary
In this lesson, you have seen how bindings can be debugged. You have learned about the UpdateSourceTrigger binding option, and have seen further examples of data binding. You have also seen an example of how, if you're using data binding properly, the look and behavior of the UI can be changed without touching the C# code.
In the next lesson, we examine how you can use data binding to display multiple items in a list.