Register in a connected environment
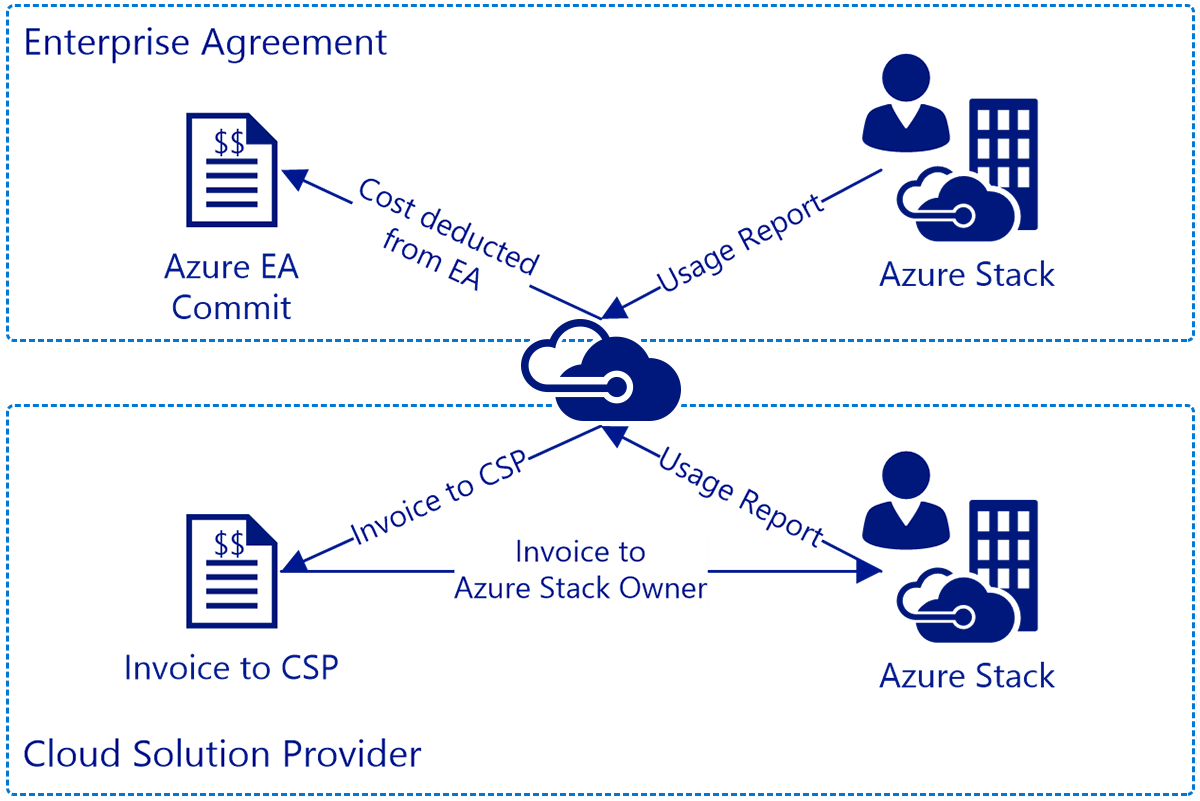
You register Azure Stack Hub with Azure so you can download Azure Marketplace items from Azure and set up commerce data reporting back to Microsoft. After you register Azure Stack Hub, usage is reported to Azure commerce and you can see it under the Azure billing Subscription ID used for registration.
The information in this unit describes registering Azure Stack Hub integrated systems with Azure.
Registration is required to support full Azure Stack Hub functionality, including offering items in the marketplace. You'll be in violation of Azure Stack Hub licensing terms if you don't register when using the pay-as-you-use billing model.
Complete the following prerequisites before you register:
- Verify your credentials.
- Set the PowerShell language mode.
- Install PowerShell for Azure Stack Hub.
- Download the Azure Stack Hub tools.
- Determine your billing model.
- Determine your unique registration name.
Verify your credentials
Before registering Azure Stack Hub with Azure, you must have:
- The subscription ID for an Azure subscription. Only EA, CSP, or CSP shared services subscriptions are supported for registration. CSPs need to decide whether to use a CSP or APSS subscription.
To get the ID, sign in to Azure, click All services. Then, under the GENERAL category, select Subscriptions, click the subscription you want to use, and under Essentials you can find the Subscription ID. As a best practice, use separate subscriptions for production and dev or test environments.
After registration, Microsoft Entra Global Administrator permission isn't required. However, some operations may require the global admin credential (for example, a resource provider installer script or a new feature requiring a permission to be granted). You can either temporarily reinstate the account's global admin permissions or use a separate global admin account that's an owner of the default provider subscription.
The user who registers Azure Stack Hub is the owner of the service principal in Microsoft Entra ID. Only the user who registered Azure Stack Hub can modify the Azure Stack Hub registration. If a non-admin user that's not an owner of the registration service principal attempts to register or re-register Azure Stack Hub, they may come across a 403 response. A 403 response indicates the user has insufficient permissions to complete the operation.
If you have more than one Azure Stack Hub, a best practice is to register each Azure Stack Hub to its own subscription. This makes it easier for you to track usage.
Set the PowerShell language mode
To successfully register Azure Stack Hub, the PowerShell language mode must be set to FullLanguageMode. To verify that the current language mode is set to full, open an elevated PowerShell window and run the following PowerShell cmdlets:
$ExecutionContext.SessionState.LanguageMode
Ensure the output returns FullLanguageMode. If any other language mode is returned, registration needs to be run on another machine or the language mode needs to be set to FullLanguageMode before continuing.
Install PowerShell for Azure Stack Hub
Use the latest PowerShell for Azure Stack Hub to register with Azure.
Download the Azure Stack Hub tools
The Azure Stack Hub tools GitHub repository contains PowerShell modules that support Azure Stack Hub functionality, including registration functionality. During the registration process, you need to import and use the RegisterWithAzure.psm1 PowerShell module (found in the Azure Stack Hub tools repository) to register your Azure Stack Hub instance with Azure.
Determine your billing model
A connected deployment allows Azure Stack Hub to connect to the internet, and to Azure. You can also use either Microsoft Entra ID or Active Directory Federation Services (AD FS) as your identity store, and choose from two billing models: pay-as-you-use or capacity-based. You specify the billing model later, while running the registration script.
Determine your unique registration name
When you run the registration script, you must provide a unique registration name. An easy way to associate your Azure Stack Hub subscription with an Azure registration is to use your Azure Stack Hub Cloud ID.
Azure Stack Hub registrations using the capacity-based billing model will need to change the unique name when re-registering after those yearly subscriptions expire unless you delete the expired registration and re-register with Azure.
Register with pay-as-you-use billing
Use these steps to register Azure Stack Hub with Azure using the pay-as-you-use billing model.
All steps must be run from a computer that has access to the privileged endpoint (PEP).
Connected environments can access the internet and Azure. For these environments, you need to register the Azure Stack Hub resource provider with Azure and then configure your billing model.
To register the Azure Stack Hub resource provider with Azure, start PowerShell ISE as an administrator and use the following PowerShell cmdlets with the EnvironmentName parameter set to the appropriate Azure subscription type (see parameters below).
Add the Azure account that you used to register Azure Stack Hub. To add the account, run the Add-AzAccount cmdlet. You're prompted to enter your Azure account credentials and you may have to use two-factor authentication based on your account's configuration.
Add-AzAccount -EnvironmentName "<environment name>"Parameter
Description
EnvironmentName
The Azure cloud subscription environment name. Supported environment names are AzureCloud, AzureUSGovernment, or if using a China Azure Subscription, AzureChinaCloud.
If you have multiple subscriptions, run the following command to select the one you want to use:
Get-AzSubscription -SubscriptionID '<Your Azure Subscription GUID>' | Select-AzSubscriptionRun the following command to register the Azure Stack Hub resource provider in your Azure subscription:
Register-AzResourceProvider -ProviderNamespace Microsoft.AzureStackStart PowerShell ISE as an administrator and navigate to the Registration folder in the AzureStack-Tools-az directory created when you downloaded the Azure Stack Hub tools. Import the RegisterWithAzure.psm1 module using PowerShell:
Import-Module .\RegisterWithAzure.psm1Next, in the same PowerShell session, ensure you're signed in to the correct Azure PowerShell context. This context would be the Azure account that was used to register the Azure Stack Hub resource provider previously. PowerShell to run:
Connect-AzAccount -Environment "<environment name>"In the same PowerShell session, run the Set-AzsRegistration cmdlet. PowerShell to run:
$CloudAdminCred = Get-Credential -UserName <Privileged endpoint credentials> -Message "Enter the cloud domain credentials to access the privileged endpoint."
$RegistrationName = "<unique-registration-name>"
Set-AzsRegistration `
  -PrivilegedEndpointCredential $CloudAdminCred `
  -PrivilegedEndpoint <PrivilegedEndPoint computer name> `
  -BillingModel PayAsYouUse `
  -RegistrationName $RegistrationName
The process takes between 10 and 15 minutes. When the command completes, you see the message "Your environment is now registered and activated using the provided parameters."
Register with capacity billing
Use these steps to register Azure Stack Hub with Azure using the capacity billing model.
All these steps must be run from a computer that has access to the privileged endpoint (PEP).
Connected environments can access the internet and Azure. For these environments, you need to register the Azure Stack Hub resource provider with Azure and then configure your billing model.
To register the Azure Stack Hub resource provider with Azure, start PowerShell ISE as an administrator and use the following PowerShell cmdlets with the EnvironmentName parameter set to the appropriate Azure subscription type (see parameters below).
Add the Azure account that you used to register Azure Stack Hub. To add the account, run the Add-AzAccount cmdlet. You're prompted to enter your Azure account credentials and you may have to use two-factor authentication based on your account's configuration.
Connect-AzAccount -Environment "<environment name>"Parameter
Description
EnvironmentName
The Azure cloud subscription environment name. Supported environment names are AzureCloud, AzureUSGovernment, or if using a China Azure Subscription, AzureChinaCloud.
If you have multiple subscriptions, run the following command to select the one you want to use:
Get-AzSubscription -SubscriptionID '<Your Azure Subscription GUID>' | Select-AzSubscriptionRun the following command to register the Azure Stack Hub resource provider in your Azure subscription:
Register-AzResourceProvider -ProviderNamespace Microsoft.AzureStackStart PowerShell ISE as an administrator and navigate to the Registration folder in the AzureStack-Tools-az directory created when you downloaded the Azure Stack Hub tools. Import the RegisterWithAzure.psm1 module using PowerShell:
$CloudAdminCred = Get-Credential -UserName <Privileged endpoint credentials> -Message "Enter the cloud domain credentials to access the privileged endpoint."
$RegistrationName = "<unique-registration-name>"
Set-AzsRegistration `
  -PrivilegedEndpointCredential $CloudAdminCred `
  -PrivilegedEndpoint <PrivilegedEndPoint computer name> `
  -AgreementNumber <EA agreement number> `
  -BillingModel Capacity `
  -RegistrationName $RegistrationName