Enable Hyper-V host servers for replication
You’re ready to migrate your on-premises workloads to Azure. If you haven’t yet added the Azure Migrate Server Migration tool to the Azure Migrate project, you can do so now. The tool supports agentless migration of Windows and Linux VMs, which is appropriate as agentless migration is a requirement for your migration pilot.
Azure Migrate: Server Migration runs a lightweight Hyper-V VM appliance that discovers VMs and sends VM metadata and performance information to the tool. You’ve already set up the appliance during the discovery and assessment phase.
The Azure Migrate Server Migration service uses Azure Site Recovery as the underlying migration engine.
In this unit, you’ll look at how to deploy the Azure Site Recovery Provider on your Hyper-V host.
Hyper-V replication components
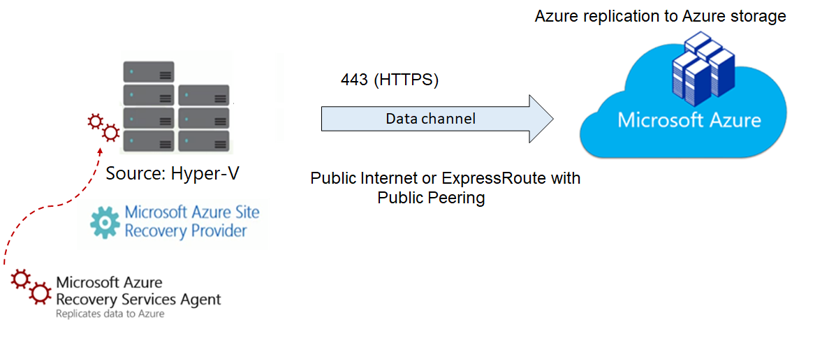
Before migrating your VMs, you’ll set up your Hyper-V host with the components it needs to manage replication of your VMs and data. With agentless migration, you install components on the Hyper-V host only. You don’t need to install anything on the Hyper-V VMs.
The Microsoft Azure Site Recovery provider orchestrates replication for Hyper-V VMs. The provider also installs the Microsoft Azure Recovery Service agent which handles data replication. Data is uploaded to a storage account that you created as part of preparing your on-premises workloads for migration.
You use a single setup file downloaded from the Server Migration tool in the portal to install both components on the Hyper-V host.
The provider and agent communicate securely with Azure Migrate Server Migration across outbound HTTPS port 443. All communication is encrypted.
Prepare the Hyper-V host server
In this task, you will register your Hyper-V host with the Azure Migrate: Server Migration service. As part of the registration process, you will deploy the Azure Site Recovery Provider on your Hyper-V host.
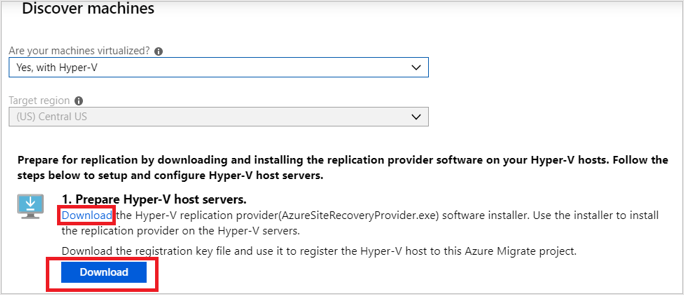
The Azure portal guides you through creating the resources that the Hyper-V host needs to replicate your VMs to Azure. From the Discover machines pane in Azure Migrate Server Migration, Set the target Azure region for the migration. You’ll use this region for subsequent migrations in the project, and once set it can’t be changed.
Next, click Create resources. This creates an Azure Site Recovery vault in the background, to hold data and configuration information for the VMs you’re migrating.
Download replication components
Next, download the Hyper-V Replication provider and the registration key file on the Hyper-V host. The registration key is needed to register the Hyper-V host with Azure Migrate Server Migration.
In the Azure Migrate: Server Assessment panel, select Discover to open the Discover machines panel.
In the Are your machines virtualized? dropdown list, select Yes, with Hyper-V.
Copy the provider setup file and registration key file to the Hyper-V host running the VMs you want to replicate.
Install the provider
Run the Azure Site Recovery Provider setup for Hyper-V, which also installs the Azure Site Recovery Services Agent on the host. In the Provider Setup wizard, opt in to use Microsoft Update and accept the default installation location for the Provider and agent.
Register the Hyper-V host
When setup completes, the Registration wizard presents options to complete the registration of the Hyper-V host.
Locate the registration key file you downloaded and associate it with the Azure Site Recovery vault that was created in the Azure Migrate project.
Specify how the provider connects from the host to the internet. To keep it simple for the pilot, you’ll connect directly to Azure Site Recovery without a proxy server.
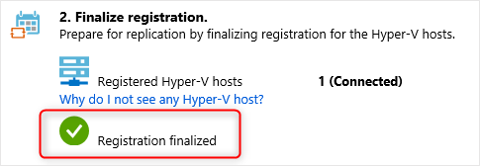
Click Finish to close the Registration wizard. Return to the Discover panel in Azure Migrate Server Migration and finalize the registration, which is now enabled.
Once registration is complete, close the Discover machines panel.
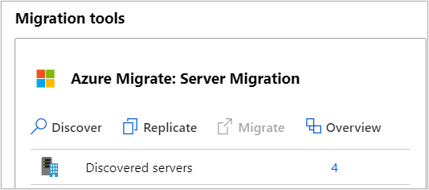
It can take up to 15 minutes after finalizing registration until discovered VMs appear in Azure Migrate Server Migration. As VMs are discovered, the Discovered servers count increases.