Exercise - Use modules from your registry
In the previous exercise, you published the CDN and website modules to your toy company's registry. Now, you want to show the team that's developing the toy dog how to use the modules for its own deployment.
In this exercise, you will:
- Create a Bicep file that includes modules from your private registry.
- Add references to the modules in the registry.
- Build and inspect the Bicep file to understand how the module restore process works.
- Switch to using a registry alias.
- Deploy your Bicep file to Azure.
Create a Bicep file
In Visual Studio Code, create a new file named main.bicep.
Save the empty file so that Visual Studio Code loads the Bicep tooling.
You can either select File > Save As or select Ctrl+S on Windows (⌘+S on macOS). Be sure to remember where you save the file. For example, you might want to create a templates folder to save it in.
Add the modules to the Bicep file
In the main.bicep file, add the following parameters and variables:
@description('The Azure region into which the resources should be deployed.')
param location string = 'westus3'

@description('The name of the App Service app.')
param appServiceAppName string = 'toy-${uniqueString(resourceGroup().id)}'

@description('The name of the App Service plan SKU.')
param appServicePlanSkuName string = 'F1'

var appServicePlanName = 'toy-dog-plan'
Below the parameters and variables, use the following code to add the website module from your registry. Replace
YOUR_CONTAINER_REGISTRY_NAMEwith the name of your private registry.module website 'br:YOUR_CONTAINER_REGISTRY_NAME.azurecr.io/website:v1' = { name: 'toy-dog-website' params: { appServiceAppName: appServiceAppName appServicePlanName: appServicePlanName appServicePlanSkuName: appServicePlanSkuName location: location } }Notice that Bicep shows red squiggly lines under the module identifier when you start typing, but then the squiggly lines go away. This behavior happens because the Bicep extension for Visual Studio Code reads the module from the registry and saves it to your local file system.
Below the module that you created, use the following code to add the CDN module from your registry. Replace
YOUR_CONTAINER_REGISTRY_NAMEwith the name of your private registry.module cdn 'br:YOUR_CONTAINER_REGISTRY_NAME.azurecr.io/cdn:v1' = { name: 'toy-dog-cdn' params: { httpsOnly: true originHostName: website.outputs.appServiceAppHostName } }Save the file.
Build and inspect your Bicep file
Here, you build the Bicep file to a JSON ARM template. You don't normally need to do a build, but it's helpful when you're learning how modules work.
In the Visual Studio Code terminal, run the following command to build the Bicep file to a JSON file:
az bicep build --file main.bicepBicep creates a file named main.json in the same folder as the main.bicep file.
Open the main.json file.
Notice that in the
resourcessection of the JSON ARM template, starting at around line 134, some resources have the typeMicrosoft.Resources/deployments. These resources represent the module deployments that were defined in the module you added from the registry.
In the Visual Studio Code terminal, run the following command to build the Bicep file to a JSON file:
bicep build main.bicepBicep creates a file named main.json in the same folder as the main.bicep file.
Open the main.json file.
Notice that in the
resourcessection of the JSON ARM template, starting at around line 134, some resources have the typeMicrosoft.Resources/deployments. These resources represent the module deployments that were defined in the module you added from the registry.
Create a registry alias
You decide to create a registry alias instead of embedding the registry URL in your Bicep file. This approach makes the Bicep file easier to read.
In Visual Studio Code, create a new file named bicepconfig.json. Create it in the same folder as the main.bicep file.
Paste the following code into the bicepconfig.json file. Replace
YOUR_CONTAINER_REGISTRY_NAMEwith the name of your private registry.{ "moduleAliases": { "br": { "ToyCompanyRegistry": { "registry": "YOUR_CONTAINER_REGISTRY_NAME.azurecr.io" } } } }Save the file.
Use the registry alias
Here, you update your Bicep file to use the registry alias instead of referring directly to the registry.
Open the main.bicep file.
Find the definition of the
websitemodule, and change the definition to include the registry alias:module website 'br/ToyCompanyRegistry:website:v1' = { name: 'toy-dog-website' params: { appServiceAppName: appServiceAppName appServicePlanName: appServicePlanName appServicePlanSkuName: appServicePlanSkuName location: location } }Tip
Be sure to change the beginning of the module path from
br:tobr/. Also, afterToyCompanyRegistry, change the slash (/) character to a colon (:).Make a similar change to the
cdnmodule:module cdn 'br/ToyCompanyRegistry:cdn:v1' = { name: 'toy-dog-cdn' params: { httpsOnly: true originHostName: website.outputs.appServiceAppHostName } }Save the file.
Verify your Bicep file
After you've completed all of the preceding changes, your main.bicep file should look like this example:
@description('The Azure region into which the resources should be deployed.')
param location string = 'westus3'
@description('The name of the App Service app.')
param appServiceAppName string = 'toy-${uniqueString(resourceGroup().id)}'
@description('The name of the App Service plan SKU.')
param appServicePlanSkuName string = 'F1'
var appServicePlanName = 'toy-dog-plan'
module website 'br/ToyCompanyRegistry:website:v1' = {
  name: 'toy-dog-website'
  params: {
    appServiceAppName: appServiceAppName
    appServicePlanName: appServicePlanName
    appServicePlanSkuName: appServicePlanSkuName
    location: location
  }
}
module cdn 'br/ToyCompanyRegistry:cdn:v1' = {
  name: 'toy-dog-cdn'
  params: {
    httpsOnly: true
    originHostName: website.outputs.appServiceAppHostName
  }
}
If the file doesn't match, copy the example or adjust your template to match the example.
Deploy to Azure
In the Visual Studio Code terminal, deploy the template to Azure by running the following command. This process can take a couple of minutes to complete a successful deployment.
az deployment group create \
   --template-file main.bicep
New-AzResourceGroupDeployment -TemplateFile main.bicep
Verify the deployment
Go to the Azure portal and make sure you're in the sandbox subscription:
- Select your avatar in the upper-right corner of the page.
- Select Switch directory. In the list, choose the Microsoft Learn Sandbox directory.
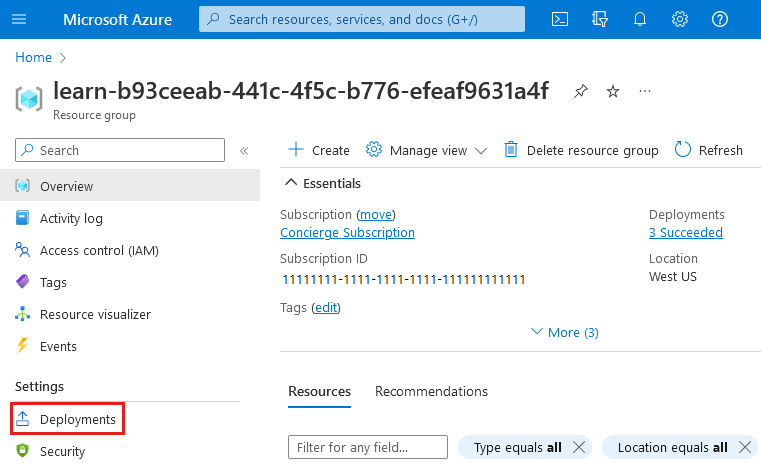
On the left-side panel, select Resource groups.
Select
[sandbox resource group name] .On the left menu, select Deployments.
Notice that three deployments are listed:
- main represents the deployment of your parent Bicep file.
- toy-dog-cdn and toy-dog-website represent the modules that you included in your main.bicep file.
Select the main deployment and expand Deployment details.
Notice that both of the modules are listed, and that their types are displayed as
Microsoft.Resources/deployments. Thetoy-dog-websitemodule is listed twice because its output is also referenced within the template.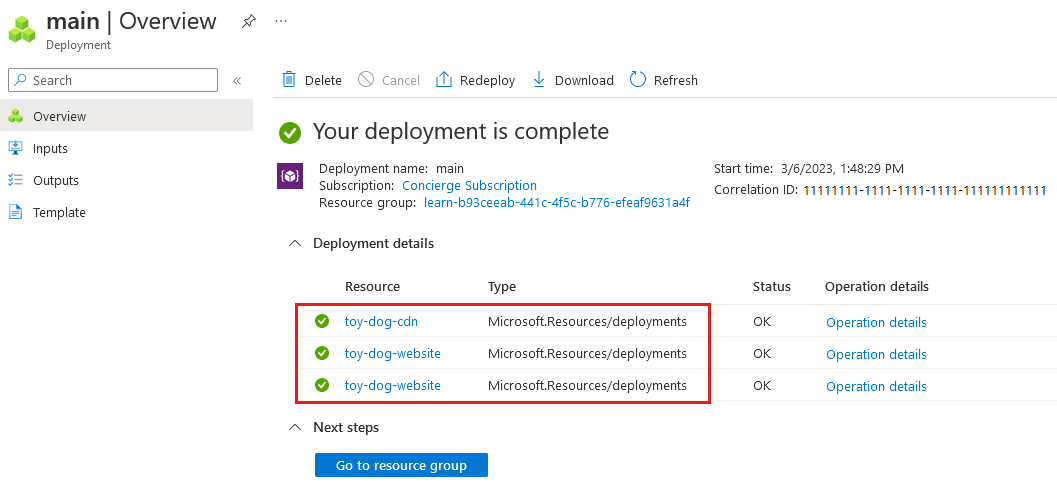
Select the toy-dog-cdn and toy-dog-website deployments, and review the resources deployed in each. Notice that they correspond to the resources defined in the respective modules.