Unlocking an encrypted Linux disk for offline repair
This article describes how to unlock an Azure Disk Encryption (ADE)-enabled OS disk for offline repair.
Azure Disk Encryption can be applied to Microsoft endorsed Linux virtual machines (VMs). Here are some basic requirements to enable Azure Disk Encryption in Linux VMs:
- Azure Key Vault
- Azure CLI or Windows PowerShell cmdlets
- Device-mapper (DM)-Crypt
Symptoms
If ADE is enabled on the OS disk, you might receive the following error messages after you try to mount the disk on a repair VM:
mount: wrong fs type, bad option, bad superblock on /dev/sda2, missing codepage or helper program, or other error
mount: unknown filesystem type 'LVM2_member'
Preparation
Before you unlock the encrypted OS disk for offline repair, complete the following tasks:
- Confirm that ADE is enabled on the disk.
- Determine whether the OS disk uses ADE version 0 (dual-pass encryption) or ADE version 1 (single-pass encryption).
- Determine whether the OS disk is managed or unmanaged.
- Select the method to unlock the encrypted disk.
Verify that ADE is enabled on the disk
You can do this step in the Azure portal, PowerShell, or the Azure command-line interface (Azure CLI).
Azure portal
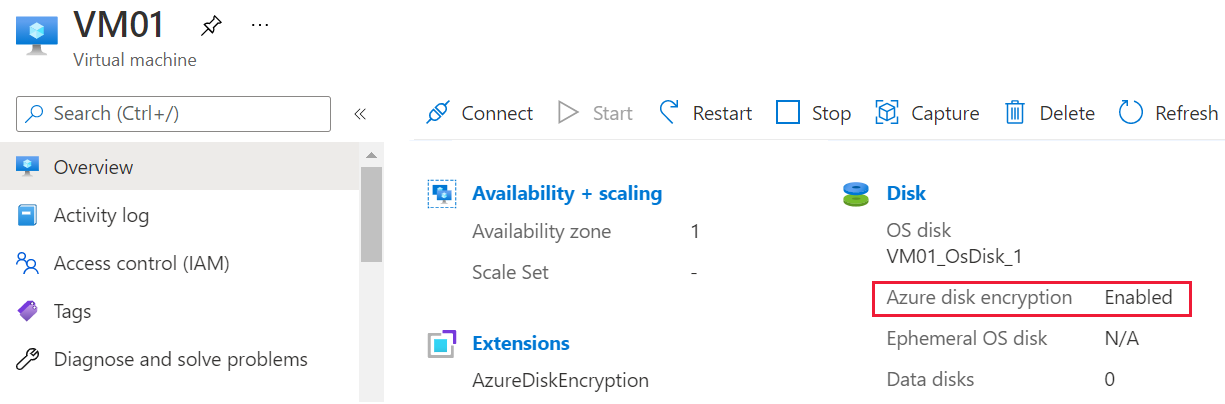
View the Overview blade for the failed VM in the Azure portal. Beneath Disk, the Azure disk encryption entry will appear as either Enabled or Not Enabled, as shown in the following screenshot.
PowerShell
You can use the Get-AzVmDiskEncryptionStatus cmdlet to determine whether the OS or data volumes for a VM are encrypted by using ADE. The following example output indicates that ADE encryption is enabled on the OS volume:
Get-AzVmDiskEncryptionStatus -ResourceGroupName "ResourceGroupName" -VMName "VmName"
For more information about the Get-AzureRmDiskEncryptionStatus cmdlet, see Get-AzVMDiskEncryptionStatus (Az.Compute).
Azure CLI
You can use the az vm encryption show command to check whether ADE is enabled on VM disks:
az vm encryption show --name MyVM --resource-group MyResourceGroup --query "disks[].encryptionSettings[].enabled"
For more information about the az vm encryption show command, see az vm encryption show.
Note
If ADE is not enabled on the disk, see the following article to learn how to attach a disk to a repair VM: Troubleshoot a Linux VM by attaching the OS disk to a repair VM.
Determine whether the OS disk uses ADE version 0 (dual-pass encryption) or ADE version 1 (single-pass encryption)
You can identify the ADE version in the Azure portal by opening the properties of the VM, and then selecting Extensions to open the Extensions blade. On the Extensions blade, view the version number of AzureDiskEncryptionForLinux.
- If the version number is
0.*, the disk uses dual-pass encryption. - If the version number is
1.*or a later version, the disk uses single-pass encryption.
If your disk uses ADE version 0 (dual-pass encryption), use the Method 3 to unlock the disk.
Determine whether the OS disk is managed or unmanaged
If you don't know whether the OS disk is managed or unmanaged, see Determine if the OS disk is managed or unmanaged.
If the OS disk is an unmanaged disk, follow the steps in Method 3 to unlock the disk.
Select the method to unlock the encrypted disk
Choose one of the following methods to unlock the encrypted disk:
- If the disk is managed and encrypted by using ADE version 1, and your infrastructure and company policy allow you to assign a public IP address to a repair VM, use Method 1: Unlock the encrypted disk automatically by using az vm repair command.
- If your disk is both managed and encrypted by using ADE version 1, but your infrastructure or company policy prevent you from assigning a public IP address to a repair VM, use Method 2: Unlock the encrypted disk by the Key file in the BEK volume. Another reason to choose this method is if you lack the permissions to create a resource group in Azure.
- If either of these methods fails, or if the disk is unmanaged or encrypted by using ADE version 1 (dual-pass encryption), follow the steps in Method 3 to unlock the disk.
Method 1: Unlock the encrypted disk automatically by using az vm repair command
This method relies on az vm repair commands to automatically create a repair VM, attach the OS disk of the failed Linux VM to that repair VM, and then unlock the disk if it's encrypted. This method requires using a public IP address for the repair VM, and it unlocks the encrypted disk regardless of whether the ADE key is unwrapped or wrapped by using a key encryption key (KEK).
To repair the VM by using this automated method, follow the steps in Repair a Linux VM by using the Azure Virtual Machine repair commands.
If your infrastructure and company policy don't allow you to assign a public IP address, or if the az vm repair command doesn't unlock the disk, go to the next method.
Method 2: Unlock the encrypted disk by the key file in the BEK volume
To unlock and mount the encrypted disk manually, follow these steps:
Create a new repair VM, and attach the encrypted disk to this VM during VM creation.
You must attach the encrypted disk when you create the repair VM. This is because the system detects that the attached disk is encrypted. Therefore, it fetches the ADE key from your Azure key vault, and then creates a new volume that's named "BEK VOLUME" to store the key file.
Log in to the repair VM, then unmount any mounted partitions on the encrypted disk.
Identify the header file in the boot partition of the encrypted OS.
Unlock the encrypted disk by using the ADE key file and the header file.
Mount the partition: LVM, RAW or non-LVM.
Create a repair VM
Create a disk from the snapshot. For the new disk, choose the same location and availability zone as that of the problem VM that you want to repair.
Create a VM that's based on the following guidelines:
- In the Azure Marketplace, choose the same image for the repair VM that was used for the failed VM. (The OS version should be the same.)
- Choose a size that allocates at least 8 GB of memory to the VM.
- Assign this new VM to the same resource group, region, and availability settings that you used for the new disk that you created in step 2.
On the Disks page of the Create a Virtual Machine wizard, attach the new disk (that you just created from the snapshot) as a data disk.
Important
Because the encryption settings are detected only during the VM creation, make sure that you attach the disk when you create the VM. This enables a volume that contains the ADE key file to be added to the VM automatically.
Unmount any mounted partitions on the encrypted disk
After the repair VM is created, SSH to your repair VM, log in by using the appropriate credentials, and then elevate the account to root:
sudo -sList the attached devices by using the lsblk command. In the output, you should see multiple attached disks. These disks include the active OS disk and the encrypted disk. They can appear in any order.
Identify the encrypted disk by using the following information:
- The disk will have multiple partitions
- The disk will not list the root directory ("/") as a mountpoint for any of its partitions.
- The disk will match the size that you noted when you created it from the snapshot.
In the following example, the output indicates that "sdd" is the encrypted disk. This is the only disk that has multiple partitions and that does not list "/" as a mountpoint.
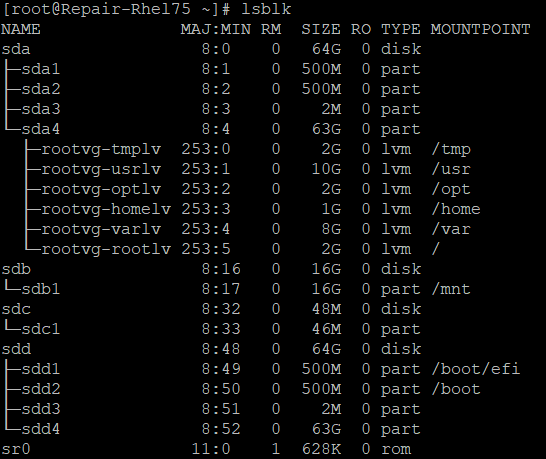
Unmount any partitions on the encrypted data disk that have been mounted in the file system. For example, in the previous example, you would have to unmount both "/boot/efi"* and "/boot".
umount /boot/efi

umount /boot
Identify the ADE key file
You must have both the key file and the header file to unlock the encrypted disk. The key file is stored in the BEK volume, and the header file is in the boot partition of the encrypted OS disk.
Determine which partition is the BEK volume:
lsblk -fs | grep -i bekThe following example output indicates that sdb1 is the BEK volume:
>sdb1 vfat BEK VOLUME 04A2-FE67If no BEK volume exists, re-create the repair VM by having the encrypted disk attached. If the BEK volume still does not attach automatically, try Method 3 to retrieve the BEK volume.
Create a directory that's named "azure_bek_disk" under the "/mnt" folder:
mkdir /mnt/azure_bek_diskMount the BEK volume in the "/mnt/azure_bek_disk" directory. For example, if sdb1 is the BEK volume, enter the following command:
mount /dev/sdb1 /mnt/azure_bek_diskList the available devices again:
lsblk -o NAME,SIZE,LABEL,PARTLABEL,MOUNTPOINTNote: You'll see that the partition that you determined to be the BEK volume is now mounted in "/mnt/azure_bek_disk."
View the contents in the "/mnt/azure_bek_disk/" directory:
ls -l /mnt/azure_bek_diskYou should see the following files in the output (the ADE key file is "LinuxPassPhraseFileName"):
>total 1

 -rwxr-xr-x 1 root root 148 Aug  4 01:04 CRITICAL_DATA_WARNING_README.txt
 -r-xr-xr-x 1 root root 172 Aug  4 01:04 LinuxPassPhraseFileName
You may see multiple "LinuxPassPhraseFileName" if more than one disk is attached to the encrypted VM. The "LinuxPassPhraseFileName" will be enumerated according to the number of disks in the same order as their Logical Unit Numbers (LUNs).
Identify the header file
The boot partition of the encrypted disk contains the header file. You'll use this file, together with the "LinuxPassPhraseFileName" key file, to unlock the encrypted disk.
Use the following command to show selected attributes of the available disks and partitions:
lsblk -o NAME,SIZE,LABEL,PARTLABEL,MOUNTPOINTOn the encrypted disk, identify the OS partition (root partition). This is the largest partition on the encrypted disk. In the previous example output, the OS partition is "sda4." This partition must be specified when you run the unlock command.
In the root directory ("/") of the file structure, create a directory to which to mount the root partition of the encrypted disk. You'll use this directory later, after the disk is unlocked. To distinguish it from the active OS partition of the repair VM, give it the name "investigateroot".
mkdir /{investigateboot,investigateroot}On the encrypted disk, identify the boot partition, which contains the header file. On the encrypted disk, the boot partition is the second largest partition that shows no value in the LABEL or PARTLABEL column. In the previous example output, the boot partition of the encrypted disk is "sda2."
Mount the boot partition that you identified in step 4 into the /investigateboot/ directory. In the following example, the boot partition of the encrypted disk is sda2. However, the location on your system might differ.
mount /dev/sda2 /investigateboot/If mounting the partition fails and returns a "wrong fs type, bad option, bad superblock" error message, try again by using the
mount -o nouuidcommand, as in the following example:mount -o nouuid /dev/sda2 /investigateboot/List the files that are in the /investigateboot/ directory. The "luks" subdirectory contains the header file that you must have to unlock the disk.
List the files that are in the /investigateboot/luks/ directory. The header file is named "osluksheader."
ls -l /investigateboot/luks
Use the ADE key file and the header file to unlock the disk
Use the
cryptsetup luksOpencommand to unlock the root partition on the encrypted disk. For example, if the path to the root partition that contains the encrypted OS is /dev/sda4, and you want to assign the name "osencrypt" to the unlocked partition, run the following command:cryptsetup luksOpen --key-file /mnt/azure_bek_disk/LinuxPassPhraseFileName --header /investigateboot/luks/osluksheader /dev/sda4 osencryptNow that you have unlocked the disk, unmount the encrypted disk's boot partition from the /investigateboot/ directory:
umount /investigateboot/Note: You'll have to mount this partition to another directory later.
The next step is to mount the partition that you have just unlocked. The method that you use to mount the partition depends on the device mapper framework (LVM or non-LVM) that's used by the disk.
List the device information together with the file system type:
lsblk -o NAME,FSTYPEYou'll see the unlocked partition and the name that you assigned to it (in our example, that name is "osencrypt"):
- For the LVM partition such as "LVM_member", see Mount the LVM partitionRAW or non-LVM.
- For the non-LVM partition, see Mount the non-LVM partition.
Mount the unlocked partition and enter the chroot environment (LVM only)
If the disks use the LVM device mapper framework, you have to take extra steps to mount the disk and enter the chroot environment. To use the chroot tool together with the encrypted disk, the unlocked partition ("osencrypt") and its logical volumes must be recognized as the volume group that's named rootvg. However, by default, the repair VM's OS partition and its logical volumes are already assigned to a volume group that has the name rootvg. We must resolve this conflict before we can continue.
Use the
pvscommand to display the properties of the LVM physical volumes. You might see warning messages, as in the following example, that indicate that the unlocked partition ("/dev/mapper/osencrypt") and another device are using duplicate universally unique identifiers (UUIDs). Alternatively, you might see two partitions assigned to rootvg.Note
You want only the unlocked partition ("osencrypt") to be assigned to the rootvg volume group so that you can access its logical volumes through the chroot utility. To fix this problem, you'll temporarily import the partition into a different volume group, and activate that volume group. Next, you'll rename the current rootvg volume group. Only after you enter the chroot environment will you rename the encrypted disk's volume group as "rootvg."
Assigning the unlocked partition (example)
Import the newly unlocked partition into a new volume group. In this example, we are temporarily naming the new volume group "rescuemevg". Import the newly unlocked partition into a new volume group. In this example, we are temporarily naming the new volume group "rescuemevg".
Activate the new volume group:
vgimportclone -n rescuemevg /dev/mapper/osencrypt
vgchange -a y rescuemevg
Rename the old rootvg volume group. In this example, we will use the name "oldvg."
vgrename rootvg oldvgRun
lsblk -o NAME,SIZE,LABEL,PARTLABEL,MOUNTPOINTto review the available devices. You should now see both volume groups listed by the names that you assigned to them.Mount the rescuemevg/rootlv logical volume to the /investigateroot/ directory without using the duplicate UUIDs:
umount /investigateboot
mount -o nouuid /dev/rescuemevg/rootlv /investigateroot/
Now, the root partition of the failed VM is unlocked and mounted, and you should be able to access the root partition to troubleshoot the issues. For more information, see Troubleshoot Linux virtual machine boot issues due to filesystem errors.
However, if you want to use the chroot utility for troubleshooting, continue by using the following steps.
Mount the encrypted disk's boot partition to the directory /investigateroot/boot/ without using the duplicate UUIDs. (Remember that the encrypted disk's boot partition is the second largest that's assigned no partition label.) In our current example, the encrypted disk's boot partition is sda2.
mount -o nouuid /dev/sda2 /investigateroot/bootMount the encrypted disk's EFI system partition to the /investigateroot/boot/efi directory. You can identify this partition by its label. In our current example, the EFI system partition is sda1.
mount /dev/sda1 /investigateroot/boot/efiMount the remaining unmounted logical volumes in the encrypted disk's volume group to subdirectories of "/investigateroot/":
mount -o nouuid /dev/mapper/rescuemevg-varlv /investigateroot/var
mount -o nouuid /dev/mapper/rescuemevg-homelv /investigateroot/home
mount -o nouuid /dev/mapper/rescuemevg-usrlv /investigateroot/usr
mount -o nouuid /dev/mapper/rescuemevg-tmplv /investigateroot/tmp
mount -o nouuid /dev/mapper/rescuemevg-optlv /investigateroot/opt
Change the active directory to the mounted root partition on the encrypted disk:
cd /investigaterootEnter the following commands to prepare the chroot environment:
mount -t proc proc proc
mount -t sysfs sys sys/
mount -o bind /dev dev/
mount -o bind /dev/pts dev/pts/
mount -o bind /run run/
Enter the chroot environment:
chroot /investigateroot/Rename the rescuemevg volume group to "rootvg" to avoid conflicts or possible issues with grub and initramfs. Keep the same naming convention when you regenerate initramfs. Because of the vg name changes, work on the rescue VM. It will no longer be useful if you restart it. The rescue VM should be considered to be a temporary VM.
vgrename rescuemevg rootvgTroubleshoot issues in the chroot environment. For example, you can read logs or run a script. For more information, see Perform fixes in the chroot environment.
Mount the unlocked disk, and enter the chroot environment (RAW/non-LVM)
In the root directory ("/") of the file structure, create a directory into which to mount the root partition of the encrypted disk. You'll use this directory later, after the disk is unlocked. To distinguish it from the active OS partition of the repair VM, name it to "investigateroot".
mkdir /{investigateboot,investigateroot}Mount the newly unlocked partition ("osencrypt") to the /investigateroot/ directory:
mount /dev/mapper/osencrypt /investigateroot/If mounting the partition fails and returns a "wrong fs type, bad option, bad superblock" error message, try again by using the mount
-o nouuidcommand:mount -o nouuid /dev/mapper/osencrypt /investigateroot/Try to display the contents of the /investigateroot/ directory to verify that the mounted partition is now unlocked:
ls /investigateroot/Now the root partition of the failed VM is unlocked and mounted, you can access the root partition to troubleshoot the issues. For more information, see Troubleshoot Linux virtual machine boot issues due to filesystem errors..
However, if you want to use the chroot utility for troubleshooting, go to the next step.
Use the command
lsblk -o NAME,SIZE,LABEL,PARTLABEL,MOUNTPOINTto review the available devices. Identify the boot partition on the encrypted disk as the second largest partition that's assigned no label.Mount the boot partition on the encrypted disk to the "/investigateroot/boot/" directory, as in the following example:
mount /dev/sdc2 /investigateroot/boot/Change the active directory to the mounted root partition on the encrypted disk:
cd /investigaterootEnter the following commands to prepare the chroot environment:
mount -t proc proc proc

mount -t sysfs sys sys/

mount -o bind /dev dev/

mount -o bind /dev/pts dev/pts/

mount -o bind /run run/
Enter the chroot environment:
chroot /investigateroot/Troubleshoot issues in the chroot environment. You can read logs or run a script. For more information, see Perform fixes in the chroot environment.
Method 3: Re-encrypt the disk to retrieve the key file, and unlock the encrypted disk
Create the repair VM, and attach a copy of the locked disk to a repair VM:
- For a managed disk, see Troubleshoot a Linux VM by attaching the managed OS disk to a repair VM.
- For an unmanaged disk, use the Storage Explorer to create a copy of the affected VM's OS disk. For more information, see Attach an unmanaged disk to a VM for offline repair.
After you attach the encrypted disk as the data disk to the repair VM, use the Key Vault and Key Encrypted key (KEK) that used for the original VM to re-encrypt this data disk. This process will automatically generate and mount a BEK volume by using a BKE key file in the repair VM. You must not use the EncryptFormatAll option because the ADE extension could encrypt the boot sector on the data disk.
If the original VM is encrypted by wrapped BEK, run the following command.
az vm encryption enable -g "resource group" --name "VMName" --disk-encryption-keyvault "keyvault" --key-encryption-key "kek" --volume-type "data"If the original VM is encrypted by BEK, run the following command:
az vm encryption enable -g "resource group" --name "VMName" --disk-encryption-keyvault "keyvault" --volume-type "data"To determine the values for disk-encryption-keyvault and key-encryption-key, run the following command:
az vm encryption show --name "OriginalVmName" --resource-group "ResourceGroupName"In the following table, find the values in the output. If the keyEncryptionKey value is blank, your VM is encrypted by BEK.
Parameter Value in the output example disk-encryption-keyvault diskEncryptionKey:id /subscriptions/deb73ff9-0000-0000-0000-0000c7a96d37/resourceGroups/Thomas/providers/Microsoft.KeyVault/vaults/ContosoKeyvault key-encryption-key keyEncryptionKey:KeyURI https://ContosoKeyvault.vault.azure.net/keys/mykey/00000000987145a3b79b0ed415fa0000
Run the following command to check whether a new disk is attached:
lsblk -fIf a new disk is attached, go to Identify the ADE key file in the BEK volume, and then continue following the provided steps to unlock the disk.
Next steps
If you're having problems connecting to your VM, see Troubleshoot SSH connections to an Azure VM.
Contact us for help
If you have questions or need help, create a support request, or ask Azure community support. You can also submit product feedback to Azure feedback community.
Feedback
Coming soon: Throughout 2024 we will be phasing out GitHub Issues as the feedback mechanism for content and replacing it with a new feedback system. For more information see: https://aka.ms/ContentUserFeedback.
Submit and view feedback for