How to: Add class diagrams to projects
Applies to: ![]() Visual Studio
Visual Studio ![]() Visual Studio for Mac
Visual Studio for Mac
Note
This article applies to Visual Studio 2017. If you're looking for the latest Visual Studio documentation, see Visual Studio documentation. We recommend upgrading to the latest version of Visual Studio. Download it here
To design, edit, and refactor classes and other types, add a class diagram to your C#, Visual Basic, or C++ project. To visualize different parts of the code in a project, add multiple class diagrams to the project.
You can't create class diagrams from projects that share code across multiple apps. To create UML class diagrams, see Create UML modeling projects and diagrams.
Install the Class Designer component
If you haven't installed the Class Designer component, follow these steps to install it.
Open Visual Studio Installer from the Windows Start menu, or by selecting Tools > Get Tools and Features from the menu bar in Visual Studio.
Visual Studio Installer opens.
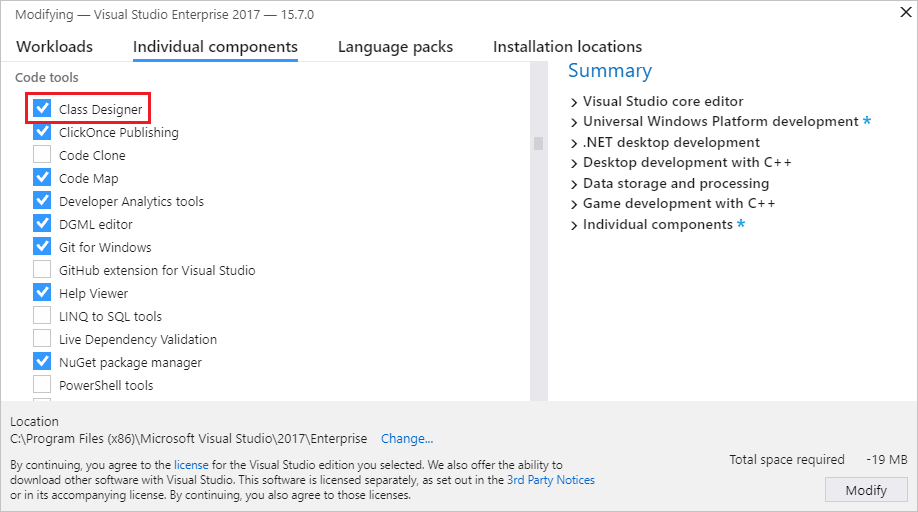
Select the Individual components tab, and then scroll down to the Code tools category.
Select Class Designer and then select Modify.
The Class Designer component starts installing.
Add a blank class diagram to a project
In Solution Explorer, right-click the project node and then choose Add > New Item. Or, press Ctrl+Shift+A.
The Add New Item dialog opens.
Expand Common Items > General, and then select Class Diagram from the template list. For Visual C++ projects, look in the Utility category to find the Class Diagram template.
Note
If you don't see the Class Diagram template, follow the steps to install the Class Designer component for Visual Studio.
The class diagram opens in Class Designer and appears as a file that has a .cd extension in Solution Explorer. You can drag shapes and lines to the diagram from Toolbox.
To add multiple class diagrams, repeat the steps in this procedure.
Add a class diagram based on existing types
In Solution Explorer, open a class file's context menu (right-click) and then choose View Class Diagram.
-or-
In Class View, open the namespace or type context menu and then choose View Class Diagram.
Tip
If Class View is not open, open Class View from the View menu.
To display the contents of a complete project in a class diagram
In Solution Explorer or Class View, right-click the project and choose View, then choose View Class Diagram.
An auto-populated class diagram is created.
Important
Class Designer is not available in .NET Core projects.