Unit testing JavaScript and TypeScript in Visual Studio
You can write and run unit tests in Visual Studio using some of the more popular JavaScript frameworks without the need to switch to a command prompt. Both Node.js and ASP.NET Core projects are supported.
The supported frameworks are:
- Mocha (mochajs.org)
- Jasmine (Jasmine.github.io)
- Tape (github.com/substack/tape)
- Jest (jestjs.io)
If your favorite framework is not supported, see Add support for a unit test framework for information on adding support.
Write unit tests for a CLI-based project (.esproj)
The CLI-based projects supported in Visual Studio 2022 work with Test Explorer. Jest is the built-in test framework for React and Vue projects, and Karma and Jasmine is used for Angular projects. By default, you will be able to run the default tests provided by each framework, as well as any additional tests you write. Just hit the Run button in Test Explorer. If you don’t already have Test Explorer open, you can find it by selecting Test > Test Explorer in the menu bar.
To run unit tests from the command-line, right-click the project in Solution Explorer, choose Open in Terminal, and run the command specific to the test type.
For information on setting up unit tests, see the following:
A simple example is also provided here. However, use the preceding links for complete information.
Add a unit test (.esproj)
The following example is based on the TypeScript React project template provided in Visual Studio 2022 version 17.8 or later, which is the Standalone TypeScript React Project template. For Vue and Angular, the steps are similar.
In Solution Explorer, right-click the React project and choose Edit Project File.
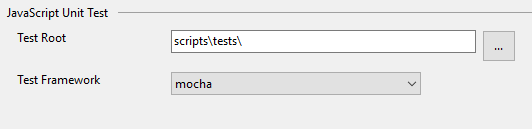
Make sure that the following properties are present in the .esproj file with the values shown.
<PropertyGroup>
  <JavaScriptTestRoot>src\</JavaScriptTestRoot>
  <JavaScriptTestFramework>Jest</JavaScriptTestFramework>
</PropertyGroup>
This example specifies Jest as the test framework. You could specify Mocha, Tape, or Jasmine instead.
The
JavaScriptTestRootelement specifies that your unit tests will be in the src folder of the project root.In Solution Explorer, right-click the npm node and choose Install new npm packages.
Use the npm package installation dialog to install the following npm packages:
- jest
- jest-editor-support
These packages are added to the package.json file under dependencies.
In package.json, add the
testsection at the end of thescriptssection:"scripts": { ... "test": "jest" },In Solution Explorer, right-click the src folder and choose Add > New Item, and then add a new file named App.test.tsx.
This adds the new file under the src folder.
Add the following code to App.test.tsx.
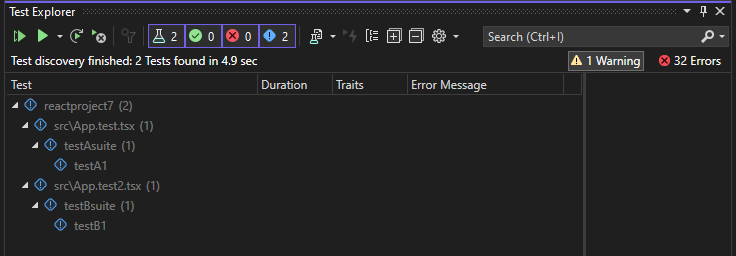
describe('testAsuite', () => {
   it('testA1', async () => {
      expect(2).toBe(2);
   });
});
Open Test Explorer (choose Test > Test Explorer) and Visual Studio discovers and displays tests. If tests are not showing initially, then rebuild the project to refresh the list.
Note
For TypeScript, do not use the
outfileoption in tsconfig.json, because Test Explorer won't be able to find your unit tests. You can use theoutdiroption, but make sure that configuration files such aspackage.jsonandtsconfig.jsonare in the project root.
Run tests (.esproj)
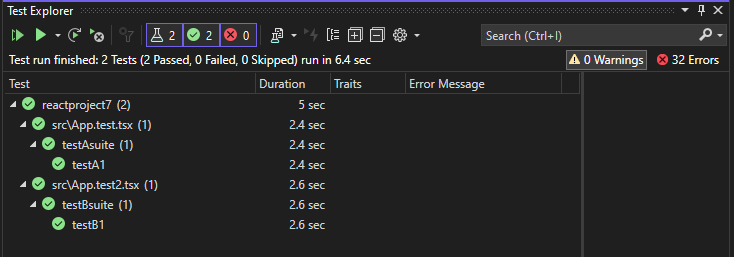
You can run the tests by clicking the Run All link in Test Explorer. Or, you can run tests by selecting one or more tests or groups, right-clicking, and selecting Run from the shortcut menu. Tests run in the background, and Test Explorer automatically updates and shows the results. Furthermore, you can also debug selected tests by right-clicking and selecting Debug.
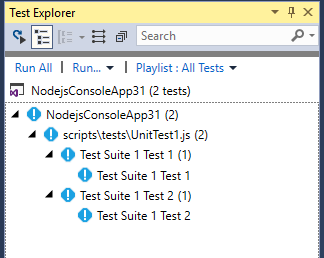
The following illustration shows the example with a second unit test added.
For some unit test frameworks, unit tests are typically run against the generated JavaScript code.
Note
In most TypeScript scenarios, you can debug a unit test by setting a breakpoint in TypeScript code, right-clicking a test in Test Explorer, and choosing Debug. In more complex scenarios, such as some scenarios that use source maps, you may have difficulty hitting breakpoints in TypeScript code. As a workaround, try using the debugger keyword.
Note
Profiling tests and code coverage are not currently supported.
Write unit tests for ASP.NET Core
To add support for unit testing of JavaScript and TypeScript in an ASP.NET Core project, you need to add TypeScript, Npm, and unit testing support to the project by including required NuGet packages.
Add a unit test (ASP.NET Core)
The following example is based on the ASP.NET Core Model-View-Controller project template, and includes adding a Jest or Mocha unit test.
Create an ASP.NET Core Model-View-Controller project.
For an example project, see Add TypeScript to an existing ASP.NET Core app. For unit testing support, we recommend you start with a standard ASP.NET Core project template.
In Solution Explorer (right pane), right-click the ASP.NET Core project node and select Manage NuGet Packages for Solutions.
In the Browse tab, search for the following packages and install each one:
Use the NuGet package to add TypeScript support instead of the npm TypeScript package.
In Solution Explorer, right-click the project node and choose Edit Project File.
The .csproj file opens in Visual Studio.
Add the following elements to the .csproj file in the
PropertyGroupelement.This example specifies Jest or Mocha as the test framework. You could specify Tape or Jasmine instead.
The
JavaScriptTestRootelement specifies that your unit tests will be in the tests folder of the project root.<PropertyGroup> ... <JavaScriptTestRoot>tests\</JavaScriptTestRoot> <JavaScriptTestFramework>Jest</JavaScriptTestFramework> <GenerateProgramFile>false</GenerateProgramFile> </PropertyGroup>In Solution Explorer, right-click the ASP.NET Core project node and select Add > New Item. Choose the TypeScript JSON Configuration File, and then select Add.
If you don't see all the item templates, select Show All Templates, and then choose the item template.
Visual Studio adds the tsconfig.json file to the project root. You can use this file to configure options for the TypeScript compiler.
Open tsconfig.json and replace the default code with the following code:
{
  "compileOnSave": true,
  "compilerOptions": {
     "noImplicitAny": false,
     "noEmitOnError": true,
     "removeComments": false,
     "sourceMap": true,
     "target": "es5",
     "outDir": "wwwroot/js"
  },
  "include": [
    "scripts/**/*"
  ],
  "exclude": [
   "node_modules",
   "tests"
  ]
}
For Jest, if you want to compile TypeScript tests to JavaScript, remove the tests folder from the exclude section.
The scripts folder is where you can put the TypeScript code for your app. For an example project that adds code, see Add TypeScript to an existing ASP.NET Core app.
Right-click the project in Solution Explorer and choose Add > New Item (or press Ctrl + SHIFT + A). Use the search box to find the npm file, choose the npm Configuration File, use the default name, and click Add.
A package.json file is added to the project root.
In Solution Explorer, right-click the npm node under Dependencies and choose Install new npm packages.
Note
In some scenarios, Solution Explorer might not show the npm node due to a known issue described here. If you need to see the npm node, you can unload the project (right-click the project and choose Unload Project) and then reload the project to make the npm node re-appear. Alternatively, you can add the package entries to package.json and install by building the project.
Use the npm package installation dialog to install the following npm packages:
In package.json, add the
testsection at the end of thescriptssection:In Solution Explorer, right-click the test folder and choose Add > New Item, and then add a new file named App.test.tsx.
This adds the new file under the test folder.
Add the following code to App.test.tsx.
Open Test Explorer (choose Test > Windows > Test Explorer) and Visual Studio discovers and displays tests. If tests are not showing initially, then rebuild the project to refresh the list. The following illustration shows the Jest example, with two different unit test files.

Note
For TypeScript, do not use the
outfileoption in tsconfig.json, because Test Explorer won't be able to find your unit tests. You can use theoutdiroption, but make sure that configuration files such aspackage.jsonandtsconfig.jsonare in the project root.
Run tests (ASP.NET Core)
You can run the tests by clicking the Run All link in Test Explorer. Or, you can run tests by selecting one or more tests or groups, right-clicking, and selecting Run from the shortcut menu. Tests run in the background, and Test Explorer automatically updates and shows the results. Furthermore, you can also debug selected tests by right-clicking and selecting Debug.
The following illustration shows the Jest example, with a second unit test added.

For some unit test frameworks, unit tests are typically run against the generated JavaScript code.
Note
In most TypeScript scenarios, you can debug a unit test by setting a breakpoint in TypeScript code, right-clicking a test in Test Explorer, and choosing Debug. In more complex scenarios, such as some scenarios that use source maps, you may have difficulty hitting breakpoints in TypeScript code. As a workaround, try using the debugger keyword.
Note
Profiling tests and code coverage are not currently supported.
Add support for a unit test framework
You can add support for additional test frameworks by implementing the discovery and execution logic using JavaScript.
Note
For ASP.NET Core, add the NuGet package Microsoft.JavaScript.UnitTest to your project to add support.
You do this by adding a folder with the name of the test framework under:
<VisualStudioFolder>\Common7\IDE\Extensions\Microsoft\NodeJsTools\TestAdapter\TestFrameworks
If you don't see the NodeJsTools folder in an ASP.NET Core project, add the Node.js development workload using the Visual Studio Installer. This workload includes support for unit testing JavaScript and TypeScript.
This folder has to contain a JavaScript file with the same name which exports the following two functions:
find_testsrun_tests
For a good example of the find_tests and the run_tests implementations, see the implementation for the Mocha
unit testing framework in:
<VisualStudioFolder>\Common7\IDE\Extensions\Microsoft\NodeJsTools\TestAdapter\TestFrameworks\mocha\mocha.js
Discovery of available test frameworks occurs at Visual Studio start. If a framework is added while Visual Studio is running, restart Visual Studio to detect the framework. However you don't need to restart when making changes to the implementation.
Unit tests in .NET Framework
You are not limited to writing unit tests in just your Node.js and ASP.NET Core projects. When you add the TestFramework and TestRoot properties to any C# or Visual Basic project, those tests will be enumerated and you can run them using the Test Explorer window.
To enable this, right-click the project node in the Solution Explorer, choose Unload Project, and then choose Edit Project. Then in the project file, add the following two elements to a property group.
Important
Make sure that the property group you're adding the elements to doesn't have a condition specified. This can cause unexpected behavior.
<PropertyGroup>
    <JavaScriptTestRoot>tests\</JavaScriptTestRoot>
    <JavaScriptTestFramework>Tape</JavaScriptTestFramework>
</PropertyGroup>
Next, add your tests to the test root folder you specified, and they will be available to run in the Test Explorer window. If they don't initially appear, you might need to rebuild the project.
Unit test .NET Core and .NET Standard
In addition to the preceding properties described for .NET Framework, you also need to install the NuGet package Microsoft.JavaScript.UnitTest and set the property:
<PropertyGroup>
    <GenerateProgramFile>false</GenerateProgramFile>
</PropertyGroup>
Some test frameworks might require additional npm packages for test detection. For example, jest requires the jest-editor-support npm package. If necessary, check the documentation for the specific framework.
Write unit tests in a Node.js project (.njsproj)
For Node.js projects, before adding unit tests to your project, make sure the framework you plan to use is installed locally in your project. This is easy to do using the npm package installation window.
The preferred way to add unit tests to your project is by creating a tests folder in your project, and setting that as the test root in project properties. You also need to select the test framework you want to use.
You can add simple blank tests to your project, using the Add New Item dialog box. Both JavaScript and TypeScript are supported in the same project.
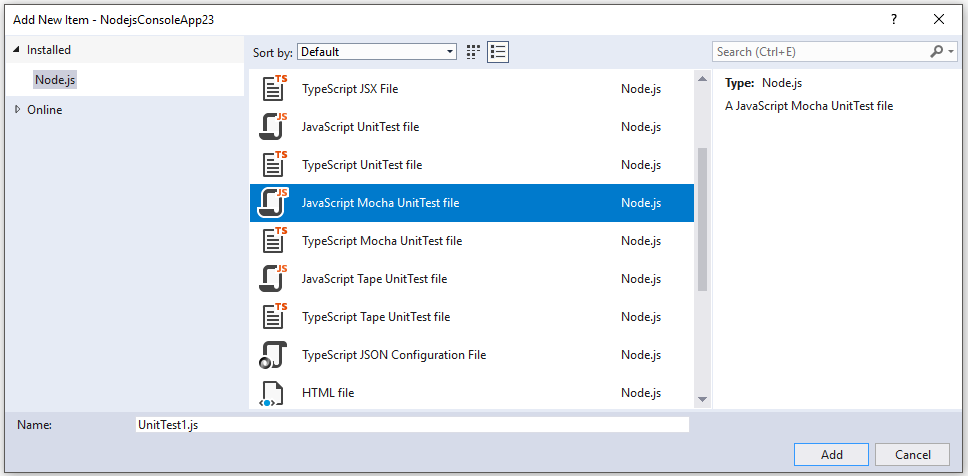
For a Mocha unit test, use the following code:
var assert = require('assert');

describe('Test Suite 1', function() {
    it('Test 1', function() {
        assert.ok(true, "This shouldn't fail");
    })

    it('Test 2', function() {
        assert.ok(1 === 1, "This shouldn't fail");
        assert.ok(false, "This should fail");
    })
})
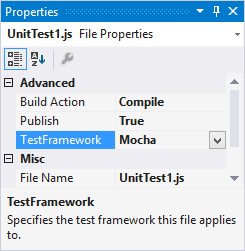
If you haven't set the unit test options in the project properties, you must ensure the Test Framework property in the Properties window is set to the correct test framework for your unit test files. This is done automatically by the unit test file templates.
Note
The unit test options will take preference over the settings for individual files.
After opening Test Explorer (choose Test > Windows > Test Explorer), Visual Studio discovers and displays tests. If tests are not showing initially, then rebuild the project to refresh the list.
Note
For TypeScript, do not use the outdir or outfile option in tsconfig.json, because Test Explorer won't be able to find your unit tests.
Run tests (Node.js)
You can run tests in Visual Studio or from the command line.
Run tests in Visual Studio
You can run the tests by clicking the Run All link in Test Explorer. Or, you can run tests by selecting one or more tests or groups, right-clicking, and selecting Run from the shortcut menu. Tests run in the background, and Test Explorer automatically updates and shows the results. Furthermore, you can also debug selected tests by right-clicking and selecting Debug.
For TypeScript, unit tests are run against the generated JavaScript code.
Note
In most TypeScript scenarios, you can debug a unit test by setting a breakpoint in TypeScript code, right-clicking a test in Test Explorer, and choosing Debug. In more complex scenarios, such as some scenarios that use source maps, you may have difficulty hitting breakpoints in TypeScript code. As a workaround, try using the debugger keyword.
Note
We don't currently support profiling tests, or code coverage.
Run tests from the command line
You can run the tests from Developer Command Prompt for Visual Studio using the following command:
vstest.console.exe <path to project file>\NodejsConsoleApp23.njsproj /TestAdapterPath:<VisualStudioFolder>\Common7\IDE\Extensions\Microsoft\NodeJsTools\TestAdapter
This command shows output similar to the following:
Microsoft (R) Test Execution Command Line Tool Version 15.5.0
Copyright (c) Microsoft Corporation.  All rights reserved.

Starting test execution, please wait...
Processing: NodejsConsoleApp23\NodejsConsoleApp23\UnitTest1.js
  Creating TestCase:NodejsConsoleApp23\NodejsConsoleApp23\UnitTest1.js::Test Suite 1 Test 1::mocha
  Creating TestCase:NodejsConsoleApp23\NodejsConsoleApp23\UnitTest1.js::Test Suite 1 Test 2::mocha
Processing finished for framework of Mocha
Passed   Test Suite 1 Test 1
Standard Output Messages:
 Using default Mocha settings
 1..2
 ok 1 Test Suite 1 Test 1

Failed   Test Suite 1 Test 2
Standard Output Messages:
 not ok 1 Test Suite 1 Test 2
   AssertionError [ERR_ASSERTION]: This should fail
       at Context.<anonymous> (NodejsConsoleApp23\NodejsConsoleApp23\UnitTest1.js:10:16)

Total tests: 2. Passed: 1. Failed: 1. Skipped: 0.
Test Run Failed.
Test execution time: 1.5731 Seconds
Note
If you get an error indicating that vstest.console.exe cannot be found, make sure you've opened the Developer Command Prompt and not a regular command prompt.
Feedback
Coming soon: Throughout 2024 we will be phasing out GitHub Issues as the feedback mechanism for content and replacing it with a new feedback system. For more information see: https://aka.ms/ContentUserFeedback.
Submit and view feedback for