Training
Module
Create a UI that uses data binding in .NET MAUI. - Training
Create a UI with data binding. Your UI automatically updates based on the latest data, while the data updates in response to changes in the UI.
This browser is no longer supported.
Upgrade to Microsoft Edge to take advantage of the latest features, security updates, and technical support.
In XAML Designer, you can set data binding properties by using the artboard and the Properties window. The example in this walkthrough shows how to bind data to a control. Specifically, the walkthrough shows how to create a simple shopping cart class that has a DependencyProperty named ItemCount, and then bind the ItemCount property to the Text property of a TextBlock control.
On the File menu, choose New > Project.
In the New Project dialog box, choose either the Visual C# or Visual Basic node, expand the Windows Desktop node, and then choose the WPF Application template.
Name the project BindingTest, and then choose the OK button.
Open the MainWindow.xaml.cs (or MainWindow.xaml.vb) file and add the following code. In C#, add the code in the BindingTest namespace (before the final closing parenthesis in the file). In Visual Basic, just add the new class.
public class ShoppingCart : DependencyObject
{
    public int ItemCount
    {
        get { return (int)GetValue(ItemCountProperty); }
        set { SetValue(ItemCountProperty, value); }
    }

    public static readonly DependencyProperty ItemCountProperty =
         DependencyProperty.Register("ItemCount", typeof(int),
         typeof(ShoppingCart), new PropertyMetadata(0));
}
This code sets a value of 0 as the default item count by using the PropertyMetadata object.
On the File menu, choose Build > Build Solution.
In Solution Explorer, open the shortcut menu for MainWindow.xaml and choose View Designer.
In the Toolbox, choose a Grid control and add it to the form.
With the Grid selected, in the Properties window, choose the New button next to the DataContext property.
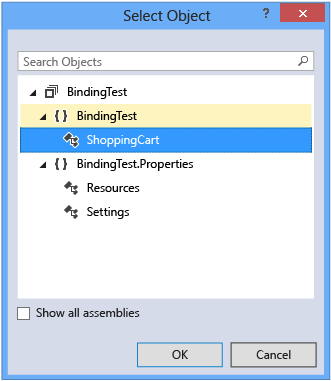
In the Select Object dialog box, make sure that Show all assemblies checkbox is cleared, choose ShoppingCart under the BindingTest namespace, and then choose the OK button.
The following illustration shows the Select Object dialog box with ShoppingCart selected.
In the Toolbox, choose a TextBlock control to add it to the form.
With the TextBlock control selected, in the Properties window, choose the property marker to the right of the Text property, and then choose Create Data Binding. (The property marker looks like a small box.)
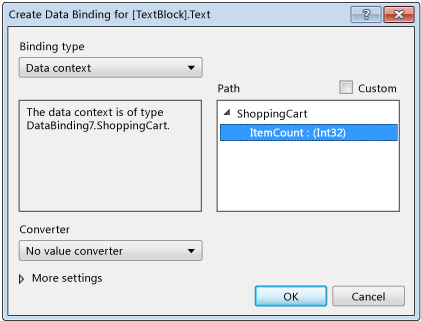
In the Create Data Binding dialog box, in the Path box, choose the ItemCount : (int32) property and then choose the OK button.
The following illustration shows the Create Data Binding dialog box with the ItemCount property selected.
Press F5 to run the app.
The TextBlock control should show the default value of 0 as text.
Tip
For more information about data binding, see Bind controls to data in Visual Studio.
Training
Module
Create a UI that uses data binding in .NET MAUI. - Training
Create a UI with data binding. Your UI automatically updates based on the latest data, while the data updates in response to changes in the UI.
Documentation
Organize objects into layout containers - Visual Studio (Windows)
Explore the layout panels and controls in XAML Designer that are used to arrange objects on a page, such as Grid, Canvas, Border, and Viewbox.
Working with elements in XAML Designer - Visual Studio (Windows)
Work with elements in the XAML Designer in Visual Studio or Blend for Visual Studio and add elements—controls, layouts, and shapes—to your app in XAML.
Create UIs with Visual Studio XAML Designer - Visual Studio (Windows)
Explore XAML Designer workspace UI and features in Blend for Visual Studio that provides a visual interface to help you design XAML-based apps.