Access query results and modify existing queries
In the advanced insights app's Analyst experience, the Query results page lists all the results available for your organization. In addition to seeing basic information about each query, use this page to:
- Create a copy of (clone) a query.
- Edit, rename, and delete a query.
- Favorite a query to find it later.
- Download query results as a .csv file.
- Get a link to access results as data in Power BI or Excel.
This article talks about each of these capabilities, and it also provides some information about permissions and your downloaded query results file.
Permissions
To view, download, rename, edit, delete, favorite, or clone query results, you need to have the Insights Analyst role assigned.
Important
Only the analyst who originally ran the query can edit, rename, or delete its results. Other analysts in the organization can view, favorite, and clone results.
To use the query results page
Results statuses
After you run your query, you might see a few different statuses in the Status column.
Running
A blue square within a blue circle means that the query is running. The analyst who ran the query can cancel the query by selecting Stop.
Stop, Stopping, and Stopped
Selecting this blue circle (Stop when hovered over) freezes the query. While stopping is in progress, the query status shows Stopping; after the query is fully stopped, the status shows Stopped. If the analyst who ran the query wants to run this query again later, they can select Rerun from the More options menu.

Note
Other analysts in the organization can see a query is running, but they aren't able to stop it.
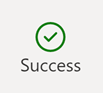
Success
When a query successfully runs, you’ll see a green checkmark within a green circle labeled Success. If you ran the query, you can now edit, delete, or rename it. All other analysts can now clone or favorite it.
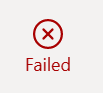
Failed
If an error occurs while a query is running, you’ll see a Failed status.
Results filters
Predefined filters
There are some predefined views on the Query results page:
- My results – Queries only you’ve run
- All results – Queries all analysts in your organization have run
- Favorites – Queries you’ve marked as Favorite
- Power BI templates – Predefined queries all analysts in your organization have run for Power BI templates (for example, Ways of working)
- Custom queries – Custom person queries all analysts in your organization have run
Content filters
In addition to predefined results filters, you can also add a custom content filter. With a content filter, narrow results by who ran the query, which Power BI template it's for, whether auto-refresh is on, and query type.
To access content filters, select the + icon to the right of the Custom queries filter button.

Then, use the dropdown menus to select your filter.

While you can only use one content filter active at a time, you can have up to five filters available. Filters won’t carry over from one session to the next.
Setting the query to auto-refresh
If you ran a query and want it to recur on a certain schedule, you can set the Auto-Refresh toggle key to On. Analysts who didn’t run a query can’t turn on auto-refresh for it.
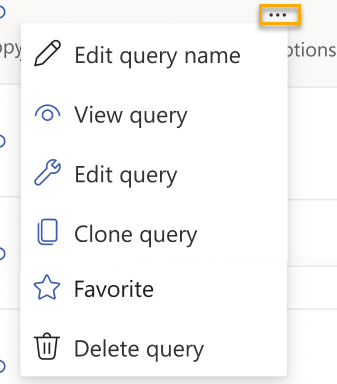
More options
When you select the More options ellipses—located in the far-right column of the Query results page—you’ll see a few different options based on whether you ran the query or are another analyst in the organization: Edit query name, Edit query, Clone query, Favorite, and Delete query.
Let’s explore these options in more detail.
Edit query name
Applies to: analyst who ran the query
To change a query name, select the Edit query name option. After you’ve successfully renamed your query, you’ll receive a notification in the upper right corner of your screen.
Important
All query names need to be unique. You’ll receive an error if the query name you enter already exists.
View query
Applies to: any analyst in the organization
If you want to see how a query was set up, but don't want to edit anything, select View query. This option takes you to the query's setup screen. You can clone a query from here, too.
Edit query
Applies to: analyst who ran the query
If you want to change your query’s setup information (like Query name and Time period), metrics, conditions and condition groups, and employee attributes, edit the query and run it again. When you select Edit query, you’re prompted to confirm whether you want to overwrite your existing results or want to clone the query instead. If you select Edit query in this box, the app takes you to the query setup screen, where you can then make changes and rerun the original query. If you choose Clone, the app takes you to a new query setup screen with the same settings as the original.
Caution
The Edit query option permanently deletes and replaces the query’s existing results. To keep a query’s existing results, use the Clone option instead and make changes in a new query.
Clone query
Applies to: any analyst in the organization
The Clone option makes an identical copy of an existing query. Use Clone when you want to start a new query using the same settings (Time period, Group by, metrics, conditions and condition groups, and employee attributes) as an existing query.
Tip
You can reach the Edit and Clone options through the query setup screen, too.
Favorite query
Applies to: any analyst in the organization
Favoriting a query saves it in your Favorites view so you can find it later.
Delete query
Applies to: analyst who ran the query
Deleting a query removes it from the results list for everyone in the organization. After you select Delete query, you’ll need to confirm you’re ready to delete before proceeding. After your query is deleted, you’ll receive a notification in the upper right corner of your screen.
Caution
Deleting queries is permanent. If you delete a query that’s set to auto-refresh, you’re also disabling that query’s future updates.
To access query results
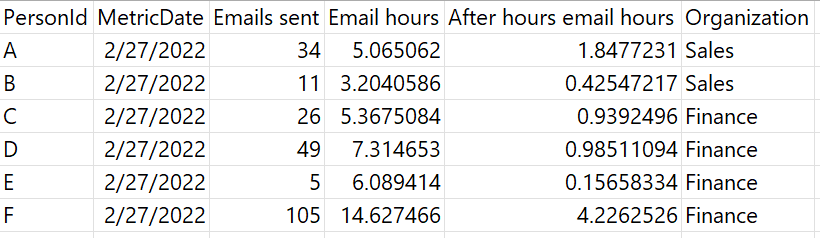
About query results
When you define a query, you select metrics and employee attributes. After the query runs, its results are organized into columns and rows. The column headers in the results match the attribute names and metric names that you selected while defining the query. To learn how to download these results, read on.
Downloading and connecting to results
Download and import results in Excel
In Query results, next to the results you want, select the CSV icon.
Select to open and right-click the zip file, which contains a .csv version of the data, and then select Extract All and extract the .csv to a local folder.
Open the extracted .csv file using Excel.
Here's an example of a results file:
Here's an example of a results file:
Connect through the Power BI Connector
In Power BI Desktop, select Get Data.
Select Online Services, select Viva Insights, and then select Connect.
In the Analyst > Query results page, find your query and select Copy link.
Note
The link contains two pieces of information: the partition identifier and the query identifier, which are separated by a slash.
In Connect to Viva Insights Data, enter the partition identifier and the query identifier.
Note
Query name isn't supported right now.
In Advanced parameters > Data granularity, select Row-level data.
Select Import under Data Connectivity mode, and then select OK.
If you're prompted to sign in, select Sign in, enter your Microsoft 365 credentials, and then select Connect.
In the preview window, select Load. Optionally, select Transform Data to transform and shape the data in the Power Query editor before loading it into Power BI.
FAQs
We've compiled answers for some questions you might run across while viewing your query results.
General
When I download and view a query, why is the data unreadable or not shown correctly in Excel?
You probably opened the .csv file as-is. For Excel to show the data correctly, you need to import the .csv file into Excel. If you're using Excel 2016, follow the steps in Access query results and modify existing queries. For other versions of Excel, open Help in Excel and then search for the instructions on how to import a .csv file.
Why isn't a user showing up in query results?
Licensing might be a factor. For a user to appear in query results, that user needs to have a license at the time the query is run. If you have questions about user licensing, contact your Microsoft 365 admin and your Insights Administrator.
Meeting queries
Why is a meeting's Attendee count lower than expected? Or, why are metric values listed as 0?
You might notice that more people accepted a meeting than attended it. This can happen for a few reasons:
- Some invitees accepted the meeting but then attended another meeting without changing their response. Or, some invitees were deemed to be attending a conflicting meeting.
- Some attendees are external or unmeasured, meaning they're not assigned a Viva Insights license, and thus aren't included in the metric calculation.
- The query was run in a partition and the meeting had participants who aren't in the partition, and thus aren't included in the metric calculation.
Why are meetings missing from my results?
The query might not have had any attendees. If no one attended a meeting, Viva Insights removes that meeting from query results by default.
Why is data about the meeting organizer missing?
This can happen for a few reasons:
- The organizer doesn't have a license.
- The organizer opted out of Viva Insights. Learn more about opting out in Opt out of Viva Insights.
- The organizer isn't part of the partition.
- The organizer's HR data hasn't been uploaded.
Why is the Subject column empty for a meeting?
Your admin might have suppressed certain sensitive keywords. If a meeting title contained one of those keywords, then query results don't show that meeting title.
Why don’t a person’s low-quality meeting hours equal the sum of their redundant, conflicting, and multitasking meeting hours in my query?
You might expect the total number of redundant, conflicting, and multitasking meeting hours to equal the total number of low-quality meeting hours. However, sometimes they won’t equal because of how conflicting meeting hours are calculated.
Why do I see decimal numbers for Meetings count metrics?
"Meetings" can be decimal numbers because the count is proportional to the scheduled meeting time.
- Meetings that start before midnight and end after midnight on the cutoff date for the row.
- Example: You attended a meeting that started at 11:30 PM on February 1st and ended at 12:30 AM on February 2nd. In this case, you'd get 0.5 meetings for February 1st, and 0.5 meetings for February 2nd.
- Meetings by time of day.
- Example: You have a meeting between 9:30 AM and 10:30 AM. Meetings between 9:00 AM and 10:00 AM = 0.5; Meetings between 10:00 AM and 11:00 AM = 0.5.
- Overlapping meetings.
- Example: Meeting 1 from 10:00 AM to 11:00 AM and meeting 2 from 10:30 AM to 11:30 AM on the same day. Meetings = 1.5
- Meetings that begin within your working hours and end after work hours (and vice versa).
- Example: Your working hours set in Outlook are 8:00 AM to 5:00 PM. You have a meeting that begins at 4:30 PM and ends at 5:30 PM. Meetings during working hours = 0.5; Meetings during after-hours = 0.5.
- Example: You have a meeting between 9:30 AM and 10:30 AM. Meetings between 9:00 AM and 10:00 AM = 0.5; Meetings between 10:00 AM and 11:00 AM = 0.5.
Why don't totals for meeting hours and email hours match up with totals for working hours and after hours in person query output?
Because totals for working hours and after hours calculate the "time booked on your calendar" instead of "time in meetings." Calculations for total meeting hours (time in meetings) adjusts the duration time to account for double-booked meetings, where a person has two meetings scheduled at the same time or times that overlap on the calendar. A heuristic logic orders which meetings a person likely attended and assigns time accordingly.
Related topics
Feedback
Coming soon: Throughout 2024 we will be phasing out GitHub Issues as the feedback mechanism for content and replacing it with a new feedback system. For more information see: https://aka.ms/ContentUserFeedback.
Submit and view feedback for