
Praise in Viva Insights
Use praise in the Microsoft Viva Insights app to recognize the contributions of your employees and coworkers. Praise messages are shown as notifications in Teams. You can have a praise message delivered in a private chat, or for wider recognition, in a Teams channel conversation.
Notes:
-
The praise app is a messaging extension of Microsoft Teams that you can access in the Viva Insights app. For more information, see Messaging extensions.
-
Praise isn't available in the Department of Defense (DoD) Microsoft 365 environment.
Send praise
To send praise, open the praise feature in one of the following ways:
-
The Viva Insights Home tab
-
The content pane of Teams
You can also set reminders to send acclaim on a regular basis to your coworkers and view your praise history. See Set a praise reminder and Praise history for details.
Send praise from the Viva Insights Home tab
-
In the Recommended for you section, find the Send praise to colleagues card, and select the Send praise button.
-
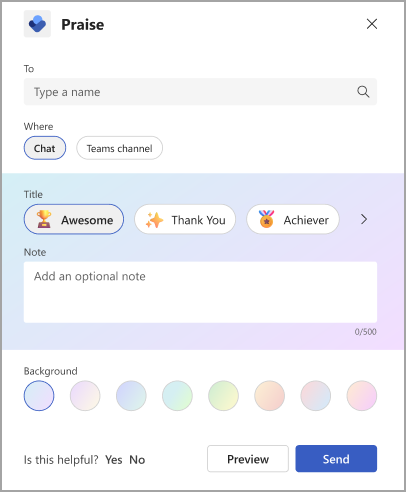
When the Praise composer opens, add the name of the person you want to praise in the To field.
-
(Optional) If you want to share a copy of this praise with someone else in your organization, expand the arrow to the right of praise in the Tofield. Start typing to select a recipient.
Tip: The same person can't be in both the To field and their name in the Share a copy with field. If you can't find someone by typing their name in the Share a copy with field, check to make sure they're not already a direct recipient.
-
In the Where field, pick how you want your praise to appear—either just between you and the recipient, or to everyone in a Teams channel:
-
To make the praise message appear privately in a 1:1 chat between you and the recipient, select 1:1 chat. This option is available only if you and the recipient have already participated in a Teams chat together.
-
To let all the members of a Teams channel or subchannel see the praise message, select Teams channel. This option is available only if all of the praise recipients are participants in the Teams channel or subchannel that you choose.
-
-
Pick a Title, or leave it at the default choice: Awesome.
-
(Optional) In the Note field, add a personalized message of up to 500 characters.
-
(Optional) Select a new Background color for your praise message.
-
(Optional) Select Preview to view what your message will look like after you send it.
-
If you need to make any edits, select Edit.
-
When it's ready to go, select the Send button.
Send praise from the Teams content pane using the praise messaging extension
In Viva Insights, you can always send praise directly from the Home tab, which doesn't require installing the praise messaging extension.
To use the Teams messaging extension:
-
Below the Type a new message field, select the Praise icon.

(If the praise feature doesn't appear, follow the steps in Find the Praise feature.) -
If you’re in a group chat or channel, add the name of the person you want to praise in the To field. In a 1:1 chat, the name defaults to the other person in the chat.
Tip: The same person can't be in both the To field and the Share a copy with field. If you can't find someone by typing their name in the Share a copy with field, check to make sure they're not already a direct recipient.
-
Pick a Title or leave it at the default choice: Awesome.
-
(Optional) If you want to share a copy of this praise with someone else in your organization, expand the arrow to the right of the To field. Start typing to select a recipient.
-
(Optional) In the Note field, add a personalized message of up to 500 characters.
-
(Optional) Select a Background color for your praise message.
-
(Optional) Select Preview to view what your message will look like after you send it.
-
Select Send.
Praise feed
The praise feed shows your six most recent praise messages. To only see praise you've received, praise you've sent, or praise messages that other people have shared with you, use the dropdown menu.
Find the praise feature
-
Below the Type a new message field, select more options (the ellipsis).
-
In the Find an app field, start typing "praise" and then select Praise to open the feature.
-
Continue with the steps in Send praise from the Teams content pane using the praise messaging extension.
Set praise reminders
Remind yourself to send praise to coworkers. Praise reminders are always recurring; this helps you build the habit of letting coworkers know that you appreciate their contribution.
Notes:
-
You can schedule praise reminders for any day of the week, including days not configured as workdays in your Outlook settings.
-
The time you select will apply to every day on which you'll see reminders. You can't set different times for different days of the week.
-
The reminder might not arrive at exactly the scheduled time, but most reminders appear within five minutes before their scheduled time.
You can set praise reminders either from the Viva Insights Home tab or Settings page:
From the Home tab:
-
On the card, select the All praises link, which is to the right of the Send praise button.
-
On the Praise page, configure your reminder through the card on the right, beneath Recommendations and Trends.
From the Settings page:
Note: Access the settings page by selecting the ellipses(...) at the top of any screen in the Viva Insights app, then selecting Praise.
-
Select Praise from the left pane.
-
In the praise reminder settings, move the Reminder toggle to On.
-
Select the time of day and day of the week you want to be reminded.
On the day of the week and time that you configured, the Viva Insights app will remind you to send praise. Selecting the reminder notification opens the Praise feature, after which you can continue with the steps in Send praise from the Viva Insights Home tab.
Praise history
Note: Praise history is only available for users with Exchange Online mailboxes. Mailboxes hosted on-premises aren't supported. For more details about plans, refer to our FAQ.
To find a history of all the praise messages you've sent and received over the last six months, select View history at the bottom of your praise feed. This history includes the message's title and text, sender and receiver, and date sent. View the original praise in the Teams chat by selecting Go to message.
You can also access your personal praise history by selecting Review your praise history in the Praise section that shows within your Teams channel Posts. This link only shows you your own personal history that nobody else can see.
Praise recommendations
On the right section of the praise page, you'll see praise recommendations for your top collaborators. Recommendations provide pre-populated suggestions to send praise based on signals such as collaboration activity. If you're a manager, the app recommends team members you haven't praised in a while. To start your message, select the Start praise button.
Praise trends
Praise trends is available to you if you have a Viva Insights subscription. Select the Trends tab to see analytics about your praise messages, like praise sent and received counts, your biggest fans, and top praises received. Only you can see this information.
Learn more


Need more help?
Want more options?
Explore subscription benefits, browse training courses, learn how to secure your device, and more.


Communities help you ask and answer questions, give feedback, and hear from experts with rich knowledge.


