Events
Apr 29, 2 PM - Apr 30, 7 PM
Join the ultimate Windows Server virtual event April 29-30 for deep-dive technical sessions and live Q&A with Microsoft engineers.
Sign up nowThis browser is no longer supported.
Upgrade to Microsoft Edge to take advantage of the latest features, security updates, and technical support.
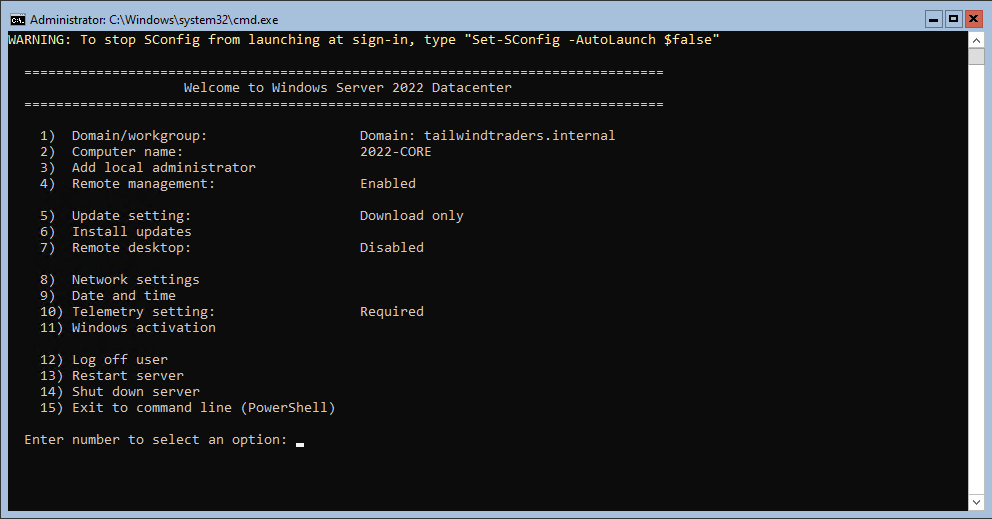
You can use the Server Configuration tool (SConfig) to configure and manage a Windows Server instance or Azure Local. When Windows Server is installed with the Server Core installation option, SConfig is the primary way to configure and manage common aspects of the operating system, including:
Note
SConfig is a convenient tool which is especially helpful if you need to configure or troubleshoot a single server. However, it's not the only way to configure settings, and might not be efficient at large scale. If you need to setup more than a handful of servers, we recommend that you leverage more automated installation processes, such as Answer files (unattend.xml), Microsoft Deployment Toolkit (MDT) or Microsoft Endpoint Configuration Manager. If you're deploying a virtualization host or a virtual machine, the best way to install and configure the operating system is often System Center Virtual Machine Manager (VMM).
Similarly, for ongoing management across multiple server instances, we recommend remote management approaches using tools like Windows Admin Center, Server Manager or components of System Center. You may also use Group Policy to automatically configure numerous operating system settings, such as enabling remote management and configuring updates. Each of these tools work equally well with Server Core and Server with Desktop Experience installation options, removing or greatly reducing the need for locally managing one server a time.
Here are some things to keep in mind about SConfig:
SConfig.cmd.SConfig starts automatically starting with Windows Server 2022 (deployed in Server Core installation option) and Azure Local. To run SConfig on previous versions of Windows Server, follow these steps: It is also possible to run SConfig on Windows Server installed with the Server with Desktop Experience installation option using these steps:
Launch PowerShell.
Type SConfig, and then press Enter. The Server configuration tool interface opens.
Note
Launching SConfig from a Command prompt (CMD) window by running SConfig.cmd also works in Windows Server 2022 and Azure Local, just like it did in previous versions. However, this method is no longer being developed and may be removed in the future versions of the operating system. The recommended way to manually launch SConfig if required is by running SConfig in a PowerShell window.
The current Active Directory domain or workgroup settings are displayed on the main screen of SConfig. You can join an Active Directory domain or a workgroup by accessing the Domain/workgroup settings page from the main menu and following the instructions, supplying any required information.
Note
You’ll only be able to join a domain if the computer is able to resolve the DNS address of a domain controller in the target domain's Active Directory Domain Services forest and you have the credentials of an account that has permission to perform a domain join operation. You may need to configure network settings and/or the date and time before joining the domain. You also have the option of changing the computer name as a part of the domain join operation.
To join a standalone server instance to a domain with SConfig, follow these steps:
1 and press Enter to enter the Change domain/workgroup membership settings page.D.Enter to join a domain.Enter.domain\user or user@domain.com and press Enter.Enter.Y or N and press Enter.Y, provide the new name for the computer and press Enter. You will need to reenter the password for the user account you specified when joining the computer to domain.Y and press Enter to restart the computer.ESC to switch users so you can sign in with a domain account.The current computer name is displayed on the main screen of SConfig. You can change the computer name by accessing the Computer Name settings page from the main menu and following the instructions.
To change the computer name, follow these steps:
2 and press Enter to enter the Computer name settings page.Enter.Enter after entering a username and then type the password and press Enter.Y and press Enter.To add other users or groups to the local Administrators group, use the Add local administrator option on the main menu.
To add a domain user account to the local Administrators group, do the following:
3 and press Enter to enter the Add local administrator settings page.Enter.The changes take effect immediately.
You can enable various remote management scenarios from the Configure remote management settings page:
4 and press Enter to enter the Configure remote management settings page.1 and press Enter to enable remote management or type 2 and press Enter to disable remote management.4 and press Enter to enter the Configure remote management settings page.3 and press Enter, or to disable server response to ping or type 4 and press Enter.The Microsoft Update settings are displayed in the main SConfig screen. You can configure the server to use automatic or manual updates on the Update setting settings page.
When Automatic is selected, the system will check for and install updates every day at 3:00 AM. (Time is interpreted according to the effective time zone configured on the server, which may or may not be the same as the official time zone in the area).
The Download only option will scan for updates, download any that are available, and then notify you in the Action center that they are ready for installation. It is the default option.
When Manual updates is selected, the system will not check for updates automatically.
Note
Action center is only available on Windows Server installed with the Server with Desktop Experience installation option, and it is only visible while you're signed in to the server. On Server Core and Azure Local, you won't receive any notifications.
5 and press Enter to enter the Update setting settings page.A and press Enter to select updates to be installed automatically.D and press Enter to have updates periodically checked for and automatically downloaded, but not installed.M and press Enter to require you to check manually for updates.You can choose to search for updates from the following categories:
Note
The terminology for update types (but not necessarily release cadence and schedule) is unified with Windows 10 and Windows 11. Hence, Feature updates is another name for what used to be known as operating system upgrades. Regular monthly updates, including security updates, are referred to as Quality updates.
Feature updates from Microsoft Update are currently only available for Azure Local. If you want to upgrade Windows Server to a newer version, you need to use traditional installation media (such as an ISO). From there, you either run Setup.exe directly or leverage an automation solution such as mentioned earlier. SConfig does not specifically facilitate these scenarios.
The search returns any available updates within the category. You will be presented with the option of installing all available updates, a specific update, or none of the available updates.
From the main SConfig menu, type 6 and press Enter to enter the Install updates settings page.
Choose from one of the following options:
1 and press Enter.2 and press Enter.3 and press Enter.After you have made your selection, a list of available updates will be displayed. You can choose one the following options:
A and press Enter.N and press Enter.S and press Enter, then type the update number, and press Enter.The status of Remote desktop settings is displayed in the main SConfig screen. You can configure the following Remote desktop settings by accessing the Remote desktop settings page and following the instructions on screen:
7 and press Enter to enter the Remote desktop settings page.E and press Enter to enable Remote desktop. Alternatively, press D and press Enter to disable Remote desktop.1 and press Enter.2 and press Enter.By default, the operating system will attempt to provision a network address from a DHCP server. If no DHCP server is available, it will assign an Automatic Private IP Address (APIPA) to the network interface. Alternatively, you can assign a static IPv4 address manually, and specify the subnet mask and default gateway. When configuring an IPv4 address, you can also use this settings page to configure primary and secondary DNS servers.
8 and press Enter to enter the Network settings settings page.1, and press Enter to select that interface.1 and press Enter to set the network adapter address.D and press Enter to configure DHCP or press S and press Enter to configure a static IP address.255.255.255.0), and default gateway address, pressing Enter after each entry.2 and press Enter to set the DNS server address.
Enter.Enter.3 and press Enter to clear current DNS server settings.Selecting the Date and time option from the main menu will open the Date and Time Control Panel applet. You can use this applet to set the date and time and to modify the time zone settings.
This option lets you configure whether anonymized statistical information about your system is forwarded to Microsoft.
10 and press Enter to enter the Telemetry setting settings page.Y for Yes or N for No and press Enter.Note
Windows Server and Azure Local have different default configuration regarding to telemetry. For information specific to Windows Server, see Configure Windows diagnostic data in your organization. For Azure Local, see Azure Local telemetry and diagnostics extension. Please note that you cannot configure Azure Local data collection in SConfig. To learn more about Microsoft's approach to privacy, see Privacy at Microsoft.
This option lets you display current license and activation status, install a product key, and activate Windows Server.
Note
Activation is only needed for Windows Server. This menu item is not available on Azure Local as Azure Local deployment is a different process.
11 and press Enter to enter the Windows activation settings page.1 and press Enter to view the current Activation status.2 and press Enter to attempt Activation with the currently installed product key.3 and press Enter to add a new product key. At the prompt, type in the product key and press Enter. Press Enter again once the product key is installed and then return to this menu and use option 2 to perform activation.12 and press Enter.Y and press Enter. The currently signed in user will be logged off.13 and press Enter.Y and press Enter. The server will restart.14 and press Enter.Y and press Enter. The server will shut down.This menu item closes the SConfig menu and returns to an interactive PowerShell prompt (or Command Prompt (CMD) for Windows Server 2019 or Windows Server 2016). You can use it to run arbitrary PowerShell commands and scripts for advanced configuration or troubleshooting. Many of these specialized options are not available natively in SConfig. Examples of this are, configuring storage, advanced network adapter settings (such as setting VLAN IDs), and installing device drivers.
Note
As a general rule, every setting available in the operating system can be controlled using command line tools or scripts. However, many of these settings are more conveniently managed remotely using graphical tools such as Windows Admin Center, Server Manager and System Center.
To exit to PowerShell from SConfig main menu, type 15 and press Enter. To return to Server configuration tool, type SConfig, and then press Enter. Alternatively, starting with Windows Server 2022 and Azure Local, type exit. It will close the current PowerShell window and open a new instance of SConfig automatically.
Note
If you happened to manually launch SConfig from a Command Prompt session (as opposite to a PowerShell session), then exiting SConfig via menu option 15 will get you back to Command prompt. Even though the menu item says Exit to command line (PowerShell), in this specific case, there is no interactive PowerShell session left.
Before Windows Server 2022, the default shell on Server Core was Command Prompt (CMD). It launched by default when user signed in to Server Core. From there, you could either launch SConfig, or run arbitrary command-line tools.
Starting with Windows Server 2022 (when deployed with the Server Core installation option) and Azure Local, the default shell is PowerShell. It starts by default, and SConfig is launched automatically within the PowerShell window. If you exit SConfig by using menu option 15, you get to the interactive PowerShell session.
However, if PowerShell is uninstalled, the default shell falls back to CMD. Unlike in previous versions of the operating system, if PowerShell is uninstalled, SConfig won't run either automatically or manually. You will only be able to use the classic command-line tools such as netsh.exe and diskpart.exe.
Note
Diskpart is deprecated and might not provide full functionality. For example, unlike PowerShell, it cannot manage Storage Spaces.
The change in default shell should be transparent for most users because you can run all the same command-line tools in PowerShell as you could in CMD. Moreover, PowerShell is much more capable than CMD both in terms of interactive language features and number of commands being available. However, in some edge case scenarios, a command in PowerShell might behave differently from CMD, such as if you were using batch file syntax (such as set foo=bar) in an interactive session. If you run a batch file instead, that is, a file with .cmd or .bat extension, it would be processed by CMD even if launched from PowerShell. In this scenario, you won't observe any differences.
You can explicitly transition to Command Prompt by typing cmd in PowerShell and pressing Enter. Alternatively, type start cmd if you prefer to launch a new window.
Note
If you intend to reload an existing PowerShell session (e.g. for module updates to take effect), launching SConfig and exiting it won't be sufficient. This is because SConfig itself is a PowerShell application which runs within an existing PowerShell session. Exiting SConfig will get you into the original session.
Instead, to reload a PowerShell session, type exit and press Enter. This will close the existing PowerShell window, and a new one will be started automatically. Note that reloading a PowerShell session is specific to Server Core installations of Windows Server and Azure Local. On Server with Desktop Experience installations of Windows Server, you will have to manually launch a new PowerShell window.
SConfig launches automatically starting with Windows Server 2022 (when deployed with the Server Core installation option) and on Azure Local. You can stop SConfig from launching automatically by running the following command in PowerShell:
Set-SConfig -AutoLaunch $False
Events
Apr 29, 2 PM - Apr 30, 7 PM
Join the ultimate Windows Server virtual event April 29-30 for deep-dive technical sessions and live Q&A with Microsoft engineers.
Sign up nowTraining
Module
Perform post-installation configuration of Windows Server - Training
Perform post-installation configuration of Windows Server
Documentation
Learn how to manage a Server Core installation of Windows Server.
Administer Server Core installation
Learn how to administer a Server Core installation of Windows Server
Learn about the Server Core installation option in Windows Server