Quickstart: Sysprep and capture the reference device image, and deploy to a new device
Article
Applies to:
✅ Windows 11, ✅ Windows 10
In this quickstart, you sysprep and capture the reference device image of Windows IoT Enterprise to a Windows Imaging Format (WIM) file using the Deployment Image Servicing and Management (DISM) tool. Then, you deploy the WIM image to a new device.
After you make your customizations in audit mode, you can capture an image of your customized reference device. While audit mode isn't required, it does provide a scenario where the device can be customized online before going into the Out of Box experience (OOBE).
This section provides steps to sysprep the reference device and apply to both physical device and virtual machine:
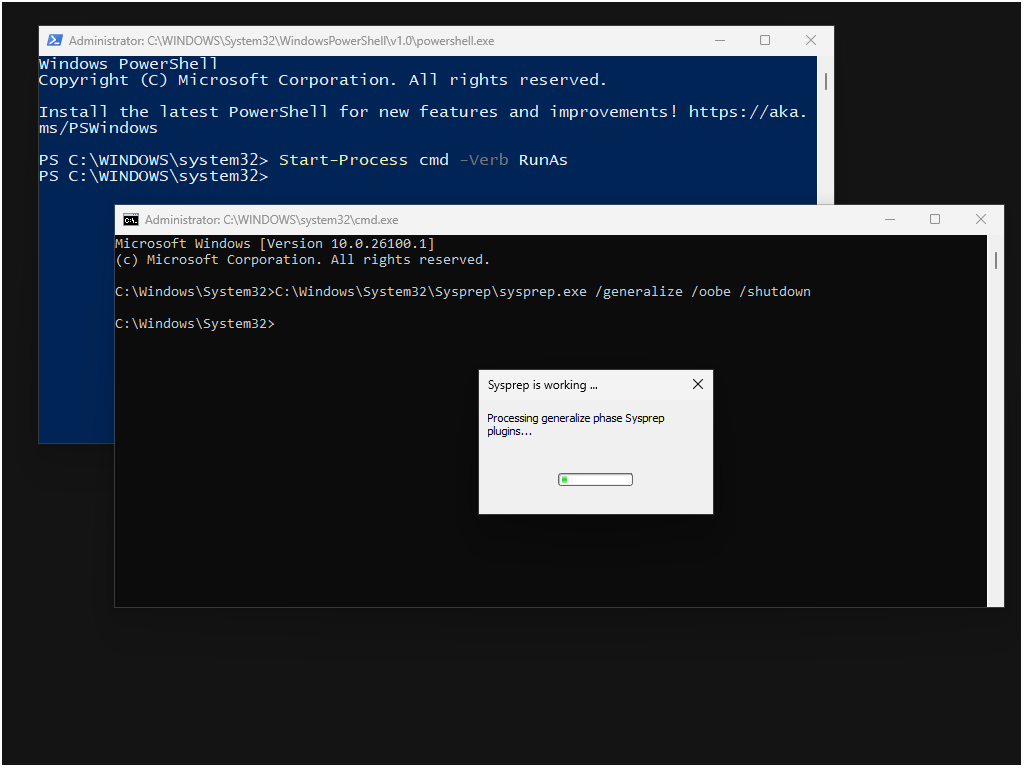
Select Cancel on the System Preparation Tool to close it, then run Sysprep from a Command Prompt with Administrator privileges to prepare the image for capture:
Note
If you completed Quickstart: Customize a reference device in Audit mode and configured powershell.exe as your custom shell, run the following command to open Command Prompt with Administrator privileges: Start-Process cmd -Verb RunAs
After Sysprep prepares the image, the reference device will shut down. The next time the device boots, it will boot into OOBE.
Caution
Don't power the reference device back on until you're ready to capture an image. If the device boots, you'll have to go through the Sysprep process again.
Create a bootable WinPE drive
Windows PE (WinPE) is a small operating system used to install, deploy, and repair Windows desktop editions, Windows Server, and other Windows operating systems. It's an add-on to the Windows Assessment and Deployment Kit (ADK) that you previously installed in your technician PC.
In your technician PC, follow the steps to create a bootable WinPE drive:
In this section, you create a bootable WinPE USB drive with multiple partitions. Having multiple partitions allows you to have a FAT32 partition for WinPE and an NTFS partition for the captured WIM file. You can use this USB drive for both capturing and deploying your image.
Tip
You can use the same USB drive where you created the bootable Windows IoT Enterprise installation media in the previous quickstart.
Insert the USB drive into the Technician PC.
Open the Deployment and Imaging Tools Environment as administrator. You can find a shortcut to the Deployment and Imaging Tools under Windows Kits in the Start Menu.
Run Diskpart:
Windows Command Prompt
diskpart
Use Diskpart to format the drive and create two new partitions for WinPE and for your images:
Windows Command Prompt
List disk
select disk X (where X is your USB drive)
clean
create partition primary size=2048
active
formatfs=FAT32 quick label="WINPE"
assign letter=P
create partition primary
formatfs=NTFS quick label="Images"
assign letter=I
Exit
Copy the WinPE files to a working folder:
Windows Command Prompt
copype amd64 C:\WinPE
This command copies the 64-bit WinPE files to C:\WinPE. The destination folder is created automatically.
Copy the WinPE files to your USB key.
Windows Command Prompt
makewinpemedia /ufd C:\WinPE P:
Where P: is the USB drive with the WinPE Partition. This command formats the partition and erases any data that's on it.
Move the USB flash drive from the technician PC to the reference device.
In this section, you create a bootable WinPE virtual hard disk drive (VHD) and a second VHD to store the captured WIM file. You use WinPE for both capturing and deploying your image.
Open Hyper-V Manager.
Right-click on the Virtual Machine and select Settings.
In the left pane, select SCSI Controller.
In the right pane, select Hard Drive and then Add.
Select New to create a VHD.
Follow the wizard to create a new VHD, for WinPE you can define a size of 4 GB.
Repeat the steps to create another VHD to store the WIM file. You can define the size as 8 GB.
At the end, select Apply and OK to create the VHDs.
Mount the VHDs on your technician PC
Press Windows + R, type diskmgmt.msc, and press Enter.
In Disk Management, select Action in the menu bar.
Select Attach VHD.
In the dialog that appears, select Browse, and navigate to the location of your VHD file.
Select the VHD file and select OK.
The VHD shows as a new disk in Disk Management.
Initialize the VHD by right-clicking on the disk and selecting Initialize Disk.
Create a volume by right-clicking on the unallocated space and selecting New Simple Volume....
Follow the wizard to create a new volume, letting FAT32 as the file system for WinPE.
Repeat the steps for the VHD where you store the WIM file, letting NTFS as the file system.
You can now access the VHD from File Explorer as if it were a regular drive.
Add WinPE files to the VHD:
Open the Deployment and Imaging Tools Environment as administrator. You can find a shortcut to the Deployment and Imaging Tools under Windows Kits in the Start Menu.
Copy the WinPE files to a working folder:
Windows Command Prompt
copype amd64 C:\WinPE
This command copies the 64-bit WinPE files to C:\WinPE. The destination folder is created automatically.
Copy the WinPE media files to the VHD
Windows Command Prompt
xcopy "C:\WinPE\media\*" "P:\" /E /H
Where P: is the WinPE VHD.
Unmount the VHDs from your technician PC:
Press Windows + R, type diskmgmt.msc, and press Enter.
Detach the VHDs by right-clicking on the disk and selecting Detach VHD.
Boot the reference device to WinPE and capture the Windows IoT Enterprise OS image
In this section, you capture a WIM image from the reference device's hard drive. This WIM can be used in development or in production. It's common to capture OS images during different stages of the development process. For example, the following steps could be used to capture a base image of the OS with default apps installed. A later image could be captured with more end customer apps installed.
In your reference device sample, follow the steps to capture a WIM image:
Boot the reference device from the bootable WinPE USB flash drive.
Important
Don't boot your device until you know which key brings up the device's boot menu. The device is in a Sysprepped state and should not be allowed to boot back into Windows IoT Enterprise.
The system boots to the WinPE, where you see a Command prompt.
Tip
If you have a different keyboard layout, you can change the keyboard layout by running wpeutil setKeyboardLayout 0816:00000816 where the language:keyboard pair list for your desired layout can be found in input locales. Then run winpeshl.exe from the WinPE Command Prompt to ensure the new layout is applied to the current session.
From the WinPE Command prompt, run Diskpart:
Windows Command Prompt
diskpart
Use Diskpart to list the disks so you can identify the disk where Windows IoT Enterprise is installed:
Windows Command Prompt
list disk
You should see something like:
Output
Disk ###  Status          Size     Free     Dyn  Gpt
--------  -------------   -------  -------  ---  ---
Disk 0    Online            63 GB      0 B        *
Disk 1    Online            14 GB      0 B
In this example, Disk 0 size represents the disk where we installed Windows IoT Enterprise.
Select Disk 0 and then list the partitions and volumes:
Windows Command Prompt
select Disk 0
list partition
list volume
You should see something like:
Output
DISKPART> select disk 0

Disk 0 is now the selected disk.

DISKPART> list partition

    Partition ###  Type              Size     Offset
    -------------  ----------------  -------  -------
    Partition 1    System             100 MB  1024 KB
    Partition 2    Reserved            16 MB   101 MB
    Partition 3    Primary             63 GB   117 MB
    Partition 4    Recovery           602 MB    63 GB

DISKPART> list volume

    Volume ###  Ltr  Label        Fs     Type        Size     Status     Info
    ----------  ---  -----------  -----  ----------  -------  ---------  --------
    Volume 0     E                UDF    DVD-ROM     4236 MB  Healthy
    Volume 1                      NTFS   Partition     63 GB  Healthy
    Volume 2                      FAT32  Partition    100 MB  Healthy    Hidden
    Volume 3                      NTFS   Partition    602 MB  Healthy    Hidden
    Volume 4     C   WINPE        FAT32  Partition   2048 MB  Healthy
    Volume 5     D   Images       NTFS   Partition     14 GB  Healthy
In this example, Partition 3 is of Type Primary and is where Windows IoT Enterprise is installed. Letters C, D, and E are assigned to the WinPE, Images, and DVD-ROM volumes respectively.
Select Partition 3 and assign a drive letter that isn't already in use:
Windows Command Prompt
select partition 3
assign letter=W
If you list volume again, you should see the Windows IoT Enterprise partition now has a drive letter assigned:
Output
Volume ###  Ltr  Label        Fs     Type        Size     Status     Info
----------  ---  -----------  -----  ----------  -------  ---------  --------
Volume 0     E                UDF    DVD-ROM     4236 MB  Healthy
Volume 1     W                NTFS   Partition     63 GB  Healthy
Volume 2                      FAT32  Partition    100 MB  Healthy    Hidden
Volume 3                      NTFS   Partition    602 MB  Healthy    Hidden
Volume 4     C   WINPE        FAT32  Partition   2048 MB  Healthy
Volume 5     D   Images       NTFS   Partition     14 GB  Healthy
Exit Diskpart:
Windows Command Prompt
exit
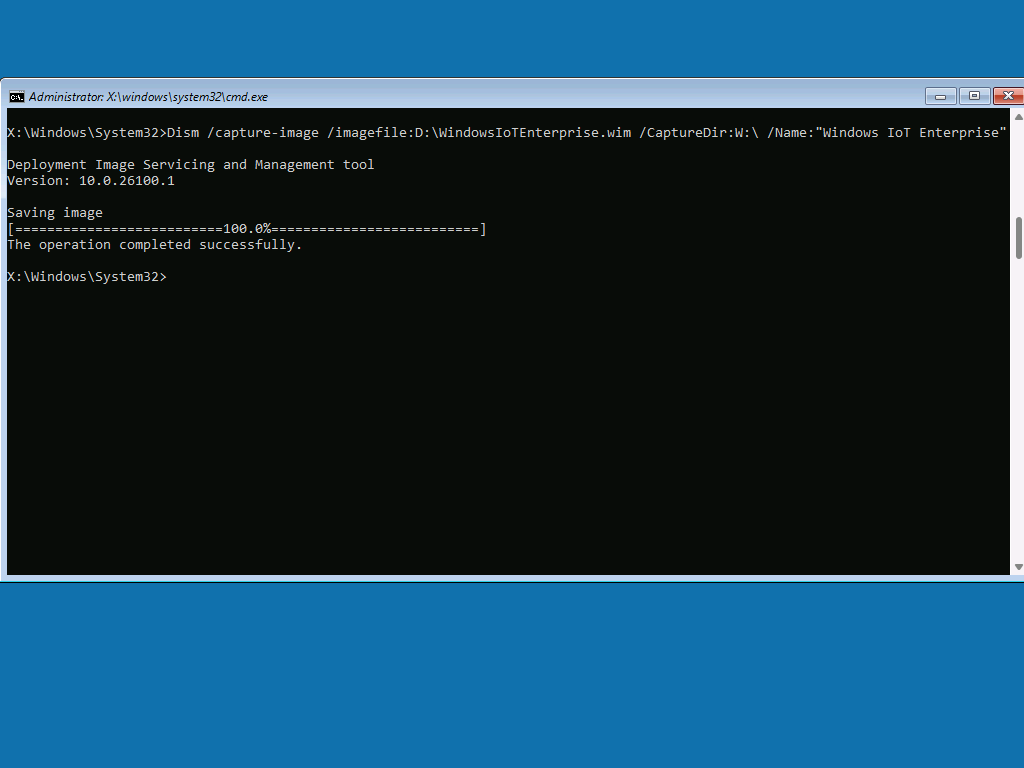
From the WinPE Command prompt, use DISM to capture an image of the Windows partition:
DISM captures an image of the OS partition and store it on D: drive.
Note
Your device will have more than one partition, but you only need to capture the Windows partition.
Shut down the virtual machine:
Windows Command Prompt
wpeutil shutdown
Select WinPE VHD as the first in boot order:
Open Hyper-V Manager
Right-click on the Virtual Machine and select Settings.
In the left pane, select Firmware.
In the right pane, move WinPE VHD to the top.
At the end, select Apply and OK
Start the Virtual machine
The system boots to the WinPE, where you see a Command prompt.
Tip
If you have a different keyboard layout, you can change the keyboard layout by running wpeutil setKeyboardLayout 0816:00000816 where the language:keyboard pair list for your desired layout can be found in input locales. Then run winpeshl.exe from the WinPE Command Prompt to ensure the new layout is applied to the current session.
From the WinPE Command prompt, run Diskpart:
Windows Command Prompt
diskpart
Use Diskpart to list the disks so you can identify the disk where Windows IoT Enterprise is installed:
Windows Command Prompt
list disk
You should see something like:
Output
Disk ###  Status          Size     Free     Dyn  Gpt
--------  -------------   -------  -------  ---  ---
Disk 0    Online            64 GB      0 B        *
Disk 1    Online            16 GB      0 B
Disk 2    Online          4096 MB      0 B
In this example, Disk 0 size represents the disk where we installed Windows IoT Enterprise.
Select Disk 0 and then list the partitions and volumes:
Windows Command Prompt
select Disk 0
list partition
list volume
You should see something like:
Output
DISKPART> select disk 0

Disk 0 is now the selected disk.

DISKPART> list partition

    Partition ###  Type              Size     Offset
    -------------  ----------------  -------  -------
    Partition 1    System             100 MB  1024 KB
    Partition 2    Reserved            16 MB   101 MB
    Partition 3    Primary             63 GB   117 MB
    Partition 4    Recovery           602 MB    63 GB

DISKPART> list volume

    Volume ###  Ltr  Label        Fs     Type        Size     Status     Info
    ----------  ---  -----------  -----  ----------  -------  ---------  --------
    Volume 0     E                UDF    DVD-ROM     4236 MB  Healthy
    Volume 1                      NTFS   Partition     63 GB  Healthy
    Volume 2                      FAT32  Partition    100 MB  Healthy    Hidden
    Volume 3                      NTFS   Partition    602 MB  Healthy    Hidden
    Volume 4     C   WINPE        FAT32  Partition   4078 MB  Healthy
    Volume 5     D   Images       NTFS   Partition     16 GB  Healthy
In this example, Partition 3 is of Type Primary and is where Windows IoT Enterprise is installed. Letters C, D, and E are assigned to the WinPE, Images, and DVD-ROM volumes respectively.
Select Partition 3 and assign a drive letter that isn't already in use:
Windows Command Prompt
select partition 3
assign letter=W
If you list volume again, you should see the Windows IoT Enterprise partition now has a drive letter assigned:
Output
Volume ###  Ltr  Label        Fs     Type        Size     Status     Info
----------  ---  -----------  -----  ----------  -------  ---------  --------
Volume 0     E                UDF    DVD-ROM     4236 MB  Healthy
Volume 1     W                NTFS   Partition     63 GB  Healthy
Volume 2                      FAT32  Partition    100 MB  Healthy    Hidden
Volume 3                      NTFS   Partition    602 MB  Healthy    Hidden
Volume 4     C   WINPE        FAT32  Partition   4078 MB  Healthy
Volume 5     D   Images       NTFS   Partition     16 GB  Healthy
Exit Diskpart:
Windows Command Prompt
exit
From the WinPE Command prompt, use DISM to capture an image of the Windows partition:
DISM captures an image of the OS partition and store it on D: drive.
Note
Your device will have more than one partition, but you only need to capture the Windows partition.
Shut down the virtual machine:
Windows Command Prompt
wpeutil shutdown
Deploy the captured WIM image from WinPE
In this section, you deploy a WIM image from WinPE. The reference device sample that you create in these quickstarts is already in a deployed state since it was captured in a Sysprepped state and, when deployed, boots into OOBE. This section provides steps to deploy the captured WIM image to a new device, though you can also use this process to deploy the image to the same device you captured it from.
Windows IoT Enterprise customizations provide a controlled and specialized experience for the end-users of a Windows device by allowing OEMs and system administrators to lock down the Windows device interaction experience.