Hello, Wear
Create your first Android Wear app and run it on a Wear emulator or device. This walkthrough provides step-by-step instructions for creating a small Android Wear project that handles button clicks and displays a click counter on the Wear device. It explains how to debug the app using a Wear emulator or a Wear device that is connected via Bluetooth to an Android phone. It also provides a set of debugging tips for Android Wear.
Your first Wear app
Follow these steps to create your first Xamarin.Android Wear app:
1. Create a new Android project
Create a new Android Wear Application:


This template automatically includes the Xamarin Android Wearable Library NuGet (and dependencies) so you'll have access to Wear-specific widgets. If you don't see the Wear template, review the Installation and Setup guide to double-check that you have installed a supported Android SDK.
2. Choose the correct Target Framework
Ensure that Minimum Android to target is set to Android 5.0 (Lollipop) or later:


For more information on setting the target framework, see Understanding Android API Levels.
3. Edit the Main.axml layout
Configure the layout to contain a TextView and a Button for the
sample:
<?xml version="1.0" encoding="utf-8"?>
<FrameLayout xmlns:android="http://schemas.android.com/apk/res/android"
android:layout_width="match_parent"
android:layout_height="match_parent">
  <ScrollView
    android:id="@+id/scroll"
    android:layout_width="wrap_content"
    android:layout_height="wrap_content"
    android:background="#000000"
    android:fillViewport="true">
    <LinearLayout
      android:layout_width="match_parent"
      android:layout_height="wrap_content"
      android:orientation="vertical">
      <TextView
        android:layout_width="wrap_content"
        android:layout_height="wrap_content"
        android:layout_marginBottom="2dp"
        android:text="Main Activity"
        android:textSize="36sp"
        android:textColor="#006600" />
      <TextView
        android:layout_width="wrap_content"
        android:layout_height="wrap_content"
        android:layout_marginBottom="2dp"
        android:textColor="#cccccc"
        android:id="@+id/result" />
      <Button
        android:layout_width="match_parent"
        android:layout_height="wrap_content"
        android:onClick="showNotification"
        android:text="Click Me!"
        android:id="@+id/click_button" />
    </LinearLayout>
  </ScrollView>
</FrameLayout>
4. Edit the MainActivity.cs source
Add the code to increment a counter and display it whenever the button is clicked:
[Activity (Label = "WearTest", MainLauncher = true, Icon = "@drawable/icon")]
public class MainActivity : Activity
{
  int count = 1;

  protected override void OnCreate (Bundle bundle)
  {
    base.OnCreate (bundle);

    SetContentView (Resource.Layout.Main);

    Button button = FindViewById<Button> (Resource.Id.click_button);
    TextView text = FindViewById<TextView> (Resource.Id.result);

    button.Click += delegate {
      text.Text = string.Format ("{0} clicks!", count++);
    };
  }
}
5. Setup an Emulator or Device
The next step is set up an emulator or device to deploy and run the app. If you are not yet familiar with the process of deploying and running Xamarin.Android apps in general, see the Hello, Android Quickstart.
If you do not have an Android Wear device such as an Android Wear Smartwatch, You can run the app on an emulator. For information about debugging Wear apps on an emulator, see Debug Android Wear on an Emulator.
If you have an Android Wear device such as an Android Wear Smartwatch, You can run the app on the device instead of using an emulator. For more information about debugging on a Wear device, see Debug on a Wear Device.
6. Run the Android Wear app
The Android Wear device should appear in the device pulldown menu. Be sure to choose the correct Android Wear device or AVD before you start debugging. After selecting the device, click the Play button to deploy the app to the emulator or device.


You may see a Just a minute... message (or some other interstitial screen) at first:
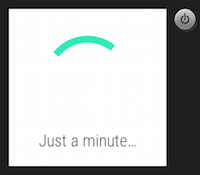
If you are using a watch emulator, it can take a while to start up the app. When you are using Bluetooth, it takes more time to deploy the app than it would over USB. (For example, it takes about 5 minutes to deploy this app to an LG G Watch that is Bluetooth-connected to a Nexus 5 phone.)
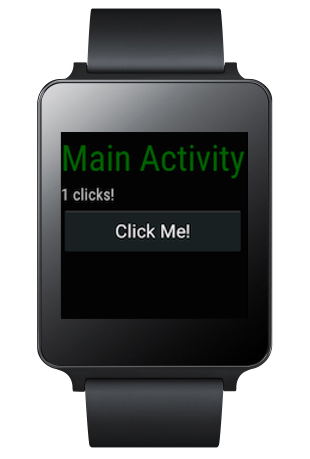
After the app successfully deploys, the screen of the Wear device should display a screen like the following:

Tap the CLICK ME! button on the face of the Wear device and see the count increment with each tap:

Next Steps
Check out the Wear samples including Android Wear apps with companion Phone apps.
When you are ready to distribute your app, see Working with Packaging.